
Gen V Supercharger Swap


Thread Starter
Junior Member
Joined: Jun 2002
Posts: 0
Likes: 0

Paul..the coolant seepage to roughly 30mm around the coolant rings is normal to see on the gasket as some coolant leaked out of the SC/TB when you removed it from the LIM. Personally..I don't see a leak, issue or problem. What I do see is a nice clean, low mileage top end in great shape from a good maintenance schedule.
I'm not referring to any seepage from the LIM into the SC, I'm referring to leakage from the coolant port where it mates to the HEAD.
It is very evident that leakage was occuring both exterior and interior.
The corrosion around the square coolant passage right where the gasket rubber seal is......crevice corrosion of the cast iron head.
I cleaned it up the best I could with a dremel and polishing disc but it is at least one thou deep. I don't like it
It makes me concerned now about the head gasket potential leakage and corrosion of the head/block around the coolant passages.
I have not seen corrosion this bad on any of the V8'* I've torn into.
I will be using some RTV sealant around all these ports....even with a new aluminum backed gasket.

Senior Member
Posts like a 4 Banger
Joined: Jun 2006
Posts: 113
Likes: 0
From: Chicago, IL
Originally Posted by 2000SilverBullet
Paul..the coolant seepage to roughly 30mm around the coolant rings is normal to see on the gasket as some coolant leaked out of the SC/TB when you removed it from the LIM. Personally..I don't see a leak, issue or problem. What I do see is a nice clean, low mileage top end in great shape from a good maintenance schedule.
I'm not referring to any seepage from the LIM into the SC, I'm referring to leakage from the coolant port where it mates to the HEAD.
It is very evident that leakage was occuring both exterior and interior.
The corrosion around the square coolant passage right where the gasket rubber seal is......crevice corrosion of the cast iron head.
I cleaned it up the best I could with a dremel and polishing disc but it is at least one thou deep. I don't like it
It makes me concerned now about the head gasket potential leakage and corrosion of the head/block around the coolant passages.
I have not seen corrosion this bad on any of the V8'* I've torn into.
I will be using some RTV sealant around all these ports....even with a new aluminum backed gasket.
Senior Member
Posts like a 4 Banger
Joined: Jun 2006
Posts: 113
Likes: 0
From: Chicago, IL
Bill and Boosty -
So is this porting something an average closet mechanic could do or would your recommend someone with experience doing the job?
Boosty - did you go with the Gen 3 to save cost or because similar gains can be had with that SC.
One other mod I'm wondering if you guys heard about - a GP racer told me that removing the center divider in the plenum of the LIM helps distribute the air/fuel mixture more evenly. I guess this is a mod ZZP does. This is the same guy saying that they can make the Gen 3 flow like the Gen 5 (or better). For a future project - (next year maybe) I was debating on either finding a Gen 5, or if easier to just mod a Gen 3.

BANNED
Joined: Mar 2004
Posts: 0
Likes: 5
From: Purgatory
Originally Posted by 67Goat
So is this porting something an average closet mechanic could do or would your recommend someone with experience doing the job?
DINOSAURUS BOOSTUS


Expert Gearhead
Joined: Mar 2005
Posts: 41,391
Likes: 30
From: Enfield, CT

Originally Posted by harofreak00
Originally Posted by 67Goat
So is this porting something an average closet mechanic could do or would your recommend someone with experience doing the job?
Goat.. mild porting and polishing can easily be done by anyone on this club. The easiest thing to do on the supercharger is to smooth the inside of the supercharger casing. Tthe surface inside the supercharger is as rough or rougher than the outside. This roughness will add to heat and resistance issues for air.
My first casing is well documented and posted here. I used nothing more than a dremel tool (or two
Simply pull the rotors out, tape over the bearings in the casing and you can flap wheel and buff until you have a mirror finish. That little bit and a little rounding out some edges of the bypass outlet and egr port will help. Will it gain much time at the track? Probably not, will it help keep heat and KR down..sure will. I went a bit more extreme on my first casing because it was a spare and a test for me.
Now..while you are there and the rotors are out. Maybe a bearing change is in order. If anyone brings WillWrens step by step bearing change to a machine shop.. they can do it no problem. If you have the tools and feel comfortable, it'* pretty straight forward.
Then using GM red gasket maker put it back together and refill with oil. All ready to go.
I don't recommend going as deep and far as I did, but a polishing and smoothing of the rough surface will help air flow.

Junior Member
Posts like a Ricer Type-R
Joined: Aug 2002
Posts: 11
Likes: 13
Goat, there'* some in progress pics of SilverBullet'* GenV blower here:
http://www.bonnevilleclub.com/forum/...64834&start=20
A general guide from the first two I ever did here:
http://www.bonnevilleclub.com/forum/...rgers/p&p.html
Thermal analysis I did on an Eaton to prove the benefits here:
http://www.bonnevilleclub.com/forum/...65027&start=20
(even though the topic relates to a question about coolant flow)
And you can also follow that first link and watch Harofreak'* Gen3 M90 go through the same process through Thanksgiving, then the Gen3 you sold me for my own car.
I've done several now. My first is currently on Driverjohn'* car, performing great. My second is on my 93 and is fantastic (I'm the only person to have sucessfully run a 2.0" pulley on a Gen3 M62), and will be replaced with an even better unit (your old core). Doing the Bullet and Freaks as well, and Billboost is working on his second. HIs first allowed him to immediately drop two tenths in pulley diameter.
Keep in mind the warning Harofreak linked you to above though. You can screw a good SC up very quickly. You have to have the skill and confidence to begin with, and don't attempt this 'in secret' to surprise anyone. Do it here, where we (Bill and Bill) can talk you through it. We've done it, and it worked for us. I ported my first SC almost 3 years ago as a test. I've been learning ever since, and still am.
Thread Starter
Junior Member
Joined: Jun 2002
Posts: 0
Likes: 0
Some progress pics of my most recent mods to the LIM.
For now I am planning to keep the Gen 3 SC and LIM as a spare back-up, so might as well practice drilling it for the spray nozzle.

Air Temp probe test fit.


For now I am planning to keep the Gen 3 SC and LIM as a spare back-up, so might as well practice drilling it for the spray nozzle.
Air Temp probe test fit.
Thread Starter
Junior Member
Joined: Jun 2002
Posts: 0
Likes: 0
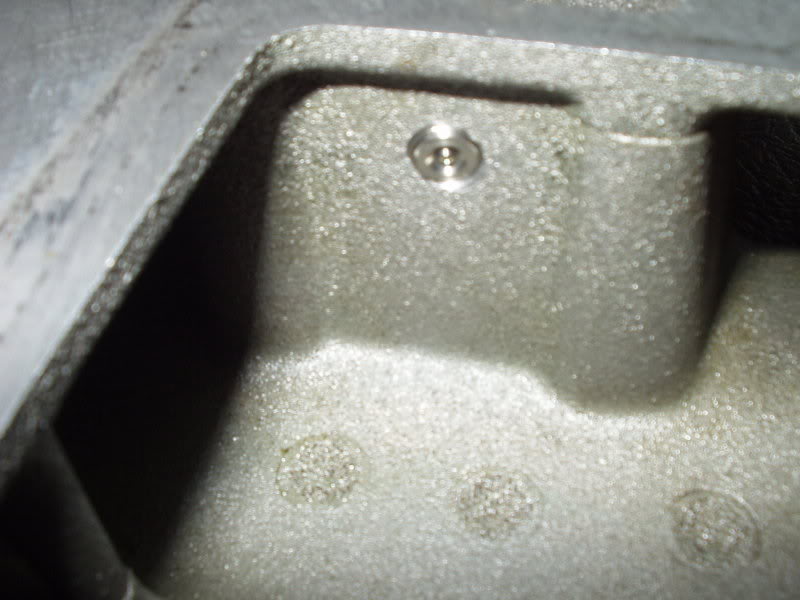
I have decided to install the temp probe and nozzle opposite the above pic.
Spray in the front. Temp probe at the rear.
Temp probe is now drilled, tapped and installed.
I am still debating over the location for the nozzle. I really would like to be able to remove it for cleaning or nozzle replacement without having to remove the SC every time. The only other alternative is locating the nozzle on the passenger side next to the vacuum/pressure nipple connection. The only reason I don't like this location is because, due to internal casting profiles, it is almost entirely at the entrance to Cylinder #1 intake port and I'm concerned about distribution of the liquid under +5 psi Boost conditions at 3500 rpm when the system is activated.
Give me some FEEDBACK....................... Boosty :?
DINOSAURUS BOOSTUS
Expert Gearhead
Joined: Mar 2005
Posts: 41,391
Likes: 30
From: Enfield, CT
Feedback would be that the pressure nipple you plan to install next to is called a fuel pressure regulator 
As well..why wouldn't you install it in the position of your temp probe from the picture above. Between cylinders 3 and 5?
As well..why wouldn't you install it in the position of your temp probe from the picture above. Between cylinders 3 and 5?
Junior Member
Posts like a Ricer Type-R
Joined: Aug 2002
Posts: 11
Likes: 13
Paul, do you have a rising rate pump? You're going to be injecting into a pressurized plenum. You might have to bump your pressure, but it would be cool if it would rise based on MAF signal.
And can you bend that thermocouple so the nozzle isn't spraying directly to it?
And can you bend that thermocouple so the nozzle isn't spraying directly to it?