
Need some sub advice

Senior Member
Posts like a Turbo
Joined: Jul 2010
Posts: 326
Likes: 0
From: Sacramento, CA.

Sorry i'm just getting to this, but rmac and atsaubrey (the guy you got the subs from) are right. No need for a dual chamber box when this box is so small and you're running the subs wired together on a mono amp.
Me myself personally, I only would make the box a dual chamber type if I would otherwise add a brace in said location. But because this box is going to be so small, an extra brace wasn't needed so I didn't opt to make it a dual chamber. If you were going to run the subs independent from each other off a 2ch amp then it would make sense to make the box dual chamber, not because it would need bracing but because if for some strange reason you blew a sub or lost the output to one of the channels, the other sub would still function and sound just fine since it'* being run on it'* own channel and in it'* own airspace.
Me myself personally, I only would make the box a dual chamber type if I would otherwise add a brace in said location. But because this box is going to be so small, an extra brace wasn't needed so I didn't opt to make it a dual chamber. If you were going to run the subs independent from each other off a 2ch amp then it would make sense to make the box dual chamber, not because it would need bracing but because if for some strange reason you blew a sub or lost the output to one of the channels, the other sub would still function and sound just fine since it'* being run on it'* own channel and in it'* own airspace.
Thread Starter
Senior Member
True Car Nut
Joined: Jun 2007
Posts: 2,478
Likes: 0
From: New Lenox, IL
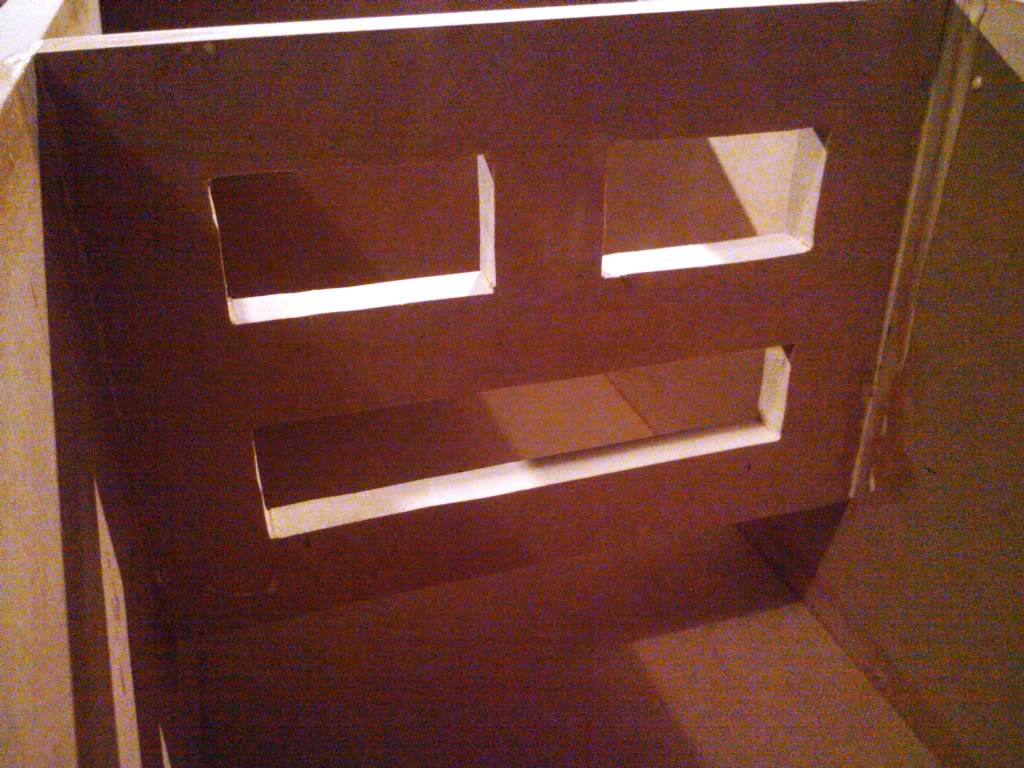
Well, the box is getting closer to being done. Its all put together now, I just need to cut out the holes for the sub and get it all carpeted.
Oh, and I got some bracing done in the center as well.
Oh, and I got some bracing done in the center as well.
Senior Member
Posts like a Turbo
Joined: Jul 2010
Posts: 326
Likes: 0
From: Sacramento, CA.
Way overkill, but ok. You would have been perfectly fine with a 3/4" x 3/4" rod glued and screwed there, and would have lost alot less internal volume too. With ur box being so small, even without a second baffle it would have been fine without bracing. If ur gonna do a second baffle so u can flush mount ur subs then that bracing isn't needed at all.
Thread Starter
Senior Member
True Car Nut
Joined: Jun 2007
Posts: 2,478
Likes: 0
From: New Lenox, IL
Way overkill, but ok. You would have been perfectly fine with a 3/4" x 3/4" rod glued and screwed there, and would have lost alot less internal volume too. With ur box being so small, even without a second baffle it would have been fine without bracing. If ur gonna do a second baffle so u can flush mount ur subs then that bracing isn't needed at all.
The actual edges are 1.5"x.75" The piece it was cut out of was 8"x11".
According to my calculations, I've lost 0.024 cubic feet with this bracing. Also, I won't be using a second baffle.
Senior Member
Posts like a Turbo
Joined: Jul 2010
Posts: 326
Likes: 0
From: Sacramento, CA.
It was partially so I would have a box that would be capable of handling more powerful subs in the future. I can't imagine that I lost too much internal volume with that piece in there, since it is pretty small. I was at 1.51 cubic feet, and while it was recommended that I run .75 cubic feet per sub, these apparently sound good in enclosures as small as .50 cubic feet, so I think I'll be fine.
The actual edges are 1.5"x.75" The piece it was cut out of was 8"x11".
According to my calculations, I've lost 0.024 cubic feet with this bracing. Also, I won't be using a second baffle.
The actual edges are 1.5"x.75" The piece it was cut out of was 8"x11".
According to my calculations, I've lost 0.024 cubic feet with this bracing. Also, I won't be using a second baffle.
Thread Starter
Senior Member
True Car Nut
Joined: Jun 2007
Posts: 2,478
Likes: 0
From: New Lenox, IL
http://www.woofersetc.com/p5535/SWX1...-Subwoofer.htm
Oh well. Live and learn I guess. Its the first time I've ever made any bracing for a sub, and it also looked pretty cool.

Senior Member
Posts like a Turbo
Joined: Jul 2010
Posts: 326
Likes: 0
From: Sacramento, CA.
Here'* one for starters:
http://www.woofersetc.com/p5535/SWX1...-Subwoofer.htm
Oh well. Live and learn I guess. Its the first time I've ever made any bracing for a sub, and it also looked pretty cool.
http://www.woofersetc.com/p5535/SWX1...-Subwoofer.htm
Oh well. Live and learn I guess. Its the first time I've ever made any bracing for a sub, and it also looked pretty cool.

Thread Starter
Senior Member
True Car Nut
Joined: Jun 2007
Posts: 2,478
Likes: 0
From: New Lenox, IL
So, a few fun experiences. I discovered that once you run out of hardener, fiberglass resin doesn't dry on its own, lol. Not too big a deal, fortunately. I also discovered that black **** fabric from Joann'* fabrics also works extremely well as a box cover. I did an excellent job of getting that on there and I'm quite proud of the work that I did. It looks absolutely awesome. I was doubtful since I was looking more for conventional sub carpeting, but this looks MUCH better. Got them all wired up, plugged in, and got the amps in. Spent most of the day hooking it all up, redoing the ground connection to make it more legit, (bolt and nut instead of self tapping screw).
When I put it all back together this time, I didn't use the capacitor, and it makes absolutely no difference at all. Proof that a good electrical system with beefy wiring is all you need. I also installed the factory carpeting in the trunk that I pulled from a junkyard car so it all looks much better overall.
Last step for the amp board after connecting everything was getting the fuses in. Didn't take any chances, and once I fired up the car, everything worked perfectly aside from having reversed the left and right channels (big deal...). Now on to those ID subs.
I thought that 15" sub went low, but these go way lower than I've ever heard before. I'm sure some of you have heard this for a while, but its new to me to hear the bass in a frequency test like a helicopter blade passing over your head, and have it pulsate in your head even if you turn the volume down.
I listened to some music, and found that I enjoy bass again. Transitions are tight and accurate, and all of the notes play with excellent precision.
Its dark out, but I'll take some pictures tomorrow.