
A tale of 3 Superchargers


Thread Starter
Junior Member
Posts like a Ricer Type-R
Joined: Aug 2002
Posts: 11
Likes: 13

As most of you know, I've worked over a couple SC'* for myself. One is currently running on the Zilla, and that one replaced my first, which is now running on driverjohn'* SSEi.
This winter, I'm taking on a few big tasks. Among them, another IMPROVED Gen3 M62 for the Zilla, which will turn it into a hybrid of the GenV. How am I doing this?
I'm learning from a Gen3 M90 (harofreak/Andrew) and a Gen5 M90 (2000Silverbullet/Paul)
These other two Superchargers will be mildly ported and polished for gauranteed gain, with zero risk. The difference between them is that Paul'* will be running with no EGR, so it opens an opportunity to improve his flow in the inlet by filling the port for the EGR.
Follow along with me as these 3 superchargers transform over the next couple weeks.
Work area #1. This is the 'prep' or 'clean' area. Dining room table. Polishing will happen in the garage:
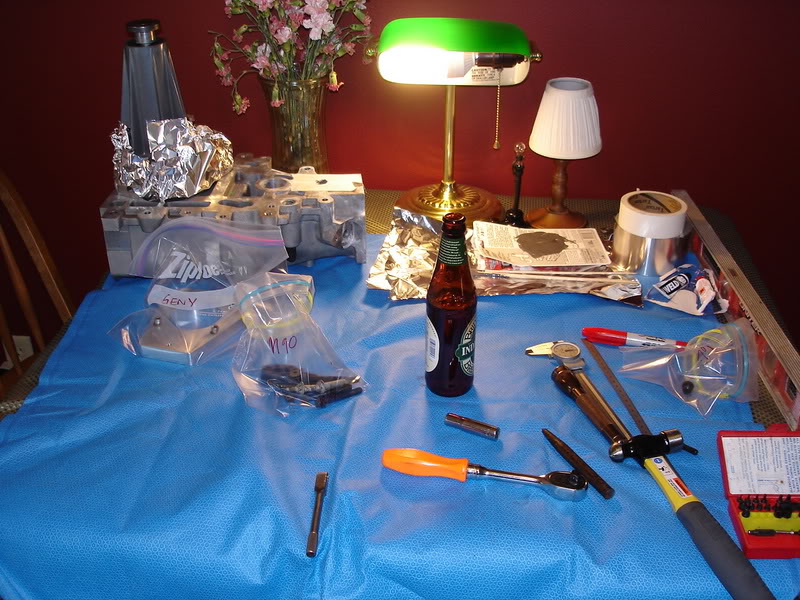
In this pic, you can see the GenV case on the table with the Gen3 M90 (haro) nosedrive on it.
__________________________________________________ __________
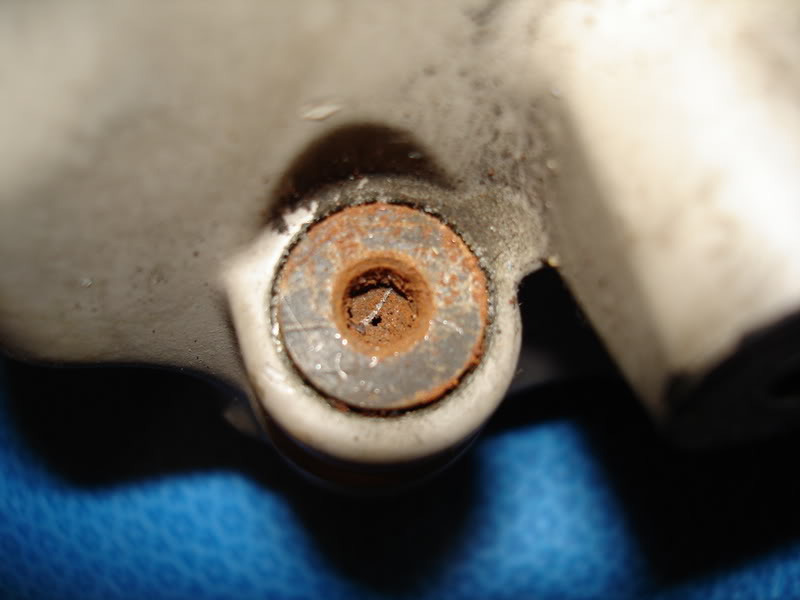
This is what happens when someone strips a nosedrive plug on an M62:
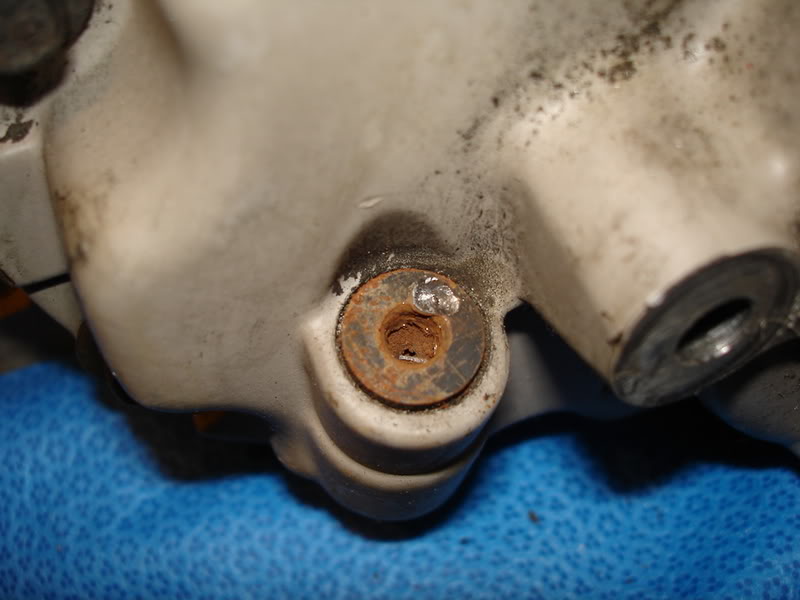
Then the aftermath from using a hammer and centerpunch to work the plug out:
And off to the Barf Bucket to drain:

That about wraps up the M62 Gen3 for now. More on that later.
__________________________________________________ _______________
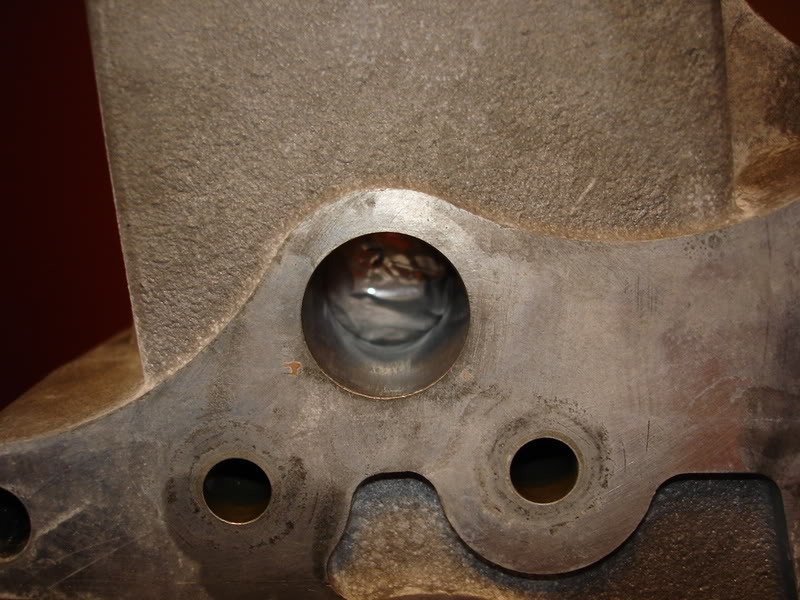
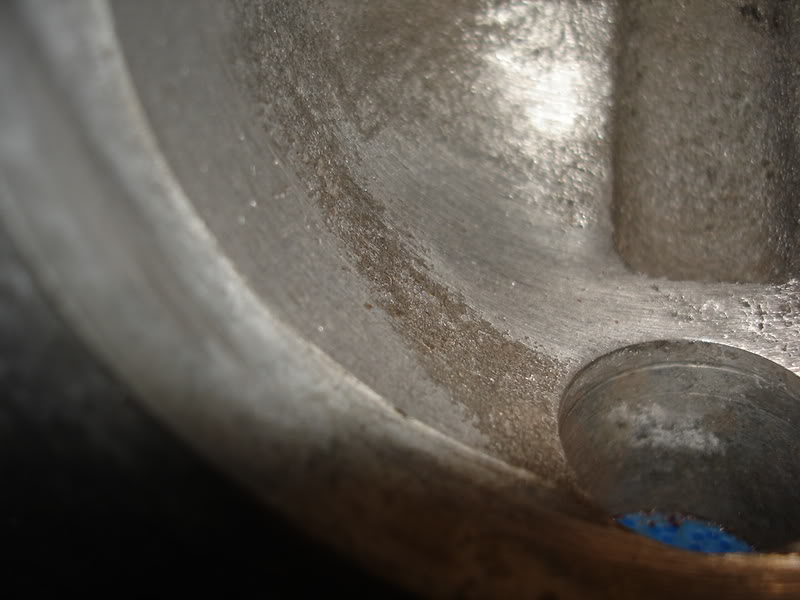
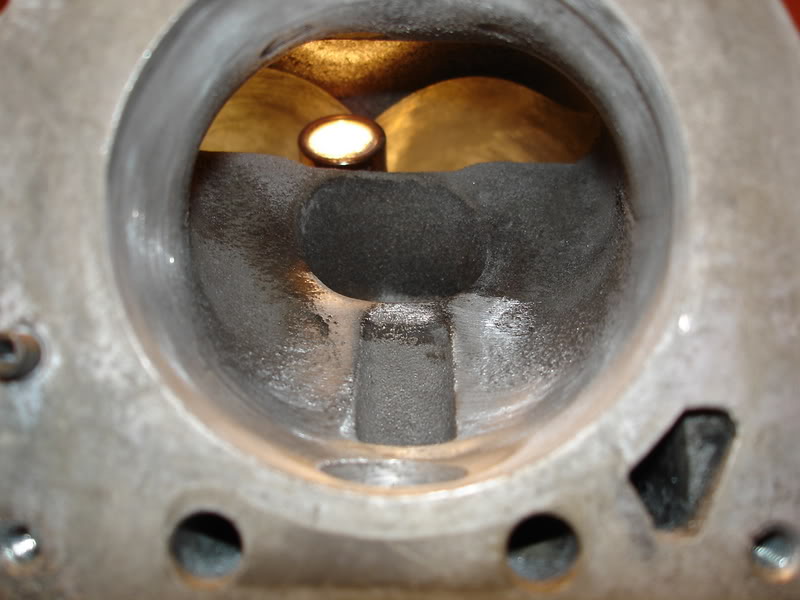
Harofreak'* Gen3 M90 is an interesting case. It looks like a manufacturing defect:
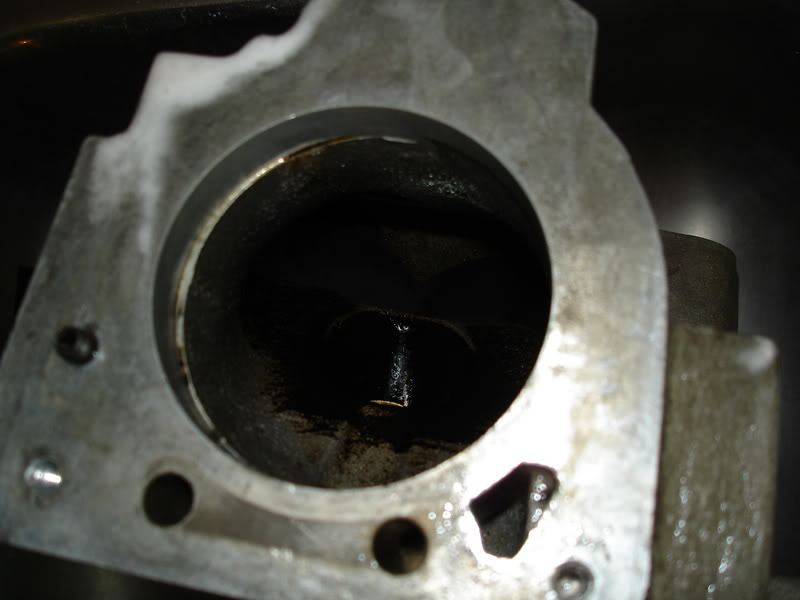
After casting, Eaton bores the inlet. This isn't an opening after the casting process.
They 'missed'. This will be fixed before Andrew sees his supercharger again. This is
performance-killing turbulence.
__________________________________________________ ______________
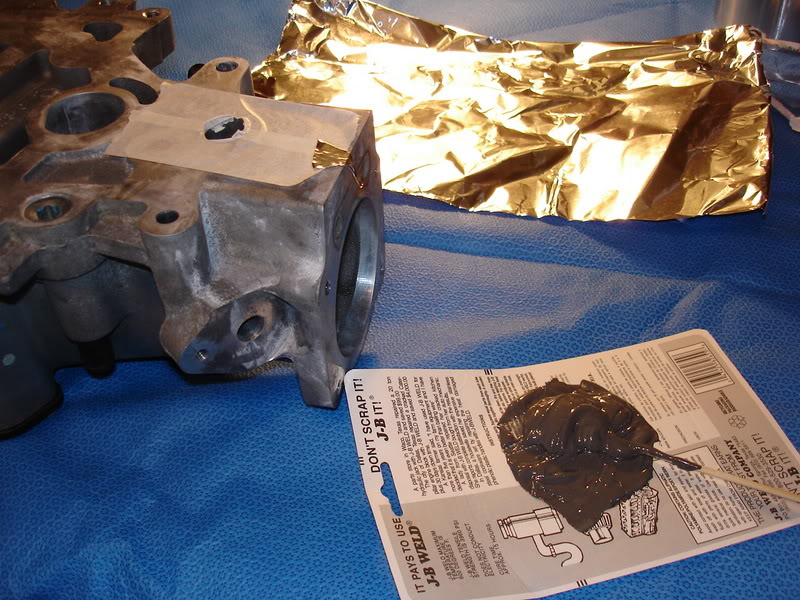
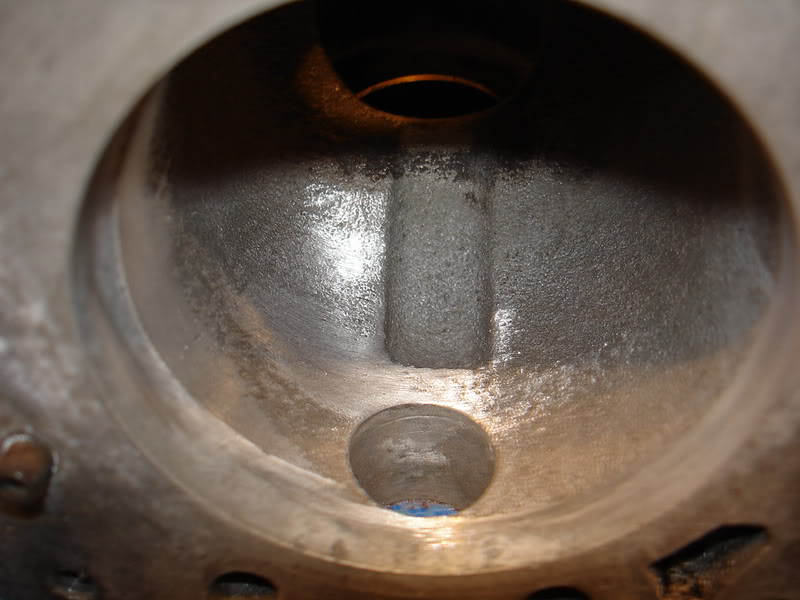
Paul'* GenV is being worked over as well. I filled the EGR port, and while that dries, it gives me the chance to get the two Gen3'* to the same point (clean and ready to port).
(Paul, your needle bearings are sealed off in all pics from here on).
The plug patch applied so the epoxy filler stays put:
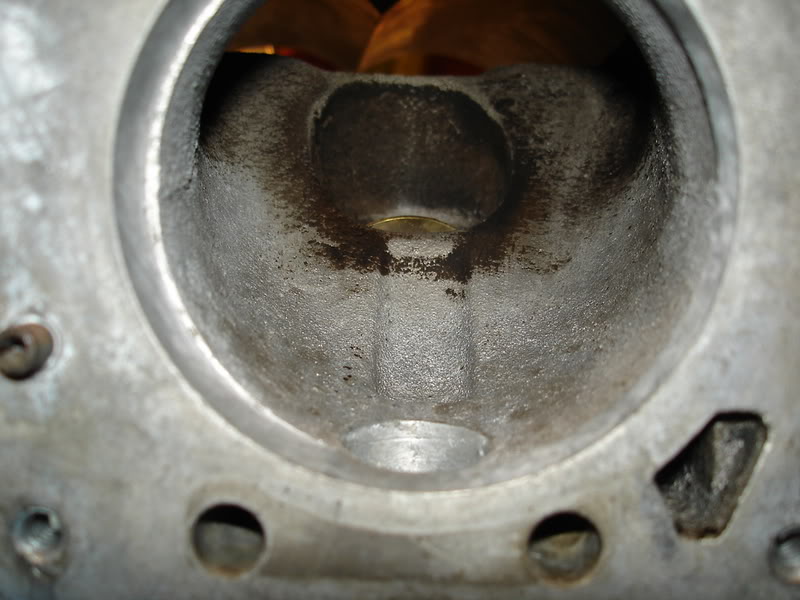
Inside view before filling (this EGR port is tapered towards the inlet of the SC, so the plug
will naturally stay where it should):
Magic sauce:
Magic sauce diaper:

All three are moving quickly at this point. Keep tabs on me, and ask questions if you like.
This winter, I'm taking on a few big tasks. Among them, another IMPROVED Gen3 M62 for the Zilla, which will turn it into a hybrid of the GenV. How am I doing this?
I'm learning from a Gen3 M90 (harofreak/Andrew) and a Gen5 M90 (2000Silverbullet/Paul)
These other two Superchargers will be mildly ported and polished for gauranteed gain, with zero risk. The difference between them is that Paul'* will be running with no EGR, so it opens an opportunity to improve his flow in the inlet by filling the port for the EGR.
Follow along with me as these 3 superchargers transform over the next couple weeks.
Work area #1. This is the 'prep' or 'clean' area. Dining room table. Polishing will happen in the garage:
In this pic, you can see the GenV case on the table with the Gen3 M90 (haro) nosedrive on it.
__________________________________________________ __________
This is what happens when someone strips a nosedrive plug on an M62:
Then the aftermath from using a hammer and centerpunch to work the plug out:
And off to the Barf Bucket to drain:
That about wraps up the M62 Gen3 for now. More on that later.
__________________________________________________ _______________
Harofreak'* Gen3 M90 is an interesting case. It looks like a manufacturing defect:
After casting, Eaton bores the inlet. This isn't an opening after the casting process.
They 'missed'. This will be fixed before Andrew sees his supercharger again. This is
performance-killing turbulence.
__________________________________________________ ______________
Paul'* GenV is being worked over as well. I filled the EGR port, and while that dries, it gives me the chance to get the two Gen3'* to the same point (clean and ready to port).
(Paul, your needle bearings are sealed off in all pics from here on).
The plug patch applied so the epoxy filler stays put:
Inside view before filling (this EGR port is tapered towards the inlet of the SC, so the plug
will naturally stay where it should):
Magic sauce:
Magic sauce diaper:
All three are moving quickly at this point. Keep tabs on me, and ask questions if you like.


Thread Starter
Junior Member
Posts like a Ricer Type-R
Joined: Aug 2002
Posts: 11
Likes: 13
Originally Posted by 1993 SLE
following this one closely....Interested in the M62 changes
any info on what is going on/what you are doing to it?
any info on what is going on/what you are doing to it?

 watching this one closely.
Thread Starter
Junior Member
Posts like a Ricer Type-R
Joined: Aug 2002
Posts: 11
Likes: 13
Now that my hands aren't as full, I'll answer Pat'* question in more detail.
The changes happening to mine (my 3rd I've done) are extreme enough to fall into the category of "I'll tell you if/when it actually works". Not everything I do works the first time even though I base my changes on strong flow dynamics theory, and in this case, a known end product (GenV).
The other two superchargers are 'safe' enough and proven already in what will be done with them (not only on my own car twice, but on another S2 L67 in CT), that you'll see details as we go that you'll be able to duplicate it if you wish to.
I'll warn you in advance, that the work done to each SC will run in the neighborhood of $25-50 EACH in consumable (throwaway when done) supplies. Not to mention that you MUST replace the bearings when you're done.
Thread Starter
Junior Member
Posts like a Ricer Type-R
Joined: Aug 2002
Posts: 11
Likes: 13
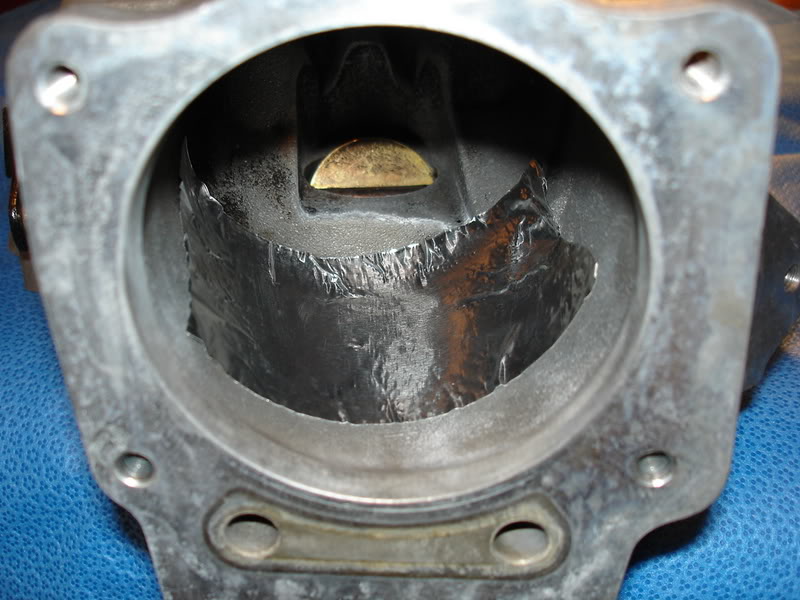
Here'* another shot showing the manufacturing misalignment in Andrew'* Gen3:
After careful measuring, I determined that the MILLED area that was bored into the casting is actually true to the bore of the Throttle body. So it'* the cast inner section that needs to be matched.
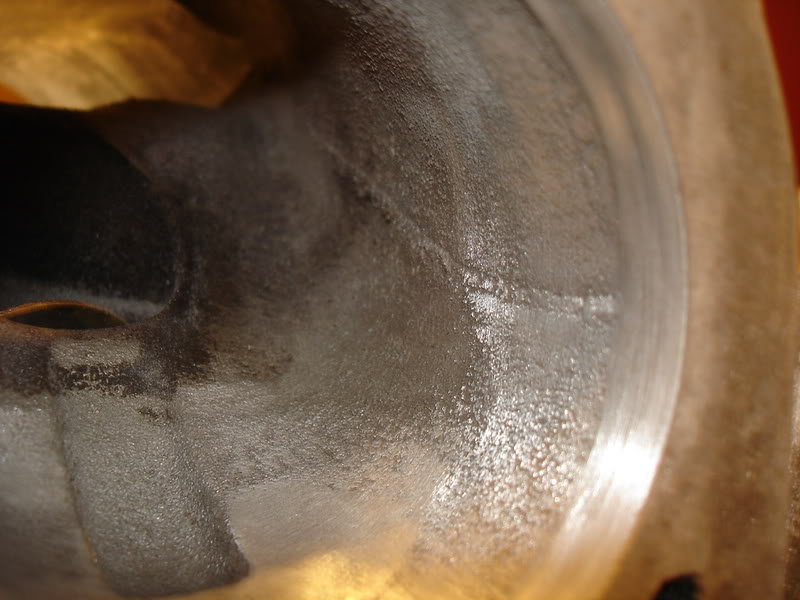
The next two pics show the beginning of the smoothing/material removal process on the inlet. This is done with an 80-grit flap-sander on a high-rpm electric drill to start. I won't move to the dremel until later.
If you look closely, you can see the roughness of the casting in comparison. The shiny areas are done with 80 grit, then I'll move to 120 grit, and after that, switch to the dremel. The final finish will probably be 400-grit wet-sanded:
The first opening (port) you see at the bottom in this one is what I filled on Paul'* GenV. It'* still drying. I'll rough his inlet tomorrow.
After careful measuring, I determined that the MILLED area that was bored into the casting is actually true to the bore of the Throttle body. So it'* the cast inner section that needs to be matched.
The next two pics show the beginning of the smoothing/material removal process on the inlet. This is done with an 80-grit flap-sander on a high-rpm electric drill to start. I won't move to the dremel until later.
If you look closely, you can see the roughness of the casting in comparison. The shiny areas are done with 80 grit, then I'll move to 120 grit, and after that, switch to the dremel. The final finish will probably be 400-grit wet-sanded:
The first opening (port) you see at the bottom in this one is what I filled on Paul'* GenV. It'* still drying. I'll rough his inlet tomorrow.
Thread Starter
Junior Member
Posts like a Ricer Type-R
Joined: Aug 2002
Posts: 11
Likes: 13
A few more pics:
Andrew'* (still):
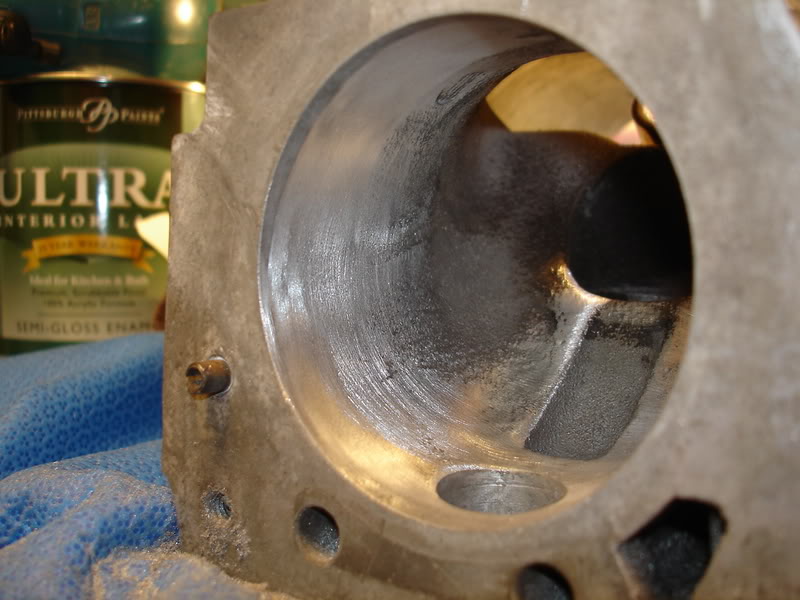
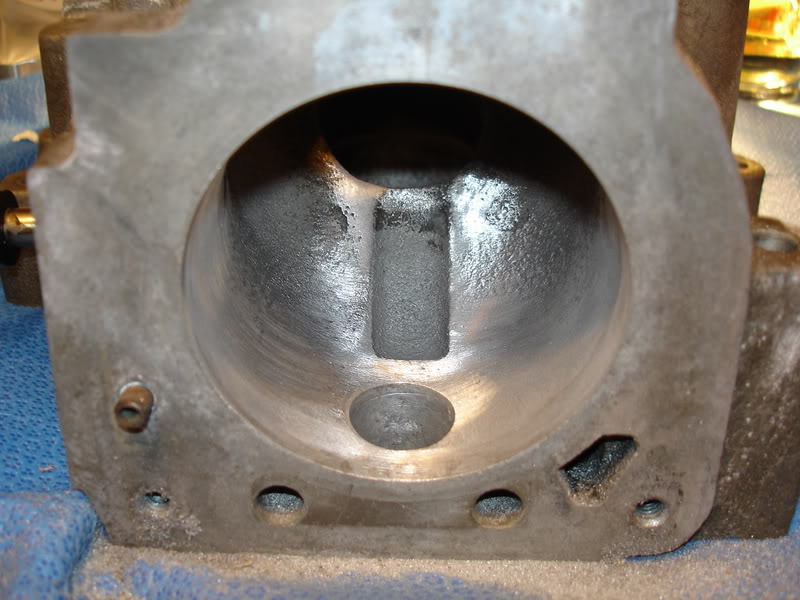
The inlet misalignment is all but gone. The casting marks you see in the top pic are now gone. I'm working my way up to the bypass port with the 80 grit, and will be moving to 120 soon.
Please note that this is BRUTALLY difficult work and is VERY hard on the hands. The sheer physical force and tension you exhert to keep the tool under control leads to fatigue very quickly. I take alot of 'hand breaks'.
Andrew'* inlet will probably be nearly done tonight, other than final polishing. At that point, I'll move back to Paul'*, and get that caught up. Paul, your plug is STILL drying.
Andrew'* (still):
The inlet misalignment is all but gone. The casting marks you see in the top pic are now gone. I'm working my way up to the bypass port with the 80 grit, and will be moving to 120 soon.
Please note that this is BRUTALLY difficult work and is VERY hard on the hands. The sheer physical force and tension you exhert to keep the tool under control leads to fatigue very quickly. I take alot of 'hand breaks'.
Andrew'* inlet will probably be nearly done tonight, other than final polishing. At that point, I'll move back to Paul'*, and get that caught up. Paul, your plug is STILL drying.
Putting this in quotes so people actually notice it and read it. The inlet work I'm doing right now PRIMARILY decreases temperatures. The INLET is typically the hottest part of the SC during operation, as it'* squeezing alot of air through a small opening, and it'* a ROUGH surface. Primary gains from inlet porting:
1. Looks cool.
2. Matches flow (in Andrew'* case)
3. Reduces inlet temps.......this is HUGE. Just ask Matt about the comparison we did.
4. Increased inlet velocity.
1. Looks cool.
2. Matches flow (in Andrew'* case)
3. Reduces inlet temps.......this is HUGE. Just ask Matt about the comparison we did.
4. Increased inlet velocity.

Senior Member
Certified GM nut
Joined: Dec 2004
Posts: 2,077
Likes: 0
From: Port Charlotte FLORIDA
in reguards to andrews eaton... whats messed up with it?? i see what im lookin at but dont understand whats wrong... sorry it might be the beer in my cause i can never find waldo when im drinkin....