
CAM SENSOR POSITION


Thread Starter
Member
Posts like a V-Tak
Joined: Apr 2007
Posts: 85
Likes: 0
From: NEW YORK

Originally Posted by Archon
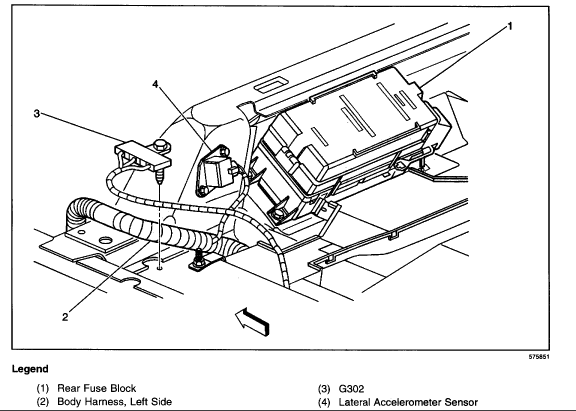
Do you see what what disconnected here? Perhaps the lateral accelerometer sensor (#4)? That was sent the stability system warning on the DIC.

RIP
True Car Nut
Joined: Jul 2004
Posts: 5,656
Likes: 4
From: Grand Rapids, Mi
That'* part of the Stabilitrak system, so the warning on the DIC was likely Service Stability system. Clean up all the power and ground connections under the back seat, and where the power cable connects to the under hood fuse box.
While you're in that area, remove the cover for the fuse box, and pull fuse #11 (10 amp IGN1 fuse. Once it'* removed, use a pick, paper clip, or similar small tool and push the connections for the fuse closer together and then reinstall the fuse. Also, locate relay 38 (IGN1 relay) and see if any of the other relays have the same part number. If so, try swapping those relays.
While you're in that area, remove the cover for the fuse box, and pull fuse #11 (10 amp IGN1 fuse. Once it'* removed, use a pick, paper clip, or similar small tool and push the connections for the fuse closer together and then reinstall the fuse. Also, locate relay 38 (IGN1 relay) and see if any of the other relays have the same part number. If so, try swapping those relays.
Thread Starter
Member
Posts like a V-Tak
Joined: Apr 2007
Posts: 85
Likes: 0
From: NEW YORK
Originally Posted by Archon
That'* part of the Stabilitrak system, so the warning on the DIC was likely Service Stability system. Clean up all the power and ground connections under the back seat, and where the power cable connects to the under hood fuse box.
While you're in that area, remove the cover for the fuse box, and pull fuse #11 (10 amp IGN1 fuse. Once it'* removed, use a pick, paper clip, or similar small tool and push the connections for the fuse closer together and then reinstall the fuse. Also, locate relay 38 (IGN1 relay) and see if any of the other relays have the same part number. If so, try swapping those relays.
While you're in that area, remove the cover for the fuse box, and pull fuse #11 (10 amp IGN1 fuse. Once it'* removed, use a pick, paper clip, or similar small tool and push the connections for the fuse closer together and then reinstall the fuse. Also, locate relay 38 (IGN1 relay) and see if any of the other relays have the same part number. If so, try swapping those relays.
RIP
True Car Nut
Joined: Jul 2004
Posts: 5,656
Likes: 4
From: Grand Rapids, Mi
Don't just check the fuse...push the connections together that the fuse pushes in to. This could be the cause of the original problem where it stalled to begin with. This is a post by 2000SilverBullet who had a recurring problem of the car dying. This takes you to the last page where the solution was found, but you may want to read up on the whole thing.
http://www.bonnevilleclub.com/forum/...5582&start=120
I also stand corrected on the fuse number..it'* #19 per his post.
Edit - You can leave the battery connected while you do it. Just don't short to ground. The 3 screws that hold the box down are also ground. Make sure those are snug also.
http://www.bonnevilleclub.com/forum/...5582&start=120
I also stand corrected on the fuse number..it'* #19 per his post.
Edit - You can leave the battery connected while you do it. Just don't short to ground. The 3 screws that hold the box down are also ground. Make sure those are snug also.
Thread Starter
Member
Posts like a V-Tak
Joined: Apr 2007
Posts: 85
Likes: 0
From: NEW YORK
[quote="Archon"]Don't just check the fuse...push the connections together that the fuse pushes in to. This could be the cause of the original problem where it stalled to begin with. This is a post by 2000SilverBullet who had a recurring problem of the car dying. This takes you to the last page where the solution was found, but you may want to read up on the whole thing.
http://www.bonnevilleclub.com/forum/...5582&start=120
I also stand corrected on the fuse number..it'* #19 per his post.
Edit - You can leave the battery connected while you do it. Just don't short to ground. The 3 screws that hold the box down are also ground. Make sure those are snug also.
Hey Archon thanks, I read the whole thing about 2000silverbullet'* problem..I guess i been lucky so far because it only has happened once.. and I drive about 40 miles round trip 5 days a week to work...well i did what you said, first I unscrewed the positive wire from motor fuse box and made sure there was no corrition in there ..tighten it back up.. took the fuse #19 out i pressed the connections together with a small needle nose plier.. the only thing is that i could only get to the corners of each side of the conections to press together..the middle and other corners are blocked by the plastic..I just hope that was good enough...now i have to reset the pcm codes with my mechanic and see if it will come back.
Thread Starter
Member
Posts like a V-Tak
Joined: Apr 2007
Posts: 85
Likes: 0
From: NEW YORK
Originally Posted by Archon
Great...we'll keep our fingers crossed. Let us know how/if it works.
Went to the mechanic today and replaced the boost seloniod that I came in today... had the codes erased but, after a short drive only the cam position sensor code came back on.
I'm thinking that rules out the ECM, I was thinking the computer was giving me bogas codes since I could not get rid of code p0341 after replacing the cam sensor... He did notice some thing else!..
I have a round K&N air filter that sits on the ECM.. right away he said that could be the cause of my error code. He removed the filter and told me that wire mesh material cuts in to the wires while i drive and the engine moves...
He was correct, I did see two wires that were scraping with the filter but not to bad yet. He taped them up and put a thick rubber hose to protect the wires from the filter..erase the code and I felt a sense of relief... went for a ride and code came back on
However, it was a good find on his part, since in time the K&N filter would of eaten through the wires..So just thought I should mention this could cause problems with 2000+ owners with the round K&N filter by the computer.
RIP
True Car Nut
Joined: Jul 2004
Posts: 5,656
Likes: 4
From: Grand Rapids, Mi
Here'* some information on diagnosing your problem. According to this, bad coils, ICM, or wires could also set the code.
CIRCUIT DESCRIPTION
The camshaft position PCM input is produced by the ignition control module. The ICM produces the camshaft position PCM input by filtering the Camshaft Position (CMP) sensor pulses when the engine is running and CKP sync pulses are also being received. The PCM uses the camshaft position PCM input pulses to initiate sequential fuel injection and to determine crankshaft position for the misfire diagnostic. The PCM constantly monitors the number of pulses on the camshaft position PCM input circuit and compares the number of camshaft position PCM input pulses to the number of 18X reference pulses and the number of 3X reference pulses being received If the PCM receives an incorrect number of pulses on the camshaft position PCM input circuit, DTCP0341 will set and the PCM will initiate injector sequence without the camshaft position PCM input with a one in six chance that injector sequence is correct. The engine will continue to start and run normally, although the misfire diagnostic will be disabled.
CONDITIONS FOR RUNNING THE DTC
The engine is running (3X reference pulses are being received).
CONDITIONS FOR SETTING THE DTC
* The ratio of 3X reference pulses to CAM pulses received by the PCM does not equal 6 to 1.
* The ratio of 3X reference pulses to 18X reference pulses received by the PCM equals 6 to 1.
* The conditions are present for 290 of 300 test samples.
ACTION TAKEN WHEN THE DTC SETS
* The PCM will illuminate the Malfunction Indicator Lamp (MIL) during the second consecutive trip in which the diagnostic has been run and failed.
* If equipped with traction control, the PCM will command the Electronic Brake And Traction Control Module (EBTCM) via the serial data circuit to turn OFF traction control, and the EBTCM will illuminate the TRACTION OFF lamp.
* The PCM will store conditions which were present when the DTC set as Freeze Frame and Failure Records data.
CONDITIONS FOR CLEARING THE MIL/DTC
* The PCM will turn OFF the MIL during the third consecutive trip in which the diagnostic has been run and passed.
* The History DTC will clear after 40 consecutive warm-up cycles have occurred without a malfunction.
* The DTC can be cleared by using a scan tool.
DIAGNOSTIC AIDS
An intermittent may be caused by a faulty connection, rubbed through wire insulation, or a wire broken inside the insulation. Check for the following conditions:
* A malfunctioning ignition coil-Remove the ignition coils and inspect the ignition control module and coils for cracks, carbon tracking, or other signs that indicate that the coil secondary circuit is arcing to the Ignition Control Module (ICM) or the ICM wiring harness. Refer to Ignition Coil(*) Replacement.
* Secondary ignition wires arcing to the wiring harness-Check the secondary ignition wires for carbon tracking or other signs of damage.
* Inspect the wiring harness for damage. If the harness appears to be OK, disconnect the PCM, turn the ignition on and observe a DMM connected to the camshaft position input signal circuit at the PCM harness connector while moving connectors and wiring harnesses related to the ICM and the Camshaft Position (CMP) sensor. A change in voltage will indicate the location of the malfunction.
Thread Starter
Member
Posts like a V-Tak
Joined: Apr 2007
Posts: 85
Likes: 0
From: NEW YORK
Originally Posted by Archon
Here'* some information on diagnosing your problem. According to this, bad coils, ICM, or wires could also set the code.
CIRCUIT DESCRIPTION
The camshaft position PCM input is produced by the ignition control module. The ICM produces the camshaft position PCM input by filtering the Camshaft Position (CMP) sensor pulses when the engine is running and CKP sync pulses are also being received. The PCM uses the camshaft position PCM input pulses to initiate sequential fuel injection and to determine crankshaft position for the misfire diagnostic. The PCM constantly monitors the number of pulses on the camshaft position PCM input circuit and compares the number of camshaft position PCM input pulses to the number of 18X reference pulses and the number of 3X reference pulses being received If the PCM receives an incorrect number of pulses on the camshaft position PCM input circuit, DTCP0341 will set and the PCM will initiate injector sequence without the camshaft position PCM input with a one in six chance that injector sequence is correct. The engine will continue to start and run normally, although the misfire diagnostic will be disabled.
CONDITIONS FOR RUNNING THE DTC
The engine is running (3X reference pulses are being received).
CONDITIONS FOR SETTING THE DTC
* The ratio of 3X reference pulses to CAM pulses received by the PCM does not equal 6 to 1.
* The ratio of 3X reference pulses to 18X reference pulses received by the PCM equals 6 to 1.
* The conditions are present for 290 of 300 test samples.
ACTION TAKEN WHEN THE DTC SETS
* The PCM will illuminate the Malfunction Indicator Lamp (MIL) during the second consecutive trip in which the diagnostic has been run and failed.
* If equipped with traction control, the PCM will command the Electronic Brake And Traction Control Module (EBTCM) via the serial data circuit to turn OFF traction control, and the EBTCM will illuminate the TRACTION OFF lamp.
* The PCM will store conditions which were present when the DTC set as Freeze Frame and Failure Records data.
CONDITIONS FOR CLEARING THE MIL/DTC
* The PCM will turn OFF the MIL during the third consecutive trip in which the diagnostic has been run and passed.
* The History DTC will clear after 40 consecutive warm-up cycles have occurred without a malfunction.
* The DTC can be cleared by using a scan tool.
DIAGNOSTIC AIDS
An intermittent may be caused by a faulty connection, rubbed through wire insulation, or a wire broken inside the insulation. Check for the following conditions:
* A malfunctioning ignition coil-Remove the ignition coils and inspect the ignition control module and coils for cracks, carbon tracking, or other signs that indicate that the coil secondary circuit is arcing to the Ignition Control Module (ICM) or the ICM wiring harness. Refer to Ignition Coil(*) Replacement.
* Secondary ignition wires arcing to the wiring harness-Check the secondary ignition wires for carbon tracking or other signs of damage.
* Inspect the wiring harness for damage. If the harness appears to be OK, disconnect the PCM, turn the ignition on and observe a DMM connected to the camshaft position input signal circuit at the PCM harness connector while moving connectors and wiring harnesses related to the ICM and the Camshaft Position (CMP) sensor. A change in voltage will indicate the location of the malfunction.
CIRCUIT DESCRIPTION
The camshaft position PCM input is produced by the ignition control module. The ICM produces the camshaft position PCM input by filtering the Camshaft Position (CMP) sensor pulses when the engine is running and CKP sync pulses are also being received. The PCM uses the camshaft position PCM input pulses to initiate sequential fuel injection and to determine crankshaft position for the misfire diagnostic. The PCM constantly monitors the number of pulses on the camshaft position PCM input circuit and compares the number of camshaft position PCM input pulses to the number of 18X reference pulses and the number of 3X reference pulses being received If the PCM receives an incorrect number of pulses on the camshaft position PCM input circuit, DTCP0341 will set and the PCM will initiate injector sequence without the camshaft position PCM input with a one in six chance that injector sequence is correct. The engine will continue to start and run normally, although the misfire diagnostic will be disabled.
CONDITIONS FOR RUNNING THE DTC
The engine is running (3X reference pulses are being received).
CONDITIONS FOR SETTING THE DTC
* The ratio of 3X reference pulses to CAM pulses received by the PCM does not equal 6 to 1.
* The ratio of 3X reference pulses to 18X reference pulses received by the PCM equals 6 to 1.
* The conditions are present for 290 of 300 test samples.
ACTION TAKEN WHEN THE DTC SETS
* The PCM will illuminate the Malfunction Indicator Lamp (MIL) during the second consecutive trip in which the diagnostic has been run and failed.
* If equipped with traction control, the PCM will command the Electronic Brake And Traction Control Module (EBTCM) via the serial data circuit to turn OFF traction control, and the EBTCM will illuminate the TRACTION OFF lamp.
* The PCM will store conditions which were present when the DTC set as Freeze Frame and Failure Records data.
CONDITIONS FOR CLEARING THE MIL/DTC
* The PCM will turn OFF the MIL during the third consecutive trip in which the diagnostic has been run and passed.
* The History DTC will clear after 40 consecutive warm-up cycles have occurred without a malfunction.
* The DTC can be cleared by using a scan tool.
DIAGNOSTIC AIDS
An intermittent may be caused by a faulty connection, rubbed through wire insulation, or a wire broken inside the insulation. Check for the following conditions:
* A malfunctioning ignition coil-Remove the ignition coils and inspect the ignition control module and coils for cracks, carbon tracking, or other signs that indicate that the coil secondary circuit is arcing to the Ignition Control Module (ICM) or the ICM wiring harness. Refer to Ignition Coil(*) Replacement.
* Secondary ignition wires arcing to the wiring harness-Check the secondary ignition wires for carbon tracking or other signs of damage.
* Inspect the wiring harness for damage. If the harness appears to be OK, disconnect the PCM, turn the ignition on and observe a DMM connected to the camshaft position input signal circuit at the PCM harness connector while moving connectors and wiring harnesses related to the ICM and the Camshaft Position (CMP) sensor. A change in voltage will indicate the location of the malfunction.
Thanks for the CIRCUIT DESCRIPTION ...today afternoon I went ahead and disconnected the cam and crank sensor harness and pulled the wires out all the way to the module..Then pulled plastic tubing of the wires striped the tape...found that the wires from the cam sensor and crank sensor had extra tape on them that were already dried up near the module..when taking the dried rot tape off I can see they were spliced and welded together..hmm I'm sure they do not come like this from factory. I'm hoping this is the cause of the error code because they still had a good welded attachment with the exception of the dry rotted tape...taped everything and installed again..lets see if that was it..If not, I've read forums of a weak cam magnet..Is that possible?