
spent all day today...


Thread Starter
Senior Member
Posts like a Camaro
Joined: Apr 2005
Posts: 1,121
Likes: 0
From: Niagara Falls Ontario Canada

Well considering I need this tool, and I've never done the rear setups before, and I can't figure out what you mean by spin the piston, I'm hesitant to do these by myself now. :?
What is the "bore"? Is that what the piston is housed in? How does that tool come into play? I'm trying to picture it'* use based on my experience (or lack of) working on the front calipers. I just unbolt the fronts, use a clamp if needed to put the piston back into the caliper for remounting. Am I a total dunce or what???? :?
What is the "bore"? Is that what the piston is housed in? How does that tool come into play? I'm trying to picture it'* use based on my experience (or lack of) working on the front calipers. I just unbolt the fronts, use a clamp if needed to put the piston back into the caliper for remounting. Am I a total dunce or what???? :?

Senior Member
True Car Nut
Joined: Feb 2005
Posts: 3,014
Likes: 0
From: Brampton, Ontario
Originally Posted by brianj
Well considering I need this tool, and I've never done the rear setups before, and I can't figure out what you mean by spin the piston, I'm hesitant to do these by myself now. :?
Is this the case guys?
Brian sorry I can't come up and help you out, since this weekend as well as the next 2 are going to be really busy. Then Comes Christmas, and you know the rest. Is it something that can wait several months?

RIP
True Car Nut
Joined: Jul 2004
Posts: 5,656
Likes: 4
From: Grand Rapids, Mi
I'll be back in a bit and post a drawing of it, and some more detailed instructions. It sounds a lot harder than it is. If you've done your front, you'll be able to handle the back. And Frank...yes, that'* right.
OK, here'* the drawing.
Using a large C clamp compress the caliper piston into the caliper bore to gain enough clearance to allow the caliper to pivot off the caliper bracket. Compress the piston until resistance is felt, but no more than 1 mm of piston travel.
Remove the bottom caliper slide pin.
Pivot the caliper body (6) upward.
Remove the inboard (2) and outboard (3) pads from the anchor bracket.
Remove and inspect the pad retainers (1).
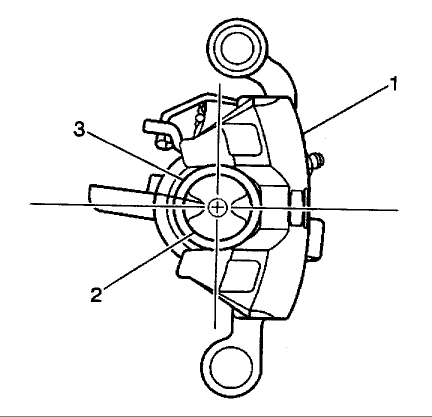
Retract the caliper piston (2) into the caliper bore (3). Use a spanner type wrench to turn the piston (2) clockwise until it bottoms out fully in the caliper.
Align the cutouts in the caliper piston to the alignment pins on the back of the brake pads. Important: Inspect the caliper bolt suspension boots for cuts, tears, or deterioration. If damaged, replace the pin boots. Inspect the caliper pin bolts for damage or corrosion. Replace if damaged or corroded. Do not attempt to clean away corrosion. Corrosion is typically caused by damaged pin boots. Refer to Brake Caliper Bracket Overhaul. Inspect the piston boot for deterioration, replace if damaged.
Install the brake pad retainers (1) into the caliper anchor bracket (5).
Install the inboard (2) and outboard (3) brake pads into the caliper anchor bracket. Important: The caliper piston boot must lay flat. Make sure convolutions are tucked into place.
Use a small plastic or wooden tool to lift the inner edge of the boot next to the piston, and press out any trapped air.
Pivot the caliper down over the brake pads and into the anchor bracket.
Insert the lower caliper slide pin. Tighten the caliper slide pin to 85 Nm (63 ft. lbs.).
Install the tire and wheel assembly.
Lower the vehicle.
Start the vehicle and apply approximately 778 N (175 lbs.) of force three times to the brake pedal to seat the brake caliper piston and the brake pads.
OK, here'* the drawing.
Using a large C clamp compress the caliper piston into the caliper bore to gain enough clearance to allow the caliper to pivot off the caliper bracket. Compress the piston until resistance is felt, but no more than 1 mm of piston travel.
Remove the bottom caliper slide pin.
Pivot the caliper body (6) upward.
Remove the inboard (2) and outboard (3) pads from the anchor bracket.
Remove and inspect the pad retainers (1).
Retract the caliper piston (2) into the caliper bore (3). Use a spanner type wrench to turn the piston (2) clockwise until it bottoms out fully in the caliper.
Align the cutouts in the caliper piston to the alignment pins on the back of the brake pads. Important: Inspect the caliper bolt suspension boots for cuts, tears, or deterioration. If damaged, replace the pin boots. Inspect the caliper pin bolts for damage or corrosion. Replace if damaged or corroded. Do not attempt to clean away corrosion. Corrosion is typically caused by damaged pin boots. Refer to Brake Caliper Bracket Overhaul. Inspect the piston boot for deterioration, replace if damaged.
Install the brake pad retainers (1) into the caliper anchor bracket (5).
Install the inboard (2) and outboard (3) brake pads into the caliper anchor bracket. Important: The caliper piston boot must lay flat. Make sure convolutions are tucked into place.
Use a small plastic or wooden tool to lift the inner edge of the boot next to the piston, and press out any trapped air.
Pivot the caliper down over the brake pads and into the anchor bracket.
Insert the lower caliper slide pin. Tighten the caliper slide pin to 85 Nm (63 ft. lbs.).
Install the tire and wheel assembly.
Lower the vehicle.
Start the vehicle and apply approximately 778 N (175 lbs.) of force three times to the brake pedal to seat the brake caliper piston and the brake pads.
Thread Starter
Senior Member
Posts like a Camaro
Joined: Apr 2005
Posts: 1,121
Likes: 0
From: Niagara Falls Ontario Canada
Thanks Frank and Dick! Looking forward to the pics Dick, as I'm a visual person when it comes to instructions!
Frank I need to do this asap, my car shakes like crazy when I am exiting highways, and I do this every day to and from work. I'm not even surprised if all the shaking so far hasn't loosened my dental work yet!
Frank I need to do this asap, my car shakes like crazy when I am exiting highways, and I do this every day to and from work. I'm not even surprised if all the shaking so far hasn't loosened my dental work yet!
Senior Member
True Car Nut
Joined: Feb 2005
Posts: 3,014
Likes: 0
From: Brampton, Ontario
Originally Posted by brianj
Thanks frank and Dick! Looking forward to the pics Dick, as I'm a visual person when it comes to instructions!
Frank I need to do this asap, my car shakes like crazy when I am exiting highways, and I do this every day to and from work. I'm not even surprised if all the shaking so far hasn't loosened my dental work yet!
Frank I need to do this asap, my car shakes like crazy when I am exiting highways, and I do this every day to and from work. I'm not even surprised if all the shaking so far hasn't loosened my dental work yet!
Then we await the pictures and we'll have to walk you through it.
Thread Starter
Senior Member
Posts like a Camaro
Joined: Apr 2005
Posts: 1,121
Likes: 0
From: Niagara Falls Ontario Canada
Originally Posted by Archon
OK, let me know if what I posted is sufficient, or if you need more diagrams.
Wish me luck.......pics will follow during and after!
Senior Member
True Car Nut
Joined: Feb 2005
Posts: 3,014
Likes: 0
From: Brampton, Ontario
I'm going to try to be online somtime tomorrow also Brian, I'm going to be driving the 90 to Mike'* place tomorrow and then sanding down some rims later on in the day, so I should be around.
Good luck.
Good luck.
RIP
True Car Nut
Joined: Jul 2004
Posts: 5,656
Likes: 4
From: Grand Rapids, Mi
I think you can do it Brian! It'* just a little different from the fronts. The instructions say to remove the parking brake cable, which I haven't found necessary. Just remove the bolt on the clamp on the lower control arm. You'll have to fiddle with the cable some to get it to cooperate, though.
Will be with the grandkids tomorrow. We'll see how well they wanna cooperate with me being online.
Will be with the grandkids tomorrow. We'll see how well they wanna cooperate with me being online.
