
My HID Projector Retrofit thread


Thread Starter
Senior Member
Posts like a Northstar
Joined: Mar 2007
Posts: 529
Likes: 0
From: Maumee, OH

Originally Posted by slick94prix
Heh, wow, some people are creative!
BTW, whats a good way to clean off this old RTV thats on here? Theres an insane amount of it on here. Not sure if it came from the factory like this, or if the headlamps were apart before. But, it needs cleaned off, bad.
BTW, whats a good way to clean off this old RTV thats on here? Theres an insane amount of it on here. Not sure if it came from the factory like this, or if the headlamps were apart before. But, it needs cleaned off, bad.

Thread Starter
Senior Member
Posts like a Northstar
Joined: Mar 2007
Posts: 529
Likes: 0
From: Maumee, OH
Originally Posted by corvettecrazy
Heat is your best bet.
Thats pretty much what I found out. I even tried brake cleaner, but it just made it more gooey!
Anyways, most of the crap is out now, so I should have less troubles with fitment.
Thread Starter
Senior Member
Posts like a Northstar
Joined: Mar 2007
Posts: 529
Likes: 0
From: Maumee, OH
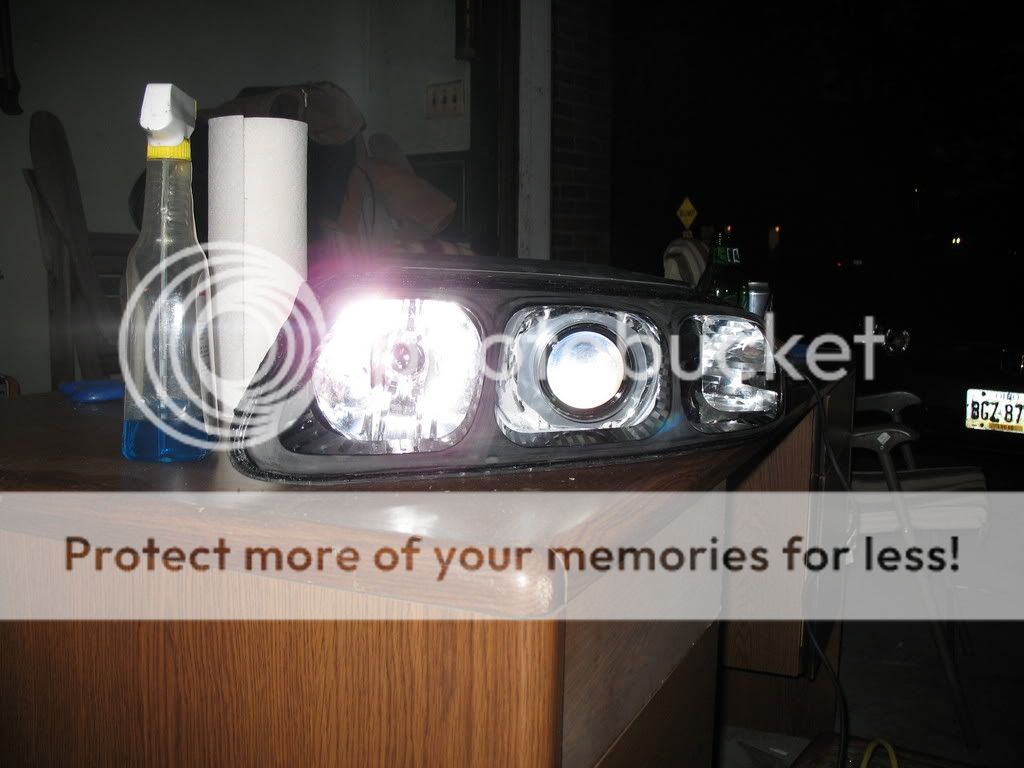
Alright, so after a few weeks of no progress, I made a bit more progress today!
Anyways, big thing first was to remove all of that factory or previous owner sealant gunk. After trying several cleaners, degreaser'*, etc.... Heat and wipe method worked best. I finally got 90% of the crap out of the way, and instantly, everything was going together and coming apart MUCH smoother. I ended up putting a bit too much heat to the black beauty trim ring, causing some parts to want to start to melt. So, I sanded it down, and it'* gonna get repainted gloss black(or maybe even color match the vehicle, but I will do some Photoshops to figure out what I want).
Next, the bottom of the inner lense assembly wasn't sitting down near as far as what it should stock. It was about 3/8" too high, which mean that the projector was still hitting the back of the housing in some high spots, causing it to not seat back all the way. I don't have pictures, but trust me, the black beauty trim and the clear outer lense was not fitting properly. Anyways, I realized that there were a few screws that were hitting the back of the housing, so I had to cut away a bit more so that there would be clearance. After it was all said and done, the gap is gone! So, next was to test the beauty trim and outer lense. Fit like a charm.
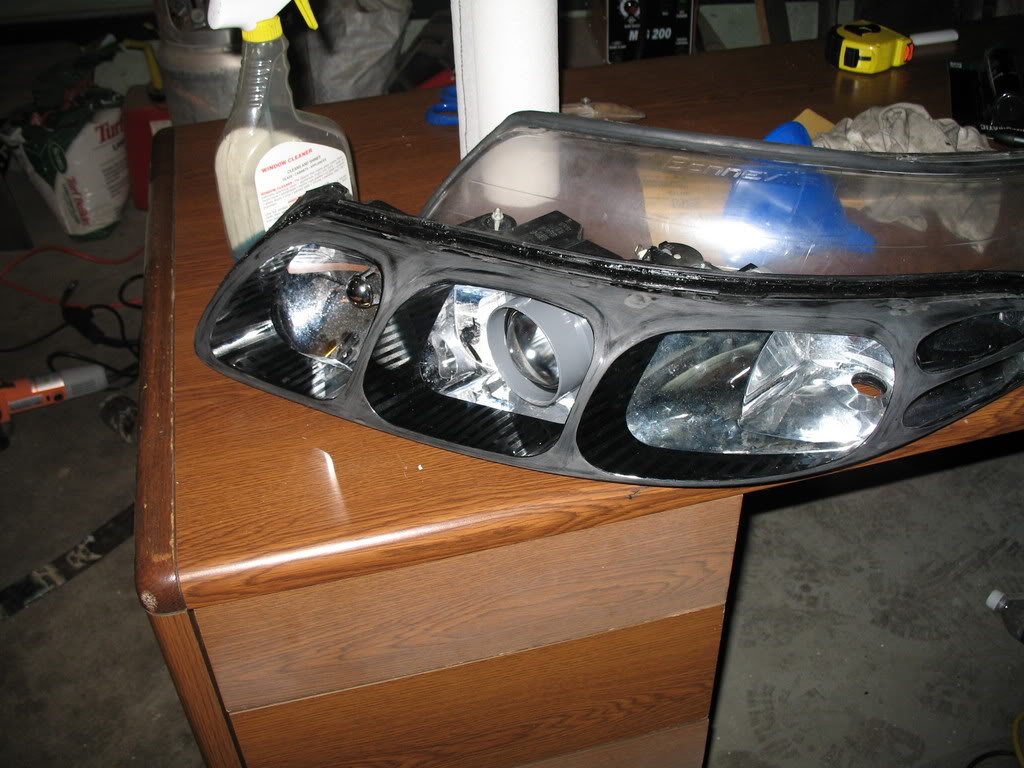
Alright, so now I needed to make a bezel for the projector itself to hide the cuts. I took some measurements, then started thinking what I could use. I thought the bottom of a plastic pop bottle would look cool:

But.... I didn't have one at the time to cut up and mess with. And, I don't really drink pop.
So.... I ran to the parts store. Ran across a few items that I could cut up and make work. One that I instantly saw that I knew I could get to work is a plastic funnel. But... I kept looking, just incase I seen something better. Then... I walked into the diy intake section, and found a coupler. So, I measured it, the opening was PERFECT size. I bought it instantly($6).
Came home, and started cutting away to get it to fit into the housing. 45 minutes later, and it fits. The coupler stick out a little far, but you know what, I like it like that!
Anways, next step is to pull the lense back off, High Temp RTV it into place, then use some epoxy to smooth out the transition from my makeshift projector trim ring to the chrome bezel. Then... sanding, and paint. The low beam inner housing will be flat black, the outer side of the trim ring will be chrome, the inner will be flat black(taping and painting this will be TONS of fun).
About 2 months ago, I rushed an attempt to clear the outer lenses on these lamps that I got. I did a decent job, but did not apply any protectant to them. Now.... you see that they are hazed up again. So... reworking those is in the order, this time spending my time and doing it right.
I would say this lamp is 80% complete.
Ok, I guess pictures are do:


Anyways, big thing first was to remove all of that factory or previous owner sealant gunk. After trying several cleaners, degreaser'*, etc.... Heat and wipe method worked best. I finally got 90% of the crap out of the way, and instantly, everything was going together and coming apart MUCH smoother. I ended up putting a bit too much heat to the black beauty trim ring, causing some parts to want to start to melt. So, I sanded it down, and it'* gonna get repainted gloss black(or maybe even color match the vehicle, but I will do some Photoshops to figure out what I want).
Next, the bottom of the inner lense assembly wasn't sitting down near as far as what it should stock. It was about 3/8" too high, which mean that the projector was still hitting the back of the housing in some high spots, causing it to not seat back all the way. I don't have pictures, but trust me, the black beauty trim and the clear outer lense was not fitting properly. Anyways, I realized that there were a few screws that were hitting the back of the housing, so I had to cut away a bit more so that there would be clearance. After it was all said and done, the gap is gone! So, next was to test the beauty trim and outer lense. Fit like a charm.
Alright, so now I needed to make a bezel for the projector itself to hide the cuts. I took some measurements, then started thinking what I could use. I thought the bottom of a plastic pop bottle would look cool:
But.... I didn't have one at the time to cut up and mess with. And, I don't really drink pop.
So.... I ran to the parts store. Ran across a few items that I could cut up and make work. One that I instantly saw that I knew I could get to work is a plastic funnel. But... I kept looking, just incase I seen something better. Then... I walked into the diy intake section, and found a coupler. So, I measured it, the opening was PERFECT size. I bought it instantly($6).
Came home, and started cutting away to get it to fit into the housing. 45 minutes later, and it fits. The coupler stick out a little far, but you know what, I like it like that!
Anways, next step is to pull the lense back off, High Temp RTV it into place, then use some epoxy to smooth out the transition from my makeshift projector trim ring to the chrome bezel. Then... sanding, and paint. The low beam inner housing will be flat black, the outer side of the trim ring will be chrome, the inner will be flat black(taping and painting this will be TONS of fun).
About 2 months ago, I rushed an attempt to clear the outer lenses on these lamps that I got. I did a decent job, but did not apply any protectant to them. Now.... you see that they are hazed up again. So... reworking those is in the order, this time spending my time and doing it right.
I would say this lamp is 80% complete.
Ok, I guess pictures are do:
Thread Starter
Senior Member
Posts like a Northstar
Joined: Mar 2007
Posts: 529
Likes: 0
From: Maumee, OH
Originally Posted by corvettecrazy
Very nice man. Time for some output shots!! 
I'll probably take it all to work with me tomorrow, light it up, and snap a picture or two.
Thread Starter
Senior Member
Posts like a Northstar
Joined: Mar 2007
Posts: 529
Likes: 0
From: Maumee, OH
Originally Posted by dillcc
Cool project! What kind of projectors are they?
I can't wait to see the end results!
I can't wait to see the end results!

Thread
Thread Starter
Forum
Replies
Last Post
Bonnie442
Detailing & Appearance
21
Feb 13, 2011 01:15 AM
1993 SLE
Your Ride: GM Pictures & Videos
19
Feb 17, 2009 04:28 PM
slick94prix
Lounge
1
Aug 3, 2007 05:46 PM