
Manifold Leak Or More?


Thread Starter
Member
Posts like a V-Tak
Joined: Jun 2008
Posts: 54
Likes: 0
From: Near Cincinnati

I've already cranked it more than 20 seconds with the throttle wide open, was open the whole time which I'd assumed was going to stop fuel flow without having to pull the fuel pump fuse?
I'm past that point, now have throttle body, alternator, most of the wiring harness disconnected.
That harness drapes over the top without much slack, going 3 opposite directions. Is there a trick to get it out of the way or do I just fight with it while pulling and placing the gaskets? I guess I'll get a "little" more slack once I label and pull the plug wires off the ignition coils as it runs under them, though it looks like I could just put them right back on but pushed out of the way as they may have a little more slack than the original wires.
Last edited by J_C; Dec 15, 2015 at 06:08 PM.
Senior Member
Posts like a Turbo
Joined: Dec 2003
Posts: 249
Likes: 43
From: Baldwin,New York
I've already cranked it more than 20 seconds with the throttle wide open, was open the whole time which I'd assumed was going to stop fuel flow without having to pull the fuel pump fuse?
I'm past that point, now have throttle body, alternator, most of the wiring harness disconnected.
That harness drapes over the top without much slack, going 3 opposite directions. Is there a trick to get it out of the way or do I just fight with it while pulling and placing the gaskets? I guess I'll get a "little" more slack once I label and pull the plug wires off the ignition coils as it runs under them, though it looks like I could just put them right back on but pushed out of the way as they may have a little more slack than the original wires.
I'm past that point, now have throttle body, alternator, most of the wiring harness disconnected.
That harness drapes over the top without much slack, going 3 opposite directions. Is there a trick to get it out of the way or do I just fight with it while pulling and placing the gaskets? I guess I'll get a "little" more slack once I label and pull the plug wires off the ignition coils as it runs under them, though it looks like I could just put them right back on but pushed out of the way as they may have a little more slack than the original wires.
Thread Starter
Member
Posts like a V-Tak
Joined: Jun 2008
Posts: 54
Likes: 0
From: Near Cincinnati
Yes, lower gaskets, upper plenum, and misc things that seemed prudent to change while doing it like temp sensor, thermostat. IF there are no problems then it'* almost done, still have to put alternator and air filter assembly back on, see how it runs, then change fluids.
Thread Starter
Member
Posts like a V-Tak
Joined: Jun 2008
Posts: 54
Likes: 0
From: Near Cincinnati
Anyone know what the little blue, plastic (or rubber?) cap is for in the Felpro LIM gasket kit? I didn't see one when I tore it apart so I didn't use the one in the kit.
It'* pictured on this page: Same pic, lower right hand side: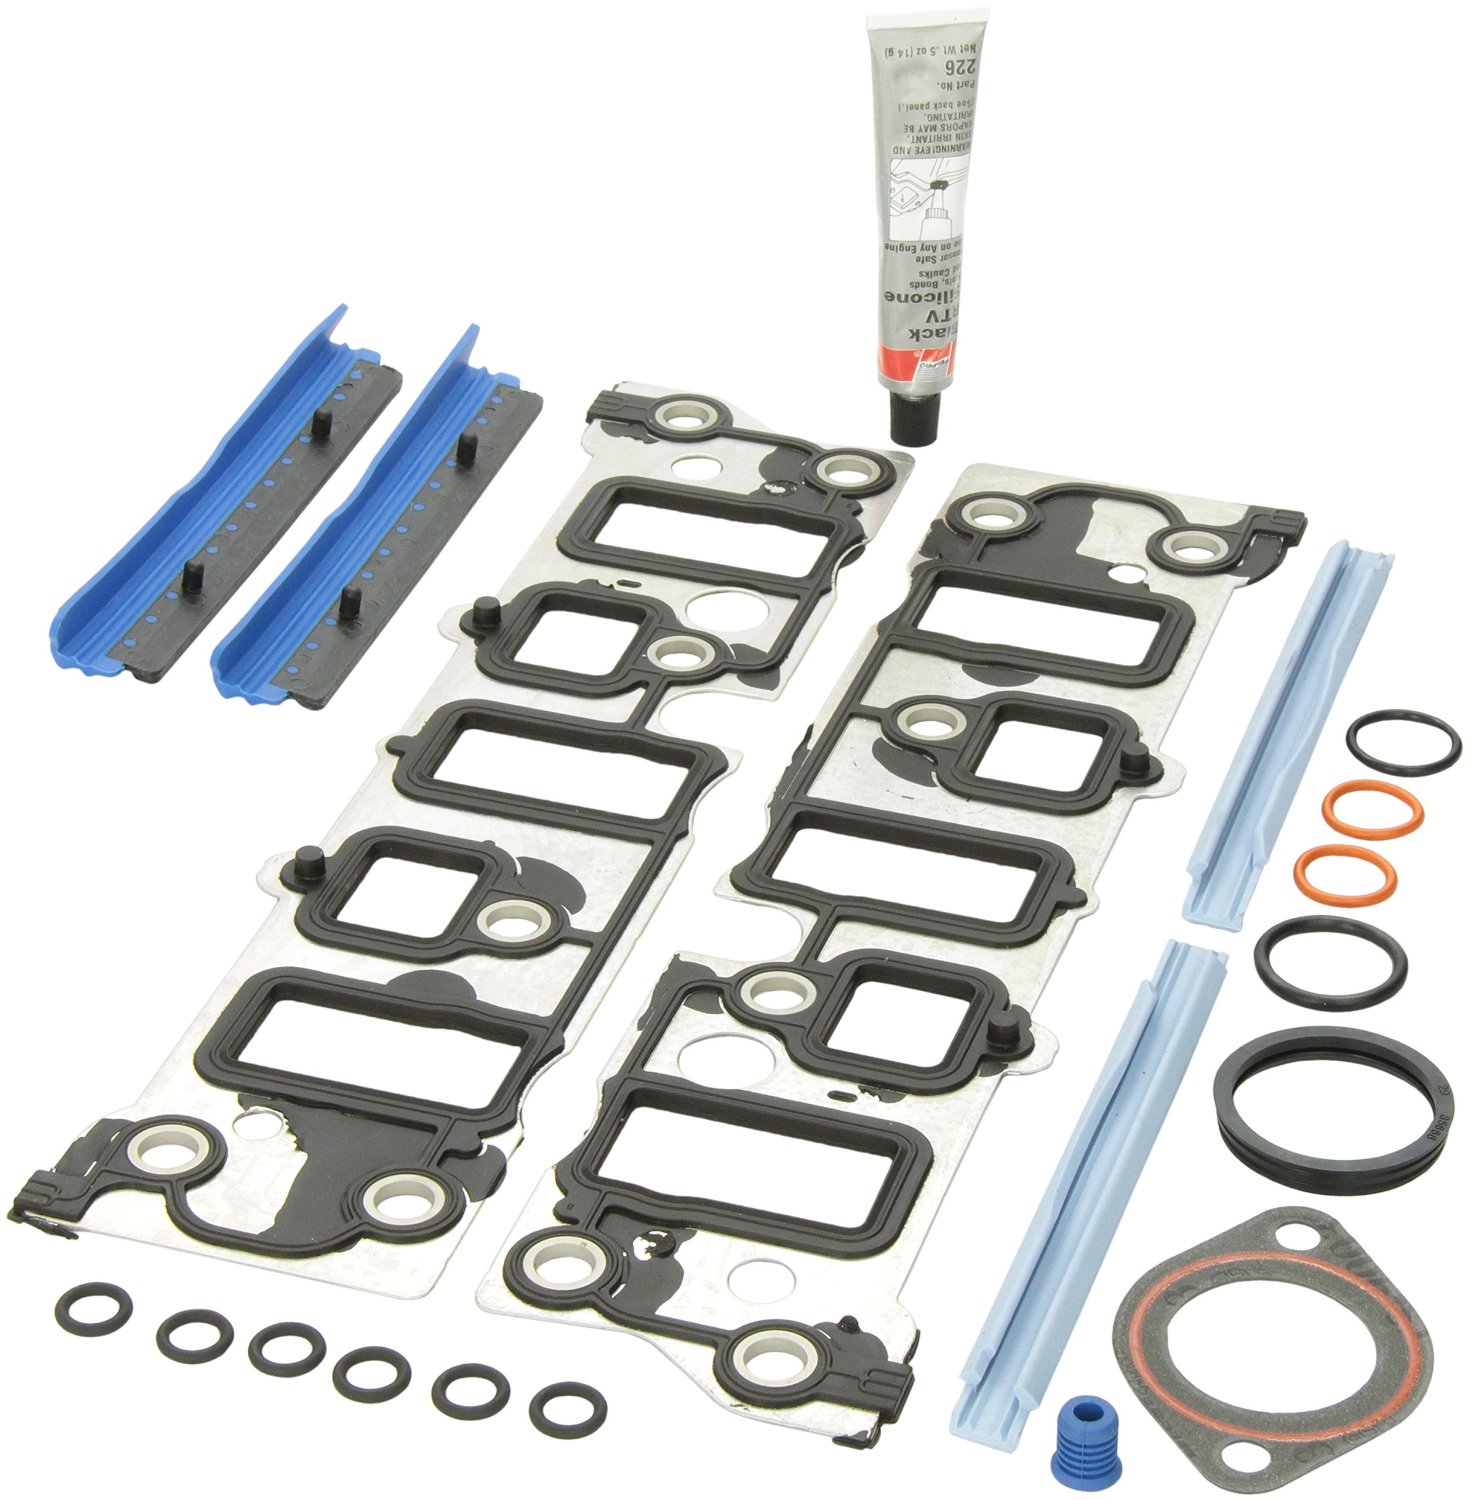
It'* pictured on this page: Same pic, lower right hand side:
Last edited by J_C; Jan 10, 2016 at 08:20 PM.


Thread Starter
Member
Posts like a V-Tak
Joined: Jun 2008
Posts: 54
Likes: 0
From: Near Cincinnati
Someone on Amazon wrote that the blue cap is a MAP sensor seal. Seems bigger than the seal I recall on mine but I may take another look at that when I get a chance... if that'* what it is, at least that'* very accessible instead of having to take the rest back apart.
Edit: Thanks William, I should've refreshed the page before posting again.
Edit: Thanks William, I should've refreshed the page before posting again.
Thread Starter
Member
Posts like a V-Tak
Joined: Jun 2008
Posts: 54
Likes: 0
From: Near Cincinnati
The gasket for it is a separate piece that snaps on but it is about 3-4mm too wide and was hitting against the intake ducts instead of sitting around them like it'* clearly supposed to, and yes I mean on the included Dorman plenum, not the old one (which I didn't even check). The reviews mentioning this go back years so I can't believe this kind of issue still persists today unless this is really old stock that'* been sitting on a shelf the whole time.
I ended up taking a torch and heating the plastic strips in the middle to bend them enough to get it to clear the ducts. That made the gasket sit slightly at an angle but I think it settled down once it was bolted on.
Last edited by J_C; Jan 10, 2016 at 08:55 PM.
Thread Starter
Member
Posts like a V-Tak
Joined: Jun 2008
Posts: 54
Likes: 0
From: Near Cincinnati
Got the whole thing finished last night (except still want to change oil and coolant as they're shot even though they didn't mix together).
Runs great again, now I am reminded why I hate these cars, because they pull like a train when you're trying to brake. I don't think there'* anything wrong with it that causes this, as it always did from brand new but I only ever drive it when I'm doing repair work so I forget about how much it does that... until it'* time to change the brakes and the rotors end up warped which is the next repair this thing needs.
Anyone know what the most cost effective rotors are? It'* not driven hard but still the rotors seem prone to warp, has gone through both the originals and 1 replacement set in ~50K mi. though that was mostly stop-n-go driving.
Anyway when I first started her up I was worried that there were more problems or that I'd botched the repair because it took a few minutes running with an extremely foggy exhaust before the coolant stuck in the exhaust was purged. I had spent a great deal of time getting every last drop cleaned out of the intake side but for those minutes it looked just as bad as it did before the repair, except it idled and drove fine.
I was pretty relieved once the exhaust cleared up and no CEL OBDII codes popped up. I'm assuming that 15 minutes idling then 15 minutes driving (in ~ 45F weather) was enough to get it into ECM closed loop mode, or does it have to run longer since it had the battery disconnected for days?
Last edited by J_C; Jan 15, 2016 at 07:55 PM.
Senior Member
Posts like a Turbo
Joined: Dec 2003
Posts: 249
Likes: 43
From: Baldwin,New York
[QUOTE=J_C;1616671]Got the whole thing finished last night (except still want to change oil and coolant as they're shot even though they didn't mix together).
I hope that you AT LEAST change the oil as antifreeze in the oil will corrode your bearings and then then the motor will be SHOT.
I hope that you AT LEAST change the oil as antifreeze in the oil will corrode your bearings and then then the motor will be SHOT.