
Window Regulator Repair Revisited


Thread Starter
RIP
True Car Nut
Joined: Jul 2004
Posts: 5,656
Likes: 4
From: Grand Rapids, Mi

After doing my window regulator repair in August
http://www.bonnevilleclub.com/forum/...324&highlight=
I wanted to find a quicker and easier way to make the repair using readily available tools and parts. My apologies ahead of time to our Canadian members, as all measurements are in inches or fractions of inches.
You may wish to lube things up as you progress through the steps.
What is needed is:
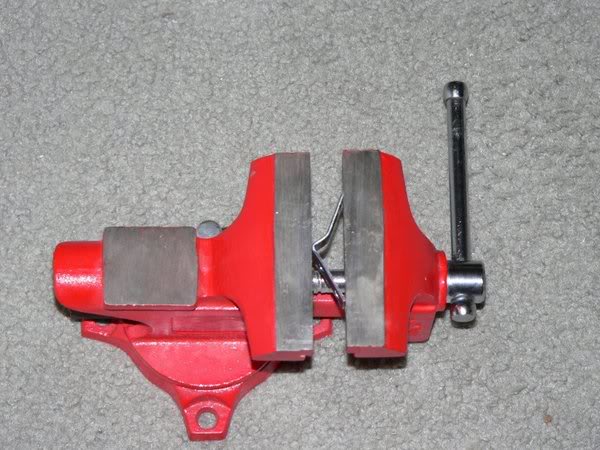
a bench vise,
grinder,
hammer,
hacksaw or dremel tool
10 mm socket or phillips screwdriver and
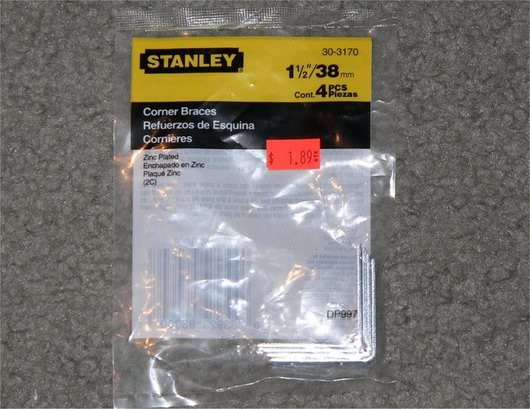
a 1 1/2 inch corner bracket. I picked them up at the Home Depot.
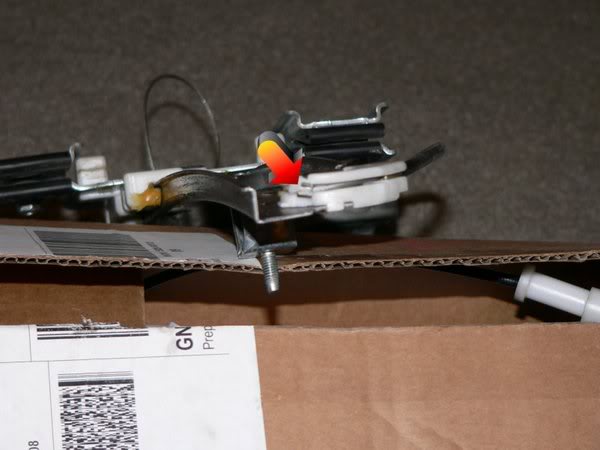
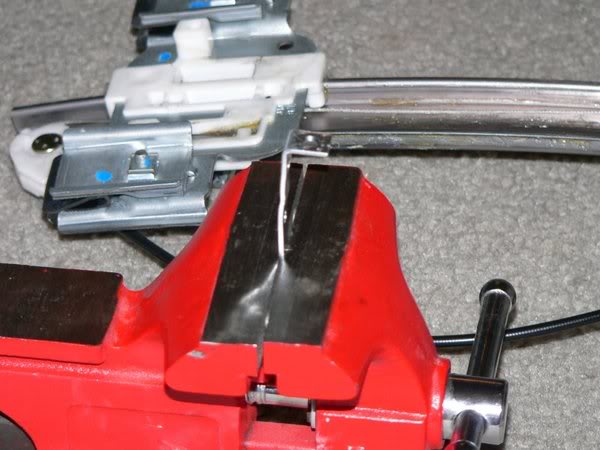
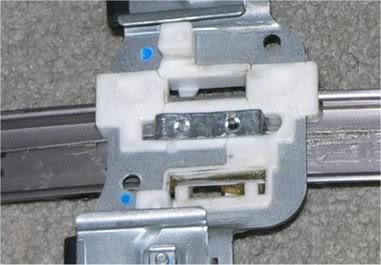
After removing the regulator from the car, it is likely to look like this.

The lower cable has slack, the sled moves up and down, and the top cable end is captured in the top guide.
Remove the 3 screws that hold down the motor
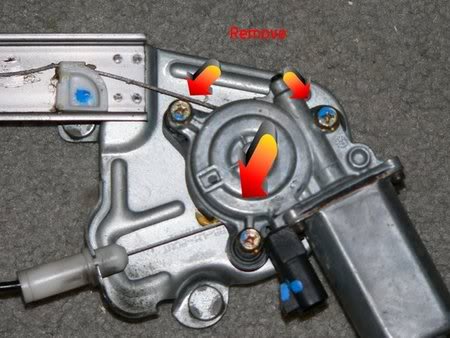
Grasp the top cable end that is stuck in the top guide, and pull down. If it moves easily and the sled slides down, you're in luck and the bottom cable has not become tangled inside the reel. If it is stuck, that will be fixed later in the instructions.
Removed the black clip from the sled by prying it off with a screwdriver.
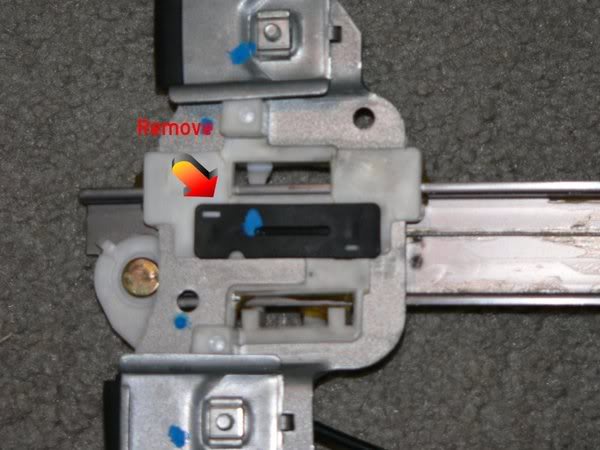
This is where the repair will be made, and the clip will not be used. Using the vise, or a hammer, flatten the corner brace.
Measure and mark 1/2 inch in from the end on each side of the bracket. Place the bracket in the vise to that mark, and bend the end to a 90 degree angle.
Take the bracket to a grinder (or a file if you're really patient) and grind off some from each side of the bend until it is 3/8 inch wide. Use care with this step, as it is easy to have the part get caught and go flying off, or grinding off part of your skin. You may wish to clamp it into a pair of vise grips to hold the piece. You could also grind it down with a dremel tool.

Using a hacksaw or Dremel cutting wheel, cut a slit down the center of the end of the bracket. This has to be wide enough to have the cable slide through it.
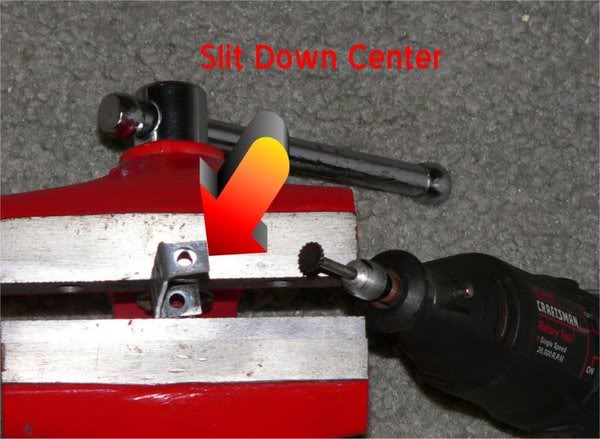
If the slit isn't wide enough for the cable, you can pry it open wider with a screwdriver, and then take a bit more off from the side of the bracket.
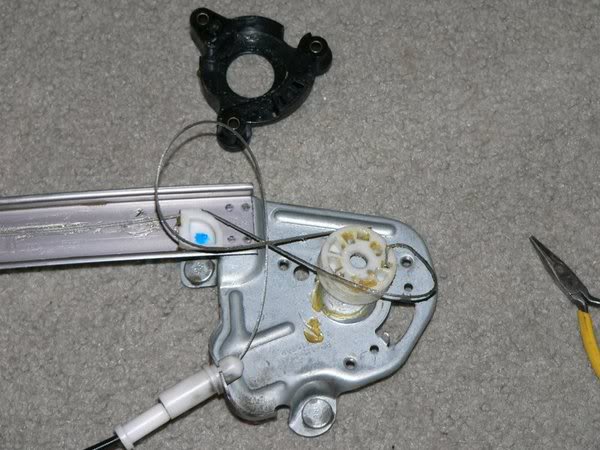
Remove the reel from the regulator by straightening the pins that hold it down, and compressing and pushing out the plastic guide pin on the back.

If the bottom cable was not tangled in the reel, use care to hold the reel inside the cover so that the cable does not spill out. If it was tangled, remove the reel from the cover.
Slide the top cable under the top of the sled, and pull up through the hole at the top.

Push the cable end into the slot just below that hole.

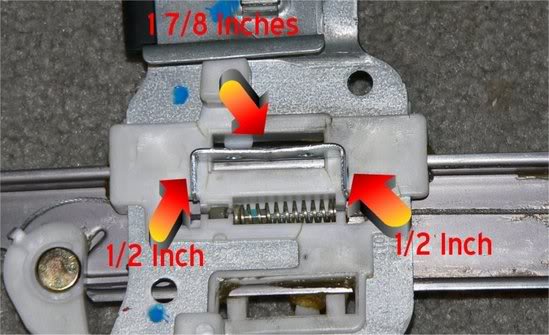
These are the dimensions of the final piece. Each bend is 1/2 inch as stated, and the distance between the bends is 1 7/8 inches.
Push the previously made bracket into the holes at the top and bottom of the sled which hold the black clip that was removed. Make certain that the cables have slid into the slits that were cut into the bracket.
If the cable had become tangled, wrap the cables back around the spool. You can tell by the direction the cable comes out of the spool which way to wrap it and there are grooves on the spool to hold the cable. Keeping a little bit of tension on the cables helps. (I don't have pictures of this step as I couldn't wrap it and hold the camera.) Place the spool back inside the cover, still keeping tension on it.
It will appear as if the cables are too short at this point, as the slack has not been taken up yet.
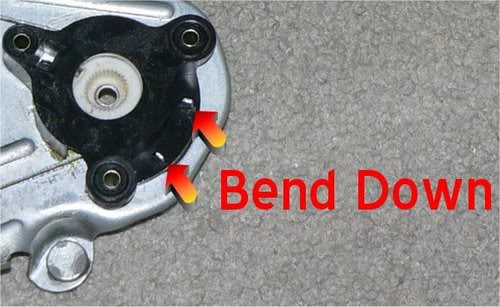
Pull the spool and cover down toward where it attaches to the regulator bracket. Align the guide pin on the back with the bracket, and slide the cover over the previously straightened pins. Bend those back down.
Note how the center of the spool slides over the raised portion of the regulator. You may need to use a screwdriver or other tool to line this up. This is where the end of the motor'* gear slides in. It is a lot easier to align it ahead of time rather than trying to do it while putting the motor back on.
Line the motor'* gears up with the gears in the center of the spool, and push it in until it is flat against the spool cover. You may have to wiggle things around a bit to get it to go in. Screw the 3 10mm screws back in, and you're done. In case you forgot which way the motor was installed originally, the motor end is on the same side as the black cable guide that goes to the top of the regulator.
This looks like a lot of detail, but it is relatively easy. The whole process, including lubing and testing (not removal or installation in the car) took 40 minutes.
http://www.bonnevilleclub.com/forum/...324&highlight=
I wanted to find a quicker and easier way to make the repair using readily available tools and parts. My apologies ahead of time to our Canadian members, as all measurements are in inches or fractions of inches.
You may wish to lube things up as you progress through the steps.
What is needed is:
a bench vise,
grinder,
hammer,
hacksaw or dremel tool
10 mm socket or phillips screwdriver and
a 1 1/2 inch corner bracket. I picked them up at the Home Depot.
After removing the regulator from the car, it is likely to look like this.
The lower cable has slack, the sled moves up and down, and the top cable end is captured in the top guide.
Remove the 3 screws that hold down the motor
Grasp the top cable end that is stuck in the top guide, and pull down. If it moves easily and the sled slides down, you're in luck and the bottom cable has not become tangled inside the reel. If it is stuck, that will be fixed later in the instructions.
Removed the black clip from the sled by prying it off with a screwdriver.
This is where the repair will be made, and the clip will not be used. Using the vise, or a hammer, flatten the corner brace.
Measure and mark 1/2 inch in from the end on each side of the bracket. Place the bracket in the vise to that mark, and bend the end to a 90 degree angle.
Take the bracket to a grinder (or a file if you're really patient) and grind off some from each side of the bend until it is 3/8 inch wide. Use care with this step, as it is easy to have the part get caught and go flying off, or grinding off part of your skin. You may wish to clamp it into a pair of vise grips to hold the piece. You could also grind it down with a dremel tool.
Using a hacksaw or Dremel cutting wheel, cut a slit down the center of the end of the bracket. This has to be wide enough to have the cable slide through it.
If the slit isn't wide enough for the cable, you can pry it open wider with a screwdriver, and then take a bit more off from the side of the bracket.
Remove the reel from the regulator by straightening the pins that hold it down, and compressing and pushing out the plastic guide pin on the back.
If the bottom cable was not tangled in the reel, use care to hold the reel inside the cover so that the cable does not spill out. If it was tangled, remove the reel from the cover.
Slide the top cable under the top of the sled, and pull up through the hole at the top.
Push the cable end into the slot just below that hole.
These are the dimensions of the final piece. Each bend is 1/2 inch as stated, and the distance between the bends is 1 7/8 inches.
Push the previously made bracket into the holes at the top and bottom of the sled which hold the black clip that was removed. Make certain that the cables have slid into the slits that were cut into the bracket.
If the cable had become tangled, wrap the cables back around the spool. You can tell by the direction the cable comes out of the spool which way to wrap it and there are grooves on the spool to hold the cable. Keeping a little bit of tension on the cables helps. (I don't have pictures of this step as I couldn't wrap it and hold the camera.) Place the spool back inside the cover, still keeping tension on it.
It will appear as if the cables are too short at this point, as the slack has not been taken up yet.
Pull the spool and cover down toward where it attaches to the regulator bracket. Align the guide pin on the back with the bracket, and slide the cover over the previously straightened pins. Bend those back down.
Note how the center of the spool slides over the raised portion of the regulator. You may need to use a screwdriver or other tool to line this up. This is where the end of the motor'* gear slides in. It is a lot easier to align it ahead of time rather than trying to do it while putting the motor back on.
Line the motor'* gears up with the gears in the center of the spool, and push it in until it is flat against the spool cover. You may have to wiggle things around a bit to get it to go in. Screw the 3 10mm screws back in, and you're done. In case you forgot which way the motor was installed originally, the motor end is on the same side as the black cable guide that goes to the top of the regulator.
This looks like a lot of detail, but it is relatively easy. The whole process, including lubing and testing (not removal or installation in the car) took 40 minutes.


Senior Member
Posts like a Corvette
Joined: Nov 2005
Posts: 1,201
Likes: 1
From: Hamilton, Ontario , Canada
Archon you da man! i will try this tomorrow as my rear passenger is broken.I have called every yard in Ontario and so has my mechanic there is none to be found , so thanks.


Senior Member
Posts like a Corvette
Joined: Nov 2005
Posts: 1,201
Likes: 1
From: Hamilton, Ontario , Canada
This is definitely TECHINFO just wondering what kind of lube do you use and I have to say now having it apart with all your description it doesnt seem difficult at all.thankyou very much  My first smiley .
My first smiley .
Thread Starter
RIP
True Car Nut
Joined: Jul 2004
Posts: 5,656
Likes: 4
From: Grand Rapids, Mi
Thanks all, and thanks to Bill for suggesting the write-up. I used a silicone based lube. The one I used is made by Permatex. I don't recall its exact name, but it'* something like Ultra-Slick (I don't have it with me at the moment.) It comes in a toothpaste sized tube. I'd suggest using a silicone lube as it won't collect dirt like other types might.
Senior Member
Posts like a Corvette
Joined: Nov 2005
Posts: 1,201
Likes: 1
From: Hamilton, Ontario , Canada
Mine was all unwound and I am out to look for some cable it needs to be replaced ,also the round pulley it wraps around(good luck) but the cable must be found somewheres.Lookin good though
Thread Starter
RIP
True Car Nut
Joined: Jul 2004
Posts: 5,656
Likes: 4
From: Grand Rapids, Mi
Originally Posted by jdq
Mine was all unwound and I am out to look for some cable it needs to be replaced ,also the round pulley it wraps around(good luck) but the cable must be found somewheres.Lookin good though
