custom short ram intake for '96 SSEi


Thread Starter
Senior Member
Posts like a Turbo
Joined: Aug 2005
Posts: 235
Likes: 0

 FOREWARD: I think the term "rice pipe" is silly, so I am calling it what it is, a short ram intake. Some prefer "hot air intake", call it whatever you want. I probably wouldnt have done this except for the fact that I was given the used intake pipe and coupler for free. If you have the cash to drop on something slick like an INTENSE fenderwell intake, then go for it.
 OK- although there dosent seem to be any overwhelming interest about this in my other old thread, I can provide pretty concise details to exactly how I built this intake- basically posting the awnsers to the questions I myself had before starting this project. Between that and the other bits of info you can find with the search feature, anyone should be able to make a short-ram style intake for their bonneville. Or at least I think so... what worked for me may not work exactly for other year/trim level bonnevilles, but the basic theory is the same.
PART 1: what I started with (requred trips to Home Depot and Pep Boys)
- used intake pipe and silicone coupler

My brother had this laying around and gave it to me, the full intake kit is being sold on eBay under the heading "02 03 04 05 ACURA RSX NON * AIR INTAKE KIT +HEAT SHIELD". Note that I only used the pipe and the coupler. It is a 3" pipe, polished aluminum, with a IAT hole and grommet already in it, although it is too small to be considered "plug and play" it is pretty easy to enlarge (I will cover that later on). There are also a couple different pipes/tubes and a bracket welded to the pipe, none of which were needed on my car, more on what was done to it later.
- Spectre Cone filter, part number 9132
Here is another area where there are many different options, I went with this because it was the best fit for my project. Also, because it was available locally for under $20 ($16.99 at Pep Boys), it is designed for 3" systems and used no adapters, it was not chrome, bright blue, or yellow (no bling is a big plus to me), and it can always be swapped out later on for a brand name cone filter. If you are only interested in looks, it visually looks almost identical to your basic K&N, also this filter is washable like K&N. Only real drawback was it didnt come with a clamp.

- big hose clamps
Pretty self explanatory, right? Used to hold the air filter on. Sold in a 2-pack at Pep Boys, $2.79. Size 48, package said something about RV sewer hose. You should only need one.
- Fernco 3" - 3" rubber coupling, part number P1056-33
Found at my local Home Depot store, this isnt designed for automotive applications but it fits nice and tight on the big throttle body. This is because its inside diameter is actually more than 3". More info on the manufacturer'* website: http://www.fernco.com/LineArt/1056_33.jpg
Rings in at a very frugal $5.97, comes only in basic black (again, no bling was a big plus for me), comes with two clamps, just what was needed on my budget. Looks exactly like the one in the picture.

- Spectre "optional air intake install kit" part number SPT8711
In the end, I only used one of the rubber grommets included in this kit, but it also comes with a hole saw to make your own hole wherever you want if the pipe you are using indeed did not come with one. It was worth the $6.99 price at Pep Boys for me to have a perfect fit for my intake air temp sensor.

- Motormite "HELP" vacuum cap assortment, part number 41050
Again, I only used one of the caps from this $1.99 assortment to cap off the small tube from the side of the intake piping. Another Pep Boys find, but these are sold at any old auto parts store.

Part 2 will include pics and descriptions of what exactly I had to do to complete this. Maybe even a picture of the end result as well, so stay tuned.

Junior Member
Posts like a Ricer Type-R
Joined: Aug 2002
Posts: 11
Likes: 13
Optmus, looks like a great project, and I'm interested to see how that heatshield ends up in the car.
Be warned that most 'knockoff' performance filters flow worse than a stock paper filter, and many of them actually flow so poorly, they hold water.
Be warned that most 'knockoff' performance filters flow worse than a stock paper filter, and many of them actually flow so poorly, they hold water.
Thread Starter
Senior Member
Posts like a Turbo
Joined: Aug 2005
Posts: 235
Likes: 0
Originally Posted by willwren
Optmus, looks like a great project, and I'm interested to see how that heatshield ends up in the car.
Be warned that most 'knockoff' performance filters flow worse than a stock paper filter, and many of them actually flow so poorly, they hold water.
Be warned that most 'knockoff' performance filters flow worse than a stock paper filter, and many of them actually flow so poorly, they hold water.
Oh, and this filter is an oiled cotton fiber element, with wire screen outer. Sound familiar? I dont doubt its quality isnt up to par with the comprable K&N, but I'm on tight budget. :( Ill try to keep it dry!
Junior Member
Posts like a Ricer Type-R
Joined: Aug 2002
Posts: 11
Likes: 13
Optmus, do the 'water test' first on the filter to be sure. DrJay and I got a helluva surprise last summer working on his beast.
My heatshield isn't totally enclosed. I make up for it by ram feeding it from a scoop below to force out engine bay heated air. Unless you use ramair to feed it, I suggest fully sealing and enclosing it like Foghorn or 1993 SLE.
My heatshield isn't totally enclosed. I make up for it by ram feeding it from a scoop below to force out engine bay heated air. Unless you use ramair to feed it, I suggest fully sealing and enclosing it like Foghorn or 1993 SLE.
Thread Starter
Senior Member
Posts like a Turbo
Joined: Aug 2005
Posts: 235
Likes: 0
Ok, whats the water test? In a pic I snapped tonight there are a couple of water drops on the element, and you can see they soaked in- however I havent oiled it yet either.
Exactly what I was thinking of doing... anyway...
PART 2- the acutal build, and results
First, I removed my original airbox and the rubber bellows to see how the pipe fit, and decided that if I cut it down to a basic 90 degree with a long inlet, it would leave me ample room for the filter. I wrapped masking tape around it so I could mark where I wanted to cut, and used a radial arm saw with an abrasive wheel to make a nice straight cut. File off the burr and trim down the small pipe and the little bracket, leaving it just long enough to cap off. Looking at it now, you wouldnt know the pipe didnt come like that. A dremel would do just as effective a job, but the cut wouldnt be as straight. Not really an issue though unless you are as picky as I am, since it isnt visible on the final product.
Also note that the IAT hole will be need to enlarged to roughly 3/4". A little more would be okay I suppose, but since the inital dry fit of the IAT into the grommet was a little loose for my tastes I made the hole slightly undersize. This crostrcts the grommet a little, and the IAT pops in just like it does in the factory intake bellows. Cant beat that.
Raw material:

Cut to size:

Fitment of the IAT into the grommet:


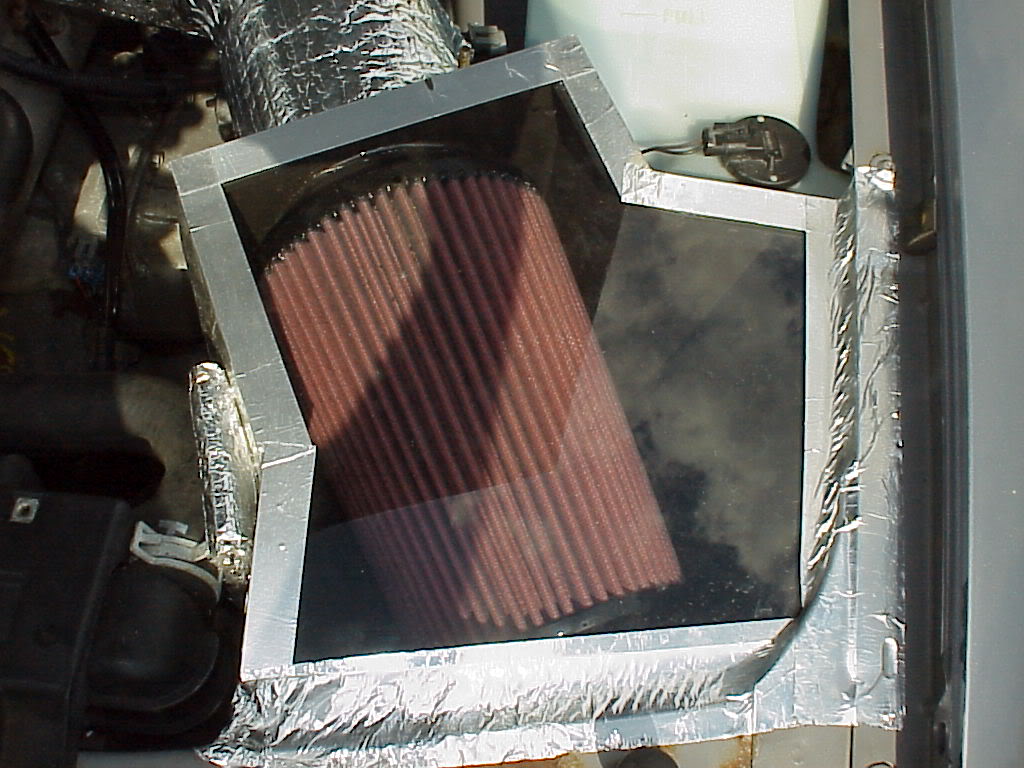
Next, since the ID of the hardware store coupler is larger than the 3" OD of the intake pipe, take the silicone coupler from the intake and cut the 3" end of it down to about 1.25" length. Use this as an spacer between the hardware store coupler and the intake pipe- it fits perfect that way, and looks nice an clean if you dont mind the little bit of blue (UGH) that shows. Also shown in the picure here are the new IAT grommet and the vacuum cap I used along with the clamp I needed for the filter (spectre filter and hardware store couple shown in the next pic).


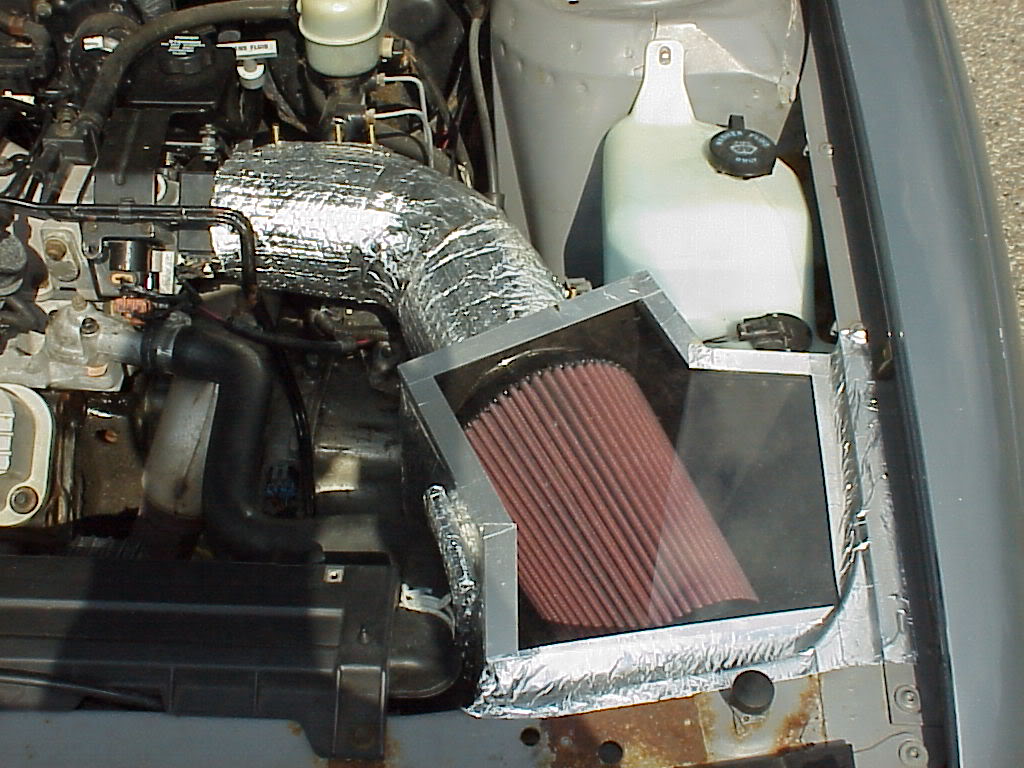
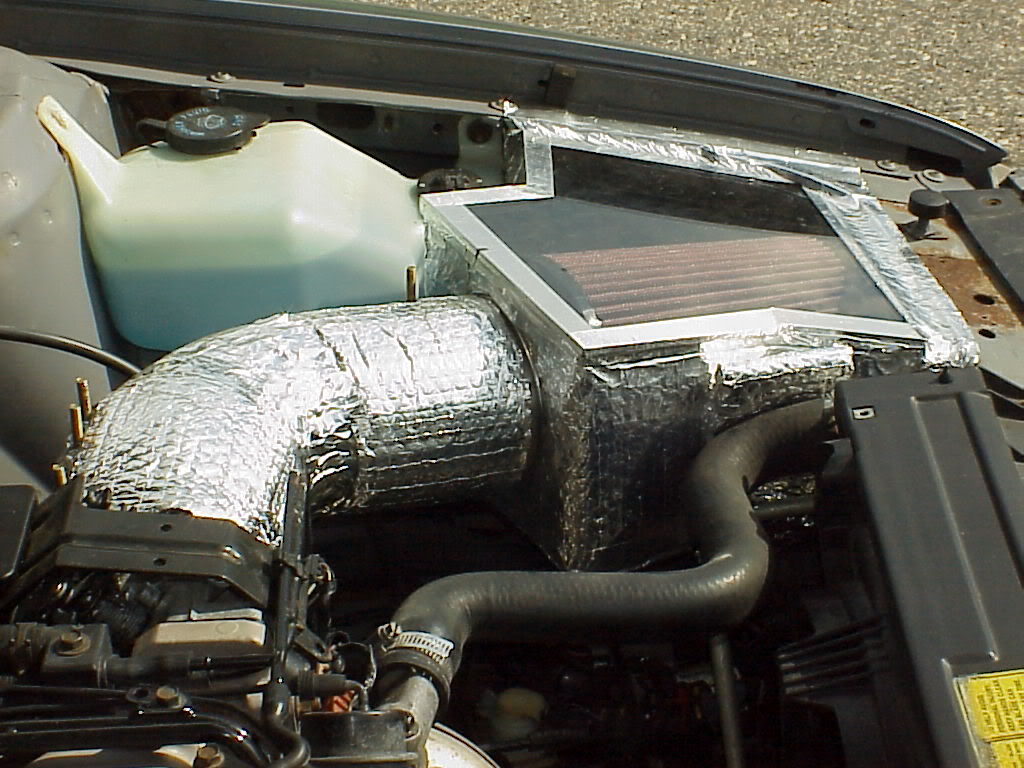
AND that leaves us with the final product, one custom made short ram intake. Total build cost up to this point: approximately $35. No problems what so ever with the harness for the IAT. You might be wondering why didnt I move the IAT location upstream, well I thought it over and decided that it was safe in the stock location. The more I thought about it, I decided that I would rather have the IAT give an accurate reading than try to fool the computer into thinking the ambient air was actually cooler than it really was. I can see relocating it being a benefit in a car more oriented towards all out performance, but it was not feasable on my 165 thousand mile daily driver. I could have posted here and learned more about it Im sure, and maybe I will relocate down the line but for now this is more than adaquate.


Bigger, better pictures here
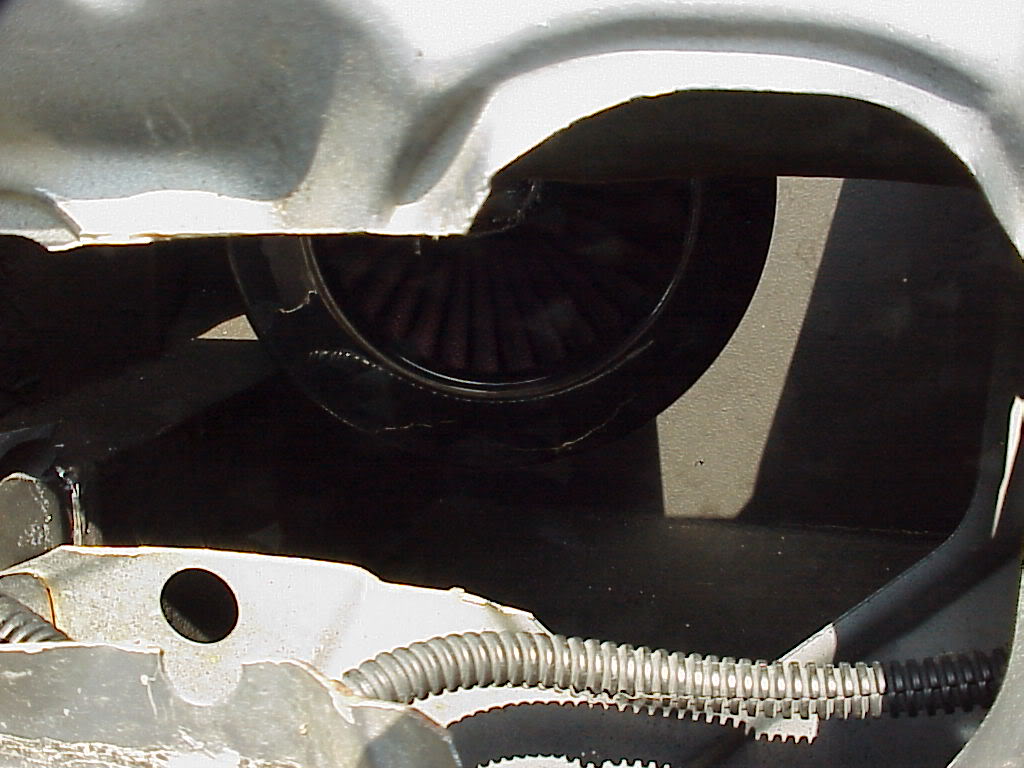
I still need to oil up the filter, and drive it some more, but everthing fits extrememly well with ample clearance. Plenty of room to build a heat shield/cool air duct. If however I decide that this isnt for me, then I will go back with my OE airbox and be selling this setup. Either way, I think it turned out really well, and that others who are considering this can learn from my experience.
 [/url]
Originally Posted by willwren
ram feeding it from a scoop below
PART 2- the acutal build, and results
First, I removed my original airbox and the rubber bellows to see how the pipe fit, and decided that if I cut it down to a basic 90 degree with a long inlet, it would leave me ample room for the filter. I wrapped masking tape around it so I could mark where I wanted to cut, and used a radial arm saw with an abrasive wheel to make a nice straight cut. File off the burr and trim down the small pipe and the little bracket, leaving it just long enough to cap off. Looking at it now, you wouldnt know the pipe didnt come like that. A dremel would do just as effective a job, but the cut wouldnt be as straight. Not really an issue though unless you are as picky as I am, since it isnt visible on the final product.
Also note that the IAT hole will be need to enlarged to roughly 3/4". A little more would be okay I suppose, but since the inital dry fit of the IAT into the grommet was a little loose for my tastes I made the hole slightly undersize. This crostrcts the grommet a little, and the IAT pops in just like it does in the factory intake bellows. Cant beat that.
Raw material:
Cut to size:
Fitment of the IAT into the grommet:
Next, since the ID of the hardware store coupler is larger than the 3" OD of the intake pipe, take the silicone coupler from the intake and cut the 3" end of it down to about 1.25" length. Use this as an spacer between the hardware store coupler and the intake pipe- it fits perfect that way, and looks nice an clean if you dont mind the little bit of blue (UGH) that shows. Also shown in the picure here are the new IAT grommet and the vacuum cap I used along with the clamp I needed for the filter (spectre filter and hardware store couple shown in the next pic).
AND that leaves us with the final product, one custom made short ram intake. Total build cost up to this point: approximately $35. No problems what so ever with the harness for the IAT. You might be wondering why didnt I move the IAT location upstream, well I thought it over and decided that it was safe in the stock location. The more I thought about it, I decided that I would rather have the IAT give an accurate reading than try to fool the computer into thinking the ambient air was actually cooler than it really was. I can see relocating it being a benefit in a car more oriented towards all out performance, but it was not feasable on my 165 thousand mile daily driver. I could have posted here and learned more about it Im sure, and maybe I will relocate down the line but for now this is more than adaquate.
Bigger, better pictures here
I still need to oil up the filter, and drive it some more, but everthing fits extrememly well with ample clearance. Plenty of room to build a heat shield/cool air duct. If however I decide that this isnt for me, then I will go back with my OE airbox and be selling this setup. Either way, I think it turned out really well, and that others who are considering this can learn from my experience.
[/url]