
SC Needle Bearing removal procedure


Thread Starter
Junior Member
Posts like a Ricer Type-R
Joined: Aug 2002
Posts: 11
Likes: 13

Per request, same procedure applies to all M45, M62, M90, and M112 Eatons:
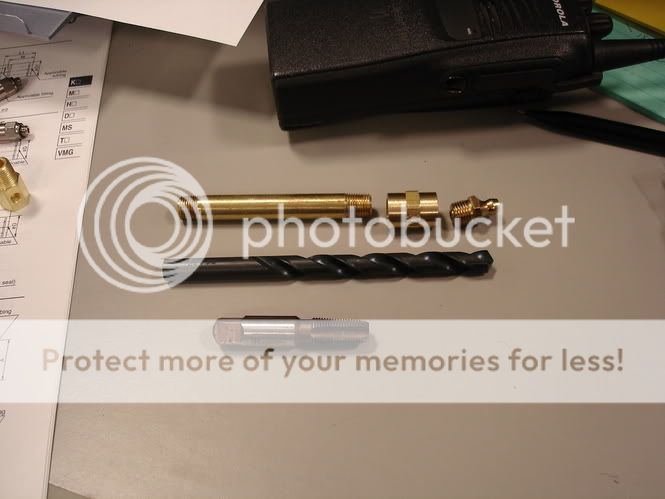
1. Get these parts. Letter drill "R", 1/8NPT tap, 1/8" brass pipe nipple (threaded
both ends), 1/8" NPT coupler, 1/8NPT grease (zerk) fitting
2. Locate these two holes on the bottom of the Supercharger. Their original
purpose was to preven compression when the original needle bearings were
inserted, to prevent air behind them from compressing and ejecting them:

3. CAREFULLY drill out the hole with the Letter R drill. If you don't have an R, go
to a 11/32" drill (0.343 , slightly larger. Do NOT hit the bearing. Drill straight.
If you mar or gall the bearing, it will leave a groove in the bearing pocket of the
SC as it comes out.

4. Carefully tap 1/8" NPT threads into each hole. Use oil. Get them as deep
as you can without hitting the bearing.

5. Results of tapping:

6. After assembling the brass parts and zerk, carefully insert and thread it in
without cross-threading. Get it snug. Use a helper and put a good-quality
grease gun on the fitting:

7. Pump away until the bearing comes out. Sometimes they come out with
significant velocity. If your helper is your significant other, and you're horny,
lay a rag inside the SC to 'catch' the bearing. If your helper is anyone else,
aim it in their general direction, and you might get a good show. Of the 4 I've
done, only one came with velocity. The term for the aftermath is 'Gicky'. You
can see the first bearing starting to come out. This one DID have velocity, and
Linda, my trusty helper, got 'Gicky'.

8. The mess you have to clean out (all of it, use solvent) so you don't have a
pre-lubed bearing that wants to move around later:

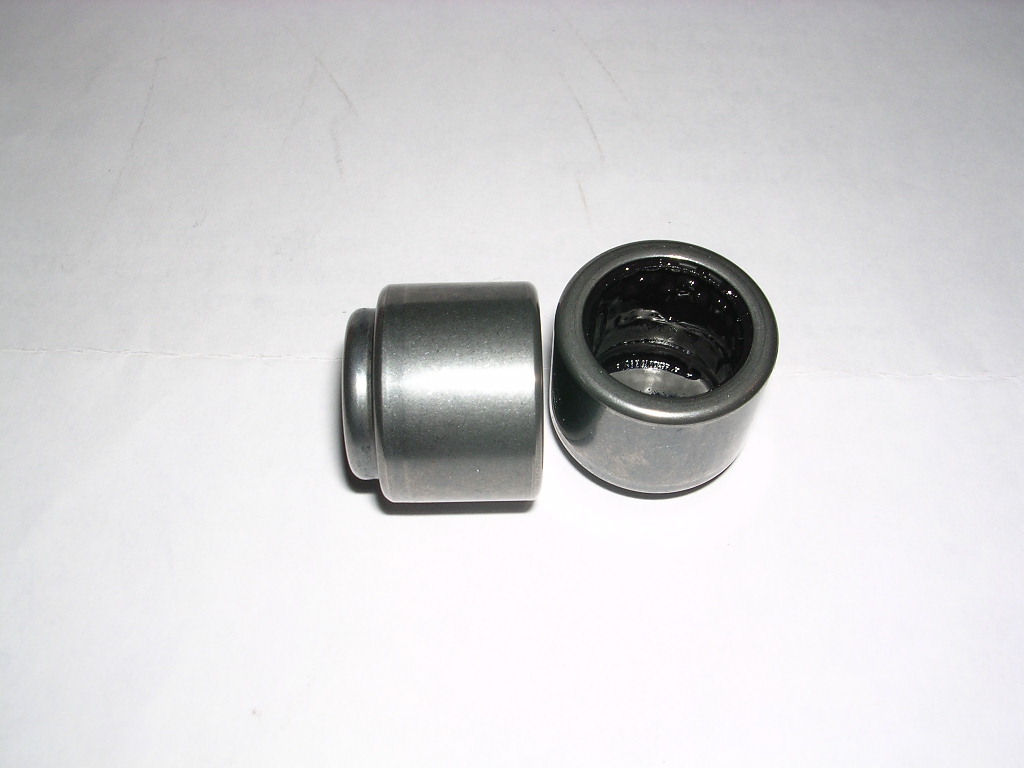
9. Ready to press new bearings. Press them just below flush (to the same
depth as the original bearing depth):

10. You can get the bearings from www.rollingperformance.com for $20,
pre-greased (this is for a pair). A mighty good deal, considering they typically
ship 2-day express mail for an additional $5.95. Great peace of mind for the
price, and you don't have to buy the expensive grease seperately
I will move these pics to my server sometime soon, then link this post in a
Techinfo article so your grandchildren can learn how to do this.
1. Get these parts. Letter drill "R", 1/8NPT tap, 1/8" brass pipe nipple (threaded
both ends), 1/8" NPT coupler, 1/8NPT grease (zerk) fitting
2. Locate these two holes on the bottom of the Supercharger. Their original
purpose was to preven compression when the original needle bearings were
inserted, to prevent air behind them from compressing and ejecting them:
3. CAREFULLY drill out the hole with the Letter R drill. If you don't have an R, go
to a 11/32" drill (0.343
If you mar or gall the bearing, it will leave a groove in the bearing pocket of the
SC as it comes out.
4. Carefully tap 1/8" NPT threads into each hole. Use oil. Get them as deep
as you can without hitting the bearing.
5. Results of tapping:
6. After assembling the brass parts and zerk, carefully insert and thread it in
without cross-threading. Get it snug. Use a helper and put a good-quality
grease gun on the fitting:
7. Pump away until the bearing comes out. Sometimes they come out with
significant velocity. If your helper is your significant other, and you're horny,
lay a rag inside the SC to 'catch' the bearing. If your helper is anyone else,
aim it in their general direction, and you might get a good show. Of the 4 I've
done, only one came with velocity. The term for the aftermath is 'Gicky'. You
can see the first bearing starting to come out. This one DID have velocity, and
Linda, my trusty helper, got 'Gicky'.
8. The mess you have to clean out (all of it, use solvent) so you don't have a
pre-lubed bearing that wants to move around later:
9. Ready to press new bearings. Press them just below flush (to the same
depth as the original bearing depth):
10. You can get the bearings from www.rollingperformance.com for $20,
pre-greased (this is for a pair). A mighty good deal, considering they typically
ship 2-day express mail for an additional $5.95. Great peace of mind for the
price, and you don't have to buy the expensive grease seperately
I will move these pics to my server sometime soon, then link this post in a
Techinfo article so your grandchildren can learn how to do this.


Senior Member
Certified GM nut
Joined: Sep 2005
Posts: 2,009
Likes: 0
From: Home Sweet Home in New York
Quick Q: You're drilling out those compression holes. Is there any danger to leaving those holes open now that they're wider? Or is it not a problem leaving it that way?
Thread Starter
Junior Member
Posts like a Ricer Type-R
Joined: Aug 2002
Posts: 11
Likes: 13
There were holes there before. They serve no purpose during operation, and pose no problems. That area of the SC is not exposed to the outlet area nor bypass. It'* isolated in a 'dead pocket' by the SC outlet gasket.
Senior Member
Certified GM nut
Joined: Sep 2005
Posts: 2,009
Likes: 0
From: Home Sweet Home in New York
Originally Posted by willwren
There were holes there before. They serve no purpose during operation, and pose no problems. That area of the SC is not exposed to the outlet area nor bypass. It'* isolated in a 'dead pocket' by the SC outlet gasket.
Nother question: How do you tell when it'* time to replace the bearinngs?

Senior Member
True Car Nut
Joined: May 2003
Posts: 8,135
Likes: 1
From: Lethbridge, Alberta, _______Canada._______ West Coast Bonneville Fest ___05,06,07 Survivor___
a bearing press basically being a long metal tube thick enough to cover the bearing face so the bearing can be drove home? Or did you use something else. I will do this if i ever have to remove my SC again..
Thread Starter
Junior Member
Posts like a Ricer Type-R
Joined: Aug 2002
Posts: 11
Likes: 13
A bearing press being something like this:
http://www.buffalohydraulic.com/prod...ing_press.html
Then use custom stuff (cylindrical bar stock, sockets and extensions, whatever) to fit the bearing to be pressed.
A press like one on that page will be needed for the nosedrive disassembly and rebuild as well.
http://www.buffalohydraulic.com/prod...ing_press.html
Then use custom stuff (cylindrical bar stock, sockets and extensions, whatever) to fit the bearing to be pressed.
A press like one on that page will be needed for the nosedrive disassembly and rebuild as well.