When you click on links to various merchants on this site and make a purchase, this can result in this site earning a commission. Affiliate programs and affiliations include, but are not limited to, the eBay Partner Network.
Ordered a new ICM. I also ordered a new crank sensor because I�m not 100% sure it is the ICM. I�m in the diagnostic tree A-3 'engine cranks but doesn�t run'. Sometimes I�m getting a bunch of codes that mostly seem irrelevant. The car will start usually at cold start but then quits after a couple minutes, or less, and usually won�t start again for a little while. It was running rough and missing after being plowed in following a recent storm, then it didn�t want to start, then missing and stalling, then running fine with no miss but suddenly losing all power and not wanting to start again. I�m praying it is the ICM so I don�t have to pull the crank sensor. Don�t ask me why I didn�t replace the crank sensor when I replaced the balancer a few months ago. I�m also putting in a new alternator - it seems to be charging the battery but I couldn�t find the tab to full field it last night and the bearings are going (30 yr old alternator, 120K).
Fuse 11:
So after cranking and going through the diagnostic tree my battery was getting weak. I go to autozone to get my battery charged and they tell me it is not holding a charge. I�m 18 mos into a 36 mos warrantee. So I install the new battery and start testing electrical system and find there is a short in fuse/circuit 11. When I pulled that fuse the test light at negative battery terminal went out. I don�t really need the accessories except for the cigar lighter for 12v power for my scan tool and phone. So I�m thinking that I�ll just pop in the fuse when I need 12v at the cigar lighter, and in the meantime I�ll start tracing the short.
Details:
I�m guessing the short may be in the A/C because there is often an audible click somewhere near there or possibly near the glove box when reattaching/detaching the negative battery � doesn�t sound like a little relay. I�ll get a better listen on Wednesday, with/without the fuse, and will put the meter on the battery drain.
The A/C has not been used in years because it leaked and leaked again. Prior to that it was intentionally disabled for a year or two by a mechanic.
The radio was disconnected a while back because of steady static.
This chime gets dim/slow when it has been raining a lot�this has been going on for over three years. I wonder if this short goes away in the summer�
Any pointers, thoughts, comments, are very welcome. Thanks!
the chime is likely the green noise box thats in teh dash
they go wonky
I have a 90 olds 88 with a new one that only got 6 months of use before my car kicked its subframe mounts. but i would say confirm it fits first
Also you said static on radio, i would say go find your rear antenna mast and wiring. its probably not working right or nicked. Its in the trunk .
There are relays under your dash on pass side and on the firewall engine side, your clicking is normal but if its after connecting, investigate
you have a water leak in cabin? Grounds conditions?
This is not a ford, full field isnt a feature of the CS130. The testing should wait until its running right or you can take it to a part store. its simple cheap, and can be upgraded if you wanted but thats a wait for fixes thing.
Your crank sensor is old and old, that is fair it may be bad
Your ICM is also a piece of absolute dog **** from GM, I suggest dumping your plans to pay for a new one, upgrade to a Delphi type 2 ignition, you need a 91 series 1 ICM bracket and the harness from a series 1 or 2 for the ignition+cam+crank sensor. The reason I say this is the ground is in a better spot and you get the 3 coil ignition system of the later cars and the ICM is different too, but its better all around.
The clicking is in the front passenger side door. I'm still investigating - it is acting funny. I think it was going out if I operated the rear door and it slowly went out when I operated the front passenger door latch.. The draw at the door is probably unrelated to the other issues I mentioned.. Seems like the draw at the door is approx 1.35 amp. 3 amp when door is open. More to come regarding the circuit circus. probably picking up an inexpensive audible detector tomorrow.
I've more work to do about the stalling tomorrow. might look at the coils. pull some injectors at idle, probably pull those firewall relays. maybe hunt down the a/c diode. and poke at some other stuff.
I had considered switching the ICM a while ago but it seemed like the coils were becoming scarce. speaking of scarce, would you have any thoughts about where to find a headlamp assembly, grill?
No water in the cabin that I'm aware of but def could be some moisture in the doors, running boards
Thanks!
the green goo has been almost entirely eradicated except for a couple of inside corners on the connector.
New spades in there but I had to brush a bit of corrosion off of the copper wire before i crimped down the pins -- i think that was 6-12 months ago.
About the codes, I had a Memcal code pop up, and CAM Sensor, TPS sensor, EGR solenoid, YIKES -- which got me wondering about ECM replacements and what on earth "local programming required" means. But I might have to throw some sensors at it first.
Engine had sounded like it was starving before it would quit so I'm still concerned about the fuel supply and may return to that as I had only briefly monitored it.
Installed the new ICM and alternator and the stalling at idle has gone away -- but the idle is poor.
I don't know what is going on with that circuit but it seems to be OK as the draw is only present for a few moments and only at passenger door. I think the latch needs to be degunked.
I'll probably look at the Idle Air Control Valve and look again at the trouble shooting guide or poor idle in the manual.
Has anyone had any luck with the fuel injector cleaners that are added to the gas tank or is this a waste of time and I should just pull the injectors to clean them? If I recall correctly, removing the fuel rail is pain in the neck.
Triumph of the night was when the tapered fasteners for the coil pack were too long, and while I was looking for washers and the extra gasket I have to make up the difference -- I found the shorter bolts that I had saved from the original installation and they fit perfectly.
Thanks for the sounding board!
The idle speed has a procedure to set on the LN3.
I would verify you have the right IAC (pintle changed between gens) and that you set it to the proper length and then also cycled ignition proper for it to find its position
the coil upgrade /icm upgrade is a good idea... also the harness from the car you steal them from is a wise idea. The ground on the bracket is smart improvement. can be bought from dorman new.
also whats this about your door? Your door has a window motor in it, a lock switch, a window switch, the possibility of illuminated entry on the keyhole(maybe?), maybe a courtesy lamp, your mirror is prob electric, and a speaker is in there i think.
also under the passenger side dash there is a HVAC solenoid thingy that moves the blend door if you have eletronic HVAC and the thing often has issues it may be trying to turn endlessly
Throttle Minimum Air Position
Tools needed:
1. Torx driver # T-20
2. Paper Clip
3. Small Punch
4. Tachometer
GENERAL NOTE: The engine should be at normal operating temperature before performing any adjustments. Never rely on the dash mounted instruments for diagnostics and adjustments. The oil pressure and temperature gauges and the voltmeter and tachometer just aren't calibrated accurately enough for diagnosis, but are a relative indication for monitoring the vehicle while driving.
For this adjustment, the transmission will be in DRIVE while you're under the hood. You will need to securely set the parking brake and block the drive wheels. It would also be a good idea to have an assistant hold the service brake while you perform the adjustments.
In order to successfully complete the adjustment, the IAC air passages and pintle need to be clean. The throttle plates and bores need to be clean as well. If this is not the case, you'll need to remove the air cleaner from TBI engines or the intake air bellows from TPI engines to gain access to the area to be cleaned. A spray-type carburetor cleaner works well for this. Cleaning the IAC passages on a TPI/MAF engine will set a DTC, but we'll be clearing that later. With the engine idling, direct the spray cleaner in to the IAC air passages and around the throttle plates. Shut off the engine and continue cleaning the throttle plates by opening the throttle manually. Once everything is satisfactorily cleaned, replace the air bellows on TPI engines. Many times, this alone can solve IAC/idle speed problems.
If this doesn't solve the problem, you may need to remove and clean the IAC stepper motor. If the IAC appears to be clean and functioning properly, continue with the adjustment procedure.
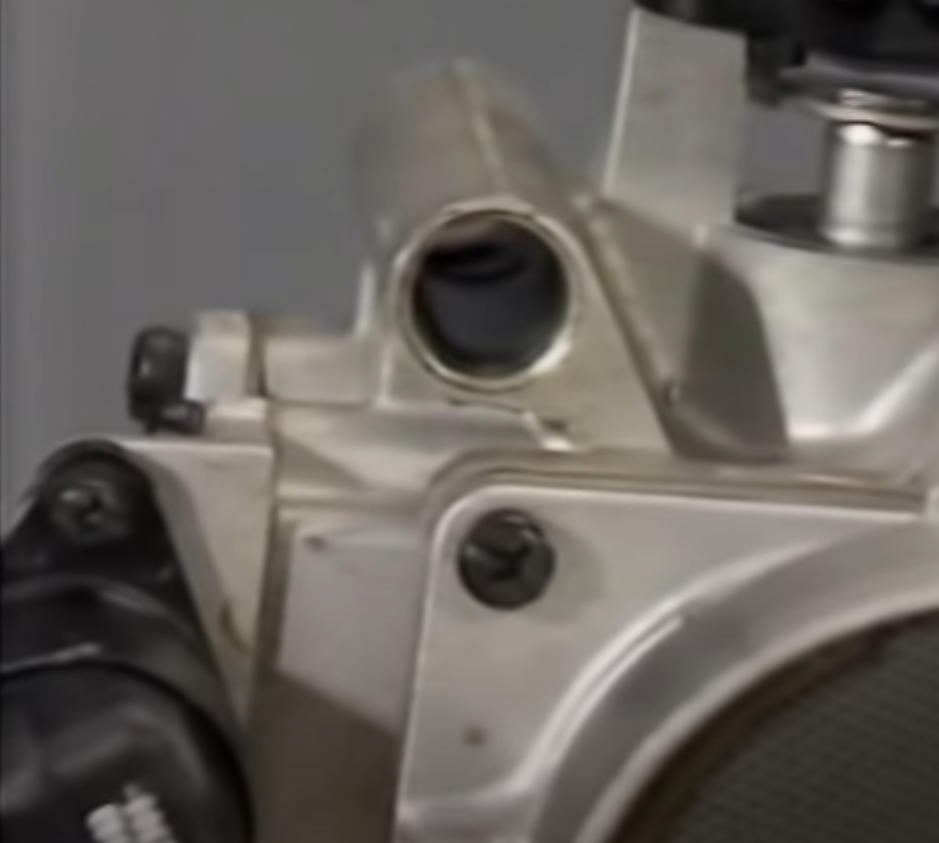
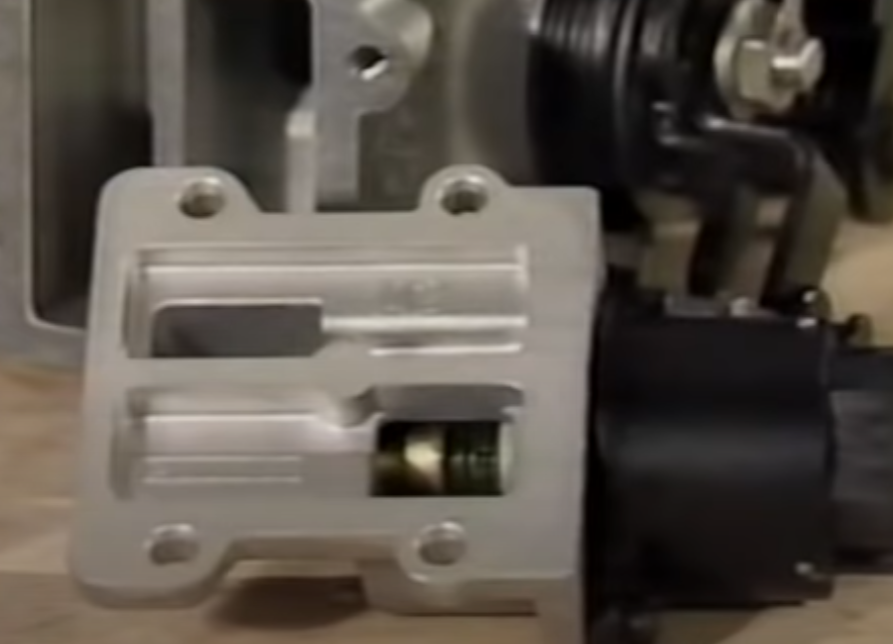
You can remove the IAC and service it. Remove the electrical connector from the IAC. Unscrew the IAC unit from the throttle body.
You can gently rock the pintle back and forth and allow the spring to extend it until it comes apart in your hands. Clean everything with lint-free cloths and a mild solvent. Harsh solvents can affect the insulation of the stepper motor coils. It'* generally the dirt and buildup on this worm shaft that causes sluggish IAC operation.
When the worm gear on the pintle shaft is clean and dry, apply one drop of clean light oil to the shaft and work the pintle back into the rack gears of the motor by the same rocking motion. It takes a while to get the pintle back into the worm gears, but you'll get it. It is important to get the pintle fully retracted into the housing so that the pintle is not forced against the gears when reinstalling the IAC unit in the throttle body.
While the IAC is out, clean the air passages in the throttle body. The orifice in the TB where the IAC resides is the seat that the IAC valve closes against, and it can accumulate a lot of carbon, dirt, and debris. The easy way to do this is with carburetor cleaner and a small stiff brush.
When everything is clean and dry, replace the gasket if it is damaged, apply a little anti-seize to the threads, and torque the IAC to the proper specs. (13 ft/lb for '85-'89 , 30 in/lb for 1990-on.) Proceed with setting the TPS and minimum air position.
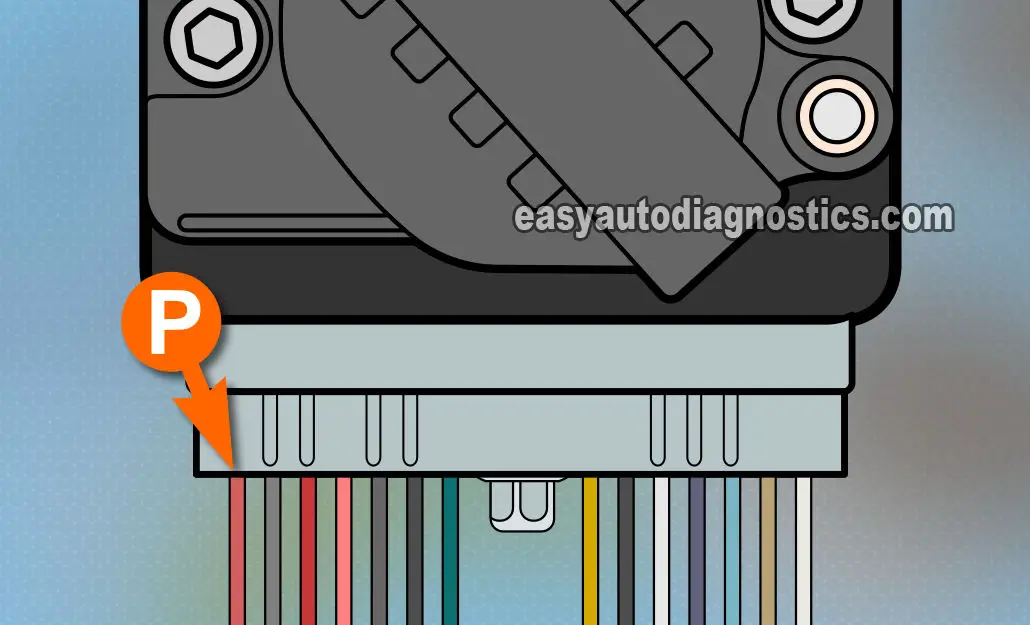
Locate the ALDL connector under your dash panel, in the driver'* footwell area. Remove the plastic trim cover (if it is still there).
Cut and form a paper clip into a "U" shape. Insert the clip ends into the ALDL in the 'A' and 'B' sockets.
Turn on the ignition, but don't start the engine. This will force the ECM into its diagnostic mode. Wait 30 seconds to allow the IAC pintle to fully extend. Under the hood, remove the electrical connector from the IAC, then turn off the ignition and remove the paper clip jumper from the ALDL. With the IAC pintle fully extended (closed) all idle air will be controlled by the position of the throttle plates. Some manuals indicate that the EST bypass connector should be disconnected for this procedure, while some make no mention of it. While timing is a factor in idle speed, the EST should only operate as a function of engine RPM, temperature, and detonation sensor inputs. To remove all doubt, disconnect the EST bypass connector is your car is so equipped. Some TBI and V-6 engines do not have this bypass connector, and therefore must be set with no regard to the EST system. The EST can be bypassed on some cars by grounding the diagnostic terminal at the ALDL and continuing with the procedure, but the fuel mixture will be skewed to the rich side, affecting idle speed as well. In any event, the minimum air position idle speed range is wide enough to allow for some variations. As always, it is best to consult your service manual for the exact procedure for your system.
Locate the Torx screw on the left side of the throttle body. It may be equipped with a protective metal cap from the factory. This was intended to discourage adjustment. If the cap is present, use a small punch to knock it out. Once the screw is accessible, start the engine and place the transmission in DRIVE. Adjust the throttle stop to obtain 400 RPM with the transmission in "DRIVE" on an automatic transmission car, 450 in neutral on a manual transmission car, rotating the Torx screw clockwise to raise speed and counter-clockwise to lower speed. Once the idle RPM is set, place the transmission in PARK, unplug the IAC, and turn off the engine then remove the jumper.
Re-connect the electrical connector onto the IAC. Start engine. Idle speed should be governed by the ECM at approximately 600-650 rpm in "DRIVE" (for unmodified cars). Idle speed in NEUTRAL or PARK is less significant, and will be higher.
Throttle Position Sensor (TPS)
Tools needed:
1. Digital Volt-Ohm-Meter (VOM)
2. Breakout jumper wires or probes (make your own)
3. AutoXray, Diacom, or similar scanner will replace the VOM and jumper wires.
Turn on ignition, but don't start the engine.
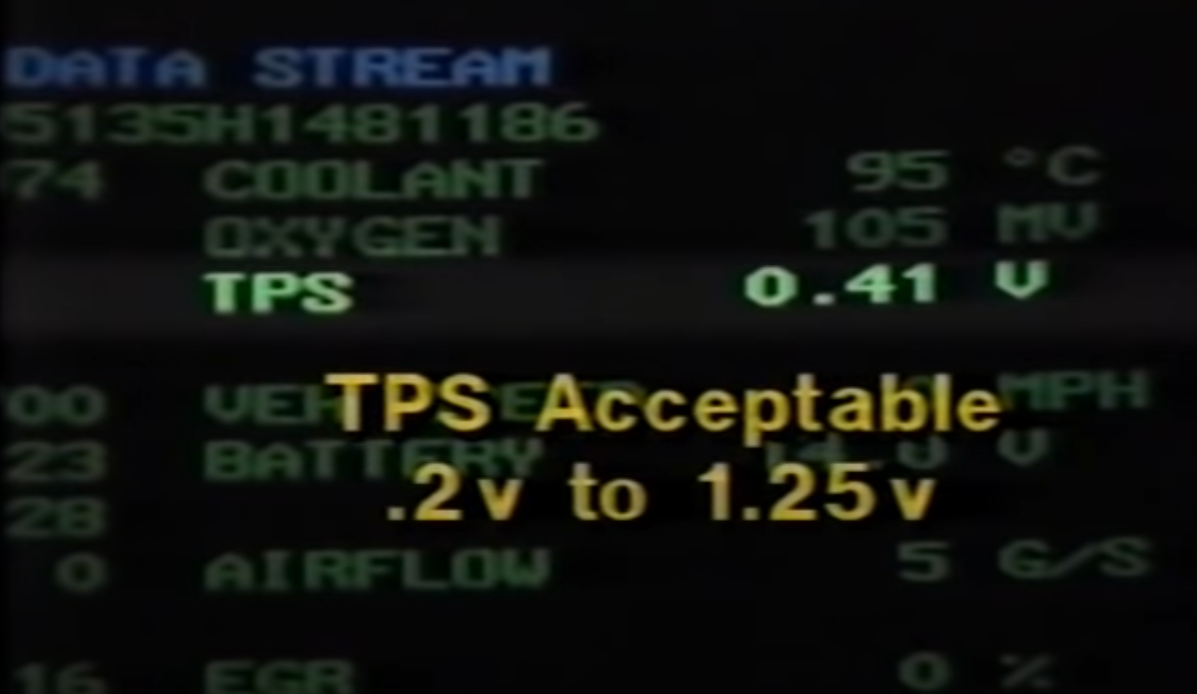
With a diagnostic scanner: plug in the scanner and read the TPS voltage. It should be 0.54Volts +/- 0.07 VDC.
Connect the VOM to the TPS electrical connector terminals �A' and �B'.
With a breakout jumper: Disconnect the electrical connector from the TPS. Install the breakout in-line, between the TPS and wiring harness connector. Connect the meter probes to terminals 'A' and 'B' on the connector. (�B' is the positive connection, �A' the signal ground, or negative.)
With probes: If you have very slender probes on your VOM, you can back-probe the TPS connector while it is attached to the TPS. If you have made probes of large dressmakers pins or a similar item, you can back-probe the connector as well. Connect the meter probes to terminals 'A' and 'B' on the connector.
Turn on the ignition to read the TPS output voltage at the idle position. The reading should be 0.54VDC +/- 0.07VDC. The ideal is the center of the range, 0.54VDC for a stock engine. To adjust the output voltage, loosen the two Torx screws holding the TPS to the throttle body, and slightly rotate the TPS up or down, reading the voltage until it comes into specification. Tighten screws. Using the throttle lever, rotate the throttle to WOT (wide open throttle). The TPS voltage should be over 4.0 volts. Close the throttle again, and then slowly open it to WOT, observing the voltage reading. It should increase progressively and in a linear fashion. If it sticks or jumps or falls off at all while doing this check, the TPS sensor may be failing and could be a cause of stumbling and driveability problems.
After achieving the desired setting, turn off the ignition switch. Remove all jumpers or the scanner and reconnect the TPS connector as required.
i bet your clicking in the door is a intermittent passenger door lock , i would open up the door or the switches and see if they have soda or something maybe shorting to power
also, I have the window switches to an 88 lesabre and my 90 olds so if you needed those I have good ones. but the door switches on the olds are good too for the locks but the latch is gunked up because first owner used DISH SOAP to lube it.
Thanks. Yeah, I had disconnected the door switch, the interior lights timer, cigar lighter, and a couple other things and there was still a temporary draw. I'm not sure if it was still clicking - probably. I'll revisit when I open up the driverside door and might also look at the horn and a/c relays at that time while trying to isolate other components.
Thanks for the guidance re the TPS and IAC. Looks like fun. I want to look at the TPS (disconnect it) to see if the ECM properly stores the code which it may not. I think the TPS is at 0.41 at idle but don't quote me. I'm reading that from a scanner that provides trouble codes, live data, and field service mode. I'll probably clean the bores there when I test/clean the injectors in a couple months.
Test drove the car the other day and made the rookie mistake of forgetting to connect the alternator control when I had installed it in the dark the other night. Anyway - i'm up and running now. Idle is good but could be more smooth,..I have a longterm tap (valve or lifter) that could be contributing to, or causing, this.
Thanks again.
your tps sounds fine? Is your TPS new? The old TPS were sketchy and are a wear part. The literal wiper wears on them internally,
I cant remember if the TPS on this gen also was sealed with o ring or the shafts themselves were sealed(butterfly shaft)
but if your car has a little unsmooth idle Id say suspect IAC, throttle body cleanliness, voltage drop at sensors/ecm, fuel pressure, injector deposits before you suspect things like engine wear, ECM or PROM issues, etc.
However, why you think its not storing codes right?
shut your car off, go un hook the camshaft sensor, make sure its not going to hit the belt unhooked, and go start your car
you should get a SERVICE ENGINE SOON or whatever buicks lamp said in 1990 after a couple seconds and it should be a code 41. It shouldnt run better but note any odd running you notice and restart the car a couple times and do a round the block drive, this is unorthodox but it would probably help you determine deposits on fuel injectors since the 1/6 chance of you getting a properly timed fuel injection sequence but those other times , if it has weird driveability between restarts, it may be deposits causing power balance oddity but your camsensor when hooked up has a set-behavior because of the proper timing of the sequence. oh yeah the unplug isnt that huge its just to make sure your ecm is getting a code and its determining it has that a few seconds into running (the code only needs the engine running 600 rpm and the crank pulses/signals read an amount to realize the cam signal should have occured by then, so not a key on kinda code.
That code and a coolant sensor are two easy ones to cause drama on your idle but maybe not set a code. IAT not so much because its not a dual range like the coolant one. IAC MAF o2(in closed loop) TP I presume would make codes almost always. who knows,
I know you have a magnavox style coil but I should have said i would suspect this before any of that other stuff besides a simple cleaning/spruce up stuff. definitely I would honestly replace your coil setup before doing injectors because a series 2 L67 coil setup would be strongest you can get for its reliability and spark strength with a modular coil setup (3 of 2 cylinders each vs 1 of 6 coils) and the weather dependant, spicy tempramental **** of your current one arent factors. plus the ICMs are better. I want to say 2000/2001 + are said to be better quality but overall you wouldnt notice but I would just go to a junkyard and find a low mileage L67 (or series 3 supercharged, l2..7? I forget) which is a rarer engine by far tho, either way find their low mileage car and take the harness which goes to the Cam sensor, crank sensor, the ICM, The 3 coils, if the plugs were OE I would take them only if in great condition, ignore them otherwise the lengths are different and different firing order. m and you do not need the bracket since you need to either change your engine bracket or find an adapter/make one to put it on your LN3 pad.
Anyway some things to throw at you
This wire is not present on your car and it is the one present onthe later cars. It grounds the ICM. The ICM grounds to the stud to the head under the bracket on the cars you would look for the coils/icm from, uses an eyelet. small wire. Im not sure if your ICM can add a pin to the connector, I doubt it, but if it could adding that would be helpful maybe. But you should ditch your dumn coil lol
you can google the swap if you decide to heed my suggestion. But the harness from the car if its low mileage is huge, the harnesses on your or my old cars are not as nicely done as the later series 2 and they arent available to be bought new(dorman makes it new for s2)
The wires/condition of the harness on my car is iffy looking so I imagine yours is getting there maybe. Those references and stuff are important signals to your substandard ICM with questionable ground integrity. Do you see where i am going here?
if you upgrade to the new coils you can use .06 and iridium plugs
also, not sure on the exact plug number becaue the threads, taper, distance into engine ,etc may be different but series 2 engines us a 41-101 ac delco iridium, gapped at .060 you cant adjust them. If your plug doesnt match the specs of a 41-101 then I would continue to use copper and your choice to gap to .060 for hotter spark or leave at .050 for longer reliable probably hotter technically since better coils, but reliable and better managed for sure. L32 engines have a good coil and ICM but the difference is the coils are less superb for the weaker engines (Which still are leagues ahead of the Ln3) so you shouldnt give up searrch if you cant find a supercharged 3800 lol!
Also if you bleed money you can get the ICM and Coil new just $$ from GM lol. last for the rest of the cars life probably tho.
also a heated oxygen sensor upgrade would help your car get to proper temp to do closed loop. do you have any exhaust leaks or a missing cat converter? An unheated o2 without any converter, a obstructed air reference line on the O2, a old/dirty/poisoned o2, and a o2 with air leaving before the sensor at a leak are all things that could screw with closed loop behavior or cause the engine to run open loop longer/more(rich, deposits, stumbly, lean, lope, or other things could manifest)
================================================== ================================================== =======================
onward, you say you have live data. Exce-*******-llent. Can you give us a picture of your live data at warm idle and maybe cold startup if you have a short list of data(so not a lot of pics, your discretion)
I also want to point out there was a rare issue with 3800s installed in GMs for sure buicks but it was a LN3 and a LG3 (Vin C and Vin 1) that coolant could quite literally be pushed through the insulation of the wire of the coolant sensor , all the way to the ECM, and cause issues on the ECM and possibly just ruin them. You would only really have reason to question this if your ECM had a lot of corrosion or strange issues on the connector cavity/plugs id think. Its a slow process since its a small orifice and a long distance.
the fix is to clean any wires, validate the continuinty of the wires, terminals, connectors, replace the sensor and
So your live data, whats the ECM say about voltage?
because I want you to test voltage
here as well. if you have a long cable for your tool(Tech 1???) you can stand at the engine if you carefully prob the terminal (please dont ruin the connector, im sure you know this tho!)
whats your variance ? Remember the ECM updates the live data once a second I believe, not like newer cars. Whats battery also say, key on all three places shouldnt be much off. also I want you to observe your IAC counts at idle warm you shouldnt see it shooting up and pulling back wildly. I
====================
There is a coolant passage on the TB that is known an issue to 3800 from later years but if you have an issue or something wore maybe its a problem, i wouldnt be a good answer to say how likely this is on these era engines but thought to mention.(that hole)
is your TB maf screen intact? Is your TB gasket good? Clean MAF? I have a 90 and 88 MAF(both worked, different PNs tho) and a good screen(unobtanium but necessary i think) The MAF heats a wire to 75 degrees C more than the IAT. if your air is mixed with hot engine bay air, its warmer, maybe more turbulent or not the way it was calibrated to read air flow, any deposits on the sensor, age itself, its going to be off on the scenario it believes to be true and it may be deficient at being able to read even if it wasnt off on the scenario provided to it
also did NOT know this but the IAC appears to be on a removeable and gasketed passage ????
I know 90 ln3 have an improved throttle body but i dont remember what the 88 I stole parts from looked like compared to mine well enough to say how different but it may mean a TB pull off to clean and have easy removal of the TPS or whatever is shoved under it.. IAC? here i posted a pic of mine because I needed a reference. I pointed out things you could have issues with that make it rouger at idle or just to check. The PCV? GOODLUCK HAHA THAT IS HELL but you can do it easier with the fuel rail taken off and the wiring moved aside. I recommend getting the grommet on the intake and the..well..i think they both go on the intake but the room to work is hell and they are both available from Dorman help at my local autozone but I got them online(ones long)
The colors are just to not be a sea of the same. the orange down in the lower right are to those things on my car but yours positions things differently because this was a front stand with hood open like normal cars yours is opens forward so you may well have them different placements. The one under above the TB i put is that there isa vac line that runs and snakes down the back there on mine which I believe feeds the HVAC and vacuum can on the firewall which if you dont remember seeing one it may be under the cover with relays and stuff. Small line on mine. You also have a vacuum line running to your stop switch for the cruise functions since you have vacuum cruise. also there is a check valve in the vac lines between the evap and cruise or perhaps the trans cruise idk which atm but it was presumably because you wouldnt want gas going to the cruise (vapor) and that means there are check valves / or junctions at play you want to make sure are ok since that could be a leak to something. Also, you have a trans modulator. The vacuum diaphram can go bad and your car starts drinking dexron II (if its original fluid) or hopefully dex 3 if someone was smart in the past.
this should be replaced if you have no idea how old it is.
Fuel pressure reg, i think you said you replaced the guts but consider service if not, also the vac line on mine is snaked to the tb with the dots there, easy to not see an issue
also consider running the fuel line into a container with the fuel filter off(replace that too?) and some air shot both ways or a new filter put on and then use fuel to push or both. the stuff that could be in your tank and make it past had lots of time to bit by bit go past a filter maybe. rusty tank shouldnt be discounted as well as the fuel sender assembly could have a plugged pulse dampener/socks or whatever ruptured is the word i was looking for maybe.
ANy arrow to a rubber containing piece may be a gasket or seal if not a grommet/vacuum line ive mentioned already. Valve covers, dipstick o ring, oil cap o ring, i believe the oil cap also has a vent possibly in it with a baffle but that may be later cars. TB gaskets as said already, those rubber things on the air box to tb could have a leak and that would be worse at idle than open since it makes the air turbulent/screwy with the MAF (intake air temp would be misleading to the ECM)
also what do intake (air charge) and coolant temp say at key on? at warm? Any thing unusual you notice on their live data?
also if you have your ECM out before, you know where it is, could you pull the cover and take a pic of your PROM and CAREFULLY make sure its seated (discharge static before) and also the VIN on the front of the ECM and could you post that too, if the VIN is different could you type your VIN? If you dont trust me i can guide you how to use the GM website to check the calibrations/prom usage and anything that could be improper there
The part number on the ECM is next to the VIN I think but if not include that if you can. ALso a tap test at warm idle , discharged static. you just gentle with fingers, dont even tap with a stiff finger, allow them to gently tap the case of the ECM while running and come to a stop so you arent striking a lot of force, a light tap (cant stress enough) is enough for this test. wiggle test at the ECM is also an old good thing to try.
88-90 ecms have a decently frequent fail rate and not to alert you but mine had failed and frankly the diagnostics were confusing as a minor with their first car and no experience but I just happened to realize the ECM sitting on my seat when I thought I had replaced the ECM and put my PROM into the 88 lesabre ECM what I had actually done was put a 88 PROM into my ECM, to hold it, but i went and put IT back onto my car. Fun fact, the 88 calibrations dont let the car run well (TB changes) but the problems were unchanged, and I was sad, but I was like oopsie and instead put the ECM from the 88 lesabre with MY prom and then my car was back to OK and no more coolant temp codes, stalls, issues. etc. but no quad driver codes, no PROM codes, and the car still worked. Oh and there is a difference in transmission behavior with cruise/egr interactions between 88 and 90. Anyway, I still have the old ECM and the one in my 90 is good, so if you get to a wall after trying more common sense things, or we determine you have some incorrect PROM or ECM, i could help. There is a good chance a 90 lesabre/park avenue uses the same PROM ID as a 90 88/98 or bonneville and we can verify those things if we get that far. Also do you have a Driver info center? Just curious. This era ECM has poor self-diagnostics for failures and based on my experience I would say its not smart to assume it but its also not unrealistic to question it. KISS, fortunately remans arent expensive and you only have to transfer a chip and GM has a helpful AF website to know the PROM and ECM PNs that would be applicable
found this btw youre good aluminum oxide is a natural formation of a mineral when aluminum reacts with the environment around it like air and unlike aluminum it does not conduct heat or electricity very well at all. Its pretty **** at it. And its better to say its insulator for heat especially. It also isnt very distinct looking like rust/steel and iron. It can blend quite well but its usually flat looking vs reflective of aluminum. this can buildup on aluminum that your car has **** bolted/studed to for grounds or places copper/brass arent used like the ICM bracket that your ICM grounds to with the surface of the pad. Or possibly a panel or sheet on the interior your ECM may have grounds or somewhere for your IP or your many connections with aluminum, just saying this because alternators and GM side posts and ICM brackets/grounds and interior grounds from GM are notorious for this problem for many years once they are old enough or connections get exposed etc. Grounds to the alternator especially can be tricky because dirty grounds effect things in the shared path that rely on small readings like your ICM Bolted to the same *** bracket as your ICM bolted to the head, and the alternator casing is also prone to the issue, and that alone easily could interact with your problem because your alternators charging could be the only iregular problem and all your sensors depend on the consistency of the supplied energy and a poorly grounded alternator can do that as well as a large amount of swings in the alternators ground path current pulling the small ones from the ICM or other sensor grounded to the block affecting engine management. Ground cables also tend to be undersized for the job from GM. The block grounds to the battery through a insufficient connection known as the side post and they also put a hat on it that hides the ugly Under it that causes ugly stuff. Also the ECM uses a ground path through the chassis which comes from the fender to your battery. an ECM which cant properly ground consistently or has it pulled/high and low from an engine poorly grounded to the battery would also not run right esp lower speeds like idle. this is what i mean also your alternator may have an unused ground spot i just cant remember if that was on the bottom or accessible based on the orientation of the thing. The L is your only wire i do believe . If you have an F, thats to the ECM heres a pic of what i mean by the ground fluctuations. Funny, your passenger door is making a noise you think. Your ECM is also nearby, both use a chassis ground I think... Anyway, the window motor is the draw that is a huge amp draw, then it starting and stopping is a lot of current that uses a ground path that may happen to also be where a ECM has one. this would throw TPS off, as example. (run diff)
Also I just realized you said you have a temporary draw.. uh... Is it consistent timed? Because thats actually going to be normal, I do believe that my car would even make a click or something, most computered cars especially if you have a MALL module/air ride/auto hvac/etc have a specified draw at key off, thenone once the car is "sleeping"" which varies. i would just make sure you arent talking about 5 hours later vs 5 minutes. also theater dimming/illuminated entry could be at play if youre using a door