
Help! engine noise


Senior Member
Posts like a Turbo
Joined: Sep 2006
Posts: 417
Likes: 0
From: Tampa, Florida, USA

Originally Posted by Woody_02SilverSE
Sapphire, could it be the harmonic balancer slapping? They say to grab the belt and tug it both directions to see if there'* rotary motion of the balancer pulley relative to the crank, and there would be if its bad.

Thread Starter
Member
Posts like a V-Tak
Joined: Mar 2004
Posts: 45
Likes: 0
From: grand rapids MI.
I think the problem is the lim gasket. because i have antifreeze in my oil and coolant resevoir is empty and that noise im hearing is probably lifter with antifreeze in them. will tear down tuesday and post after that. if anyone has a detailed parts list and detailed instruction. i would really appreciate it. thanks in advance.

RIP
True Car Nut
Joined: Jul 2004
Posts: 5,656
Likes: 4
From: Grand Rapids, Mi
Get the GM aluminum framed lower intake manifold gasket from the dealer. There have been a few part number changes for that gasket. For the supercharger and TB gaskets, get the Felpro. If you get the */c gasket at the dealer, you'll have to purchase the O ring separately. They come with the Felpro kit.
Go here for the LIMreplacement procedure.
For the supercharger...
Caution: Relieve the fuel system pressure before servicing fuel system components in order to reduce the risk of fire and personal injury.
After relieving the system pressure, a small amount of fuel may be released when servicing the fuel lines or connections. In order to reduce the chance of personal injury, cover the regulator and the fuel line fittings with a shop towel before disconnecting. This will catch any fuel that may leak out. Place the towel in an approved container when the disconnection is complete.
Notice: Servicing of the supercharger unit itself is limited to replacement only. No attempt should be made to disassemble the supercharger, as parts damage may result.
1. Disconnect the battery negative cable.
2. Remove the fuel injector sight shield.
3. Remove the supercharger belt.
4. Disconnect the right side spark plug wires from the ignition module and set aside.
5. Remove the generator brace.
6. Remove the MAP sensor bracket.
7. Remove the fuel rail mounting bolts and the fuel rail with the injectors.
8. Remove the boost control solenoid.
9. Remove the nuts that retain the throttle body to the supercharger.
10. Remove the supercharger bolts.
11. Remove the supercharger from the intake manifold.
12. Clean and inspect the supercharger. Refer to
Supercharger Clean and Inspect.
13. Clean the lower intake manifold mating surface.
Installation Procedure
Important: Do not use any sealer on the gasket.
1. Install the new supercharger intake gasket.
2. Position the supercharger to the intake manifold.
3. Install the supercharger retaining bolts.
o Tighten the bolts to 23 Nm (17 ft. lbs.) .
4. Install the MAP sensor bracket.
5. Install the throttle body to the supercharger.
o Tighten the throttle body bolts to 10 Nm (89 inch lbs.) .
6. Install the boost control solenoid.
7. Install the fuel rail.
8. Install the generator brace. Refer to Generator Replacement in Starting and Charging.
9. Connect the right side spark plug wires to the ignition module.
10. Install the supercharger belt.
11. Install the fuel injector sight shield.
12. Connect the battery negative cable.
Thread Starter
Member
Posts like a V-Tak
Joined: Mar 2004
Posts: 45
Likes: 0
From: grand rapids MI.
Here'* the verdict got engine tore down today and because i knew #3 cylinder was having problems i decided to go ahead and remove the head just to check the head gasket. glad i did number 3 piston broken but still functioning. I checked the walls not a scratch on them. but now i know the sorce of the tapping. will I'll let you guyz no how that goes. after i find a piston. do you think that trying to compress fluid is what caused this and where the hell are the little pieces of piston? no damage to the head or valves or cylinder wall and the rings are still setted. I'm confused 

Senior Member
Posts like a 4 Banger
Joined: Jan 2007
Posts: 148
Likes: 0
From: Just outside of Syracuse NY
If you have been swapping oil and antifreeze you may have spun the connecting rod bearing which would allow the piston to contact the head and sparkplug. I have had it happen to me on a previous car. If you have the ability to check it then you should cause putting it back together with a spun bearing will only cause it to happen again.
Thread Starter
Member
Posts like a V-Tak
Joined: Mar 2004
Posts: 45
Likes: 0
From: grand rapids MI.
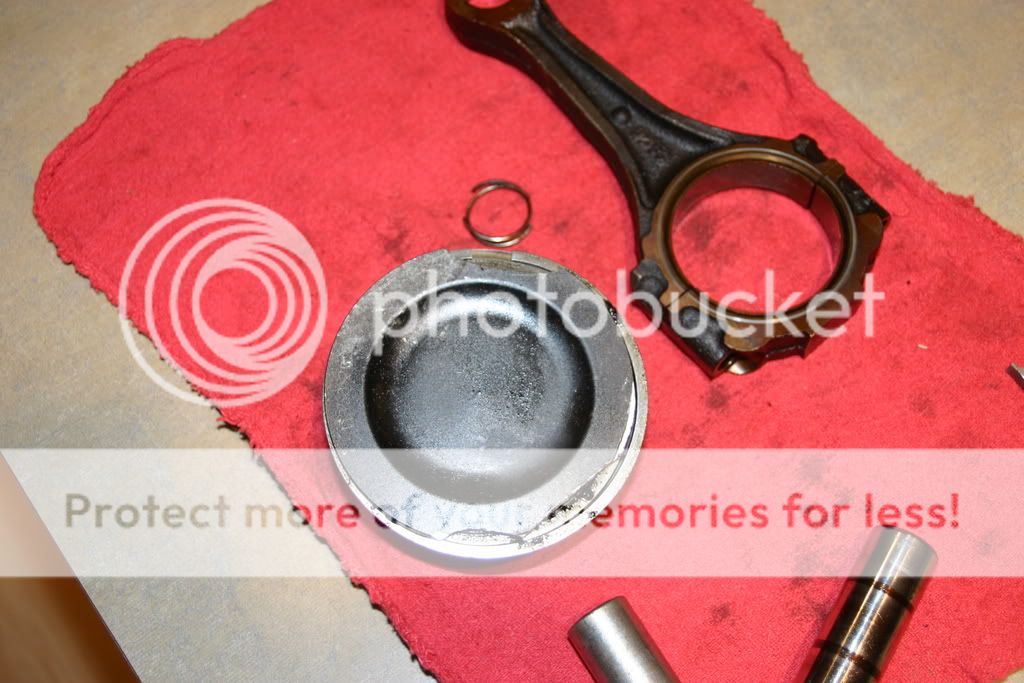
Well got the piston out the bearings are in good shape but the piston skirt in in the oil pan. [/img]http://i165.photobucket.com/albums/u64/bigdawg56/everything095.jpg [img]https://i165.photobucket.com/albums/u64/bigdawg56/everything094.jpg
compressing liquid damage :?: their was not very much antifreeze in the oil and the piston rings were still sealing. weird i no [/img]
compressing liquid damage :?: their was not very much antifreeze in the oil and the piston rings were still sealing. weird i no [/img]
 [/img]