
FIX: Sunroof Drain Leaking Into Interior


Thread Starter
Senior Member
Posts like a Turbo
Joined: Jul 2005
Posts: 239
Likes: 1
From: Palatine, IL

Many of us 00+ owner have experienced the dreaded water under the carpet problem. I determined I had the problem by pouring water down the driver'* side drain hole in the sunroof and listening as all the water trickled down onto the floorpan. 
I tried fixing the stock sunroof drain but gave up after an hour if trying to get to it from under the dash and in the wheelwell.
Anyway, I decided to try an alternate method. I'm happy to say it worked and costed about $6 bucks and 20 minutes of my time.
Parts and Tools List
* Drill with a 3/8" drill bit
* Razor cutters/Scissors
* Clear RTV Silicone
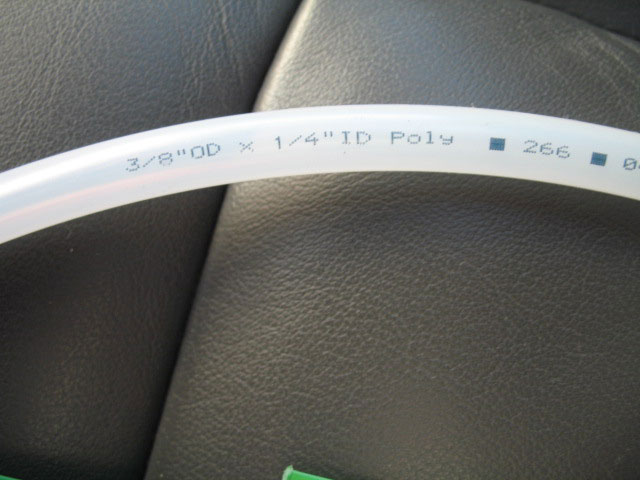
* 4-5 feet of 3/8"OD/1/4" ID poly tubing (5/16"ID preferred)
*1/4 Barb fitting (5/16" preferred)


Step1: Remove the drivers-side A-pillar, vent panel on the side of the dash and rocker panel trim plate.
Step 2: Pull back the carpet and find the emergency brake grommet on the floor pan. Partially pull the grommet from the floor pan. Checking for clearance, drill a 3/8" hole through the grommet. This is where the new tubing will come into the interior from under the car.

Step 3: Looking under the car and find the existing hole that is closest to the rocker panel. (You will see the e-brake cable coming out and running to the rear of the car.)

Step 4: Feed the tubing up through the hole and into the opening in the floor pan. (The tubing will come up from the left side of the floor pan:

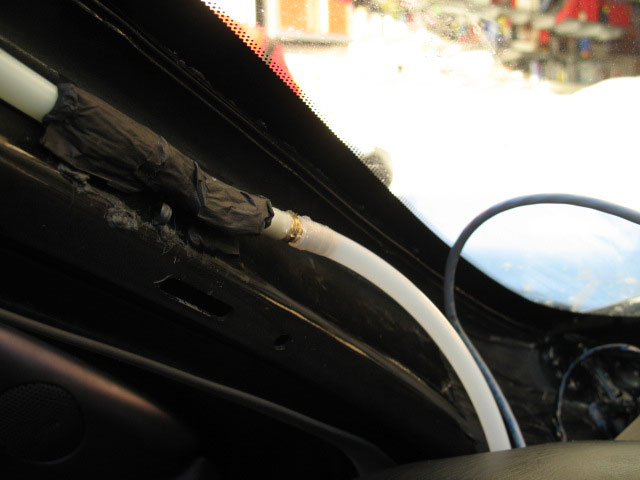
Step 5: Feed the tubing through the hole in the grommet and feed it up behind the black rubber mat, through the dash, up to the opening by the A-pillar area:


Step 6: Cut the existing drain tube above the black connector. You can leave the tubing that runs into the dash or remove it. I removed it.

Step 7: Cut the new piece of tubing to length to butt against the stock tubing coming down from the headliner. Insert the new barb connector into the new tubing. (Use some grease or vasaline to make the bard slide into the tubing.)
Step 8 (skip if you have 5/15" ID tubing): This is where I realized that the stock tubing was 5/16" ID tubing. Since I had 1/4" tubing and 1/4" barbed connector, I decided that the bard going into the stock tubing would be coated with clear RTV.

Step 9: Insert the other barbed end into the stock drain.

Step 10: Pour a couple ounces of water down the sunroof drain and check for leaks at the fitting. You should have a small puddle under the car.
Step 11: Back under the car, cut the tubing to length and on an angle.

Step 12: Push the e-brake grommet back into the floorpan opening, pull back the carpet, replace the A-pillar, side vent panel and rocker panel trim piece. You're done!
I hope this was helpful.
I tried fixing the stock sunroof drain but gave up after an hour if trying to get to it from under the dash and in the wheelwell.
Anyway, I decided to try an alternate method. I'm happy to say it worked and costed about $6 bucks and 20 minutes of my time.
Parts and Tools List
* Drill with a 3/8" drill bit
* Razor cutters/Scissors
* Clear RTV Silicone
* 4-5 feet of 3/8"OD/1/4" ID poly tubing (5/16"ID preferred)
*1/4 Barb fitting (5/16" preferred)
Step1: Remove the drivers-side A-pillar, vent panel on the side of the dash and rocker panel trim plate.
Step 2: Pull back the carpet and find the emergency brake grommet on the floor pan. Partially pull the grommet from the floor pan. Checking for clearance, drill a 3/8" hole through the grommet. This is where the new tubing will come into the interior from under the car.
Step 3: Looking under the car and find the existing hole that is closest to the rocker panel. (You will see the e-brake cable coming out and running to the rear of the car.)
Step 4: Feed the tubing up through the hole and into the opening in the floor pan. (The tubing will come up from the left side of the floor pan:
Step 5: Feed the tubing through the hole in the grommet and feed it up behind the black rubber mat, through the dash, up to the opening by the A-pillar area:
Step 6: Cut the existing drain tube above the black connector. You can leave the tubing that runs into the dash or remove it. I removed it.
Step 7: Cut the new piece of tubing to length to butt against the stock tubing coming down from the headliner. Insert the new barb connector into the new tubing. (Use some grease or vasaline to make the bard slide into the tubing.)
Step 8 (skip if you have 5/15" ID tubing): This is where I realized that the stock tubing was 5/16" ID tubing. Since I had 1/4" tubing and 1/4" barbed connector, I decided that the bard going into the stock tubing would be coated with clear RTV.
Step 9: Insert the other barbed end into the stock drain.
Step 10: Pour a couple ounces of water down the sunroof drain and check for leaks at the fitting. You should have a small puddle under the car.
Step 11: Back under the car, cut the tubing to length and on an angle.
Step 12: Push the e-brake grommet back into the floorpan opening, pull back the carpet, replace the A-pillar, side vent panel and rocker panel trim piece. You're done!
I hope this was helpful.

Senior Member
True Car Nut
Joined: Jul 2004
Posts: 7,545
Likes: 1
From: Twin Falls, Idaho
Easily the BEST how to guide here.
Picture wise and explaining the processes.
Have you considered a job designing gm cars anytime in the near future? i think they need you.
Picture wise and explaining the processes.
Have you considered a job designing gm cars anytime in the near future? i think they need you.


Senior Member
Posts like a Corvette
Joined: Nov 2005
Posts: 1,201
Likes: 1
From: Hamilton, Ontario , Canada
For those of us that have,or have had this problem, may find that this is a very good alternate fix as I know I spent a good 3 days of frustration trying to repair my drivers side drain.When u take in account of taking out seats , carpet , finding leak and going crazy trying to feed hose thru (which i spent a whole day on) ,this is a great time saver. Great pics Tommy, if this was available when I did mine I probably would have done it.
Thread Starter
Senior Member
Posts like a Turbo
Joined: Jul 2005
Posts: 239
Likes: 1
From: Palatine, IL
Well it'* been a week, one car wash and two rain showers and my drivers side floor pan is bone dry. 
Feels good to not have to do my weekly ritual of replacing bunches of paper towels under the carpet anymore.
Feels good to not have to do my weekly ritual of replacing bunches of paper towels under the carpet anymore.
Thread Starter
Senior Member
Posts like a Turbo
Joined: Jul 2005
Posts: 239
Likes: 1
From: Palatine, IL
Many of us 00+ owner have experienced the dreaded water under the carpet problem. I determined I had the problem by pouring water down the driver'* side drain hole in the sunroof and listening as all the water trickled down onto the floorpan.
I tried fixing the stock sunroof drain but gave up after an hour if trying to get to it from under the dash and in the wheelwell.
Anyway, I decided to try an alternate method. I'm happy to say it worked and costed about $6 bucks and 20 minutes of my time.
Parts and Tools List
* Drill with a 3/8" drill bit
* Razor cutters/Scissors
* Clear RTV Silicone
* 4-5 feet of 3/8"OD/1/4" ID poly tubing (5/16"ID preferred)
*1/4 Barb fitting (5/16" preferred)

Step1: Remove the drivers-side A-pillar, vent panel on the side of the dash and rocker panel trim plate.
Step 2: Pull back the carpet and find the emergency brake grommet on the floor pan. Partially pull the grommet from the floor pan. Checking for clearance, drill a 3/8" hole through the grommet. This is where the new tubing will come into the interior from under the car.

Step 3: Looking under the car and find the existing hole that is closest to the rocker panel. (You will see the e-brake cable coming out and running to the rear of the car.)

Step 4: Feed the tubing up through the hole and into the opening in the floor pan. (The tubing will come up from the left side of the floor pan:

Step 5: Feed the tubing through the hole in the grommet and feed it up behind the black rubber mat, through the dash, up to the opening by the A-pillar area:


Step 6: Cut the existing drain tube above the black connector. You can leave the tubing that runs into the dash or remove it. I removed it.

Step 7: Cut the new piece of tubing to length to butt against the stock tubing coming down from the headliner. Insert the new barb connector into the new tubing. (Use some grease or vasaline to make the bard slide into the tubing.)
Step 8 (skip if you have 5/15" ID tubing): This is where I realized that the stock tubing was 5/16" ID tubing. Since I had 1/4" tubing and 1/4" barbed connector, I decided that the bard going into the stock tubing would be coated with clear RTV.
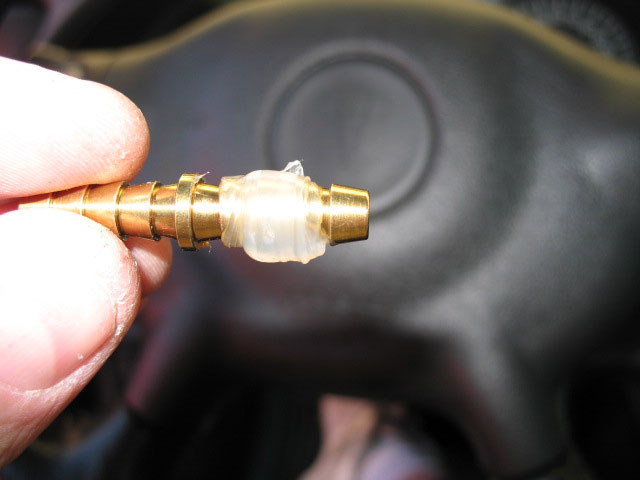
Step 9: Insert the other barbed end into the stock drain.
Step 10: Pour a couple ounces of water down the sunroof drain and check for leaks at the fitting. You should have a small puddle under the car.
Step 11: Back under the car, cut the tubing to length and on an angle.

Step 12: Push the e-brake grommet back into the floorpan opening, pull back the carpet, replace the A-pillar, side vent panel and rocker panel trim piece. You're done!
I hope this was helpful.
I tried fixing the stock sunroof drain but gave up after an hour if trying to get to it from under the dash and in the wheelwell.
Anyway, I decided to try an alternate method. I'm happy to say it worked and costed about $6 bucks and 20 minutes of my time.
Parts and Tools List
* Drill with a 3/8" drill bit
* Razor cutters/Scissors
* Clear RTV Silicone
* 4-5 feet of 3/8"OD/1/4" ID poly tubing (5/16"ID preferred)
*1/4 Barb fitting (5/16" preferred)
Step1: Remove the drivers-side A-pillar, vent panel on the side of the dash and rocker panel trim plate.
Step 2: Pull back the carpet and find the emergency brake grommet on the floor pan. Partially pull the grommet from the floor pan. Checking for clearance, drill a 3/8" hole through the grommet. This is where the new tubing will come into the interior from under the car.
Step 3: Looking under the car and find the existing hole that is closest to the rocker panel. (You will see the e-brake cable coming out and running to the rear of the car.)
Step 4: Feed the tubing up through the hole and into the opening in the floor pan. (The tubing will come up from the left side of the floor pan:
Step 5: Feed the tubing through the hole in the grommet and feed it up behind the black rubber mat, through the dash, up to the opening by the A-pillar area:
Step 6: Cut the existing drain tube above the black connector. You can leave the tubing that runs into the dash or remove it. I removed it.
Step 7: Cut the new piece of tubing to length to butt against the stock tubing coming down from the headliner. Insert the new barb connector into the new tubing. (Use some grease or vasaline to make the bard slide into the tubing.)
Step 8 (skip if you have 5/15" ID tubing): This is where I realized that the stock tubing was 5/16" ID tubing. Since I had 1/4" tubing and 1/4" barbed connector, I decided that the bard going into the stock tubing would be coated with clear RTV.
Step 9: Insert the other barbed end into the stock drain.
Step 10: Pour a couple ounces of water down the sunroof drain and check for leaks at the fitting. You should have a small puddle under the car.
Step 11: Back under the car, cut the tubing to length and on an angle.
Step 12: Push the e-brake grommet back into the floorpan opening, pull back the carpet, replace the A-pillar, side vent panel and rocker panel trim piece. You're done!
I hope this was helpful.

Thread
Thread Starter
Forum
Replies
Last Post
Berlinetta92
Your Ride: GM Pictures & Videos
10
Sep 7, 2004 10:47 AM