
Low-cost EGR pipe and sleeve for '95-'03 L36


Thread Starter
Senior Member
True Car Nut
Joined: Mar 2004
Posts: 3,066
Likes: 10
From: Ames, Iowa

Application: 1995 - 2003 Series II normally aspirated (L36) Vin K 3800 V6 engines
A procedure is described for modifying the stovepipe and EGR passage in the plastic upper manifold in '95 - '03 L36 engines. This modification is based on two principles. An air gap is created to reduce heat transfer by conduction between the hot EGR pipe and the plastic bore of the upper intake manifold. And, a heat shield in the form of a stainless steel sleeve is bonded to the plastic bore to reflect radiant heat, and to disperse and conduct absorbed heat, further reducing heat stress on the plastic upper manifold. The work is done in conjunction with changing the lower intake manifold gaskets which commonly deteriorate and fail causing harmful internal coolant leaks. A 180 F thermostat is also recommended to extend the life of the plastic gaskets.
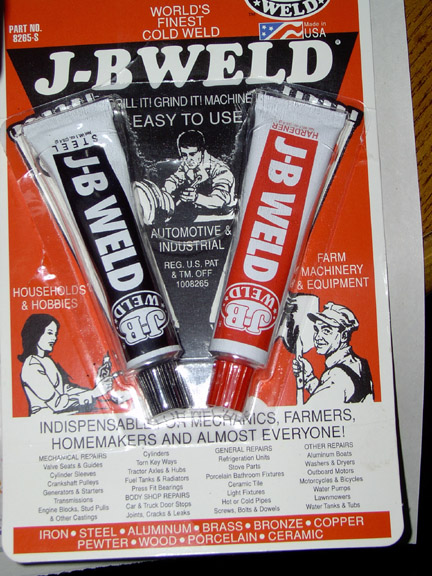
This modification does not require special tools or know-how, but will take time and patience to complete. The installation procedure requires that the upper and lower intake manifold be (reasonably) clean and dry and removed from the car. The JB Weld used to bond the sleeve into the upper manifold will need to cure overnight before it can be placed back into service.
DISCLAIMER: This modification has no long-term testing to prove that it will perform as we hope it will. Any time you modify your engine, you are taking a chance that some unforeseen damage or decrease in performance or reliability may result. If you choose to perform this modification, please understand that you do so at your own risk.
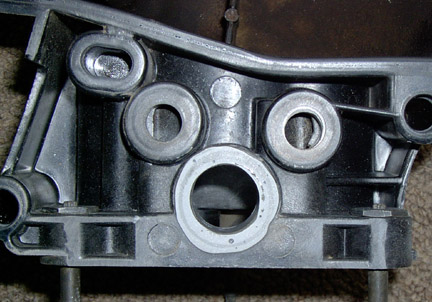
Background: The original EGR passage in a new L36 upper intake manifold (plenum) is just a few thousandths larger than 3/4". From '95 to early '99, GM used a 3/4"OD (outside diameter) stainless steel EGR stovepipe that fit closely to the plastic bore in the upper manifold and carried the hot exhaust gas from the aluminum lower intake manifold into the intake air stream just behind the throttle body. Over time, heat from the EGR pipe deteriorates the plastic walls of nearby coolant passages and sealing surfaces resulting in coolant and vacuum leaks.
In late 1999, GM replaced the lower intake manifold with a new design that reduced the bore and the outside diameter for the EGR stovepipe from 3/4" to 5/8". The upper manifold bore for the pipe was left unchanged at 3/4+". The smaller pipe provided an insulating air gap of about .065" between the hot metal and the plastic in an effort to reduce the heat stress on the upper manifold. The new design may extend the life of the plastic upper, but failures still occur in a similar manner as the previous design.
Ken Spragg (KenCo products) developed a kit to repair a damaged upper manifold and to prevent further damage of the plastic composite due to excess heat. The KenCo kit includes a smaller, 1/2" OD EGR stovepipe with a 3/4" shoulder that fits into the lower intake manifold of engines built between '95 and '99. Also provided is a sleeve with an ID (inside diameter) of 3/4" that is fitted and bonded to the bore of the plastic upper with high temperature, quick set epoxy. Installed as directed, the kit produces an insulating air gap of .125" with the sleeve providing a heat shield to further protect the plastic upper. The components appear to be made from cadmium plated mild steel. The kit sells for $80 mail order which includes shipping in the U.*.
My interest was initially focused on finding a less expensive alternative to the KenCo kit for my '95 Bonneville L36, that used stainless steel like GM, and that did not restrict the EGR passage any more than GM'* new 5/8" pipe. The result is a specification for a reduced diameter stovepipe fabricated from "off-the-shelf" 304 stainless steel tubing. A ring of 3/4" OD tubing is pressed onto a 5/8" OD tube the same length as the original pipe. A sleeve for the upper consists of a simple ring of 7/8" OD stainless steel tubing whose length is just sufficient to cover the exposed plastic in the EGR bore when it is enlarged to accept the sleeve. The .777" ID of the sleeve gives an insulating air gap of .076" around the reduced diameter pipe. JB weld is specified to bond the sleeve to the plastic upper. It has excellent heat resistance, but requires more care in its use and a longer time to cure than faster-setting epoxies.
For '99 -'03 engines, the installation of a sleeve in the plastic upper will provide the same .076" air gap and heat shield protection, because these engines come stock with a reduced diameter (5/8" OD) stovepipe.
Here are specifications for tubing you can cut and press fit in your shop vise to make your own reduced diameter pipe and sleeve. Lengths are +/- .015".
Specifications: All parts 304 stainless steel
Tube: 5/8" OD, .035" wall, seamless tube 1.420" length
Ring: 3/4" OD, .065" wall, seamless tube 0.375" length
Sleeve: 7/8" OD, .049" wall, welded tube 0.820" length
INSTALLATION PROCEDURE:
Read all instructions before starting to work.
The stock EGR pipe is used to center the sleeve in the upper intake manifold (UIM) and is used to drive the reduced diameter pipe into the lower intake manifold (LIM). The sleeve is glued with the UIM and LIM joined in an upside-down position. The sleeve must be accurately centered to obtain a constant-width air gap around the pipe.
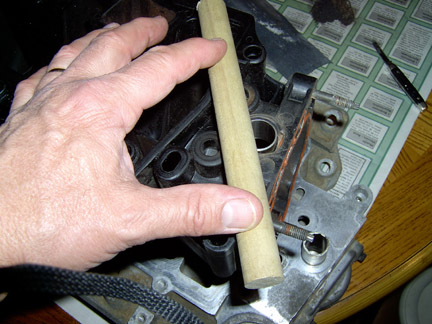
Tools and materials required: 1/2" diameter rat-tail file, or dremel drum sander, or small penknife; six-inch length of 3/4" diameter dowel rod; one sheet of 150 grit sandpaper and flat sanding block; regular (not quik-set) JB weld; carburetor cleaner; rags, latex gloves, masking tape, loctite.
Follow directions in Chilton'* 28200 or other guide to remove throttle body from upper intake manifold (UIM); remove UIM from car; wash UIM with solvent or with high pressure washer. Remove lower intake manifold (LIM) from car. DO NOT REMOVE OR DAMAGE STOCK STOVEPIPE; Wash LIM with solvent or with high pressure washer. Clean the stock stovepipe of all carbon and residues, but do not remove it from the LIM. Wipe excess oil from the old UIM gasket and clean with solvent. Carefully clean all oil from the gasket on both sides at the base of the EGR hole using carburetor cleaner and a clean rag.

For '95 -'99, make one wrap of masking tape without overlapping the ends around the stovepipe where the sleeve will fit. For '99 up, make many wraps as neatly as possible. The sleeve should be centered and just slide over the taped pipe with little clearance. If not, add or remove tape until it does.

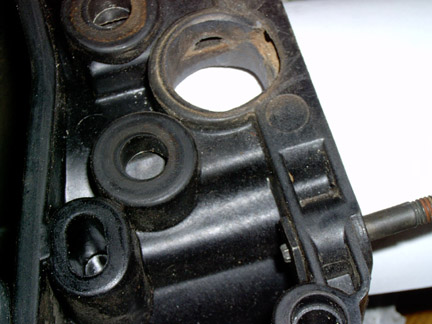
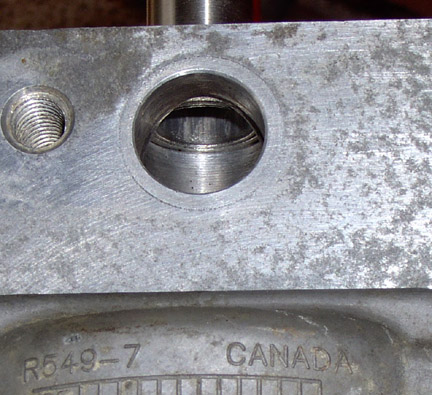
Probe the plastic EGR bore of the UIM with a sharp pick or penknife.
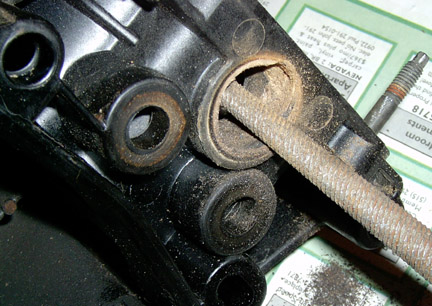
Scrape and dig out any deteriorated plastic. Enlarge the hole with the round file or other tool so that sleeve is centered but fits tightly in the top of the hole where the EGR tube will enter the air stream. The glue will adhere to the plastic better if the surface is roughened by sanding with a bit of the 150-grit paper wrapped around the dowel.

As you work, periodically check the centering of the sleeve by setting the plenum with the old gasket attached, on the LIM over the stock stovepipe.
When you are certain the sleeve is centered, turn the UIM upside down, remove any dust and clean the hole for the sleeve by spraying it with carburetor cleaner (lacquer thinner).
If the EGR bore in the UIM has perforated into the throttle body, install the old TB gasket to contain the adhesive. Align the gasket carefully so you do not create a low spot in the sealing suface. If coolant passages are perforated, use a vinyl hose or better still, a piece of old silicone throttle body gasket to cover the hole. Silicone rubber will not adhere to the JB weld. Jam a popsicle stick or rod behind to hold the hose or temporary mold in place. Clean the sleeve with lacquer thinner and keep oil away from the surfaces where the glue will be applied. Slip a piece of newspaper under the hole to catch any drips of glue.
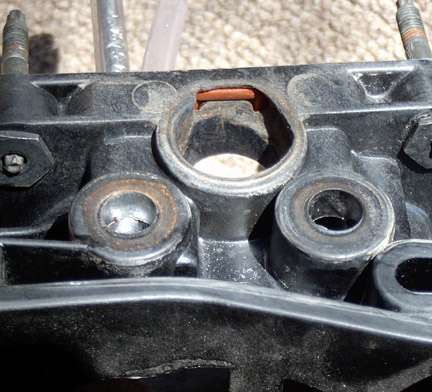
Mix up the JB weld according to directions on the package and first fill any perforations. Then coat the entire inner surface with JB weld and apply a thin layer to fully cover the outside of the sleeve. Take care not to get glue on the inside surface of the sleeve.
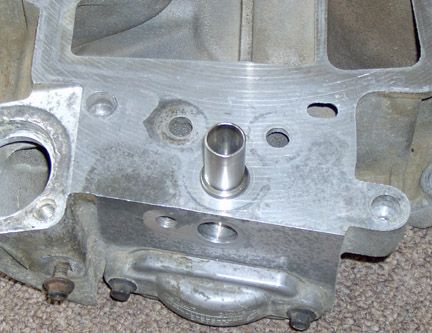
With the UIM still upside down, insert the sleeve and using the dowel rod, roll the gasket end of the sleeve flush with the hole.

Wipe the excess glue from the top of the sleeve with a latex gloved finger or small curved tool.
Fill the gap around the sleeve with JB weld, then remove any glue from the contact area between the UIM and the gasket. Wipe a latex gloved finger around the sleeve to create a concave surface to make sure that the gasket will not become glued to the UIM.

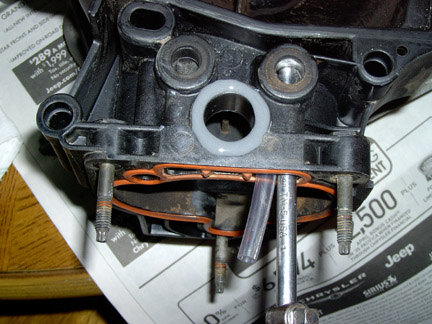
Carefully remove any glue from the inside of the sleeve. Attach the gasket to the UIM and then install the LIM with the taped original stovepipe upside down through the sleeve. Attach a few upper manifold bolts finger tight to make sure the alignment holds. Allow the glue to set for 4 hours.
After the initial set, carefully remove the LIM and gasket from the UIM. If you have to peel the silicone gasket off, clean the UIM surface with a bit of carburetor cleaner to insure a good bond, then apply additional JB weld to the concavity around the outside of the sleeve to build up a wide bead. This bead will be sanded down to form the new sealing surface. Try not to introduce bubbles into the glue that might make pits when sanded down. Keeping the UIM upside down, allow the JB weld to cure overnight.

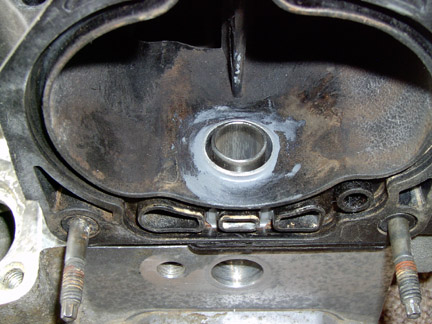
When cured, carefully remove any molds or forms for the perforated areas. Carefully inspect these areas to make sure the epoxy completely filled the holes without voids or serious imperfections that might cause a leak.
Using a flat sanding block, carefully sand the JB weld around the sleeve to create a sealing surface that is flat and level with the surrounding coolant bores and adjacent sealing surfaces. Check your progress periodically with a straightedge. If air bubbles in the JB weld formed pits in the sealing surface around the sleeve, fill them with a little RTV silcone rubber when assembling.

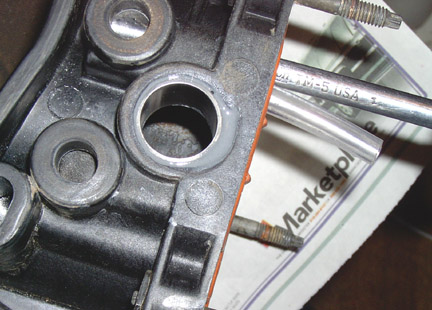
Slip a tightly fitting socket into the stock EGR tube to prevent crushing it, and grip with vise grips. Twist and lift out the old pipe. Carefully clean the bore for the EGR tube in the LIM with carburetor cleaner and a small knife, finishing with steel wool, and finally carburetor cleaner. It is important that all carbon be removed from the bore before attempting to drive in the new reduced diameter pipe.
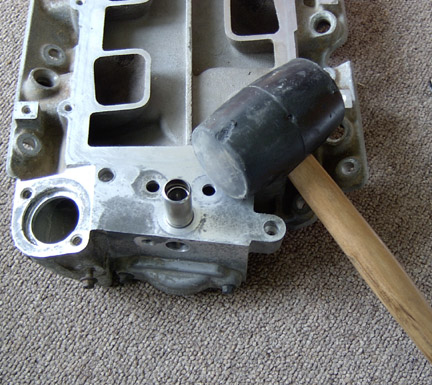
Apply a little loctite to the outside of the ring on the rd pipe and using the stock EGR pipe as a sleeve, drive in the rd pipe with a rawhide or rubber mallet.
Look through the horizontal hole in the LIM to make sure that the pipe is all the way down.
A part of the shoulder will remain above the surface of the LIM. This helps locate the gasket seal around the EGR hole. The shoulder will sit below the surface of the gasket when it is installed.
Install the LIM and UIM with new gaskets and using loctite on the bolts. Reassemble the engine.
_____________________________________
Thanks to Ken Spragg for figuring out the concepts for this fix; to Harry (57Chevythunder) for helping with development and fitting tests; to Ranger and to Joe for advice on machining, and to Bob Dillon for thinking of using a 7/8" sleeve.
For those who don't want to do it all themselves, BC member Bob Dillon is installing sleeves in plenums for others. Contact Bob for specifics.
To test this concept, I had to purchase minimum lengths of tubing that left me with extra material. I have cut and assembled the left-over tubing into 5 "kits" of a reduced diameter pipe and sleeve. BC members interested in purchasing a kit for their own use (at their own risk) for $15 can PM me. If there is sufficient demand, I may act as a distributor for cut-to-size tubing and kits for BC members.
A procedure is described for modifying the stovepipe and EGR passage in the plastic upper manifold in '95 - '03 L36 engines. This modification is based on two principles. An air gap is created to reduce heat transfer by conduction between the hot EGR pipe and the plastic bore of the upper intake manifold. And, a heat shield in the form of a stainless steel sleeve is bonded to the plastic bore to reflect radiant heat, and to disperse and conduct absorbed heat, further reducing heat stress on the plastic upper manifold. The work is done in conjunction with changing the lower intake manifold gaskets which commonly deteriorate and fail causing harmful internal coolant leaks. A 180 F thermostat is also recommended to extend the life of the plastic gaskets.
This modification does not require special tools or know-how, but will take time and patience to complete. The installation procedure requires that the upper and lower intake manifold be (reasonably) clean and dry and removed from the car. The JB Weld used to bond the sleeve into the upper manifold will need to cure overnight before it can be placed back into service.
DISCLAIMER: This modification has no long-term testing to prove that it will perform as we hope it will. Any time you modify your engine, you are taking a chance that some unforeseen damage or decrease in performance or reliability may result. If you choose to perform this modification, please understand that you do so at your own risk.
Background: The original EGR passage in a new L36 upper intake manifold (plenum) is just a few thousandths larger than 3/4". From '95 to early '99, GM used a 3/4"OD (outside diameter) stainless steel EGR stovepipe that fit closely to the plastic bore in the upper manifold and carried the hot exhaust gas from the aluminum lower intake manifold into the intake air stream just behind the throttle body. Over time, heat from the EGR pipe deteriorates the plastic walls of nearby coolant passages and sealing surfaces resulting in coolant and vacuum leaks.
In late 1999, GM replaced the lower intake manifold with a new design that reduced the bore and the outside diameter for the EGR stovepipe from 3/4" to 5/8". The upper manifold bore for the pipe was left unchanged at 3/4+". The smaller pipe provided an insulating air gap of about .065" between the hot metal and the plastic in an effort to reduce the heat stress on the upper manifold. The new design may extend the life of the plastic upper, but failures still occur in a similar manner as the previous design.
Ken Spragg (KenCo products) developed a kit to repair a damaged upper manifold and to prevent further damage of the plastic composite due to excess heat. The KenCo kit includes a smaller, 1/2" OD EGR stovepipe with a 3/4" shoulder that fits into the lower intake manifold of engines built between '95 and '99. Also provided is a sleeve with an ID (inside diameter) of 3/4" that is fitted and bonded to the bore of the plastic upper with high temperature, quick set epoxy. Installed as directed, the kit produces an insulating air gap of .125" with the sleeve providing a heat shield to further protect the plastic upper. The components appear to be made from cadmium plated mild steel. The kit sells for $80 mail order which includes shipping in the U.*.
My interest was initially focused on finding a less expensive alternative to the KenCo kit for my '95 Bonneville L36, that used stainless steel like GM, and that did not restrict the EGR passage any more than GM'* new 5/8" pipe. The result is a specification for a reduced diameter stovepipe fabricated from "off-the-shelf" 304 stainless steel tubing. A ring of 3/4" OD tubing is pressed onto a 5/8" OD tube the same length as the original pipe. A sleeve for the upper consists of a simple ring of 7/8" OD stainless steel tubing whose length is just sufficient to cover the exposed plastic in the EGR bore when it is enlarged to accept the sleeve. The .777" ID of the sleeve gives an insulating air gap of .076" around the reduced diameter pipe. JB weld is specified to bond the sleeve to the plastic upper. It has excellent heat resistance, but requires more care in its use and a longer time to cure than faster-setting epoxies.
For '99 -'03 engines, the installation of a sleeve in the plastic upper will provide the same .076" air gap and heat shield protection, because these engines come stock with a reduced diameter (5/8" OD) stovepipe.
Here are specifications for tubing you can cut and press fit in your shop vise to make your own reduced diameter pipe and sleeve. Lengths are +/- .015".
Specifications: All parts 304 stainless steel
Tube: 5/8" OD, .035" wall, seamless tube 1.420" length
Ring: 3/4" OD, .065" wall, seamless tube 0.375" length
Sleeve: 7/8" OD, .049" wall, welded tube 0.820" length
INSTALLATION PROCEDURE:
Read all instructions before starting to work.
The stock EGR pipe is used to center the sleeve in the upper intake manifold (UIM) and is used to drive the reduced diameter pipe into the lower intake manifold (LIM). The sleeve is glued with the UIM and LIM joined in an upside-down position. The sleeve must be accurately centered to obtain a constant-width air gap around the pipe.
Tools and materials required: 1/2" diameter rat-tail file, or dremel drum sander, or small penknife; six-inch length of 3/4" diameter dowel rod; one sheet of 150 grit sandpaper and flat sanding block; regular (not quik-set) JB weld; carburetor cleaner; rags, latex gloves, masking tape, loctite.
Follow directions in Chilton'* 28200 or other guide to remove throttle body from upper intake manifold (UIM); remove UIM from car; wash UIM with solvent or with high pressure washer. Remove lower intake manifold (LIM) from car. DO NOT REMOVE OR DAMAGE STOCK STOVEPIPE; Wash LIM with solvent or with high pressure washer. Clean the stock stovepipe of all carbon and residues, but do not remove it from the LIM. Wipe excess oil from the old UIM gasket and clean with solvent. Carefully clean all oil from the gasket on both sides at the base of the EGR hole using carburetor cleaner and a clean rag.
For '95 -'99, make one wrap of masking tape without overlapping the ends around the stovepipe where the sleeve will fit. For '99 up, make many wraps as neatly as possible. The sleeve should be centered and just slide over the taped pipe with little clearance. If not, add or remove tape until it does.
Probe the plastic EGR bore of the UIM with a sharp pick or penknife.
Scrape and dig out any deteriorated plastic. Enlarge the hole with the round file or other tool so that sleeve is centered but fits tightly in the top of the hole where the EGR tube will enter the air stream. The glue will adhere to the plastic better if the surface is roughened by sanding with a bit of the 150-grit paper wrapped around the dowel.
As you work, periodically check the centering of the sleeve by setting the plenum with the old gasket attached, on the LIM over the stock stovepipe.
When you are certain the sleeve is centered, turn the UIM upside down, remove any dust and clean the hole for the sleeve by spraying it with carburetor cleaner (lacquer thinner).
If the EGR bore in the UIM has perforated into the throttle body, install the old TB gasket to contain the adhesive. Align the gasket carefully so you do not create a low spot in the sealing suface. If coolant passages are perforated, use a vinyl hose or better still, a piece of old silicone throttle body gasket to cover the hole. Silicone rubber will not adhere to the JB weld. Jam a popsicle stick or rod behind to hold the hose or temporary mold in place. Clean the sleeve with lacquer thinner and keep oil away from the surfaces where the glue will be applied. Slip a piece of newspaper under the hole to catch any drips of glue.
Mix up the JB weld according to directions on the package and first fill any perforations. Then coat the entire inner surface with JB weld and apply a thin layer to fully cover the outside of the sleeve. Take care not to get glue on the inside surface of the sleeve.
With the UIM still upside down, insert the sleeve and using the dowel rod, roll the gasket end of the sleeve flush with the hole.
Wipe the excess glue from the top of the sleeve with a latex gloved finger or small curved tool.
Fill the gap around the sleeve with JB weld, then remove any glue from the contact area between the UIM and the gasket. Wipe a latex gloved finger around the sleeve to create a concave surface to make sure that the gasket will not become glued to the UIM.
Carefully remove any glue from the inside of the sleeve. Attach the gasket to the UIM and then install the LIM with the taped original stovepipe upside down through the sleeve. Attach a few upper manifold bolts finger tight to make sure the alignment holds. Allow the glue to set for 4 hours.
After the initial set, carefully remove the LIM and gasket from the UIM. If you have to peel the silicone gasket off, clean the UIM surface with a bit of carburetor cleaner to insure a good bond, then apply additional JB weld to the concavity around the outside of the sleeve to build up a wide bead. This bead will be sanded down to form the new sealing surface. Try not to introduce bubbles into the glue that might make pits when sanded down. Keeping the UIM upside down, allow the JB weld to cure overnight.
When cured, carefully remove any molds or forms for the perforated areas. Carefully inspect these areas to make sure the epoxy completely filled the holes without voids or serious imperfections that might cause a leak.
Using a flat sanding block, carefully sand the JB weld around the sleeve to create a sealing surface that is flat and level with the surrounding coolant bores and adjacent sealing surfaces. Check your progress periodically with a straightedge. If air bubbles in the JB weld formed pits in the sealing surface around the sleeve, fill them with a little RTV silcone rubber when assembling.
Slip a tightly fitting socket into the stock EGR tube to prevent crushing it, and grip with vise grips. Twist and lift out the old pipe. Carefully clean the bore for the EGR tube in the LIM with carburetor cleaner and a small knife, finishing with steel wool, and finally carburetor cleaner. It is important that all carbon be removed from the bore before attempting to drive in the new reduced diameter pipe.
Apply a little loctite to the outside of the ring on the rd pipe and using the stock EGR pipe as a sleeve, drive in the rd pipe with a rawhide or rubber mallet.
Look through the horizontal hole in the LIM to make sure that the pipe is all the way down.
A part of the shoulder will remain above the surface of the LIM. This helps locate the gasket seal around the EGR hole. The shoulder will sit below the surface of the gasket when it is installed.
Install the LIM and UIM with new gaskets and using loctite on the bolts. Reassemble the engine.
_____________________________________
Thanks to Ken Spragg for figuring out the concepts for this fix; to Harry (57Chevythunder) for helping with development and fitting tests; to Ranger and to Joe for advice on machining, and to Bob Dillon for thinking of using a 7/8" sleeve.
For those who don't want to do it all themselves, BC member Bob Dillon is installing sleeves in plenums for others. Contact Bob for specifics.
To test this concept, I had to purchase minimum lengths of tubing that left me with extra material. I have cut and assembled the left-over tubing into 5 "kits" of a reduced diameter pipe and sleeve. BC members interested in purchasing a kit for their own use (at their own risk) for $15 can PM me. If there is sufficient demand, I may act as a distributor for cut-to-size tubing and kits for BC members.


Guest
Posts: n/a
Originally Posted by ron350
Great article Bill hope this is placed in TECHINFO.
Great work...
__________________
Best Car Insurance | Auto Protection Today | FREE Trade-In Quote

Senior Member
Posts like a Camaro
Joined: Feb 2005
Posts: 922
Likes: 8
From: Gilroy, California
One member here, 96LeSabre, all ready has an upper I sleeved to give it a try!
I bought a set of reamers to ensure that the upper'* EGR passage remains centered for the sleeve. I'll be happy to ream the manifolds of any member for $20 plus shipping, and that includes the stainless sleeve.
Great write-up, Bill! It will be interesting to see if we have this problem licked with just a little old hot-rodder enginuity.
By the way, about a half can of Gunk engine cleaner uncruds (is that a word?) the upper. I let it sit in the sun for a while, sprayed it, and then dumped it into a 5-gallon bucket of hot, soapy water for a while. Worked fine.

Senior Member
Posts like a Turbo
Joined: Apr 2004
Posts: 210
Likes: 0
From: Sheridan Wyoming
 WOW Bill, TOTALLY TERRIFIC, excellent, superb, outstanding, documentation and write-up.
 Again, GREAT JOB !!
Thread Starter
Senior Member
True Car Nut
Joined: Mar 2004
Posts: 3,066
Likes: 10
From: Ames, Iowa
Thanks, to all for the kind words. And especially to Harry - couldn't have tried it without your manifold!
Good to know about the Gunk, Bob.
And, 96 LeSabre won't be testing this concept as described above, because he will not be using a reduced diameter pipe. As I understand it, he will be using his stock EGR pipe at .750 OD. This will give an air gap of only .013". My concern is that this gap is so small that the chances are great that the hot pipe will actually touch the wall of the sleeve unless he is perfectly centered. Maybe the sleeve can conduct away the heat effectively even if the pipe is very close or touching, but, I would not recommend so small a gap. I would go with the sleeve AND a reduced pipe.

Senior Member
True Car Nut
Joined: Jun 2004
Posts: 3,459
Likes: 1
From: Glendale, AZ
This is great, Bill. As always your instructions are clearly written and easy to understand. Thanks for sharing your R&D with everyone here. Because of the combined efforts of yourself, Bob Dillon, and 57chevythunder we should have a quality solution to the classic UIM failure.
The next mission for the three of you: find out why our lower intake gaskets get so chewed up!
The next mission for the three of you: find out why our lower intake gaskets get so chewed up!

Senior Member
Posts like a Turbo
Joined: Jul 2004
Posts: 214
Likes: 0
From: Woodstock Ill.
Originally Posted by Bob Dillon
One member here, 96LeSabre, all ready has an upper I sleeved to give it a try!
