
The Grizz is alive...lots of pics......

Guest
Posts: n/a
I am going to make a point here for everyone... as stupid as it sounds....
If a motor was driven easy all of its life you do not want to just go out and beat the **** out of it.... You have to ease into it slowly over time and miles.... Its almost like taking a fresh motor and expecting it to scream right off the bat..
On my second motor, I noticed that my MPG'* were way down.... I was doing 25Mpg.... That was the beginning of my tip off that something was not right... As I was going through the mountains( hit 4000 rpms a couple of times ) Noticed the engine was getting weak and was loosing power... Then noticed a bit of a stumble( it was the rod bearing starting to bind ).. From what I found this motor was Junk from the word GO...
The 3rd motor has come into its own... It had low mileage, upper intake was original and in good shape.... Lower intake gaskets weren't too bad from what the mechanic told me, they were pleased to say the least... But the car was driven by an old lady.... I did not even attempt to beat on this motor.... I kept it 4000 Rpms of less as the motor felt tight, almost like a new motor... Its been a little over 6 months, I have slowly freed up the motor and it runs great when I put the loud pedal down...
When we put Brads motor in his car and we found it to be in good shape, we eased into it as well... It too started off tight and have loosened up over time...
A Crank kit for the series I with a casting of 737 or 4737 is in the $250-$300 state side
__________________
Best Car Insurance | Auto Protection Today | FREE Trade-In Quote

Thread Starter
Junior Member
Joined: Jun 2002
Posts: 0
Likes: 0

I suppose that'* why none of my car has ever taken out an engine. I've always driven them hard. WOT all the time, but I do wait until up to operating temp.
What'* done is done.
I'm gonna leave it all up to Victor now. I'm sure he can handle it himself. He can be resourceful if I leave him alone.
This will be a very important lesson for him.
What'* done is done.
I'm gonna leave it all up to Victor now. I'm sure he can handle it himself. He can be resourceful if I leave him alone.
This will be a very important lesson for him.
Guest
Posts: n/a

Junior Member
Joined: Aug 2005
Posts: 0
Likes: 0
yeah..this is a little nuts...pretty rare indeed. old oil will do that tho...that oil looked NASTY.  by that time....i cant imagine it being able to protect an engine at high rpms very well. :?
and of course, for future reference for him...always wait until its at full temp before romping on it. my LN3 never had a problem with being WOTed constantly. even all the way to 155k...and it should be mentioned, that it was also severely overheated at 125k.
series 1 engines are, imo, built beyond spec...heavy duty. which, thinking on that line, tells you if you DO replace it...most likely, you'll have a good one on your hands.
one thing you should do though...before making a final decision on a replacement...check the lifter valley for how clean it is...looking there is a good way of seeing how often the oil was replaced. also, if it was severely overheated.

Junior Member
Posts like a Ricer Type-R
Joined: Aug 2002
Posts: 11
Likes: 13
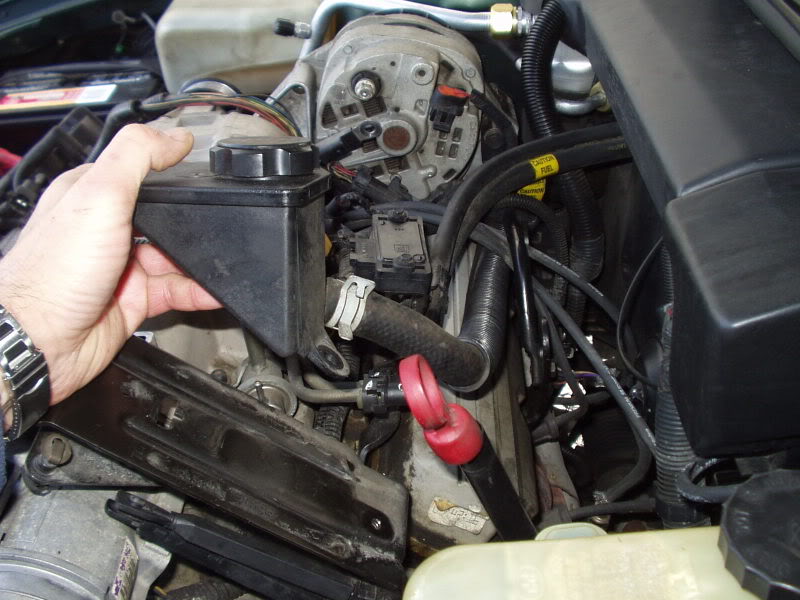
Paul, in response to your double-post, the PS reservior can stay in the engine bay. Just seperate it from the throttle bracket.
The AC gets unbolted and laid to the side. Be careful pulling the motor and putting in the new so you don't damage the lines. Worked great on mine.
As mentioned, the PS pump needs to be unbolted. Access two bolts through the pulley. Disconnect the starter, radiator hoses, and wiring harness (big connector below the alternator). Remove the alternator and cooling fans. Disconnect the fuel rail.
Disconnect the vapor recovery cannister vac lines, the vac line giong to the firewall accumulator, and the brake booster line. Be careful with that one on the SC end so you don't break the plastic.
Disconnect the downpipe and remove the studs from the rear manifold if they stay in there. You need them out for the rear exhaust manifold to clear the firewall.
From this point (other than the little things I'm not thinking of right now) it'* only two mounts. The obvious torque-axis mount by the water pump, and the mount on the back of the block below the knock sensor. It'* connected to the tailshaft housing. Through the wheelwell for that. It'* a PITA. Then the bellhousing bolts, one of which is backwards and must be accessed from the passenger wheelwell OR from the driver'* side rear of the engine with the rear exhaust manifold off the car.
Thread Starter
Junior Member
Joined: Jun 2002
Posts: 0
Likes: 0
Paul, in response to your double-post

I thought starting a new fresh thread was the right thing to do but, whatever, we will continue here with this one.
the PS reservior can stay in the engine bay. Just seperate it from the throttle bracket.
Access two bolts for PS pump through the pulley.
Disconnect the starter, radiator hoses, and wiring harness (big connector below the alternator).
The AC gets unbolted and laid to the side. Be careful pulling the motor and putting in the new so you don't damage the lines.
Remove the alternator and cooling fans.
Disconnect the fuel rail.
Disconnect the vapor recovery cannister vac lines, the vac line giong to the firewall accumulator, and the brake booster line. Be careful with that one on the SC end so you don't break the plastic.
Disconnect the downpipe and remove the studs from the rear manifold if they stay in there. You need them out for the rear exhaust manifold to clear the firewall.
From this point (other than the little things I'm not thinking of right now) it'* only two mounts. The obvious torque-axis mount by the water pump, and the mount on the back of the block below the knock sensor. It'* connected to the tailshaft housing. Through the wheelwell for that. It'* a PITA. Then the bellhousing bolts, one of which is backwards and must be accessed from the passenger wheelwell OR from the driver'* side rear of the engine with the rear exhaust manifold off the car.
I'm going to, using Victors hands, take this slow and easy.....it is a learning experience.

Start with the easy stuff I already know about, like alternator, fans and coolant lines.
How do the fuel lines disconnect? ....just pinch and pull or is a tool needed?
You forgot about the front engine mount, so doesn't that make it 3?
Should I remove both front wheels and put it on stands at this point?
Is it a good idea to remove the SC before pulling the engine?
Do the PS and AC units have to be tied out of the way or will they self support?
Noticed that the trani cooler hose connection clamps were leaking right by the rad cap and made quite a mess of gunk buildup in the area. The hose clamps cannot be tightened where they are inside under the rad support. :?
Should I still drop the engine oil pan? Is there still any doubt before we fully kickoff on this project?
Speak now or forever hold your peace
Junior Member
Posts like a Ricer Type-R
Joined: Aug 2002
Posts: 11
Likes: 13
The front mount isn't an engine mount. It'* a trans mount. It stays.
Just pinch the fuel line clips with needlenose or your fingers and pull them straight back.
Pull the motor with the SC on it. Either way.
The left front doesn't need to come off, but you need the right front off and the inner liner pulled. Don't forget you have a knock sensor and oil pressure sender in there to disconnect, as well as an oil level sensor in the pan. These are the little connectors you'll break if you miss them. Most of the wiring harness will come out with the motor if you disconnect behind the alternator, above the rear valve cover (#2 cylinder area).
AC and PS can be tied back for safety. We had enough hands not to worry about them. Oh, you'll want the strut bar off, but do that AFTER you jack up the front to remove the RF wheel and inner liner.
Yes, pull your pan first. I'm not convinced until I see the evidence.
Common misconception is that the single knock sensor in the S1 is in the water jacket. It'* not. It'* installed in an oil gallery. It won't leak much if you move it to the new motor. This is a PRIME opportunity to install an oil pressure kit.
Thread Starter
Junior Member
Joined: Jun 2002
Posts: 0
Likes: 0
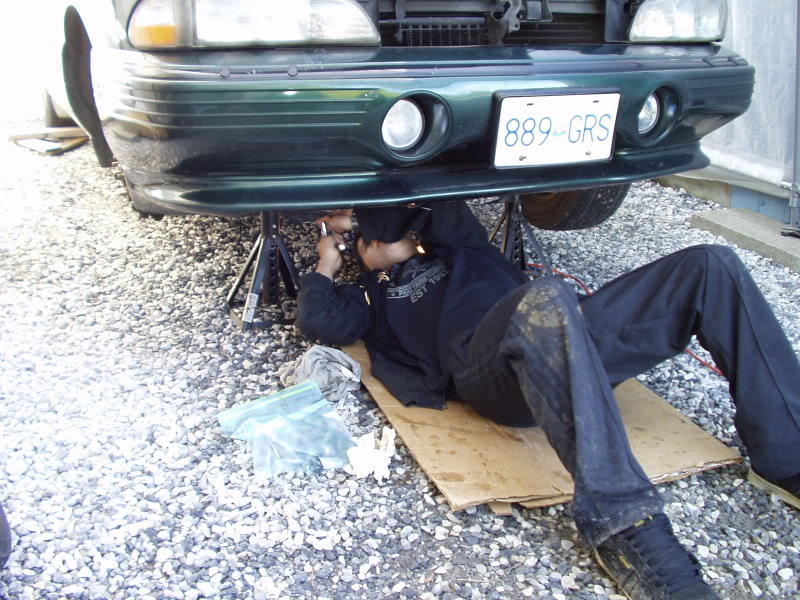
Victor was up early and anxious to begin the teardown.
Drained out the fresh oil and still no metal......but then only ran it for a few minutes after the oil change.
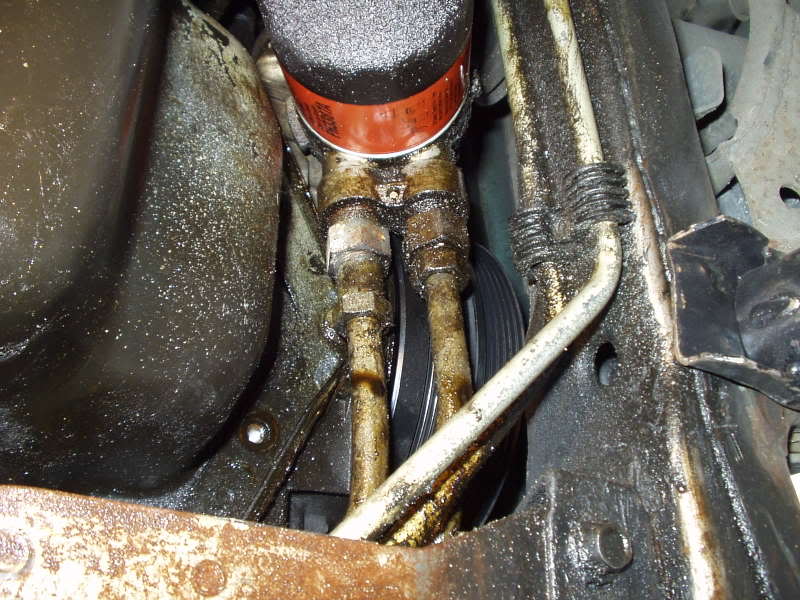
Taking your advice we began with the oil pan but Geezus, there'* an oil cooler on this thing...........so how do you get at that last pan bolt :?:
Does he have to take off the cooler lines :?:
A lot of oil on the plastic underpan. Do you keep yours on Bill :?:
That little plastic cap that covers the ring gear & starter with the three bolts...Geezus, that last bolt was a bear...and oh oh broken a chunk out of the plastic wrestling it out.
The wiring harness is all but out now. Never did find the disconnect......there isn't one.
Now how do I disconnect the last connector that is joined to the rear knock sensor :?:
Drained out the fresh oil and still no metal......but then only ran it for a few minutes after the oil change.
Taking your advice we began with the oil pan but Geezus, there'* an oil cooler on this thing...........so how do you get at that last pan bolt :?:
Does he have to take off the cooler lines :?:
A lot of oil on the plastic underpan. Do you keep yours on Bill :?:
That little plastic cap that covers the ring gear & starter with the three bolts...Geezus, that last bolt was a bear...and oh oh broken a chunk out of the plastic wrestling it out.
The wiring harness is all but out now. Never did find the disconnect......there isn't one.
Now how do I disconnect the last connector that is joined to the rear knock sensor :?:

Senior Member
Certified Car Nut
Joined: Mar 2003
Posts: 12,433
Likes: 2
You gotta get the oil cooler line off before you can get the last oil pan bolt.
The knock sensor connector comes off if you squeeze it at the end just right.
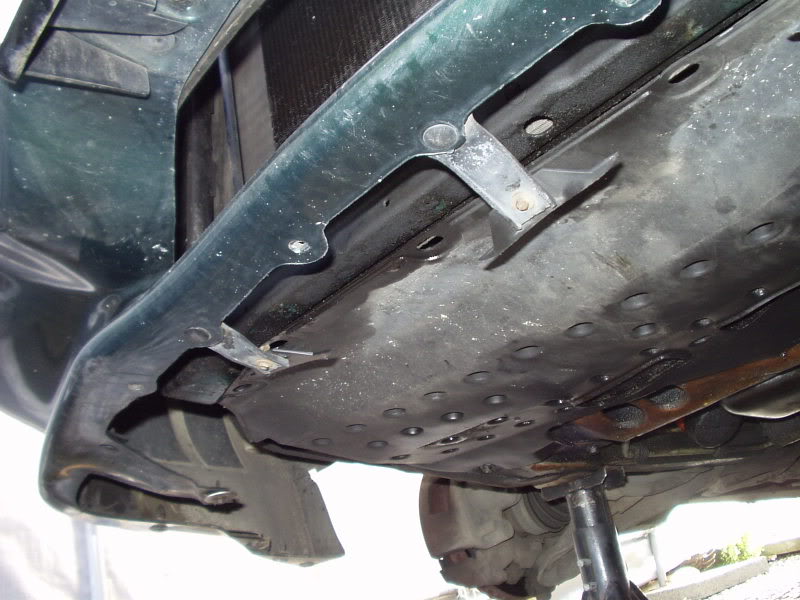
Plastic underpan? WTF is that? I've never seen one. All I've got is a metal shield under the AC compressor.
The knock sensor connector comes off if you squeeze it at the end just right.
Plastic underpan? WTF is that? I've never seen one. All I've got is a metal shield under the AC compressor.
Guest
Posts: n/a
Yes you remove the oil cooler lines..
1993 did not have the Plastic air dam( I believe 1995 was the first year for this )
the main disconnect is under the maxifuse relay cover, behind the Drier
__________________
Best Car Insurance | Auto Protection Today | FREE Trade-In Quote
1993 did not have the Plastic air dam( I believe 1995 was the first year for this )
the main disconnect is under the maxifuse relay cover, behind the Drier
__________________
Best Car Insurance | Auto Protection Today | FREE Trade-In Quote