
Climate Control Issue (AC)


Thread Starter
Member
Posts like a V-Tak
Joined: Oct 2004
Posts: 52
Likes: 0
From: Lincoln, NEBRASKA of course

Long story short, nothing happens anymore when I push the recurculation button on my climate control, I used to be able to tell a difference (audibly and climately) but now it does nothing. What do you think the problem might be. I have noticed that since this has happened, it doesn't cool the car down as good as it used to.
To quote "BIG PAPPY'*" song: "This is why I'm hot"
Please help
To quote "BIG PAPPY'*" song: "This is why I'm hot"
Please help

Senior Member
True Car Nut
Joined: May 2005
Posts: 3,448
Likes: 7
From: _Phoenix, AZ_ _WCBF '05, '06, '07 Survivor_ ____NEBF '07 Remnant___
I recently did some research in my FSM for anthoer memer here about teh recurculation mode, and found very little information. I am not sure too many topics exist here on the club about it either, so this may take some brainstorming and some time before a solution can be found. So far, the only obviuos item I could find, was that the orange vacuum line coming off of the vacuum connector from teh HVAC programmer is what supplies vacuum to the actuator that drives the fresh/recirculation air supply door. I suppose that if the nipple connector on that orange line was collapsed, then the door may not operate. Only other obvious causes would be the actuator itself failing, the door itself binding, or the HVAC programmer or control unit (on the dash) has a failure. The acuator is deep in the dash in the center or above the gas pedal but so fdar I can't find a diagram showing the door location itself.

Senior Member
Posts like a Northstar
Joined: Sep 2005
Posts: 600
Likes: 3
From: Dayton, OH
Originally Posted by Echo SSEI
I recently did some research in my FSM for anthoer memer here about teh recurculation mode, and found very little information. I am not sure too many topics exist here on the club about it either, so this may take some brainstorming and some time before a solution can be found. So far, the only obviuos item I could find, was that the orange vacuum line coming off of the vacuum connector from teh HVAC programmer is what supplies vacuum to the actuator that drives the fresh/recirculation air supply door. I suppose that if the nipple connector on that orange line was collapsed, then the door may not operate. Only other obvious causes would be the actuator itself failing, the door itself binding, or the HVAC programmer or control unit (on the dash) has a failure. The acuator is deep in the dash in the center or above the gas pedal but so fdar I can't find a diagram showing the door location itself.

Senior Member
True Car Nut
Joined: May 2005
Posts: 3,448
Likes: 7
From: _Phoenix, AZ_ _WCBF '05, '06, '07 Survivor_ ____NEBF '07 Remnant___
Thanks, again for the diagram. Does anyone know exactly where the fresh/recirculation door is? I assume its buried in the dash or cowling on the firewall, but have never tried to locate it on my own car.
Senior Member
Posts like a Northstar
Joined: Sep 2005
Posts: 600
Likes: 3
From: Dayton, OH
Originally Posted by Echo SSEI
Thanks, again for the diagram. Does anyone know exactly where the fresh/recirculation door is? I assume its buried in the dash or cowling on the firewall, but have never tried to locate it on my own car.
I'd check to see if the hose to the vacuum motor gets vacuum when the engine is running and the recirculate button is pushed. Remember there'* a plug in the hose that'* porous to slow down the action of the recirculate door after the vacuum is applied.
Thread Starter
Member
Posts like a V-Tak
Joined: Oct 2004
Posts: 52
Likes: 0
From: Lincoln, NEBRASKA of course
Thanks for the info,
I found the Vacuum block above the passengers feet with five lines going into it. Can I take the nut off of the center of the bulkhead fitting to test test the vacuum or is a bunch of things going to fall apart, or that will not test the vacuum anyway?
Also, am I correct in understanding that when the recirc. button is pressed, vacuum is applied to the orange line, which closes the door? If so, is the door located on the drivers side under the dash, or is it near this vacuum block on the passengers side?
If the problem is a "sticky" door, is it servicable? Can I squirt some Marvel mystery oil on the hunges, or are they not accessible without major dismantelization.
I recall having noticed a couple times I have had the air blowing on vent but it comes out either the defroster or the floor and never changes, until I cycle through the settings a couple times then it seems to come out of it? Is this a seperate issue or could they be related?
please help, still hot here
Senior Member
True Car Nut
Joined: May 2005
Posts: 3,448
Likes: 7
From: _Phoenix, AZ_ _WCBF '05, '06, '07 Survivor_ ____NEBF '07 Remnant___
Not sure about testing the vacuum by undoing the nut and removing the clear connector. I think that is the way it is done, but I need to double check the FSM this evening.
I do believe that vacuum is applied on the orange line to more the door to the recirculation position,but again, I need to check the FSM on that too
I have never seen (or even tried) to find the door. I tend to think that the more commen problem in this area is with vacuum rather than a sticky door, and it does appear to buried in the center stack deep under the dash. I haven't found a diagram depicting the actual location of the door, just a crude airflow diagram.
The "air out of the floor and defrost" even though you have requested air from the dash could very well be related. There is a slight delay built in from the factory, that will direct air flow from the floor vents/defrost when you first turn on the system, so you don't get blasted with hot air from the center vents, but it only several seconds. If you you have selected air from the center vents, but don't have air coming form the center vents for longer than a minute or two, then your nipples in the connector may be partially collapsed. Location of where air comes out, is all directed by vacuum through the vacuum connector that you found. From what we have seen, here, that vacuum block is merely a straight path vacuum connector, and does not appear to have any distribution functionality. Just a way to connect lines from the programmer to the actuators. Many of us who have had no air from the center vents, have "cut-out" that block, and replaced with larger vacuum lines reconnecting the tubes individually and have had no problems since. The black nipples on the programmer side of that connector tend to collapse and not allow vacuum to be applied to one (or more) tubes. The only other real possibities are a leak in the vacuum supply or the programmer iteslf has failed (which doesn't appear to happen to often). If you don't find any leaks on the supply side of the vacuum system, for under $2.00 and about an hours worth of work (not hard, just awkward and time consuming), many of us decided to replace the "block" with connector tubing. If that didn't work, then we further investigate supply before spending $ on a programmer.
EDIT: I thought of something you might try. Turn on the climate control and select "recirc". Listen by the vacuum conector/block for a hissing sound, no matter how faint. If it hisses, then it is most likely a partially blocked/collapsed nipple on the programmer side of that connector (NOT the clear connector side, that is visable). Most collapses I have seen are on the side you cant see without pulling the connector out of the programmer case.
Senior Member
Posts like a Northstar
Joined: Sep 2005
Posts: 600
Likes: 3
From: Dayton, OH
Originally Posted by Huskernation
Also, am I correct in understanding that when the recirc. button is pressed, vacuum is applied to the orange line, which closes the door? If so, is the door located on the drivers side under the dash, or is it near this vacuum block on the passengers side?
If the problem is a "sticky" door, is it servicable? Can I squirt some Marvel mystery oil on the hunges, or are they not accessible without major dismantelization.
If the problem is a "sticky" door, is it servicable? Can I squirt some Marvel mystery oil on the hunges, or are they not accessible without major dismantelization.
I even switched vacuum lines from other motors which moved when different settings on the control were chosen and put the vacuum onto the one motor I was checking. It moved when it had vacuum. You can feel that diaphgram and the plastic rod that connect to the door inside the center stack move.
That told me I had a blocked line for the vacuum to the motor. I would also put my wet fingertip over the end of the vacuum line and you can feel the vacuum in the line pull gently on your finger.
In my case I cut out the plastic connector on the corner of the programmer box. I believe the Bonneville box is the same as my LeSabre. Remove the box from the heater-2 screws. Carefull disconnect all wires and metal link rods first. The cover ot he programmer snaps on with two or three snaps and the plastic connector slides out. I listed the colors inside the programmer for the tubes and those outside--they are different. And got free 1/8 inch gas line from a parts store (out of their salvage box) and slid the wet lines into the openings.

Senior Member
True Car Nut
Joined: May 2005
Posts: 3,448
Likes: 7
From: _Phoenix, AZ_ _WCBF '05, '06, '07 Survivor_ ____NEBF '07 Remnant___
Excellent testing ideas, Imidazol (I really need to find out your actual name )
Also, Imidazol mentions that the vacuum lines are NOT the same colors on both sides of the connector, which is very true. So, I just cut and spliced my vacuum lines one at a ttime to insure I matched them up.
I actually didn't have to remove the programmer box, just back out the center bolt and pry it open.
Here is the write-up I did awhile back for another member to "crack" open the programmer box (without removing it or the dashboard!) so the "connector" can be replaced with vacuum lines:
1. Remove passenger side hush panel (below glove box).
2. On the front (facing the seats) of the HVAC programmer cover/box, there is a bolt/screw about half way up the box. Laying on the floorboard on your back, with a flashlight or the footwell light from the hush panel, you can see the screw on the front of the box by looking up between the box and the backside of the dashboard, underneath the glovebox (see the diagram in the other thread if necessary). The glovebox shouldn't need to be out. Mine was anyways because I was trying all sorts of things. I think the screw is a 10mm. I used a boxend wrench and mainly by feel began to loosen it a turn at a time. I didn't want to take it all the way out because getting it back in would be very difficult. I found out that the box will "open up" enough and the connector will come out without the screw completely removed.
3. As the screw is removed, the box can by pried open with the flat blade of a screwdriver. There are two flat tabs on the box, one below the screw and one above (think of it as kind of like a childs plastic lunchbox sitting upright on one end).
4. Each time the screw is backed out, you can "open" the box a little more. The connector also has a couple of tabs on it that you need to "separate". Everytime I loosened the screw I wiggled the connector and eventually, I wiggled it off/out. It resides in a groove/track in the box that is hard to explain. But once your start wiggling, you'll understand where the catch point is.
5. Once the connector is free from the box, you will be cutting each vacuum line from both sides on the connector and reconnecting the two cut lines back together using new larger vaccum line. I actually brought a piece from the female side of one of the lines (the male side from the box does not have any extra length) with me when I bought the connecting line to make sure I got the right size. Autozone did not have vaccum line small enough so I had to go to NAPA. This is actually the most cumbersome and lengthy part of the process. The lines are tough to shove into the replacement vacuum and doing all five lines took about a half hour of wiggling/shoving. Maybe some wd-40 or other silicone lubricant would help.
Another write-up from another post:
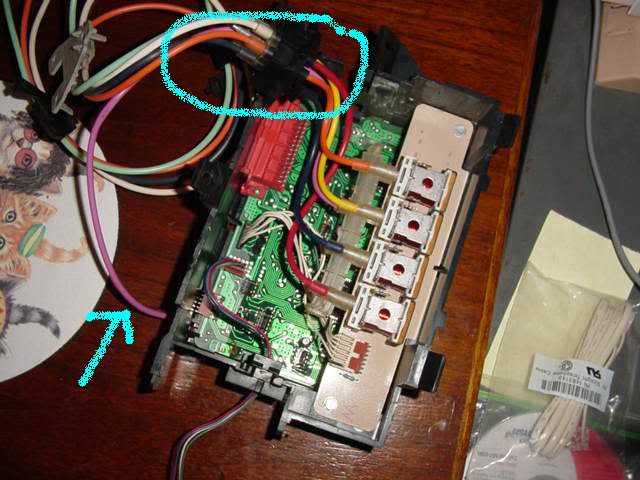
There are two bolts that hold the plastic box together. One on the middle front of the box and one on the bottom. You may not see the middle one, but you can undo it by feel. Get a flashlight and look at the box to get an idea of where the bolts are and what they are like. Undo the bolts (you do not have to take them completely out) and use the flat blade of a screwdriver to pry the box open (like a clam shell). Keep undoing the bolts until you can remove/slide the clear (and black) piece that the multi-colored lines are going to out of the box. There are lines on the other side of the piece as well, but they are different colors. Note which color lines up with which other color (make a diagram if needed).
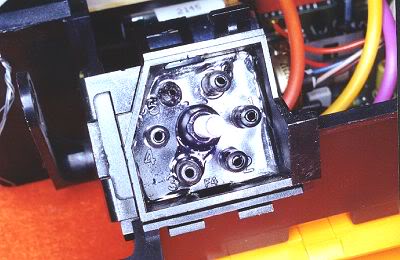
The lines lead to another clear connector insdie the box that looks like this, but you don't need to take the box apart and get to this piece for the fix. You only need to cut the lines at the connector itself.

Once the piece is dangling free from the box, you simply cut each vacuum line (do it one at a time or use your diagram of the colors) at the connector on both sides. Get some new vacuum tubing (I took a small piece from one of the lines I cut to NAPA, to insure I got tubing that was tight, but not too tight.) and rejoin/reconnect the lines, in correct order, matching the two different colors (from the diagram you made) using the new tubing. I used a little WD-40 to help me slide the vacuum lines into the tubing.
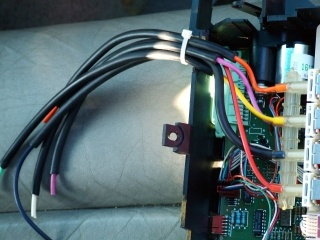
Re-route the connected tubes through the hole in the black box where the clear/black connector used to be, retighten the bolts on the black box, enjoy air from center vents.
The finished product would look similar to this photo. I only used about an inch of new tubing on mine instead of the several inches shown in this pic.
More pics showing the programmer and connector for further reference

Also, here is a thread with the diagram/schematic of the airflow and system, if your interested:
http://www.bonnevilleclub.com/forum/...=46899&start=0
Also, Imidazol mentions that the vacuum lines are NOT the same colors on both sides of the connector, which is very true. So, I just cut and spliced my vacuum lines one at a ttime to insure I matched them up.
I actually didn't have to remove the programmer box, just back out the center bolt and pry it open.
Here is the write-up I did awhile back for another member to "crack" open the programmer box (without removing it or the dashboard!) so the "connector" can be replaced with vacuum lines:
1. Remove passenger side hush panel (below glove box).
2. On the front (facing the seats) of the HVAC programmer cover/box, there is a bolt/screw about half way up the box. Laying on the floorboard on your back, with a flashlight or the footwell light from the hush panel, you can see the screw on the front of the box by looking up between the box and the backside of the dashboard, underneath the glovebox (see the diagram in the other thread if necessary). The glovebox shouldn't need to be out. Mine was anyways because I was trying all sorts of things. I think the screw is a 10mm. I used a boxend wrench and mainly by feel began to loosen it a turn at a time. I didn't want to take it all the way out because getting it back in would be very difficult. I found out that the box will "open up" enough and the connector will come out without the screw completely removed.
3. As the screw is removed, the box can by pried open with the flat blade of a screwdriver. There are two flat tabs on the box, one below the screw and one above (think of it as kind of like a childs plastic lunchbox sitting upright on one end).
4. Each time the screw is backed out, you can "open" the box a little more. The connector also has a couple of tabs on it that you need to "separate". Everytime I loosened the screw I wiggled the connector and eventually, I wiggled it off/out. It resides in a groove/track in the box that is hard to explain. But once your start wiggling, you'll understand where the catch point is.
5. Once the connector is free from the box, you will be cutting each vacuum line from both sides on the connector and reconnecting the two cut lines back together using new larger vaccum line. I actually brought a piece from the female side of one of the lines (the male side from the box does not have any extra length) with me when I bought the connecting line to make sure I got the right size. Autozone did not have vaccum line small enough so I had to go to NAPA. This is actually the most cumbersome and lengthy part of the process. The lines are tough to shove into the replacement vacuum and doing all five lines took about a half hour of wiggling/shoving. Maybe some wd-40 or other silicone lubricant would help.
Another write-up from another post:
There are two bolts that hold the plastic box together. One on the middle front of the box and one on the bottom. You may not see the middle one, but you can undo it by feel. Get a flashlight and look at the box to get an idea of where the bolts are and what they are like. Undo the bolts (you do not have to take them completely out) and use the flat blade of a screwdriver to pry the box open (like a clam shell). Keep undoing the bolts until you can remove/slide the clear (and black) piece that the multi-colored lines are going to out of the box. There are lines on the other side of the piece as well, but they are different colors. Note which color lines up with which other color (make a diagram if needed).
The lines lead to another clear connector insdie the box that looks like this, but you don't need to take the box apart and get to this piece for the fix. You only need to cut the lines at the connector itself.
Once the piece is dangling free from the box, you simply cut each vacuum line (do it one at a time or use your diagram of the colors) at the connector on both sides. Get some new vacuum tubing (I took a small piece from one of the lines I cut to NAPA, to insure I got tubing that was tight, but not too tight.) and rejoin/reconnect the lines, in correct order, matching the two different colors (from the diagram you made) using the new tubing. I used a little WD-40 to help me slide the vacuum lines into the tubing.
Re-route the connected tubes through the hole in the black box where the clear/black connector used to be, retighten the bolts on the black box, enjoy air from center vents.
The finished product would look similar to this photo. I only used about an inch of new tubing on mine instead of the several inches shown in this pic.
More pics showing the programmer and connector for further reference
Also, here is a thread with the diagram/schematic of the airflow and system, if your interested:
http://www.bonnevilleclub.com/forum/...=46899&start=0