
A/C Issue


Thread Starter
Member
Posts like a V-Tak
Joined: May 2004
Posts: 48
Likes: 0
From: Yukon, Oklahoma

EchoSSEi:
Is that photo in your sig of your car? If so, is it the emerald green like mine in my sig? Just wondering. I love that color. Can't remember the proper name right now, but I love it.
Gary
Is that photo in your sig of your car? If so, is it the emerald green like mine in my sig? Just wondering. I love that color. Can't remember the proper name right now, but I love it.
Gary

Senior Member
True Car Nut
Joined: May 2005
Posts: 3,448
Likes: 7
From: _Phoenix, AZ_ _WCBF '05, '06, '07 Survivor_ ____NEBF '07 Remnant___
Originally Posted by yukong
EchoSSEi:
Is that photo in your sig of your car? If so, is it the emerald green like mine in my sig? Just wondering. I love that color. Can't remember the proper name right now, but I love it.
Gary
Is that photo in your sig of your car? If so, is it the emerald green like mine in my sig? Just wondering. I love that color. Can't remember the proper name right now, but I love it.
Gary

Thread Starter
Member
Posts like a V-Tak
Joined: May 2004
Posts: 48
Likes: 0
From: Yukon, Oklahoma
Well, I guess I bragged too soon, or didn't knock on wood hard enough, or hold my tongue right, but it is now back to the problem. Now, it isn't as bad as it was before, but after 2 days of working right, it is now back to staying on defrost for a few minutes before slowly converting over to the center vents. I guess I will go back on the used programmer hunt. Unless there are any other suggestions.
Senior Member
True Car Nut
Joined: May 2005
Posts: 3,448
Likes: 7
From: _Phoenix, AZ_ _WCBF '05, '06, '07 Survivor_ ____NEBF '07 Remnant___
Sorry to hear that. Honestly, if it were me, I would check for vacuum leaks at the tank resevoir (under the front/passenger side fender, inderneath the car.) and along the lines. Then, I would replace the "connector" as mentioned in the procedure. THEN, if I still had the problem, I would go after the programmer.
DINOSAURUS BOOSTUS


Expert Gearhead
Joined: Mar 2005
Posts: 41,391
Likes: 30
From: Enfield, CT

Chiming in here...
Having walked through the "Nipple fix" with these guys last year..I would suggest 2 things.
First off. Connect a vacuum gauge to the purple supply line inside the cabin where it connectors to the programmer. Run the car to get vacuum in the canister and then turn off the car and walk away overnight. Observe that you have the same amount of vacuum in the morning. This is a test to ensure that the canister, check valve and rest of the system outside of the car is good and holding the vacuum for a lengthy period of time...not just a quick stop.
The next thing I'd do after that was proven out would be to replace the nipples as they are 95% of the possible reason the dealer is suggesting you replace the programmer. The dealer does not "fix" the nipples ever and would suggest replacing before fixing in this manner. Since you do gain control ... the electronics appear to be working and there is no need to replace them.
Third off.. I'd contact myself for a programmer to "test/buy" if you have no luck changing the nippiles. I've got one sitting on the shelf. It'* a last resort though. 99% of the time.. the programmer itself isn't bad.. it'* the vacuum to it or the nipples.
Having walked through the "Nipple fix" with these guys last year..I would suggest 2 things.
First off. Connect a vacuum gauge to the purple supply line inside the cabin where it connectors to the programmer. Run the car to get vacuum in the canister and then turn off the car and walk away overnight. Observe that you have the same amount of vacuum in the morning. This is a test to ensure that the canister, check valve and rest of the system outside of the car is good and holding the vacuum for a lengthy period of time...not just a quick stop.
The next thing I'd do after that was proven out would be to replace the nipples as they are 95% of the possible reason the dealer is suggesting you replace the programmer. The dealer does not "fix" the nipples ever and would suggest replacing before fixing in this manner. Since you do gain control ... the electronics appear to be working and there is no need to replace them.
Third off.. I'd contact myself for a programmer to "test/buy" if you have no luck changing the nippiles. I've got one sitting on the shelf.
It'* a last resort though. 99% of the time.. the programmer itself isn't bad.. it'* the vacuum to it or the nipples.
Thread Starter
Member
Posts like a V-Tak
Joined: May 2004
Posts: 48
Likes: 0
From: Yukon, Oklahoma
Well, I hate to sound dense, but I am not certain about how to do the "nipple fix". I have read all the threads that are linked one to the other, and I didn't see what you were talking about. Would you be so kind as to explain to me what I need to do to perform the "nipple fix". I would be forever in your debt.
Gary
Gary
Senior Member
True Car Nut
Joined: May 2005
Posts: 3,448
Likes: 7
From: _Phoenix, AZ_ _WCBF '05, '06, '07 Survivor_ ____NEBF '07 Remnant___
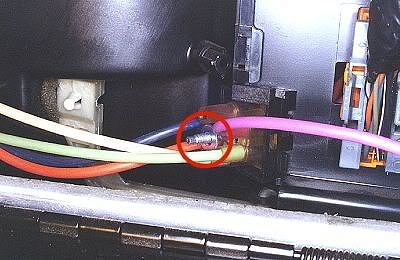
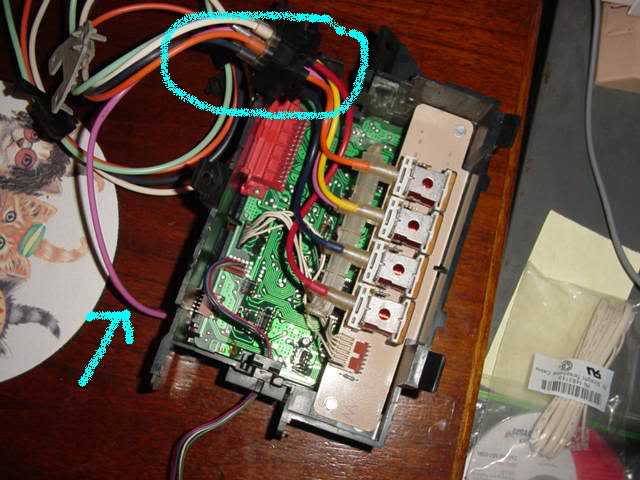
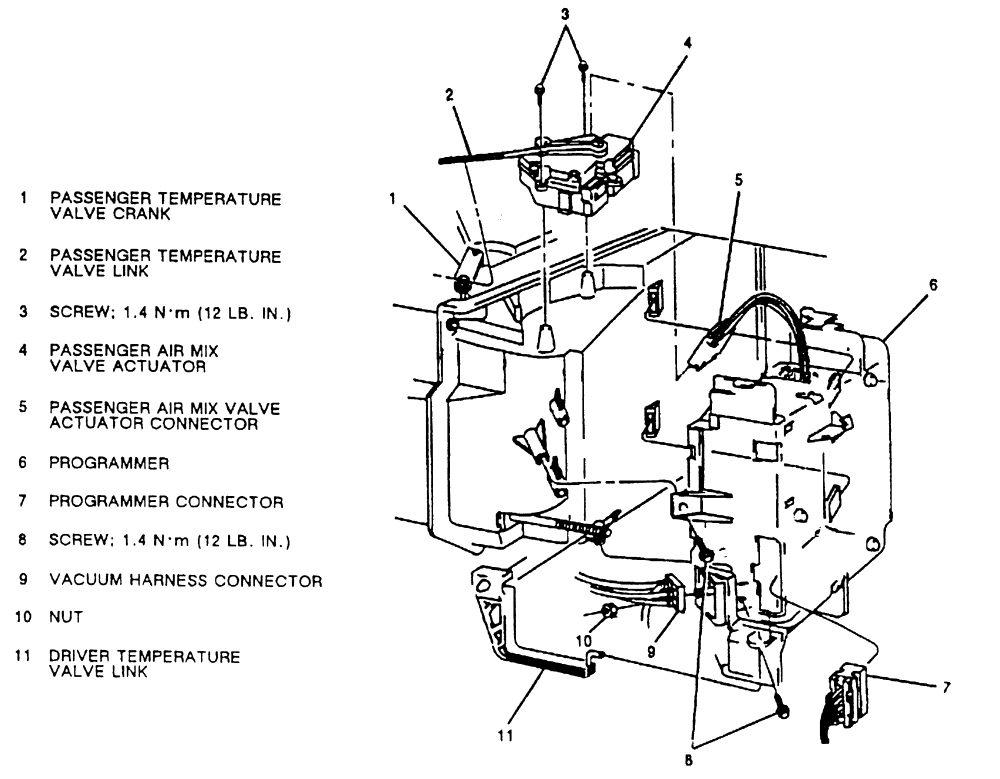
Remember, this may not be your issue, but it is a possibility. Also, the violet colored line shown in the pics below is the vacuum supply line for the HVAC system. It runs though your firewall, into a harness cover (with other wires) where it t'* off to a black vacuum line that connects to the vacuum storage tank, in front of your passenger side wheel, underneath the car. A leak in this line or storage tank (black plastic pill looking tank about 8 inches long) may cause the system to take a long time to store up enough vacuum to operate your system, which also sounds similar to what you have been experiencing, since you say the center vents take a long time to be commanded, and those vents need vacuum applied to be moved. Please, check that tank and the vacuum connector for cracks/splits/problems.
On to the "nipple" fix. First remove the plastic panel that is way underneath the dash, on the passenger side. Move the passneger seat back as far as it can go. Lay on your back and look underneath the dash. you should see a bunch of multi colored vacuum tubes going into a clear connector that is part of a black plastic box (the box is your HVAC programmer).
There are two bolts that hold the plastic box together. One on the middle front of the box and one on the bottom. You may not see the middle one, but you can undo it by feel. Get a flashlight and look at the box to get an idea of where the bolts are and what they are like. Undo the bolts (you do not have to take them completely out) and use the flat blade of a screwdriver to pry the box open (like a clam shell). Keep undoing the bolts until you can remove/slide the clear (and black) piece that the multi-colored lines are going to out of the box. There are lines on the other side of the piece as well, but they are different colors. Note which color lines up with which other color (make a diagram if needed).
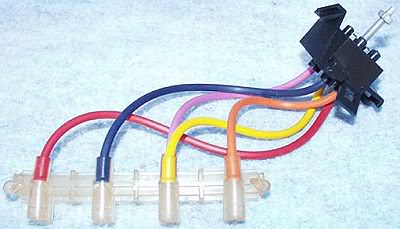
The lines lead to another clear connector insdie the box that looks like this, but you don't need to take the box apart and get to this piece for the fix. You only need to cut the lines at the connector itself.
Once the piece is dangling free from the box, you simply cut each vacuum line (do it one at a time or use your diagram of the colors) at the connector on both sides. Get some new vacuum tubing (I took a small piece from one of the lines I cut to NAPA, to insure I got tubing that was tight, but not too tight.) and rejoin/reconnect the lines, in correct order, matching the two different colors (from the diagram you made) using the new tubing. I used a little WD-40 to help me slide the vacuum lines into the tubing.
Re-route the connected tubes through the hole in the black box where the clear/black connector used to be, retighten the bolts on the black box, enjoy air from center vents.
The finished product would look similar to this photo. I only used about an inch of new tubing on mine instead of the several inches shown in this pic.
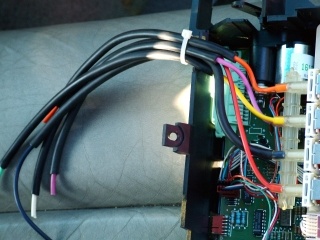
More pics showing the programmer and connector for further reference

On to the "nipple" fix. First remove the plastic panel that is way underneath the dash, on the passenger side. Move the passneger seat back as far as it can go. Lay on your back and look underneath the dash. you should see a bunch of multi colored vacuum tubes going into a clear connector that is part of a black plastic box (the box is your HVAC programmer).
There are two bolts that hold the plastic box together. One on the middle front of the box and one on the bottom. You may not see the middle one, but you can undo it by feel. Get a flashlight and look at the box to get an idea of where the bolts are and what they are like. Undo the bolts (you do not have to take them completely out) and use the flat blade of a screwdriver to pry the box open (like a clam shell). Keep undoing the bolts until you can remove/slide the clear (and black) piece that the multi-colored lines are going to out of the box. There are lines on the other side of the piece as well, but they are different colors. Note which color lines up with which other color (make a diagram if needed).
The lines lead to another clear connector insdie the box that looks like this, but you don't need to take the box apart and get to this piece for the fix. You only need to cut the lines at the connector itself.
Once the piece is dangling free from the box, you simply cut each vacuum line (do it one at a time or use your diagram of the colors) at the connector on both sides. Get some new vacuum tubing (I took a small piece from one of the lines I cut to NAPA, to insure I got tubing that was tight, but not too tight.) and rejoin/reconnect the lines, in correct order, matching the two different colors (from the diagram you made) using the new tubing. I used a little WD-40 to help me slide the vacuum lines into the tubing.
Re-route the connected tubes through the hole in the black box where the clear/black connector used to be, retighten the bolts on the black box, enjoy air from center vents.
The finished product would look similar to this photo. I only used about an inch of new tubing on mine instead of the several inches shown in this pic.
More pics showing the programmer and connector for further reference
Thread Starter
Member
Posts like a V-Tak
Joined: May 2004
Posts: 48
Likes: 0
From: Yukon, Oklahoma
Bob, Thanks for the detailed description. That will help a lot.
One thing that I have noted also, once the air finally starts coming out of the center vents, if I go into manual mode and try to shift the air down to the floor, most if not all of it comes out of the defrost. I feel a little on the floor, but the vast majority goes to defrost. And when I cycle back to center, it takes several moments to shift back to center. Does this make any difference in your evaluation of the problem?
As far as the vacuum tank, I have examined it. It appears to be fine. If I start to pull the hose off of it, I hear a hissing sound, but when i push the hose back on snug, it stops. So I believe it is holding.
Senior Member
True Car Nut
Joined: May 2005
Posts: 3,448
Likes: 7
From: _Phoenix, AZ_ _WCBF '05, '06, '07 Survivor_ ____NEBF '07 Remnant___
Originally Posted by yukong
Bob, Thanks for the detailed description. That will help a lot.
One thing that I have noted also, once the air finally starts coming out of the center vents, if I go into manual mode and try to shift the air down to the floor, most if not all of it comes out of the defrost. I feel a little on the floor, but the vast majority goes to defrost. And when I cycle back to center, it takes several moments to shift back to center. Does this make any difference in your evaluation of the problem?
As far as the vacuum tank, I have examined it. It appears to be fine. If I start to pull the hose off of it, I hear a hissing sound, but when i push the hose back on snug, it stops. So I believe it is holding.
One thing that I have noted also, once the air finally starts coming out of the center vents, if I go into manual mode and try to shift the air down to the floor, most if not all of it comes out of the defrost. I feel a little on the floor, but the vast majority goes to defrost. And when I cycle back to center, it takes several moments to shift back to center. Does this make any difference in your evaluation of the problem?
As far as the vacuum tank, I have examined it. It appears to be fine. If I start to pull the hose off of it, I hear a hissing sound, but when i push the hose back on snug, it stops. So I believe it is holding.