Transmission & dyno tune TIME: Ed's Bonne Bulid Up
 08-28-2007, 10:08 PM
#61
DINOSAURUS BOOSTUS


Expert Gearhead

Throttle cable bracket etc. It'* tough to get pics back there. The bracket I used was the N* bracket that came with the throttle body. I tried the L67 and it wasn't going to fit for me. A machinist could probably work something out though. The tip in is totally different and therefore makes it tougher. I would suggest leaving the TB off while you work things over and get the throttle cable onto the throttle. The N* throttle cable has a ball on the end..L67 has a cylinder. Using a drill I modified the hole for the slightly larger cylinder. Then began bending the bracket (leave cables attaches and slip them into bracket and move them to ensure WOT and full closed.
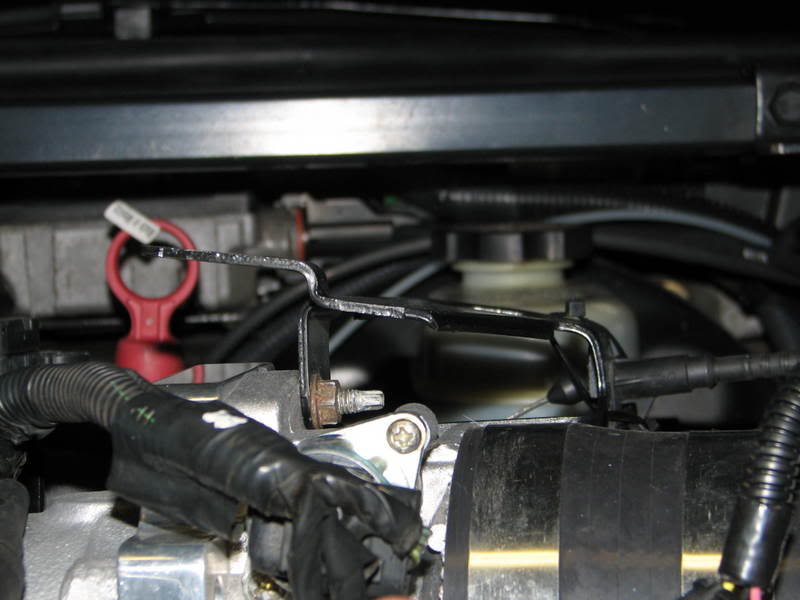
The 10mm nut at the top of the TB is one point of holding, the other is one of the two 8mm screws on the side. Here'* a shot from the radiator to show the approximate angle I bent the bracket.
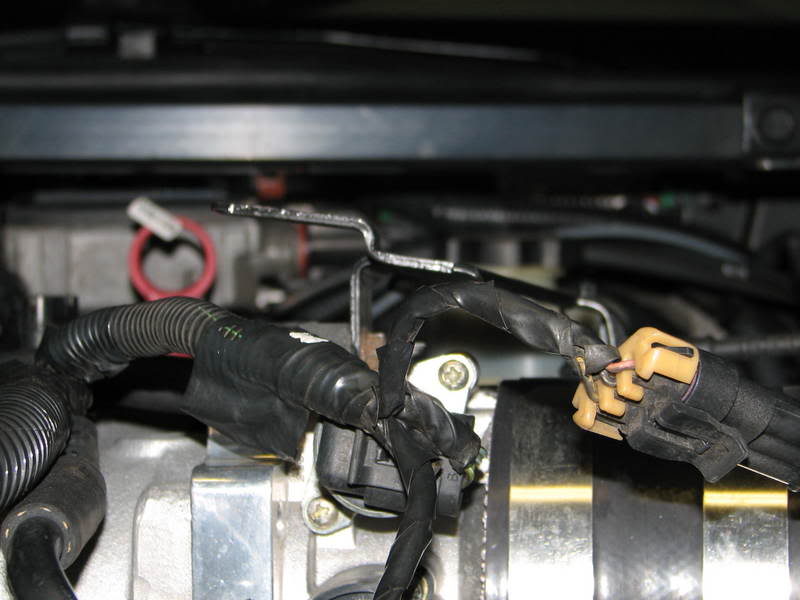
A cut between the two cables to allow the change in length. Also noted is that I have cable ties to hold the cables in place. The stock pin is in the wrong position when the cables are in the holder
You can see the cylinder of the throttle cable and backside of bracket. STB was blocking flash.

Here we see that 8mm bolt and how the bracket hole was elongated to achieve the proper angle and distance.
I can probably get reasonable measurements if you'd like.
The 10mm nut at the top of the TB is one point of holding, the other is one of the two 8mm screws on the side. Here'* a shot from the radiator to show the approximate angle I bent the bracket.
A cut between the two cables to allow the change in length. Also noted is that I have cable ties to hold the cables in place. The stock pin is in the wrong position when the cables are in the holder
You can see the cylinder of the throttle cable and backside of bracket. STB was blocking flash.
Here we see that 8mm bolt and how the bracket hole was elongated to achieve the proper angle and distance.
I can probably get reasonable measurements if you'd like.
 08-29-2007, 09:30 PM
#63
Senior Member
Certified GM nut
Thread Starter

Join Date: May 2005
Location: Wickliffe, Ohio
Posts: 2,155
Likes: 0
Received 0 Likes
on
0 Posts

I got a few things done today take a look.... Unfortunately I'm not sure if I’ll be back to wrenching untill Tuesday :( .
Touched up my alternator with the angle grinder

Put my new heater hoses on; that tool made it a breeze!

Prettied up my fuel rail (not with that paint in the background)

Next to a piece of aluminum which just came out of one of our CNC mills

Still a lot to do....


Ed
Touched up my alternator with the angle grinder
Put my new heater hoses on; that tool made it a breeze!
Prettied up my fuel rail (not with that paint in the background)
Next to a piece of aluminum which just came out of one of our CNC mills
Still a lot to do....
Ed
08-29-2007, 10:06 PM
#64
Senior Member
True Car Nut

Join Date: Mar 2005
Posts: 2,689
Likes: 0
Received 0 Likes
on
0 Posts
Wow, interesting idea with the fuel rail. I had no idea you could really paint it like that. When I get my new injectors, I'll at least clean it up...but now you got me thinking. Assuming I use engine paint (same as my valvecovers), is there any risk to painting the rail?
On another note, that thing is looking MEAN!
Take off your coolant reservoir and clean it though!!
On another note, that thing is looking MEAN!
Take off your coolant reservoir and clean it though!!
08-30-2007, 12:48 AM
#65
Senior Member
Certified GM nut
Thread Starter
Join Date: May 2005
Location: Wickliffe, Ohio
Posts: 2,155
Likes: 0
Received 0 Likes
on
0 Posts
Originally Posted by dillcc
Assuming I use engine paint (same as my valvecovers), is there any risk to painting the rail?
On another note, that thing is looking MEAN!
Take off your coolant reservoir and clean it though!!
On another note, that thing is looking MEAN!
Take off your coolant reservoir and clean it though!!
That coolant reservoir has some nice dirt baked in there very well. I must have tried to clean that thing up ever few months to no avail. I tried a little brake cleaner once but I don’t want to melt a hole in there.
Thanks for the compliments!
Ed
09-05-2007, 12:47 AM
#69
Senior Member
Certified GM nut
Thread Starter
Join Date: May 2005
Location: Wickliffe, Ohio
Posts: 2,155
Likes: 0
Received 0 Likes
on
0 Posts
Well I got back to it today after a few day break for family issues and R&R. I made a brass plug to seal off the EVAP hole on the SC, that thing is in there good too. But I think I have my headers all bolted up and ready to go, I'm alittle worried about the rear header where the crossover dumps into it. I got my coil bracket and coils on today.
I've been considering purchasing SLP headers and ditching these TOGs, every time I screw with these TOGs that crossover pipe pisses me off like no other.
I picked up some hose for the PCV and vacuum caps today.

Tomorrow should be belts, coolant, heaters hoses (motor side), STB, and a few other little things.
Ed
I've been considering purchasing SLP headers and ditching these TOGs, every time I screw with these TOGs that crossover pipe pisses me off like no other.
I picked up some hose for the PCV and vacuum caps today.
Tomorrow should be belts, coolant, heaters hoses (motor side), STB, and a few other little things.
Ed
09-05-2007, 07:55 AM
#70
DINOSAURUS BOOSTUS
Expert Gearhead
LMK when you are selling the TOGs.  (seriously)
Looking good Ed. Sounds like you will be finishing and starting it up today.
C'mon Ed...we want to hear it purr
(seriously)Looking good Ed. Sounds like you will be finishing and starting it up today.
C'mon Ed...we want to hear it purr