3800 Series II overheating
 02-03-2014, 11:56 PM
#31
Member
Posts like a V-Tak
Thread Starter

Its just been plan nasty here, so I'm soaking the bolts in Simple Green, the injectors are fully submerged, in injector cleaner, and I spent 2 hours cleaning the LIM with carb cleaner. I have one question,
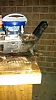
What is that? It was broken even before we pulled the LIM out, it'* in the same port that coolant runs through, and the thermostat sits on top of. Also there is a pipe that is sticking straight up, is that the EGR tube that I need to remove? If so, how do I pull it out?
Oh one more question: I want the injector unit fully submerged, including the male electric end on the injector as well? How long should I let them hang upside down for? Thank you, for your replies and time.
 02-04-2014, 04:44 AM
#32
Retired


Certified Car Nut


That'* your coolant temp sensor You need a new one. Looks like someone mashed the end where the connector connects.
Hang? Just throw them in a coffee can and let them soak. If you have access to an air compressor with a rubber tipped blow gun, regulate the PSI down to about 30-35 PSI and apply 6 volts to your injector and blow from the output end of the injector. Backwards flush.
Hang? Just throw them in a coffee can and let them soak. If you have access to an air compressor with a rubber tipped blow gun, regulate the PSI down to about 30-35 PSI and apply 6 volts to your injector and blow from the output end of the injector. Backwards flush.
__________________
Retired Administrator
2002 *-10 5.7 V8
2023 Jeep Rubicon Diesel
Retired Administrator
2002 *-10 5.7 V8
2023 Jeep Rubicon Diesel
02-04-2014, 07:31 AM
#33
Member
Posts like a V-Tak
Thread Starter
I do not have access to one. It was in another thread on the forum, about injector cleaning, I believe the idea was to make sure no particles or solid matter were in the filter screens. The connection for the temp sensor look good, its just the plastic that'* broken. How much does one run? Right now I barely have enough money for even 2 spark plugs, so I'll run some isopropyl over the connections and call it good.
02-04-2014, 12:35 PM
#34
Senior Member
True Car Nut
10-11 bucks plus shipping, we have a discount code thread too for 5%. its a pretty important sensor, bases fan operation and engine fueling off that one
02-04-2014, 01:50 PM
#35
Senior Member
True Car Nut
I think I know why you thought the car was overheating before, that Engine Coolant Temp sensor has 3 leads on it, one goes to the PCM, the other to your dash gauge, and the third is the ground, I am betting one of the signal wires were intermittently shorting out, so I am betting it was not overheating at all before.
It is still good that you are doing this job, it will save you from the engine failing eventually, those old nylon 6,6 gaskets always fail, it is just a matter of time.
When I replaced my ECT I think I went with a SMP TX-66T at first, but found its readings on the gauge to be off, it was not matching up to what the PCM was seeing, so I had to buy an AC Delco ECT and replace it, that was spot on, AC Delco, or Delphi should be fine,
You can go with the others if money is tight, but there is a chance the readings on the dash will be a bit off, it won't really be off enough to hurt anything though, as long as the PCM see'* the correct temp all is well.
If you get a new ECT that does not have any sealant already in the threads, then you will need a little of this.
I'd get this one if possible.
ACDELCO Part # 213815
Shipped from Rockauto.com it is $18.65 total, and with it you should not need to buy any thread sealant, the threads should already have some on them, I used a tiny bit of plumbers teflon tape as an extra precaution.
The AIRTEX / WELLS Part # 9J8 ECT may work as well, and is a few dollars cheaper, I have not tried that one myself though, I know the AC Delco one works perfectly.
When you replace the sensor make sure to slip that foil looking cover over top of the sensor, that area gets quite hot, which is why the sensor should have had the foil/heat shielding on it.
As for the EGR Stovepipe, I just noticed for some reason most of my pics are gone from that site, I'll have to take the time some day to find the right pics and add them back, without them the thread is incomplete.
That pipe sticking up is the one, I had to lock vice grips on it, and get a little forceful, when it comes out save it, you can use it to put over top the new smaller diameter EGR Stovepipe, and tap it with a hammer to install the new one till it is flush.
NOTE: You should have two stovepipes in that kit, it is easy to tell which one is the right one, only one should fit on the hole correctly.
Let me try to find my pics on the EGR stovepipe.
02-04-2014, 03:03 PM
#36
Member
Posts like a V-Tak
Thread Starter
One more question, in the kit there is a blue threaded tube in a packet w/ 2 sm. Dia. Orange o-rings, and 2 leg. Dia. Black o-rings where do they go? I also have 12 sm. O-rings are they for injectors or the bolts?
02-04-2014, 05:32 PM
#37
Member
Posts like a V-Tak
Thread Starter
Never mind, I answered my own question about the blue grommet, I'm guessing it goes to the PCV valve It also turns out the previous owner had the manifold replaced in 2003 or 2004. The intake manifold has a date of 12-17-03, but its listed as AC/GM so it was replaced with the same defective equipment.
02-04-2014, 05:32 PM
#38
Senior Member
True Car Nut
I think the bigger black one also went to the connector that hooks on top of the PCV, the next size smaller black o-ring would be for the lower larger coolant elbow that some cars have, that o-ring is not needed, well it could be used on the lower aluminum nipple of the tensioner, but if the old o-ring on that is fine I'd give it a lil light coat of RTV and reuse it.
I am surprised you got 12 o-rings with that kit, I only got 6, and they were for the bottoms of the injectors, they all would be for the injectors.
02-04-2014, 05:35 PM
#39
Senior Member
True Car Nut
Never mind, I answered my own question about the blue grommet, I'm guessing it goes to the PCV valve It also turns out the previous owner had the manifold replaced in 2003 or 2004. The intake manifold has a date of 12-17-03, but its listed as AC/GM so it was replaced with the same defective equipment.
Here is a video of a UIM exploding.
02-04-2014, 06:13 PM
#40
Member
Posts like a V-Tak
Thread Starter
I was given 2 diff. Diameter o-rings. I think one set is for the nozzle of the injectors, the thinner o-rings are for the tops of them. So I made a stupid rookie mistake, my torque wrench is an older simple ft/lbs and newtons wrench.Everything for the car is in/lbs. guess what I tried to do? I hope I hadn't damaged anything when I tried to go half torque on the bolts. The 12 pt socket started to slip on number 1 bolt...