3800 Series II overheating


 02-02-2014, 09:06 AM
#22
Member
Posts like a V-Tak
Thread Starter
Gotta love birthdays. I did pick up the Dorman kit, and the Fel-pro LIM gasket, along with oil. Next paycheck I'll pick up sparkplugs, I still have an extra set of wires for them. I still need to get coolant. Since we're going to have a heat wave today of 50 something, today is my window to do the work.
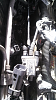
However I pulled 3 plugs yesterday:
Plug 3
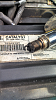
Plug 1
Plug 5
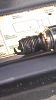
This is of the oil on the dip stick.
I didn't realise how much grime was on the engine...we used to call it 'the black death' when I was working on MGs. I'm unsure how much good the oil on the dipstick shot is, but included it anyway.
I had gone looking for the instructions, I had seen a great write up with pics to go along with it, and now cannot find it. So if you could send me the links that would be great. Thank you to everyone
However I pulled 3 plugs yesterday:

Plug 3

Plug 1

Plug 5

This is of the oil on the dip stick.
I didn't realise how much grime was on the engine...we used to call it 'the black death' when I was working on MGs. I'm unsure how much good the oil on the dipstick shot is, but included it anyway.
I had gone looking for the instructions, I had seen a great write up with pics to go along with it, and now cannot find it. So if you could send me the links that would be great. Thank you to everyone
02-02-2014, 11:35 AM
#23
Senior Member


True Car Nut

Happy Birthday, glad you were able to get the parts!
Here are some links to help you.
A write up.
https://www.gmforum.com/mechanical-1...ts-l36-297702/
A video, ignore the super charger part, this will mainly help once you have the UIM off of there.
http://www.cpaclubgp.com/misc/lim-gasket.html
And a link from 3800 Pro, it is the thread I made when I needed help doing the UIM/LIM job, since I had never done one before, it is a long thread, but there are many questions in there that are helpful.
Replacing UIM, UIM Gasket, and LIM Gasket. - 3800Pro.com Forum
Plug 3 does not look too bad, but the others are fouled for sure, looks like you may have been running rich for a while, once you get the plugs changed and the UIM/LIM job finished, I'd get a little seafoam and run it through the break booster, slowly at first, then pour enough in to stall it out, leave it and come back to start it around an hour later, that should help remove a little of that carbon from the internals.
With the way those look I'd even consider getting a syringe and tubing, and a little of the old GM Top End Cleaner, I'd pull all plugs and put a few cc'* of that in the plug holes, leave it till the next day, and then suction any remaining fluid back out of the cylinders.
If you cannot do that at least Seafoam it once all is done.
Your oil color does not look too bad, just looks like it was do for a change anyway.
Any questions you may have along your repair job, feel free to ask them here.
02-02-2014, 09:32 PM
#24
Member
Posts like a V-Tak
Thread Starter
The sad part is, I had changed the oil just last month, not even 5k miles.
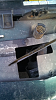
I am rather ashamed to say, that'* the top of my engine.
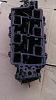
We had to stop here, still need to get a new tube of rtv sealant anyway. The amount of coolant and other crap on the outside of the manifold was astounding. A question: what should I use on the bolts for the LIM?
Thank you for all of your help.

I am rather ashamed to say, that'* the top of my engine.


We had to stop here, still need to get a new tube of rtv sealant anyway. The amount of coolant and other crap on the outside of the manifold was astounding. A question: what should I use on the bolts for the LIM?
Thank you for all of your help.
02-02-2014, 11:13 PM
#25
Senior Member
True Car Nut
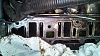
I see you broke a soft EVAP connector going to the purge valve, you can buy those for a few bucks at any auto parts store.
I am betting most of your soft EVAP connectors will eventually need replacing, they dryrot after time..
That oil build up from PCV blowback is pretty much normal after a lot of miles, I wish there was a way to filter it somehow so all of that oil would not get into there.
Did you not get a tube of black RTV with the Fel-PRO LIM Kit?
That is what I used for the four corners that you apply it to.
For your LIM bolts, I'd at least recommend using a wire brush, and or carefully use a razor blade to get the bolt threads as clean as you can, the best way to clean them would be if you had a spare nut that fit the bolts, then you could cut a slit into it so it would act as a thread chaser, you want those bolts as clean as possible so the new thread sealant works well, and so they torque right.
Once clean, I used Loctite� Threadlocker Blue 242 on them, this will also work, Permatex 24200 Medium Strength Threadlocker Blue.
I know that thread of mine has a lot of pages, but you should find a bit of helpful info there, I asked all questions that I could think of to ask, since it was my first time doing the job, I wanted to get it done right.
Also, I see that coolant elbow still in there, do not reuse that, it will not last, they almost always fall apart when removing them.
Replace that with Dorman 47065HP, the Aluminum Coolant Elbow, don't go with the plastic elbow again.
Don't forget to remove that old EGR stove pipe, and replace it with the smaller diameter one that comes with the Dorman UIM Kit.
When you are all done, if you Seafoam it like I suggested, I bet you will have a lot of thick white smoke coming out, do that early, or really late, so your neighbors won't have a fit because you smoked out the neighborhood.
02-03-2014, 12:26 AM
#26
Member
Posts like a V-Tak
Thread Starter
I've got to register on 3800 pro before I can read the rest of that thread, I was reading it during the game. So nothing looked horrendously out of place?
I couldn't find on any threads or in the book what that connection was, thank you. We labelled everything and bagged and tagged everything, my wife and I didn't take any chances. Thank the gods I married the theatre company'* Technical Director.
I couldn't find on any threads or in the book what that connection was, thank you. We labelled everything and bagged and tagged everything, my wife and I didn't take any chances. Thank the gods I married the theatre company'* Technical Director.
02-03-2014, 06:34 AM
#27
Senior Member
True Car Nut
Thread Sealants : Permatex� High Performance Thread Sealant
this is what i use, you can use the locktite he recommended because it is listed as a sealant also, but i dont like locktite it makes everything a pain to get back apart. i have never used it and never had anything that was properly torqued come back apart because i didn't use it. my bonnie has been well maintained since new and it looked like that when i did my gaskets again. i spent like an hour on the lower with simple green and thankfully got the new upper to put back.
this is what i use, you can use the locktite he recommended because it is listed as a sealant also, but i dont like locktite it makes everything a pain to get back apart. i have never used it and never had anything that was properly torqued come back apart because i didn't use it. my bonnie has been well maintained since new and it looked like that when i did my gaskets again. i spent like an hour on the lower with simple green and thankfully got the new upper to put back.
02-03-2014, 02:19 PM
#28
Member
Posts like a V-Tak
Thread Starter
I have gotten to page 8 of your thread William, it'* great. I've been taking notes. I do have a question though. Since I've got the injectors out anyway: when I soak them, completely submerged do I use a combination injector cleaner and gasoline, or just injector cleaner in the coffee can?
Also I know that people have been saying to use brake cleaner on the LIM, can I get away with carb cleaner? It'* snowing/raining so I have a day for upkeep. Thank you. Oh, one more question, when cleaning the LIM surface, can I use steel wool or should I use a brillo pad?
Also I know that people have been saying to use brake cleaner on the LIM, can I get away with carb cleaner? It'* snowing/raining so I have a day for upkeep. Thank you. Oh, one more question, when cleaning the LIM surface, can I use steel wool or should I use a brillo pad?
Last edited by WesleySands; 02-03-2014 at 02:22 PM.
02-03-2014, 02:27 PM
#29
Retired

Certified Car Nut

Use injector cleaner. Gas just dilutes it.
Carb cleaner will work better on the LIM. It'* designed to clean the dirty crap off, and use the brillo pad vs the steel wool. You don't want pieces of steel wool floating around in your engine.
Carb cleaner will work better on the LIM. It'* designed to clean the dirty crap off, and use the brillo pad vs the steel wool. You don't want pieces of steel wool floating around in your engine.
__________________
Retired Administrator
2002 *-10 5.7 V8
2023 Jeep Rubicon Diesel
Retired Administrator
2002 *-10 5.7 V8
2023 Jeep Rubicon Diesel
02-03-2014, 07:45 PM
#30
Senior Member
True Car Nut
I went with blue threadlock because it is what the manual suggested, and also when I removed my UIM, I noticed a few bolts were a tad loose, also since the original UIM and all made it 134K miles for me, I don't plan to have to do the job again, it is done right so it should hold up another 130-150k hopefully.
When I did my fuel injectors I did what the guy in this video did, I had to buy the injector wiring end, the momentary off/on switch, and the syringe, it worked well to clean out the injectors.
Carb cleaner will work to clean the LIM, I soaked mine in a trash can filled with dish soap, then lightly used a Brillo pad on it, I was careful scrubbing the area where the gaskets go, you don't want any gouging or pitting, I had some small places beforehand, so I used some JB Weld to fill them, then scraped carefully with a razor.
Hope the rest of the job goes well for you!