
my little bonneville project progress thread
 12-23-2007, 12:04 PM
#61
Senior Member
Certified GM nut

Join Date: Oct 2006
Location: burb of detroit. 2 miles north of 8 mile Rd.
Posts: 2,028
Likes: 0
Received 1 Like
on
1 Post

coming along. nice work Chris.
did you say you have a press, or a freind with a press?
and as far as the wp goes, the sc and lim out, doesnt really make it much easier to remove. you still have to remove the accessory bracket. so keep that in mind. certainly not impossible, but its a PITA.(while in the car anyway).
idk if you have the torque specs, but the LIM is 88 in #*. the sc is 20 ft #*. and the fuel rail is 15 ft #*.
 12-23-2007, 12:16 PM
#62
Senior Member
Posts like a Supercharger
Thread Starter

Join Date: Dec 2007
Posts: 170
Likes: 0
Received 0 Likes
on
0 Posts
Originally Posted by samueljackson
coming along. nice work Chris.
did you say you have a press, or a freind with a press?
and as far as the wp goes, the sc and lim out, doesnt really make it much easier to remove. you still have to remove the accessory bracket. so keep that in mind. certainly not impossible, but its a PITA.(while in the car anyway).
idk if you have the torque specs, but the LIM is 88 in #*. the sc is 20 ft #*. and the fuel rail is 15 ft #*.
did you say you have a press, or a freind with a press?
and as far as the wp goes, the sc and lim out, doesnt really make it much easier to remove. you still have to remove the accessory bracket. so keep that in mind. certainly not impossible, but its a PITA.(while in the car anyway).
idk if you have the torque specs, but the LIM is 88 in #*. the sc is 20 ft #*. and the fuel rail is 15 ft #*.
i was thinking about cleaning and painting the LIM anyway so install may be as late as next week. will probably not get any work done tomorrow or christmas day. plus i need to put brakes on my sisters car before she leaves and replace broken motor mount in my daily driven clunker.
thanks for the specs, my sister just brought the service manuals down from binghamton yesterday. the GM manuals don't have any info about rebuilding the charger, just chaning oil heh? :?
going to browse through it more while i eat now. your thread has me wanting to port the LIM.
 12-23-2007, 12:48 PM
#63
Senior Member
Certified GM nut
Join Date: Oct 2006
Location: burb of detroit. 2 miles north of 8 mile Rd.
Posts: 2,028
Likes: 0
Received 1 Like
on
1 Post
yeah, at the time those manuals were published, gm didnt want any service on the chargers. just replacement  . i just got a quote from the dealer last week. $1500. YEAH RIGHT.
but anyway, running into the same wall you did with the manual, i recently asked for torque specs for the nosedrive. sir wren enlightened me with this
ohh, and the book says to torque to specs twice on the LIM. almost forgot to mention that. i went through the sequence for a 3rd, just to be sure
. i just got a quote from the dealer last week. $1500. YEAH RIGHT. but anyway, running into the same wall you did with the manual, i recently asked for torque specs for the nosedrive. sir wren enlightened me with this
Originally Posted by willwren
20 ft/lbs. That'* an Eaton and Magnusson spec. I suggest you 'stage torque'.
Criss-cross pattern to 10, then 15, then 20. You'll get good even torque and no leaks gauranteed.
Criss-cross pattern to 10, then 15, then 20. You'll get good even torque and no leaks gauranteed.
ohh, and the book says to torque to specs twice on the LIM. almost forgot to mention that. i went through the sequence for a 3rd, just to be sure
12-23-2007, 01:13 PM
#64
Senior Member
Posts like a Supercharger
Thread Starter
Join Date: Dec 2007
Posts: 170
Likes: 0
Received 0 Likes
on
0 Posts
Originally Posted by samueljackson
sir wren enlightened me with this
ohh, and the book says to torque to specs twice on the LIM. almost forgot to mention that. i went through the sequence for a 3rd, just to be sure
Originally Posted by willwren
20 ft/lbs. That'* an Eaton and Magnusson spec. I suggest you 'stage torque'.
Criss-cross pattern to 10, then 15, then 20. You'll get good even torque and no leaks gauranteed.
Criss-cross pattern to 10, then 15, then 20. You'll get good even torque and no leaks gauranteed.
ohh, and the book says to torque to specs twice on the LIM. almost forgot to mention that. i went through the sequence for a 3rd, just to be sure
Take careful measurements of the depth of the 3-pin plate in the nosedrive that the coupler mounts to BEFORE pulling that apart
12-24-2007, 08:35 PM
#65
Senior Member
Posts like a Supercharger
Thread Starter
Join Date: Dec 2007
Posts: 170
Likes: 0
Received 0 Likes
on
0 Posts
spend about 30 minutes ensuring the LIM and valve cover gasket surfaces were clean. ripped nose cone off supercharger. i understand 100% how it is assembled now. i don't want to put this back together without replacing the needle bearings too so i'll probably be pushed back a few days waiting for parts.
probably won't get back to it until wed between christmas and some small plumbing work i need to do anyway.
what are the stock injectors in these? if i replace them what size should i go with if only mods are pulley, chip or computer reprogram and a homemade cai? i believe the thermostat that came out was a 195. should i change that to a 180? what temperature does stock ecu need to see to go closed loop? 175?
what is the scan tool of preference for these cars? does this computer get a chip or use a plug in programmer?
my directscan for the turbo car allows me to view all sensor outputs and makes quick work of adjusting things like the tps or seeing knock count/retard. i'd like to be able to do that with this car.
off to google.
12-25-2007, 09:58 AM
#66
Senior Member
Certified GM nut
Join Date: Oct 2006
Location: burb of detroit. 2 miles north of 8 mile Rd.
Posts: 2,028
Likes: 0
Received 1 Like
on
1 Post
i believe the stock injectors are 32#, not 100% on that, but regardless, it would take quite a few more mods to out flow the stockers. so i wouldnt worry about replacing. you may consider a flow matched set. do a search for "fie".
the stock is a 192/195 stat. you can go to a 180. but i would not go any lower than that. i believe the ecu needs to see 130 to go into closed loop. so 180 isnt an issue.
for 95, you would need a new chip, or a stock e-prom (chip) re-flashed. ryan @ gmtuners.com , would be the guy to see for that.
i use the actron cp9145. that would work for ur moms 95 obd 1.5
there are others that would work, but i dont recall any names or part #*.
12-25-2007, 01:34 PM
#67
Senior Member
Posts like a Supercharger
Thread Starter
Join Date: Dec 2007
Posts: 170
Likes: 0
Received 0 Likes
on
0 Posts
got a little work done prior to having to prepare for christmas dinner. homemade press worked great!
used an old chain alignment tool to measure depth of pin plate prior to removal. mine sat about 1372 thousands of an inch in.

old press and rusty bottle jack worked flawless.
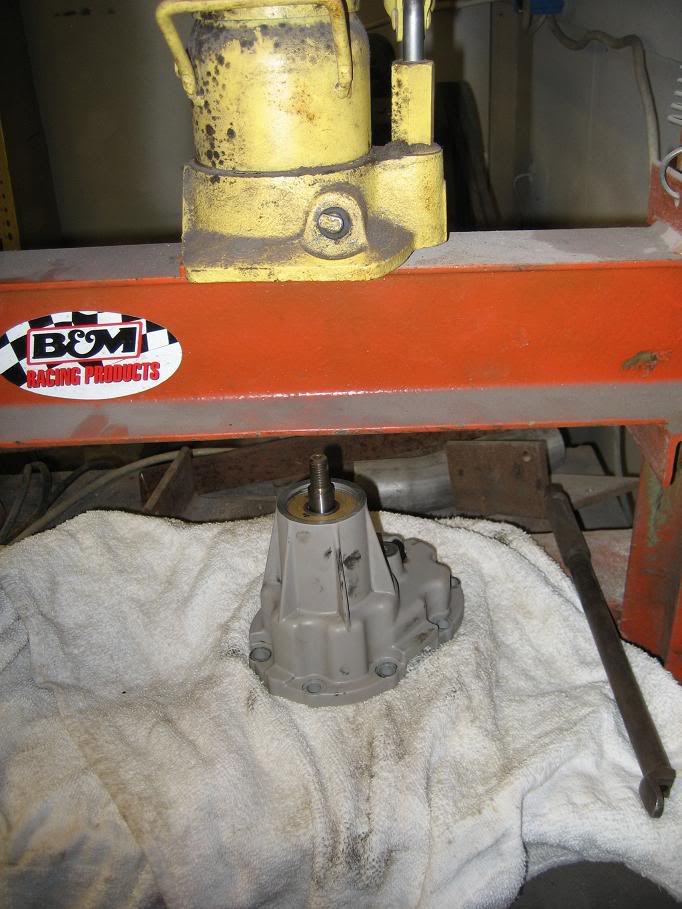
used several cups from 4 in 1 ball joint tool to space and support nosecone.

only question i have at this point. i assume the 3 pin plate is pressed on the shaft the same as a water pump. that stated can i secure the bearing and plate and press shaft through?

much thanks to all who have given input and guided me! heers:
used an old chain alignment tool to measure depth of pin plate prior to removal. mine sat about 1372 thousands of an inch in.
old press and rusty bottle jack worked flawless.
used several cups from 4 in 1 ball joint tool to space and support nosecone.
only question i have at this point. i assume the 3 pin plate is pressed on the shaft the same as a water pump. that stated can i secure the bearing and plate and press shaft through?
much thanks to all who have given input and guided me!
12-25-2007, 03:37 PM
#68
Junior Member
Posts like a Ricer Type-R

For the pin plate, fixture the shaft in the press through 2 V plates pulley end (threaded) down. Press the shaft down through it and the bearing. Reverse procedure to put it back. The trick when reassembling is a push-me pull-you arrangement where you'll have to have support for one bearing while pressing the other. I install the inside bearing and shaft first, then use a large socket that just fits within the pins to sit on the press, set the pin plate on that, then press the top bearing and seal with another large socket. Best to alternat sockets up there to alternately press on the inner rim, then the outer rim of the bearing and seal, and alternate as you go down a little each time.
With regards to SamJackson'* post above, the stock injectors are 29#. Not 32. I'm currently running 32'*, and it took me a LOT of work to get to the point I was out-flowing them. Stick with stockers, and run them through FIE if you like. He does great work, and I hear his right-hand-man (occasional free labor) is a pretty smart dude.
With regards to SamJackson'* post above, the stock injectors are 29#. Not 32. I'm currently running 32'*, and it took me a LOT of work to get to the point I was out-flowing them. Stick with stockers, and run them through FIE if you like. He does great work, and I hear his right-hand-man (occasional free labor) is a pretty smart dude.
12-25-2007, 06:42 PM
#69
Senior Member
Posts like a Supercharger
Thread Starter
Join Date: Dec 2007
Posts: 170
Likes: 0
Received 0 Likes
on
0 Posts
Originally Posted by willwren
For the pin plate, fixture the shaft in the press through 2 V plates pulley end (threaded) down. Press the shaft down through it and the bearing. Reverse procedure to put it back. The trick when reassembling is a push-me pull-you arrangement where you'll have to have support for one bearing while pressing the other. I install the inside bearing and shaft first, then use a large socket that just fits within the pins to sit on the press, set the pin plate on that, then press the top bearing and seal with another large socket. Best to alternat sockets up there to alternately press on the inner rim, then the outer rim of the bearing and seal, and alternate as you go down a little each time.
With regards to SamJackson'* post above, the stock injectors are 29#. Not 32. I'm currently running 32'*, and it took me a LOT of work to get to the point I was out-flowing them. Stick with stockers, and run them through FIE if you like. He does great work, and I hear his right-hand-man (occasional free labor) is a pretty smart dude.
With regards to SamJackson'* post above, the stock injectors are 29#. Not 32. I'm currently running 32'*, and it took me a LOT of work to get to the point I was out-flowing them. Stick with stockers, and run them through FIE if you like. He does great work, and I hear his right-hand-man (occasional free labor) is a pretty smart dude.
12-27-2007, 09:56 PM
#70
Senior Member
Posts like a Supercharger
Thread Starter
Join Date: Dec 2007
Posts: 170
Likes: 0
Received 0 Likes
on
0 Posts
trying to get back on track. cleaned the LIM till i grew tired of doing so. i'll never understand where one would get the patience to polish such an item.


waiting for blower and blower parts.
waiting for blower and blower parts.