
2000+ door panel removal & installation


Thread Starter
BANNED
Joined: Mar 2004
Posts: 0
Likes: 5
From: Purgatory

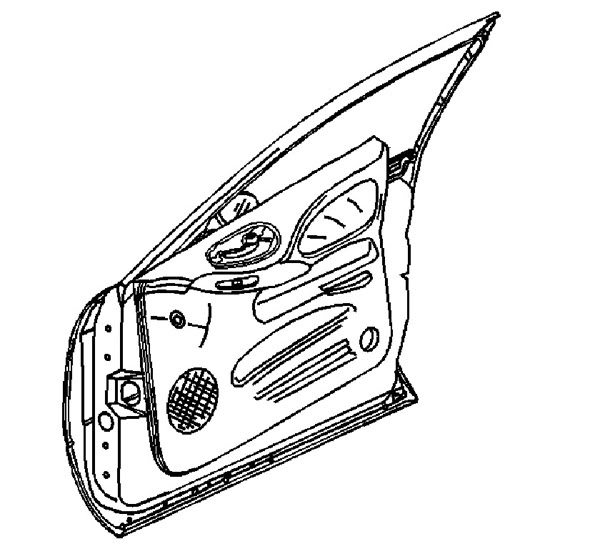
Trim Panel Replacement - Side Front Door
Tools Required
J 36796 Clip Zip Tool
J 38778 Door Trim Pad Clip Remover
Removal Procedure
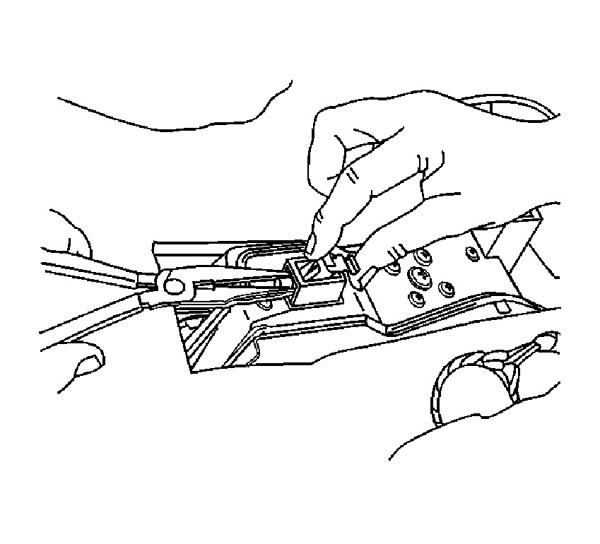
Remove the inside door handle bezel. The front inside door handle bezel has electrical connectors, the rear does not.
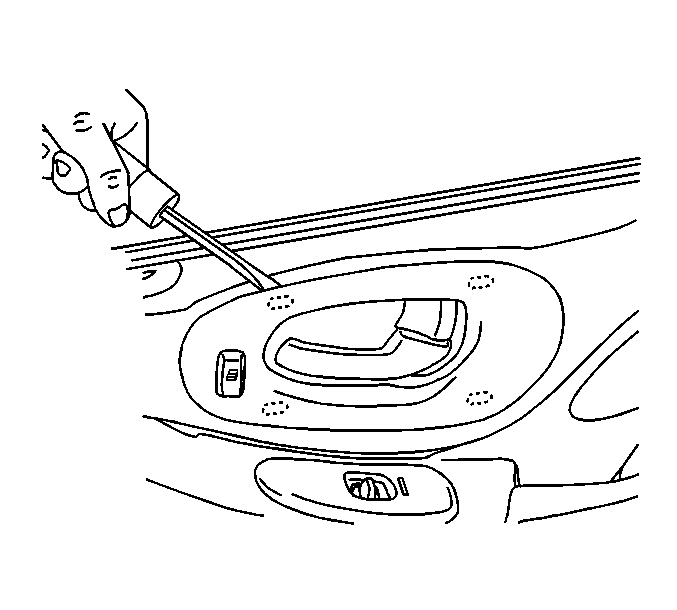
Insert a flat bladed tool behind the forward upper edge of the door handle bezel.
Gently pry the upper portion of the bezel away from the door trim panel.

Pull the bezel forward over the inside door handle.
Disconnect the electrical connector.
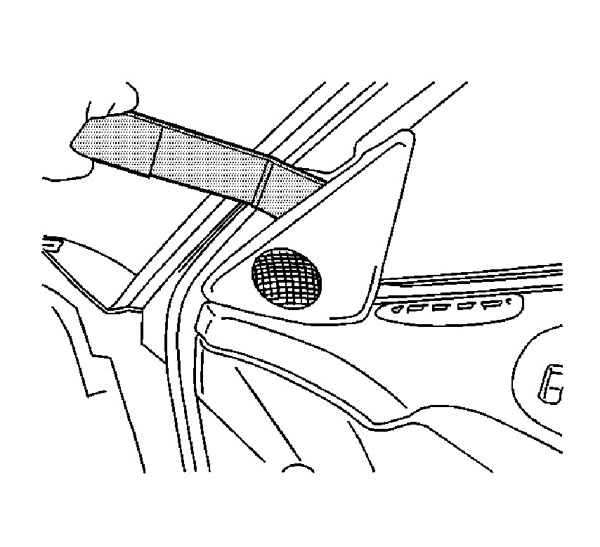
Remove the upper door trim panel.
Use the J 38778 in order to release the retainer at the top of the upper door trim panel.
Lift the upper door trim panel upwards in order to remove.
Disconnect the wire harness to the tweeter.
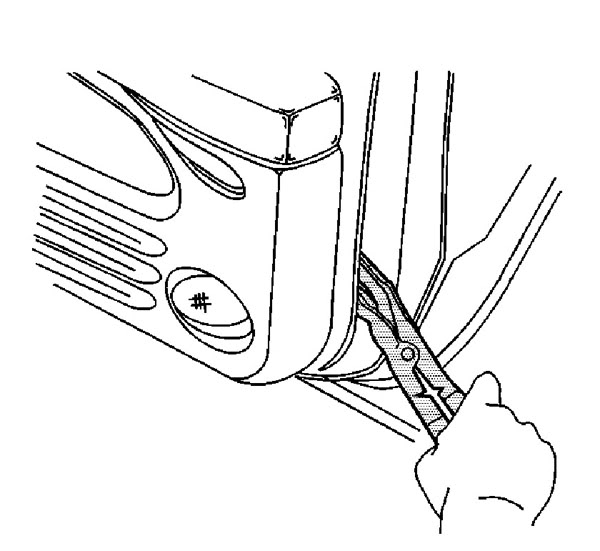
Use the J 36796 in order to release the retainers around the outside edges of the door trim panel. Start at the bottom and work around.
Starting at the bottom rear of the door trim panel pull inwards, while lifting upwards in order to remove.
Disconnect the door trim panel wiring harness.
Remove the armrest pull cup retainers from the inside of the door trim panel.
Use needle nose pliers to compress the 360 clip.
Pull the 360 clip out of the nylon nut on the door trim panel.
Installation Procedure
Install the 360 clip retainers into the nylon nuts on the inner door panel.
Connect the door wire harness to the door trim panel wire harness.

Starting at the bottom, secure the door trim panel around the outside edges with the retainers (2).
Align the door trim panel to the 360 clip retainers (1).
Snap the retainers in to secure the center of the door trim panel to the inner door panel.
Pull on the armrest to assure proper fit.
Push outwards near the top of the door trim panel in order to snap the top door trim panel retainer into the channel in the window inner belt seal strip.
Install the inside door handle bezel.

Connect the electrical connectors, if any, to the inside door handle bezel.
Guide the inside door handle through the opening in the door handle bezel.
Snap the door handle bezel into place.
Work the rubber around and behind both the manual lock **** and the inside door handle.
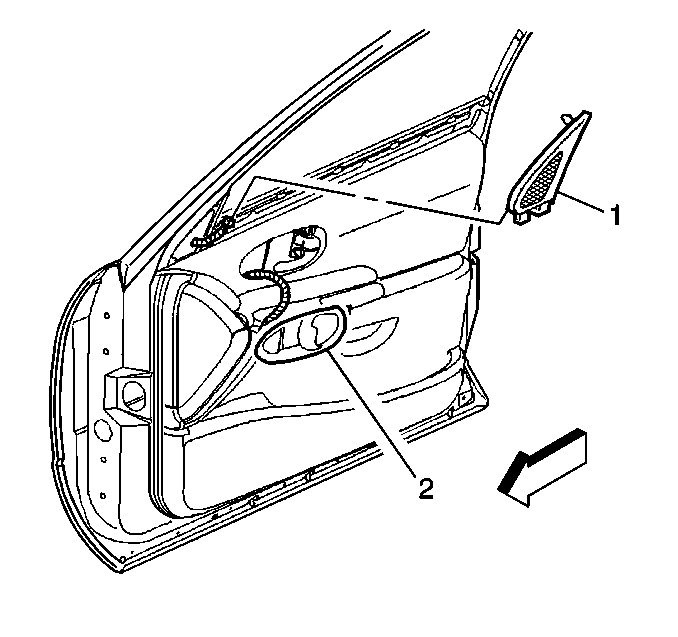
Install the upper door trim panel (1).
Connect the wire harness to the tweeter.
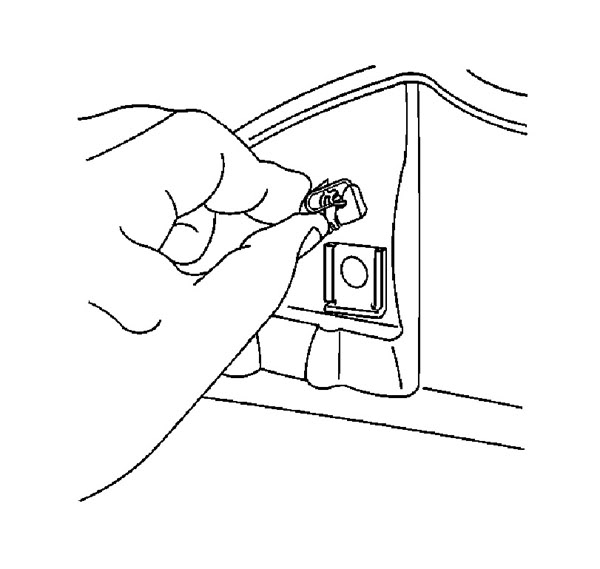
Insert the tabs into the slots on the door trim panel.
Insert the retainer into the hole in the door frame.
Trim Panel Replacement - Side Rear Door
Tools Required
J 36796 Clip Zip Tool
Removal Procedure
Remove the inside door handle bezel. The front inside door handle bezel has electrical connectors, the rear does not.
Insert a flat bladed tool behind the forward upper edge of the door handle bezel.
Gently pry the upper portion of the bezel away from the door trim panel.
Pull the bezel forward over the inside door handle.
Disconnect the electrical connector.

Use the J 36796 in order to release the retainers around the outside edges of the door trim panel.
Rock the door trim panel (1) upwards, starting at the rear, while lifting upwards to remove.
Disconnect the door trim panel wiring harness.
Remove the armrest pull cup retainers from the inside of the door trim panel.
Use needle nose pliers to compress the 360 clip.
Pull the 360 clip out of the nylon nut on the door trim panel.
Installation Procedure
Install the 360 clip to the nylon nuts on the inner door panel by sliding the 360 clip down into the grooves in the nylon nuts.
Connect the trim panel electrical connector to the door wiring harness connector.
Starting at the bottom, secure the door trim panel around the outside edges with the retainers (2).
Align the door trim panel to the armrest pull cup retainers (1).
Snap the retainers in to secure the center of the door trim panel to the inner door panel.
Pull on the armrest to assure proper fit.
Push outwards near the top of the door trim panel in order to snap the top door trim panel retainer into the channel in the window inner belt seal strip.
Install the inside door handle bezel.
Connect the electrical connectors, if any, to the inside door handle bezel.
Guide the inside door handle through the opening in the door handle bezel.
Snap the door handle bezel into place.
Work the rubber around and behind both the manual lock **** and the inside door handle.
Install the upper door trim panel (1).
Connect the wire harness to the tweeter.
Insert the tabs into the slots on the door trim panel.
Insert the retainer into the hole in the door frame.
Tools Required
J 36796 Clip Zip Tool
J 38778 Door Trim Pad Clip Remover
Removal Procedure
Remove the inside door handle bezel. The front inside door handle bezel has electrical connectors, the rear does not.
Insert a flat bladed tool behind the forward upper edge of the door handle bezel.
Gently pry the upper portion of the bezel away from the door trim panel.
Pull the bezel forward over the inside door handle.
Disconnect the electrical connector.
Remove the upper door trim panel.
Use the J 38778 in order to release the retainer at the top of the upper door trim panel.
Lift the upper door trim panel upwards in order to remove.
Disconnect the wire harness to the tweeter.
Use the J 36796 in order to release the retainers around the outside edges of the door trim panel. Start at the bottom and work around.
Starting at the bottom rear of the door trim panel pull inwards, while lifting upwards in order to remove.
Disconnect the door trim panel wiring harness.
Remove the armrest pull cup retainers from the inside of the door trim panel.
Use needle nose pliers to compress the 360 clip.
Pull the 360 clip out of the nylon nut on the door trim panel.
Installation Procedure
Install the 360 clip retainers into the nylon nuts on the inner door panel.
Connect the door wire harness to the door trim panel wire harness.
Starting at the bottom, secure the door trim panel around the outside edges with the retainers (2).
Align the door trim panel to the 360 clip retainers (1).
Snap the retainers in to secure the center of the door trim panel to the inner door panel.
Pull on the armrest to assure proper fit.
Push outwards near the top of the door trim panel in order to snap the top door trim panel retainer into the channel in the window inner belt seal strip.
Install the inside door handle bezel.
Connect the electrical connectors, if any, to the inside door handle bezel.
Guide the inside door handle through the opening in the door handle bezel.
Snap the door handle bezel into place.
Work the rubber around and behind both the manual lock **** and the inside door handle.
Install the upper door trim panel (1).
Connect the wire harness to the tweeter.
Insert the tabs into the slots on the door trim panel.
Insert the retainer into the hole in the door frame.
Trim Panel Replacement - Side Rear Door
Tools Required
J 36796 Clip Zip Tool
Removal Procedure
Remove the inside door handle bezel. The front inside door handle bezel has electrical connectors, the rear does not.
Insert a flat bladed tool behind the forward upper edge of the door handle bezel.
Gently pry the upper portion of the bezel away from the door trim panel.
Pull the bezel forward over the inside door handle.
Disconnect the electrical connector.
Use the J 36796 in order to release the retainers around the outside edges of the door trim panel.
Rock the door trim panel (1) upwards, starting at the rear, while lifting upwards to remove.
Disconnect the door trim panel wiring harness.
Remove the armrest pull cup retainers from the inside of the door trim panel.
Use needle nose pliers to compress the 360 clip.
Pull the 360 clip out of the nylon nut on the door trim panel.
Installation Procedure
Install the 360 clip to the nylon nuts on the inner door panel by sliding the 360 clip down into the grooves in the nylon nuts.
Connect the trim panel electrical connector to the door wiring harness connector.
Starting at the bottom, secure the door trim panel around the outside edges with the retainers (2).
Align the door trim panel to the armrest pull cup retainers (1).
Snap the retainers in to secure the center of the door trim panel to the inner door panel.
Pull on the armrest to assure proper fit.
Push outwards near the top of the door trim panel in order to snap the top door trim panel retainer into the channel in the window inner belt seal strip.
Install the inside door handle bezel.
Connect the electrical connectors, if any, to the inside door handle bezel.
Guide the inside door handle through the opening in the door handle bezel.
Snap the door handle bezel into place.
Work the rubber around and behind both the manual lock **** and the inside door handle.
Install the upper door trim panel (1).
Connect the wire harness to the tweeter.
Insert the tabs into the slots on the door trim panel.
Insert the retainer into the hole in the door frame.


Junior Member
Posts like a Ricer Type-R
Joined: Mar 2006
Posts: 18
Likes: 0
From: U.S.A.
I just want to say thank you all very much for the great information on removing the door panel. I forgot the persons name, but he even sent in a link to go to showing step by step pictures on how to do it.
I know I am new here, but only can say this is a super great place to learn about your Pontiac'* problems. I will do the job this weekend, and should get to the issue why the window does not work.
Again thanks to everyone that helped me learning how to take this door panel off. I really thought it had hidden screws like the earlier models, but that is why I ask questions, so I can learn.
I will post back to let you know of the results.
Joe


Junior Member
Posts like a Ricer Type-R
Joined: Mar 2006
Posts: 18
Likes: 0
From: U.S.A.
Harofreak00,
I just want to say that I followed your instructions to the "T" , and everything went perfect. As for as the window itself not working, it had power going to it, so I removed the 3 screws that hold it to the regulator, and it felt like it was jammed. So I pulled the motor out, hit the switch and it worked fine. So I started turning the the gear that makes it go up and down, by hand, and the window worked also. So I put it all together and the window is working fine.
I really dont know what I did to fix it, but it all works.
Thanks again for your instruction removal.
Joe

Junior Member
Posts like a Ricer Type-R
Joined: Mar 2006
Posts: 18
Likes: 0
From: U.S.A.
Haro, I have a curved tool from Snap-on, made especially for the door panel plastic rivets, and but to tell you the truth, since the plastic rivets were further inward from the edge of the door panel than earlier year cars, the tool was uesless, it was too short to use. So dont laugh, but I used one of my roofing nail pulling tools to get to the plastic rivets. It is long, almost flat but makes a curve at the end of it, and it has a notch at the end that gets under roofing nails, but it worked perfect on the plastic rivets. It made the job real easy. This was the first time seeing newer style door panels, and I was impressed at how tight they the plastic rivets were.
Joe
Joe
Junior Member
Posts like a Ricer Type-R
Joined: Mar 2006
Posts: 18
Likes: 0
From: U.S.A.
MacDrive, to let you know I did use you advice, byusing my putty knife to slide it behind the door panel locating the rivets, but it was way to flimsy to pop out the rivets and I only had one. So I used a roofing nail puller, which is long, thin, and then curved on the end. It worked so good, Snap-On should sell on their tool trucks. It took those plastic rivets right out.
So yeah I used your advice, some, and thanks for helping out. My next project is the radio lights which I saw in one of the topics of the today by Harofreak00.
Joe
So yeah I used your advice, some, and thanks for helping out. My next project is the radio lights which I saw in one of the topics of the today by Harofreak00.
Joe