CAI and compressor clearance
 05-08-2005, 02:16 PM
#1
DINOSAURUS BOOSTUS


Expert Gearhead
Thread Starter

I've read a few threads mentioning the problem with a CAI as most have used the Autozone rice pipe and K&N RX-4750. I decided to try it after a BC member told me how I needed the supercharger whine.
But what about the compressor problem? Ok, AJ USA for the filter $55 free shipping. Autozone for the only rice pipe they stock $38 + tax. Not bad on the prices. I can live with that. I was told by the BC member, let'* call him Haro for the sake of a name that his dad was able to stretch the coupler that came with rice pipe to fit the tb with some lube and 1/2 of time. So I shouldn't need anything but pipe and filter....ok I'm ready
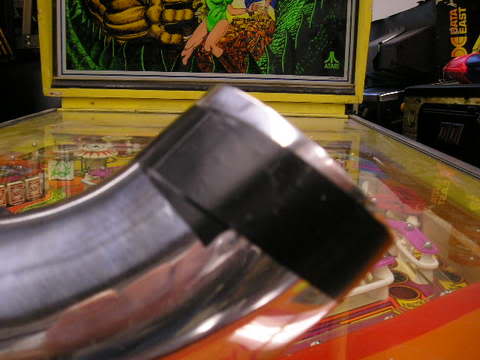
I put a little silicone lube on the inside of the coupler, catch the bottom edge of it on the tb, then with my fingers cupped inside the coupler I lift and slide the top onto the rest of the TB. (less an 1 minute...I'm feeling good about this mod). Then I try a little fitting of parts. Need to lose about inch and a half off the end of rice pipe and it is going to hit the compressor. Hmmmmm
I pull out my handy cutting tools for an aluminum pipe

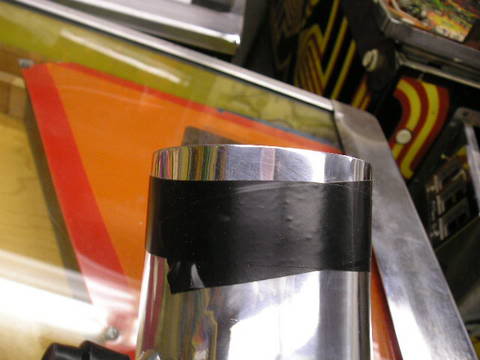
and the end comes right off the pipe. Hmmm what about that compressor? I think..can I slightly modify the angle?
So I try it and heres that same section but after the cut.

Time to try a fit
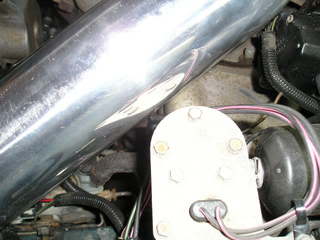
About a half inch clearance...hey...that'* nice....w/o a bracket to hold..I got a 1/2"
What about that IAT hole in the air cleaner? I read a hot soldering iron, but don't want melted rubber on mine...I use it to solder..not melt. Hmmmm

Bet this would cut rubber....a couple minutes and test tries later.

It'* a nice snug fit....perfect! Let'* put it together and put the bracket that comes with the rice pipe to the existing airbox hole. But also let'* put some rubber tape onto it like everyone else.
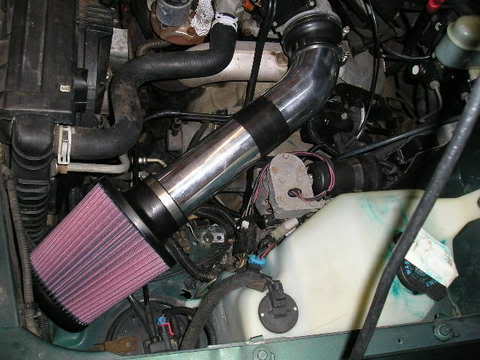
And....tada...I'm done
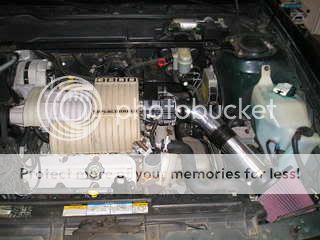
Project rated simple, I'd give it a whole case of beer rating. Because you got tons of time left over and didn't hardly get dirty.
Solved the clearance problem with a little angle change on the pipe. It helped having the right tools available. Now it'* time to consider the heat shield. The pipe gets warm by nature and consideration is needed. What can I insulate the pipe itself with?...got a couple of ideas. As well..my heat gun is probably going to get used on the heat shield for the filter. Prepare for a possible one piece shield of bent plexi.
But what about the compressor problem? Ok, AJ USA for the filter $55 free shipping. Autozone for the only rice pipe they stock $38 + tax. Not bad on the prices. I can live with that. I was told by the BC member, let'* call him Haro for the sake of a name that his dad was able to stretch the coupler that came with rice pipe to fit the tb with some lube and 1/2 of time. So I shouldn't need anything but pipe and filter....ok I'm ready
I put a little silicone lube on the inside of the coupler, catch the bottom edge of it on the tb, then with my fingers cupped inside the coupler I lift and slide the top onto the rest of the TB. (less an 1 minute...I'm feeling good about this mod). Then I try a little fitting of parts. Need to lose about inch and a half off the end of rice pipe and it is going to hit the compressor. Hmmmmm
I pull out my handy cutting tools for an aluminum pipe
and the end comes right off the pipe. Hmmm what about that compressor? I think..can I slightly modify the angle?
So I try it and heres that same section but after the cut.
Time to try a fit
About a half inch clearance...hey...that'* nice....w/o a bracket to hold..I got a 1/2"
What about that IAT hole in the air cleaner? I read a hot soldering iron, but don't want melted rubber on mine...I use it to solder..not melt. Hmmmm
Bet this would cut rubber....a couple minutes and test tries later.
It'* a nice snug fit....perfect! Let'* put it together and put the bracket that comes with the rice pipe to the existing airbox hole. But also let'* put some rubber tape onto it like everyone else.
And....tada...I'm done
Project rated simple, I'd give it a whole case of beer rating. Because you got tons of time left over and didn't hardly get dirty.
Solved the clearance problem with a little angle change on the pipe. It helped having the right tools available. Now it'* time to consider the heat shield. The pipe gets warm by nature and consideration is needed. What can I insulate the pipe itself with?...got a couple of ideas. As well..my heat gun is probably going to get used on the heat shield for the filter. Prepare for a possible one piece shield of bent plexi.


 05-08-2005, 04:04 PM
#3
Junior Member
Posts like a Ricer Type-R

You went about it in somewhat the same fashion as I did a couple years back, the only difference being I wasn't going to cut that beautiful custom ADTR intake pipe (Serial #2  ).
).
Instead, I inserted a piece of 3" PVC pipe into my silicon reducer to hold it'* shape, and used a bandsaw to cut both it and my silicon reducer at the proper angle. Now the reducer holds the intake pipe at the right angle. I clear the compressor, but not by the margin you did.
).Instead, I inserted a piece of 3" PVC pipe into my silicon reducer to hold it'* shape, and used a bandsaw to cut both it and my silicon reducer at the proper angle. Now the reducer holds the intake pipe at the right angle. I clear the compressor, but not by the margin you did.
05-09-2005, 01:00 AM
#4
Senior Member
Posts like a Corvette

Join Date: Jul 2004
Location: Bolingbrook, IL Location: Clarkston, MI
Posts: 1,256
Likes: 0
Received 0 Likes
on
0 Posts

I had the same problem clearing the compressor but it was because I was trying to fit a 4" intake tube and a 9" filter. I just ended up moving the compressor over to where the battery is.
 05-09-2005, 08:00 AM
#6
DINOSAURUS BOOSTUS
Expert Gearhead
Thread Starter
Originally Posted by harofreak00
KUDOS bill!!! nice job...
my filter looks so dirty already...
my filter looks so dirty already...
05-09-2005, 09:53 AM
#7
Junior Member
Posts like a Ricer Type-R
Heat shield comes out with the intake in about 10 seconds, and 6 screws hold the filter to the shield. 2 minutes to come apart. You technically only have to clean it once a year, but I do it twice a year.
05-09-2005, 09:58 AM
#8
DINOSAURUS BOOSTUS
Expert Gearhead
Thread Starter
Sounds good....has the heating of the CAI rice pipe been address to anyone'* knowledge. I searched but didn't see it. I noticed the pipe conducts heat very well being made of aluminium.
05-09-2005, 10:21 AM
#9
Junior Member
Posts like a Ricer Type-R
My beautiful red pipe is now insulated. To pull the filter, I disconnect the IAT, loosen the screw holding the coupler to the TB, disconnect the quick-release line for my water/methanol injection, then lift it out.
The insulation on my pipe gives me some added cushion for the ELC compressor. As an added margin, I also run 2 (count them TWO) crossover pipe heatshields. One custom to shield the trans temp sensor, it runs LONG from front to rear in order to channel the air coming from the backside of the radiator all the way to the rear around the crossover, and another chrome one directly under the TB.
The insulation on my pipe gives me some added cushion for the ELC compressor. As an added margin, I also run 2 (count them TWO) crossover pipe heatshields. One custom to shield the trans temp sensor, it runs LONG from front to rear in order to channel the air coming from the backside of the radiator all the way to the rear around the crossover, and another chrome one directly under the TB.