LeSabre's Ported LIM Project
 04-29-2008, 11:06 PM
#1
Member
Posts like a V-Tak
Thread Starter

Join Date: Jan 2008
Location: Buffalo, NY (soon to be Columbia, SC)
Posts: 60
Likes: 0
Received 0 Likes
on
0 Posts

After reading about the miraculous ported lower intake manifold, I decided to make one for the LeSabre. I ordered one off of Ebay that looked pretty good for $50 shipped. According to them, it came off a 99 Bonneville, mileage not stated. This looks to be in decent shape, with none of the pitting seen in some other LIM photos around here. And the casting looks to be pretty good to my fairly untrained eyes, again not like some other LIM photos around.
Opinions and advice appreciated. I've bookmarked about 6 threads that really get into the process and tools needed. I have the Dremel and carbide bit, and will pick up some sanding drums before starting. And a good set of calipers for measuring progress.
This is something I'm going to pick at in my spare time, since I still have lots of other stuff to do and want a nice project to pick up as I please.
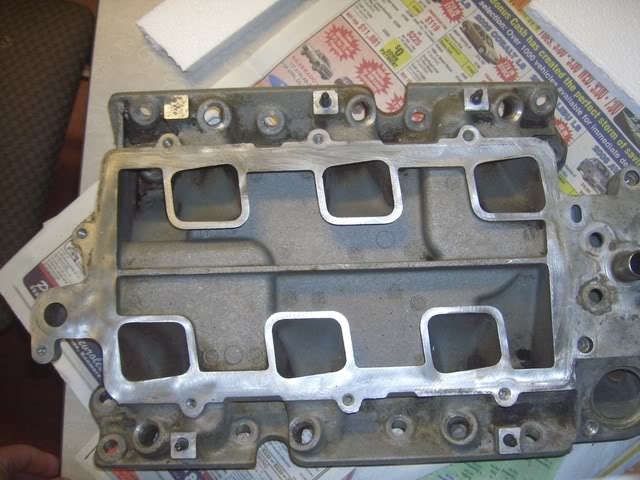
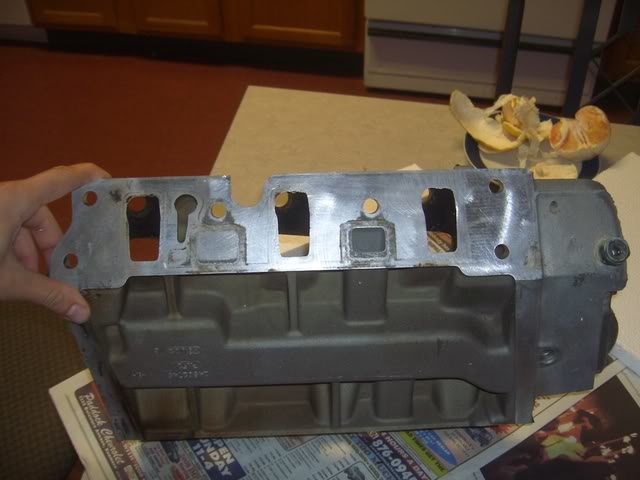
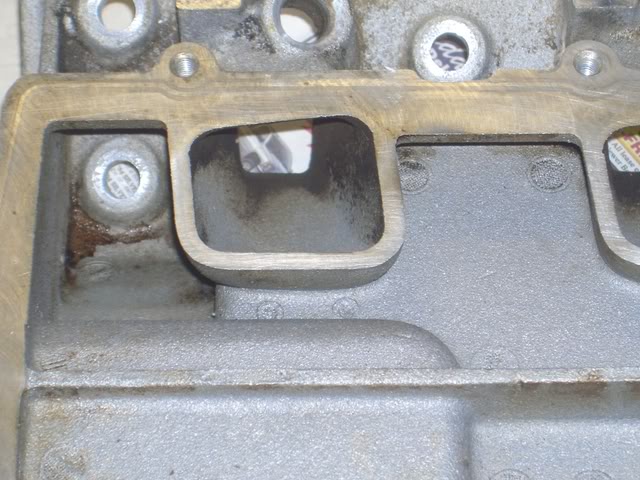
Now for the photos of the LIM to be ported:
LIM top
The front-side ports
An example of the casting done on the manifold

One of the runners. All of them are fairly lacking in carbon.
That'* it for now. I will post progress with the porting and polishing as time permits, which isn't much currently.
Any advice and encouragement will be greatly appreciated!
Opinions and advice appreciated. I've bookmarked about 6 threads that really get into the process and tools needed. I have the Dremel and carbide bit, and will pick up some sanding drums before starting. And a good set of calipers for measuring progress.
This is something I'm going to pick at in my spare time, since I still have lots of other stuff to do and want a nice project to pick up as I please.
Now for the photos of the LIM to be ported:
LIM top
The front-side ports
An example of the casting done on the manifold
One of the runners. All of them are fairly lacking in carbon.
That'* it for now. I will post progress with the porting and polishing as time permits, which isn't much currently.
Any advice and encouragement will be greatly appreciated!
 04-29-2008, 11:16 PM
#2
Junior Member
Posts like a Ricer Type-R

Thumb through this. It'* not a step-by-step guide, but it will 'show' you what you're after:
http://www.bonnevilleclub.com/forum/...ic.php?t=97624
More specifics here:
http://www.bonnevilleclub.com/forum/...ic.php?t=97754
http://www.bonnevilleclub.com/forum/...ic.php?t=97624
More specifics here:
http://www.bonnevilleclub.com/forum/...ic.php?t=97754
04-29-2008, 11:32 PM
#3
Member
Posts like a V-Tak
Thread Starter
Join Date: Jan 2008
Location: Buffalo, NY (soon to be Columbia, SC)
Posts: 60
Likes: 0
Received 0 Likes
on
0 Posts
Thanks! Those are getting added to the bookmark collection of posts about porting the LIM.
And is it really necessary to open the motor while doing this? I see the reasoning behind it, yet feel sort of uncomfortable having the motor apart while working on porting out the LIM. I know, newbie/squeamish question.
And is it really necessary to open the motor while doing this? I see the reasoning behind it, yet feel sort of uncomfortable having the motor apart while working on porting out the LIM. I know, newbie/squeamish question.
04-29-2008, 11:40 PM
#4
Junior Member
Posts like a Ricer Type-R
Take this as the bible:
The WIDTH and the HEIGHT of the ports is probably VERY close to where you want it at the WIDEST point. Halfway up the port for the width at the widest point, and the same for the long axis. Make sense?
Make the 3 corners that DON'T have the injector boss 'roundout' RECTANGULAR. You'll have a rectangle with a bulbout for the injector on each port. You'll be very close to a good port-match in size and port-port spacing as a result.
Leaving the motor open is no big deal if nothing gets in, and you'll do an oil change after the install (drive a couple miles first) anyway.
04-30-2008, 12:30 AM
#5
Member
Posts like a V-Tak
Thread Starter
Join Date: Jan 2008
Location: Buffalo, NY (soon to be Columbia, SC)
Posts: 60
Likes: 0
Received 0 Likes
on
0 Posts
Rectangular ports, round off the corners, and clean everything up. More material off at the edges than in the center to keep it straight.
Would removing material down to the start of the round injector area be part of this, or should I terminate a little ways above there to allow for error?
So a darn good straightedge and a scribing tool for marking where to cut up to are a couple more things to pick up before beginning this.
Would removing material down to the start of the round injector area be part of this, or should I terminate a little ways above there to allow for error?
So a darn good straightedge and a scribing tool for marking where to cut up to are a couple more things to pick up before beginning this.
04-30-2008, 07:52 AM
#6
Junior Member
Posts like a Ricer Type-R
Buy your new gaskets first. Test-fit them several times to make sure you're ok. LIGHTLY clean up around the injector bosses.
Then work your way up the runners from both ends shaving the rough. Knock the high points down to the low points.
It takes skill, manual dexterity, and alot of patience. Especially the first time you do it.
The inside radius of the 3 corners of an L36 port need to be the same inside radius as the cylinder head port when you're done. This last part can be done after you get the old LIM off if necessary. Or you can go by a picture of a cylinder head port for scale reference.
04-30-2008, 10:45 AM
#7
Member
Posts like a V-Tak
Thread Starter
Join Date: Jan 2008
Location: Buffalo, NY (soon to be Columbia, SC)
Posts: 60
Likes: 0
Received 0 Likes
on
0 Posts
Gaskets will be ordered shortly, and all the parts for the gasket replacement will be assembled. I'll definitely stop often to measure and check alignment with the gasket. No sense in falling too far off one side.
I was wondering what to do about the bosses, and that makes sense.
I'm anticipating putting a lot of time into this to ensure it'* as good as it can be. A nice little summer project.
I was wondering what to do about the bosses, and that makes sense.
I'm anticipating putting a lot of time into this to ensure it'* as good as it can be. A nice little summer project.

Thread
Thread Starter
Forum
Replies
Last Post
PortugalFocus
Performance, Brainstorming & Tuning
2
03-08-2008 02:54 PM
agrazela
Performance, Brainstorming & Tuning
49
05-08-2007 06:04 PM
OLBlueEyesBonne
Forced Induction
20
10-13-2006 02:55 AM
OLBlueEyesBonne
Performance, Brainstorming & Tuning
14
08-10-2006 05:13 PM