Making and Installing a shift kit for 4T60-E transmission
 01-28-2010, 12:58 PM
#1
Retired


Certified Car Nut
Thread Starter


Time to install that street/strip shift kit? Feeling a little stressed about it? Well, don't. It'* a easy job, just make sure you read and follow the directions very closely. Read, look, read again. Check it a third time just to make sure.
Shopping list...
1. Tubing. Must be rigid. Hardware store/Lowes.
2. 1 gallon and 2 quarts of your favorite flavor of trans fluid.
3. New filter and gasket for your transmission.
4. 2000 grit sandpaper to rough up the accumulator.
Tools required:
Jack stands
Torque wrench
Oil catch pan(a big one)
Assorted sockets and ratchets.
Ruler
Hacksaw/Dremel
You will need the inside diameter to be .25", this must be the correct size. The outside diameter should be .375" This can be a little larger with out causing problems, but no larger then .5" outside diameter.
Now cut (2) tubes at .75" long, and 1 tube .5" long.
Jack up front of car. Or put on ramps.
Find your tranny pan

It'* going to get messy! The big catch pan comes in handy here. Start loosening the bolts at the narrow end first(passenger side) and work your way around a few bolts at a time. If you loosen too many, more fluid will seep out all around, so take your time and let out as much as your catch pan can catch.

Now, once it has completely drained, you can remove the pan and set it aside for inspection. This is the critical step. If you have large pieces of debris(metal/plastic chunks) DO NOT PROCEED WITH THIS MOD.
Example:

It should look like this...
Now wipe out real good and clean magnet off.

Get back under car and proceed to remove the accumulator. It is held in by 4 bolts located in the circled areas. Once those 4 bolts are removed, simply twist and pull away from the metal lines. They should slip right out of the accumulator. CAUTION: You will have another quart of oil come out at this point.

Once it is out, drain as much of it as you can into your drain pan. Flip it around in different ways to get it all out. Head to the work bench now.
Now remove the 7 other bolts and remove the top cover. You can see on both sides that shows which one is 1-2 and 2-3. Make a note annotating which is which for after you get the cover off. This is crucial in the spacer stage, and place everything like you see in the photo'*. Otherwise you may mix things up.

Remove the pistons

Remove the springs and piston guide pins. You will notice that accumulator 2-3 has (2) springs and 1-2 has only (1). This is normal.

Clean everything out, wipe clean, and gently sand the inside sealing surface for the piston seal.
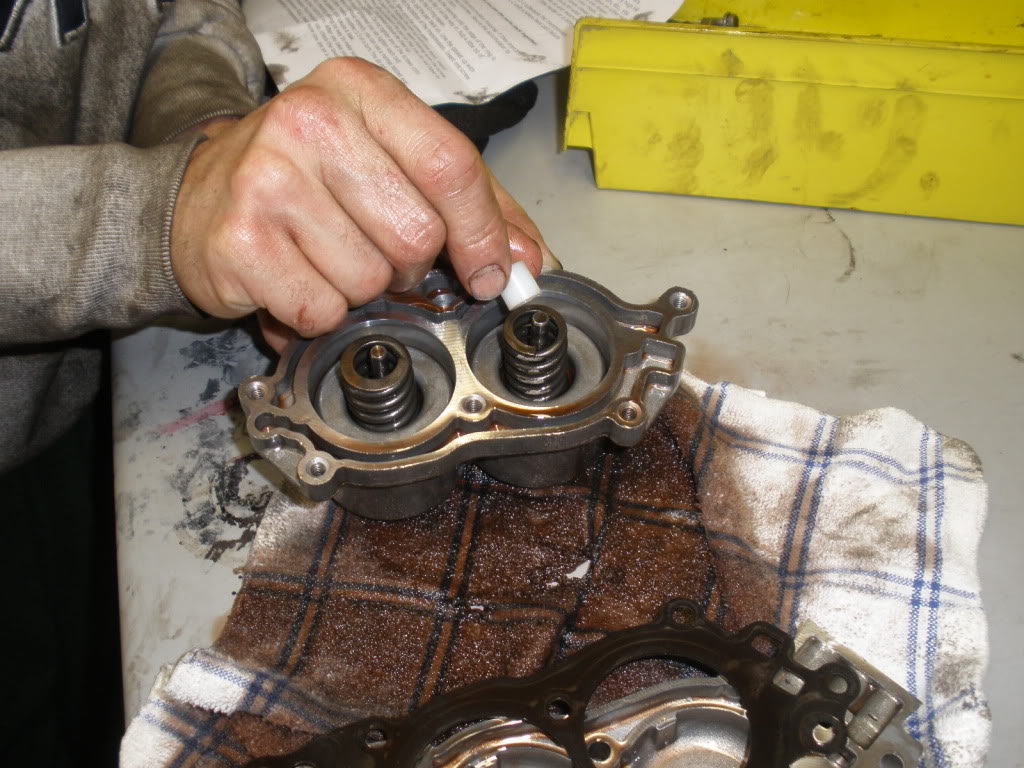
Once everything is cleaned, put your springs and pins back in. Take your 1/2" tube and place down into the 2-3 accumulator, and your 3/4" spacer in the 1-2 accumulator. Just like shown below. THE ONE BELOW IS A 4T65-HD accumulator, SLIGHTLY DIFFERENT THAN THE 4T60-E, BUT ITS ONLY FOR ILLUSTRATIVE PURPOSES ONLY.
Now put the pistons back onto the pins and make sure they are seated by pushing them down a couple times.
Put the cover back on, and torque to specs.
Put accumulator back into transmission.
CAUTION: This is a very important step. The 2 steel tubes can be put in (2) different ways. Go by what the image below depicts and you won't have problems like I did.

If you need, you can follow the same re-assembly procedure in the 4T65-HD write up.
https://www.gmforum.com/performance-137/making-installing-shift-kit-4t65-hd-transmission-278802/
Shopping list...
1. Tubing. Must be rigid. Hardware store/Lowes.
2. 1 gallon and 2 quarts of your favorite flavor of trans fluid.
3. New filter and gasket for your transmission.
4. 2000 grit sandpaper to rough up the accumulator.
Tools required:
Jack stands
Torque wrench
Oil catch pan(a big one)
Assorted sockets and ratchets.
Ruler
Hacksaw/Dremel
You will need the inside diameter to be .25", this must be the correct size. The outside diameter should be .375" This can be a little larger with out causing problems, but no larger then .5" outside diameter.
Now cut (2) tubes at .75" long, and 1 tube .5" long.
Jack up front of car. Or put on ramps.
Find your tranny pan
It'* going to get messy! The big catch pan comes in handy here. Start loosening the bolts at the narrow end first(passenger side) and work your way around a few bolts at a time. If you loosen too many, more fluid will seep out all around, so take your time and let out as much as your catch pan can catch.
Now, once it has completely drained, you can remove the pan and set it aside for inspection. This is the critical step. If you have large pieces of debris(metal/plastic chunks) DO NOT PROCEED WITH THIS MOD.
Example:
It should look like this...
Now wipe out real good and clean magnet off.
Get back under car and proceed to remove the accumulator. It is held in by 4 bolts located in the circled areas. Once those 4 bolts are removed, simply twist and pull away from the metal lines. They should slip right out of the accumulator. CAUTION: You will have another quart of oil come out at this point.
Once it is out, drain as much of it as you can into your drain pan. Flip it around in different ways to get it all out. Head to the work bench now.
Now remove the 7 other bolts and remove the top cover. You can see on both sides that shows which one is 1-2 and 2-3. Make a note annotating which is which for after you get the cover off. This is crucial in the spacer stage, and place everything like you see in the photo'*. Otherwise you may mix things up.
Remove the pistons
Remove the springs and piston guide pins. You will notice that accumulator 2-3 has (2) springs and 1-2 has only (1). This is normal.
Clean everything out, wipe clean, and gently sand the inside sealing surface for the piston seal.
Once everything is cleaned, put your springs and pins back in. Take your 1/2" tube and place down into the 2-3 accumulator, and your 3/4" spacer in the 1-2 accumulator. Just like shown below. THE ONE BELOW IS A 4T65-HD accumulator, SLIGHTLY DIFFERENT THAN THE 4T60-E, BUT ITS ONLY FOR ILLUSTRATIVE PURPOSES ONLY.
Now put the pistons back onto the pins and make sure they are seated by pushing them down a couple times.
Put the cover back on, and torque to specs.
Put accumulator back into transmission.
CAUTION: This is a very important step. The 2 steel tubes can be put in (2) different ways. Go by what the image below depicts and you won't have problems like I did.
If you need, you can follow the same re-assembly procedure in the 4T65-HD write up.
https://www.gmforum.com/performance-137/making-installing-shift-kit-4t65-hd-transmission-278802/
__________________
Retired Administrator
2002 *-10 5.7 V8
2023 Jeep Rubicon Diesel
Retired Administrator
2002 *-10 5.7 V8
2023 Jeep Rubicon Diesel

 04-01-2021, 11:41 PM
#3
Senior Member


True Car Nut
This thread is 11 years old now. Please do not bump old threads. The manufactured 4T60E shift kit consists of TransoGo accumulator piston kit & a separate Valve body repair kit.
If a thread/post is more than say 6 months old, we would prefer that you not reply to that thread.
Instead make an new thread pointing to this thread or link to your current thread https://www.gmforum.com/chevrolet-17...-313667/page4/ about the transmission now, as members may not be participating any longer.
See site rules & policy. https://www.gmforum.com/introductions-new-members-106/site-rules-policies-june-2015-read-first-304557/
Thread closed:
__________________
1997 Buick Pk Ave (Soft Ride) Suspension!
1997 Buick Pk Ave (Soft Ride) Suspension!
Last edited by Soft Ride; 04-01-2021 at 11:48 PM.

Thread
Thread Starter
Forum
Replies
Last Post
karldergrosse
Performance, Brainstorming & Tuning
3
03-15-2007 12:18 AM