sand casting
 02-27-2007, 02:17 PM
#1
Senior Member
True Car Nut
Thread Starter

Anyone done sand casting with aluminum? If so, any suggestions/recommendations on ideal setups. Best way to achieve the results I am after, etc. I am looking to make some small rectangular aluminum tubes. Just looking for tips and tricks. Thanks!
 02-27-2007, 03:52 PM
#2
Senior Member
Posts like a Northstar

Join Date: Apr 2004
Posts: 606
Likes: 0
Received 0 Likes
on
0 Posts

Have you done any casting before?
How big are you thinking? Could you drill or machine from solid vs trying to cast it as a tube?
I am not a casting expert by any means, but I did have a class on it and know the basics. I can figure riser size and look up sand type and oil content or whatever else in my book. I assume you want to DIY at home so I'm just trying to get an idea of what you are looking to get out of it.
02-28-2007, 10:03 AM
#3
Senior Member
True Car Nut
Thread Starter
Never done it before. Looking to use 362 aluminum I think. I think the pieces I want to make are 5" long. I don't have them in front of me. Drilling/machining the pieces is out of the question as I have no way to procure the tools to do that. The end result is top secret at this point. If I can make it work, it'll become public knowlege, but until it'* tried and true, it stays in my garage.
02-28-2007, 12:34 PM
#4
Senior Member
Posts like a Northstar
Join Date: Apr 2004
Posts: 606
Likes: 0
Received 0 Likes
on
0 Posts
Could you do two halves and weld them together?
Having to use a core in order to make a hollow cast part adds a lot of time - you have to mold the core out of sand with adhesive "binders" so the core will hold up when you pour the metal but will still be able to be removed from the part. Takes a lot more care to set it up as well; to make sure the core stays where you want it to be in the mold. You can't get a machined type surface or tolerances with sand either. Finishing work is required for that.
Having to use a core in order to make a hollow cast part adds a lot of time - you have to mold the core out of sand with adhesive "binders" so the core will hold up when you pour the metal but will still be able to be removed from the part. Takes a lot more care to set it up as well; to make sure the core stays where you want it to be in the mold. You can't get a machined type surface or tolerances with sand either. Finishing work is required for that.
02-28-2007, 12:37 PM
#5
Senior Member
True Car Nut
Thread Starter
Yes, I'd say it can deffinately be welded from two pieces if that will be easier. I also fully expect to do finishing work on it. It wouldn't be done by me if it were as simple as pour and forget.
03-05-2007, 11:05 AM
#6
Senior Member
Posts like a Northstar
Join Date: Apr 2004
Posts: 606
Likes: 0
Received 0 Likes
on
0 Posts
Use greensand. I still have to find the oil content. I know we just used motor oil though.
You need to make your part out of wood or something sturdy first. You will pack the sand around it to form the cavity in your mold.
You need two frames. We had actual steel boxes for casting but I�m sure some made of 2X4 or 2X6 would work fine. You also need �lids� for them that you can just clamp on.
You put a lid on one of the frames and flip it upside-down. You place your model part on the bottom and then sprinkle � um flour� on it. I�m pretty sure we used four, will have to check on that as well. This is so you can get your model out. Then you pack the sand around your model. Pack it in layers and pack it tight. Lots and lots of pounding. The better you pack it the better your mold will be.
Once you have your frame full of sand you flip it over and take the lid off. Carefully remove your model part. Depending on the shape of your part, you either carve a runner into the sand or you just leave it. It just depends how you want the mold to fill.
You need one or two tapered cylinders. You put the lit on your other frame and stand the cylinder into it. You have to position it properly, this will be your fill hole (spru). So if you made a runner than make it line up with it, otherwise make it line up with your part cavity. Pack this frame full of sand, in layers, pounding the crap out of it again. Then flip the mold over. You take off the lid and remove the cylinder. That is why it had a taper to it, so you can get it out. You can carve out the top of the cylinder like a basin if you want to make it easier to hit when pouring the metal. Now place this frame on top of your other one so you have a complete mold.
That is the gist of it.
Consider tapers on your model part so you can get it out of the sand. Also consider the parting line and how you want it to fill. You will have to cut off the spru and any runners you made.
If your part is big you may want to use two cylinders, one as an in and one as an out. You pour into one until you see the metal come up the other. This way when the metal shrinks as it cools the part will be fed from both sides and will not have shrinkage porosity.
I will see if I can find some pictures of the set up. Probably will make more sense then.
03-05-2007, 11:15 AM
#7
Senior Member
Posts like a Northstar
Join Date: Apr 2004
Posts: 606
Likes: 0
Received 0 Likes
on
0 Posts
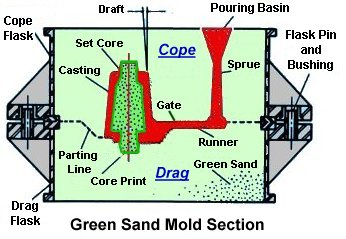

The second pic is probably the most helpful. The cope is the top half of the mold and the drag is the bottom. You can see how the two risers are used to both vent air and allow for a "tank" of metal to feed back into the part as it cools. It also shows how you can use two halves of a part model, one in the cope and one in the drag, so that the parting line is in a place that you can get your part out of the sand. Well, you are going to have to bust the cooked sand off the cast part, but you wouldn't be able to get the model piece out in order to make the cavity.
You can cast more than one part at a time by using several models and then connecting them with runners.
You could also pour directly into the part instead of using a runner between the sprue and cavity, but you could get turbulant metal flow and could cause problems.
That second pic should say sprue instead of runner, runners are horizontal flow paths, the sprue is the fill hole.

Thread
Thread Starter
Forum
Replies
Last Post