00+ Center tail light up - Write up
 01-08-2010, 12:07 AM
#1
Senior Member
True Car Nut
Thread Starter
Join Date: Mar 2009
Location: Fort crack homie
Posts: 2,894
Likes: 0
Received 0 Likes
on
0 Posts

This thread is a write up to help you install LED lights into your trunk mounted center tail light reflector, if you have any questions please feel free to post them below or PM me
you will need the following:
A dremel (I recommend the one with adjustable speed)
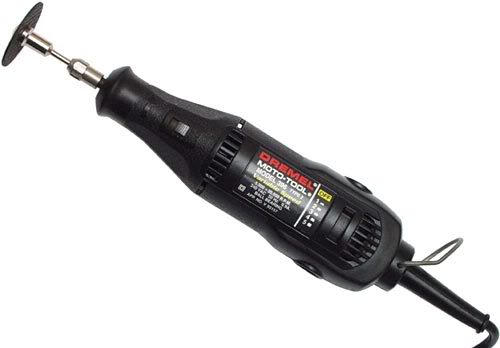
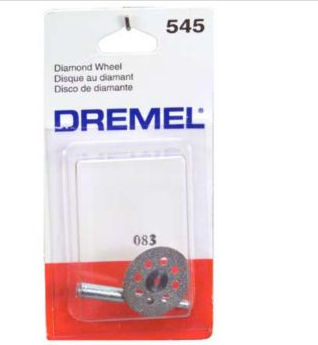
A dremel cutting disk (diamond wheel was the best I ever used)
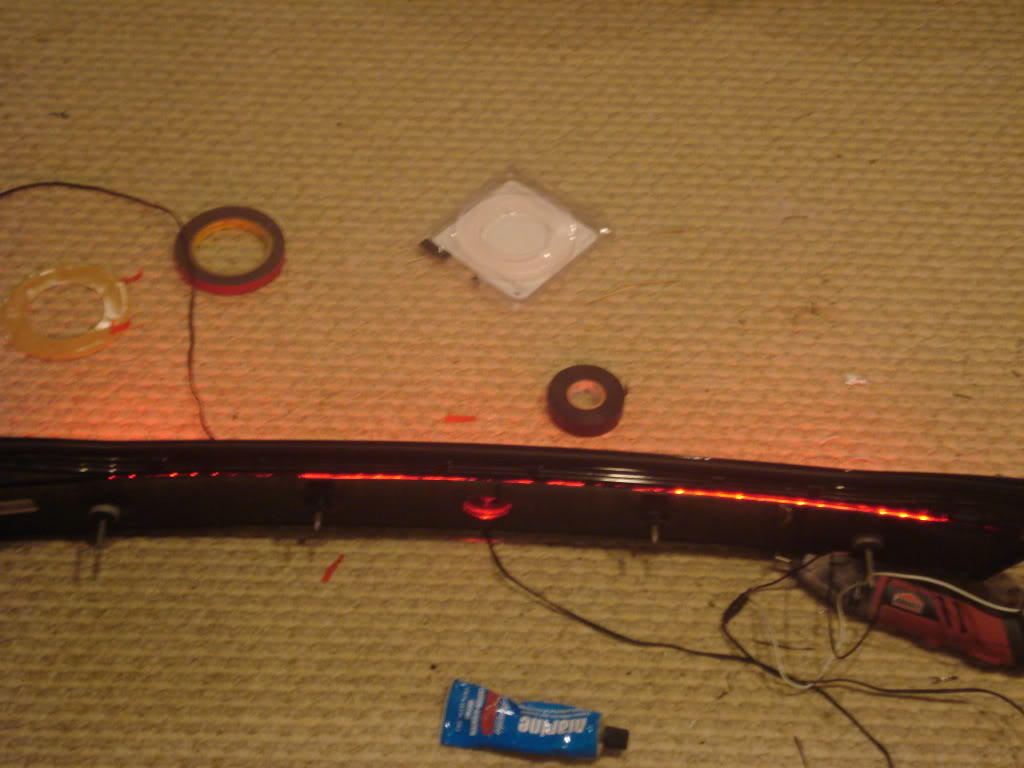
Glue/sealant (make sure its water and weather proof)
I used goop glue and sealant... so far so good... the thicker the glue the better I�d say. Reason behind that the glue won�t leak as bad inside (had that problem before with clearing my GTP'* tail lights)

LED strips
I used the Catera tail light but after taking it apart I realized that it wasn�t a must.

any good strong LED strips will work just fine.. something like this would work even better than the Catera lights, reason is the thickness of the strips
I wish I knew that all I had to use was LED strips I would have bought this over the Catera anytime and it would have made it a lot easier
http://www.oznium.com/led-flex-strips
MAKE SURE YOU WEAR SAFETY GLASSES WHILE CUTTING THE TAIL LIGHT.
Get ready and the fun begins here
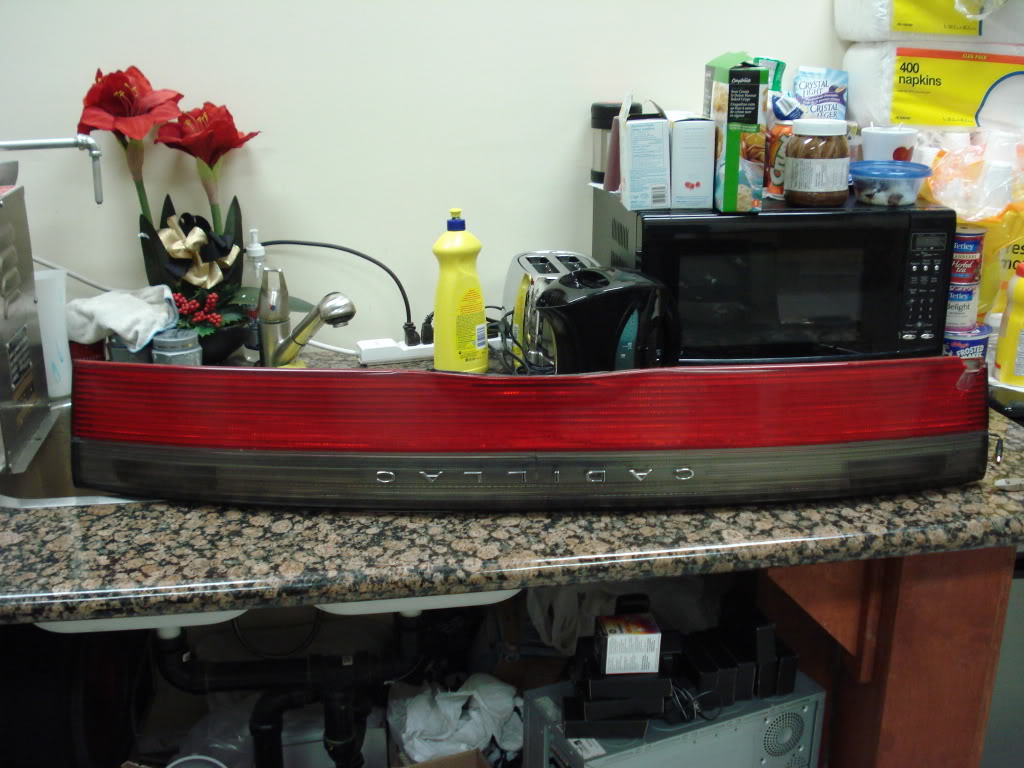
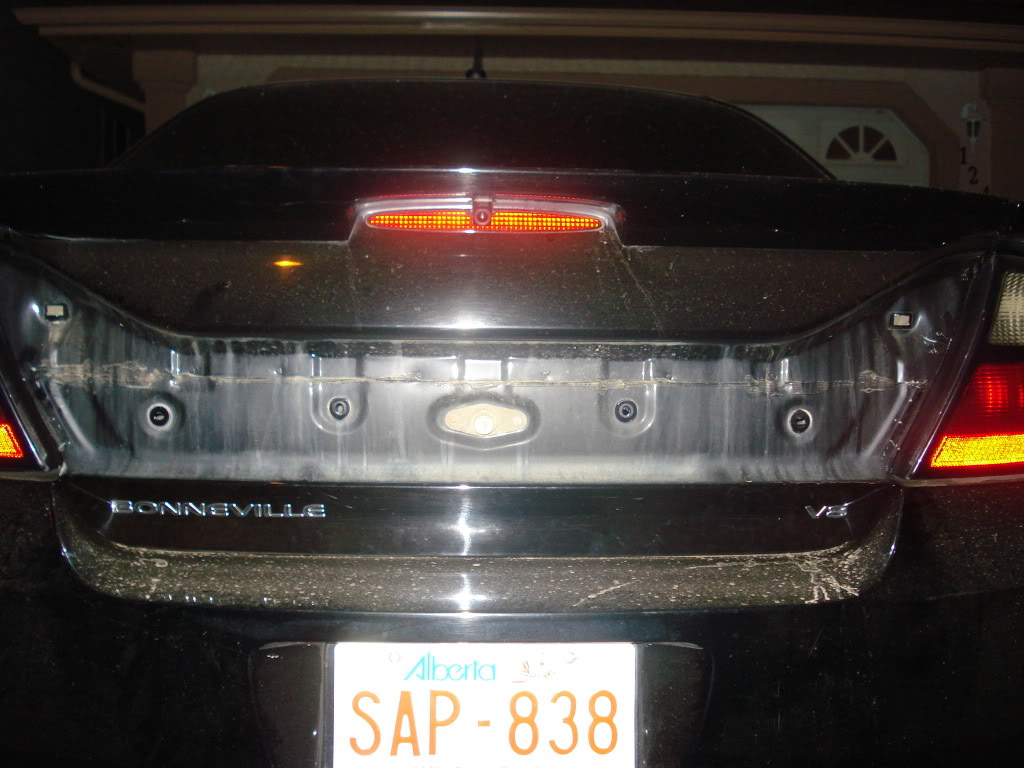
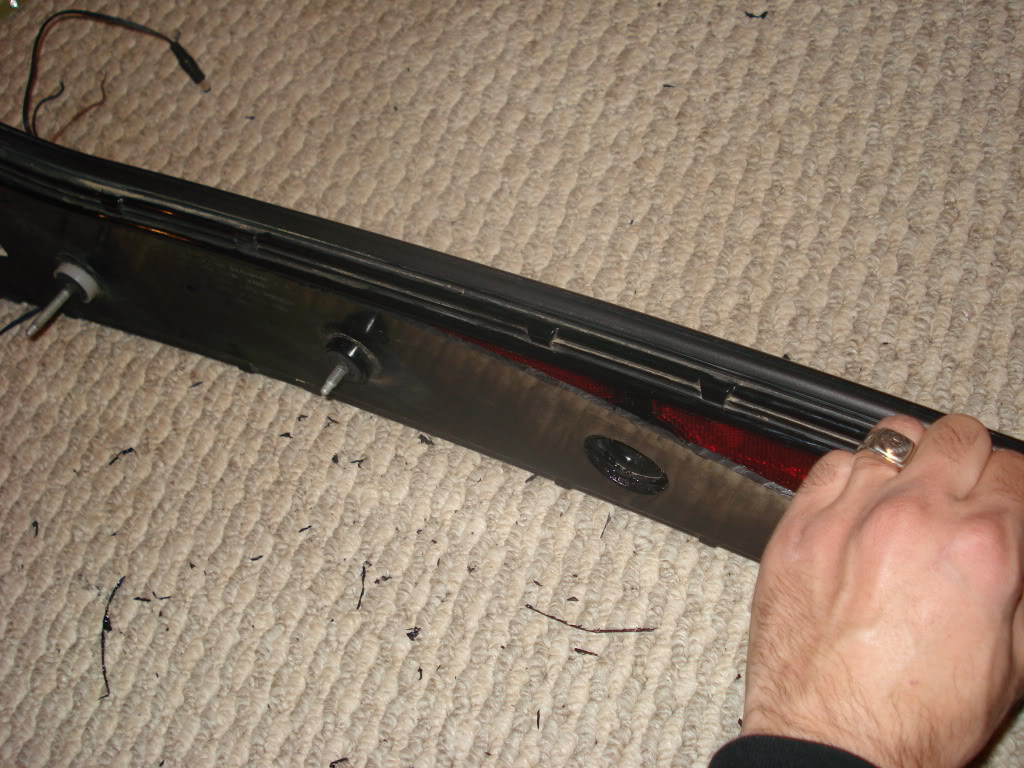
First you start with removing the carpet in the back of the trunk lid, then you would have to remove 4 nuts using a 10mm socket, this will set the bottom of the center tail piece free. From there you have to remove the top right and left clips... and you have to do is pull. Most likely you will break the clips... and good luck finding replacements because most GM dealers will tell you that you must buy the full trunk piece to replace them... idiots... I�m still looking for replacements, I think I got somewhere... I�ll keep this thread updated... I have a part number, just waiting for my order to come in to confirm
Top right and left are the clips that you even know they are there, trunk is sealed at the back were they sit.
Bottom 4 holes are the nuts, 10mm I believe
Then
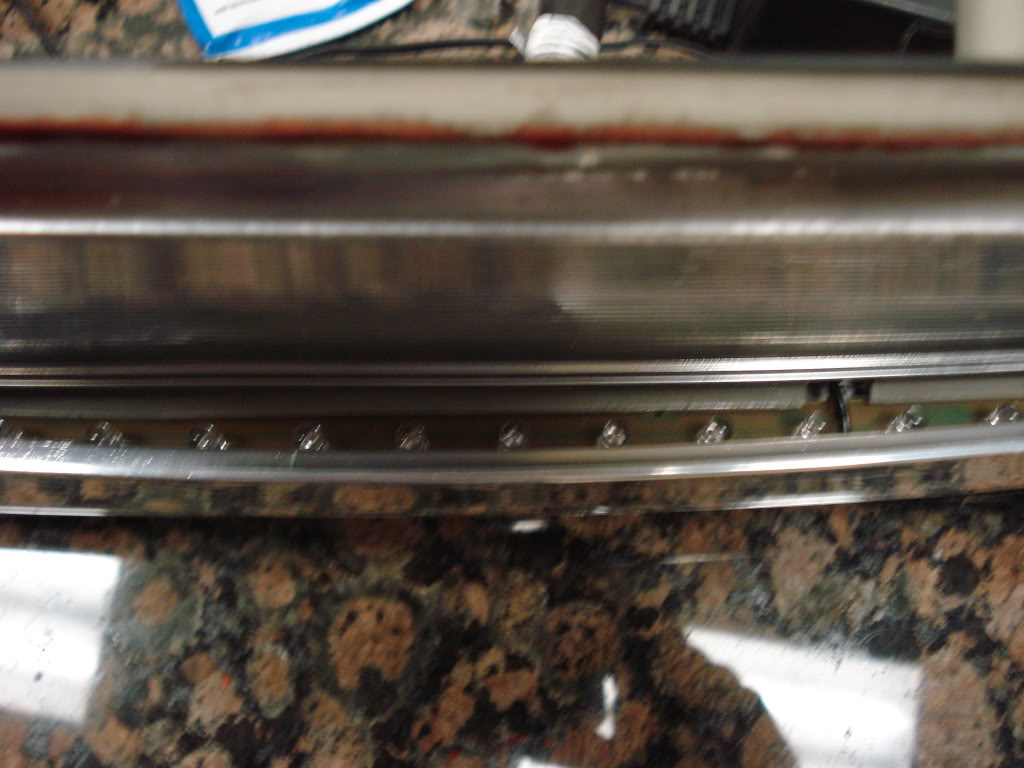
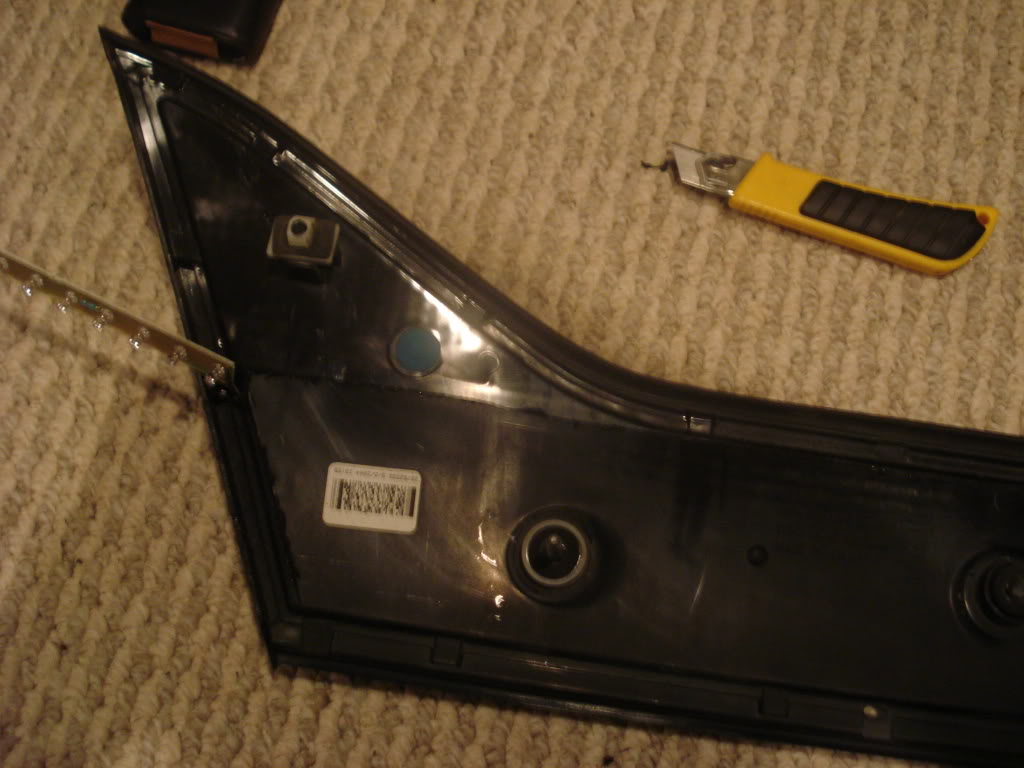
Using the Catera light all you have to do is remove the LED strips inside... there should be a total of four you will only need 3 of them.

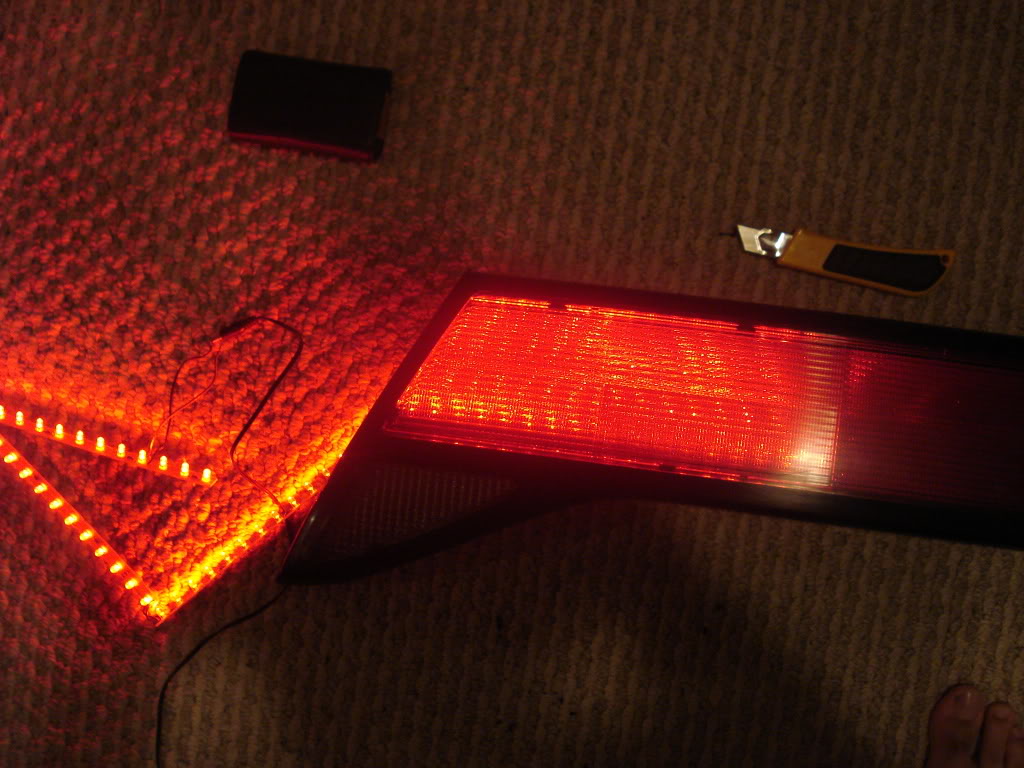
Picture above shows all 4 led strips on top of the Bonneville center piece. You can tell they are a little too long for the bonnie, so removing one will fit just perfect
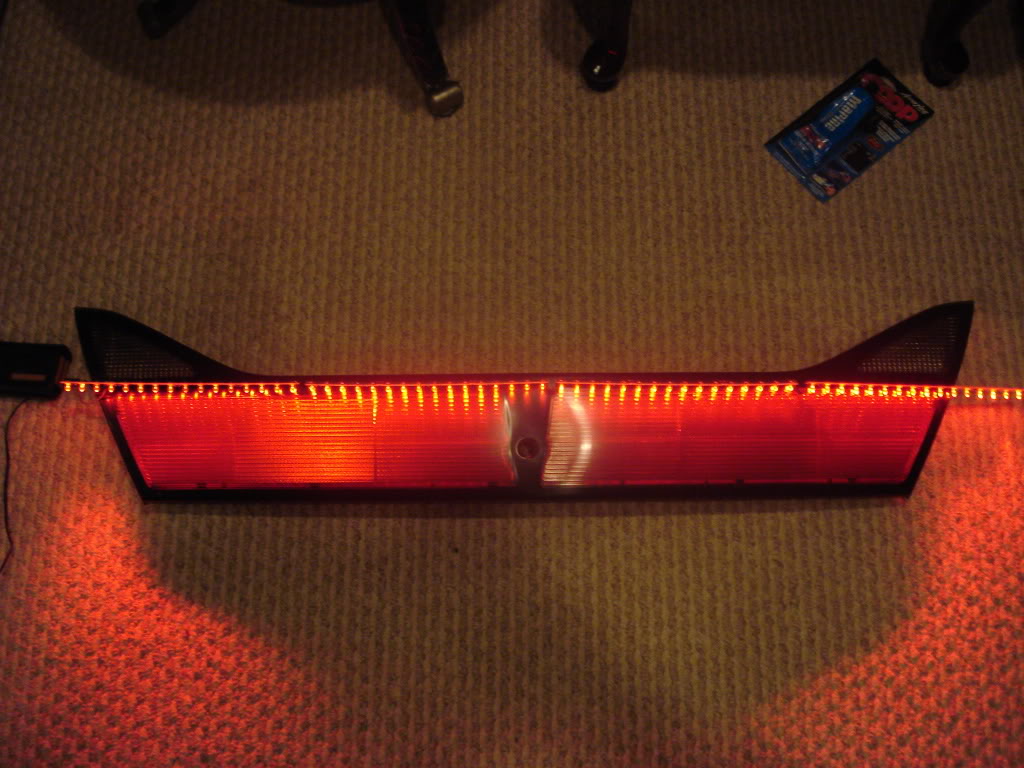
Picture above shows the LEDs on the outside just to give me an idea what it looks like.
Oh yeah... by the way� you might wanna test and make sure all LEDs are working� because it would really really suck doing all the work and finding out you have some LEDs that don�t work
Then the hard/fun part begins... this job will determine how easy you will finish at the end.. I set the dremel on low speed and I made a line all across the back... I didn�t cut it all the way in,, because of the high RPM if you start cutting straight you will end up with melting plastic all around, so you will end up with a huge gap instead of a small fine crack.
so after marking it all the way around the top and sides set the dremel to a high speed and start cutting all the way in.. Again don�t keep the dremel on the same spot for too long� it will only make the opening wider... which you wanna avoid to make it easier to close
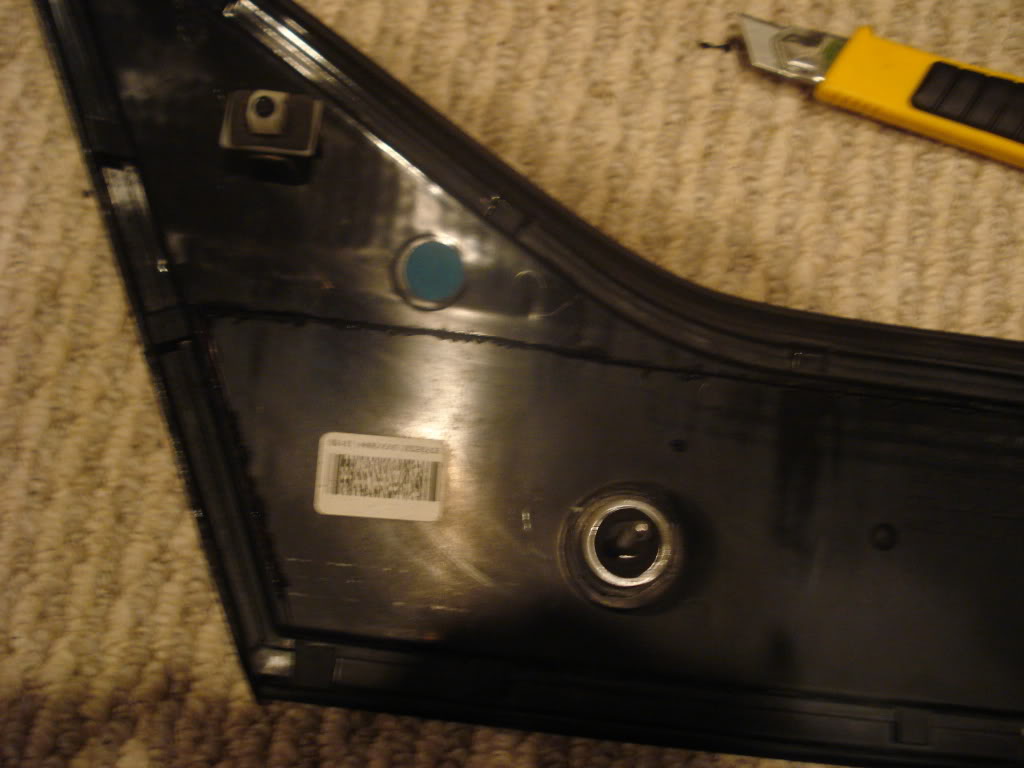
Do exact same to the center piece were the key cylinder is
From there you have some play... it would be nice to have some help here� someone can open the plastic for you while you insert the LED strips
Little testing
As you can see� I didn�t use anything to mount the LED because they were wide I just insert them there and by force they stayed at the top.
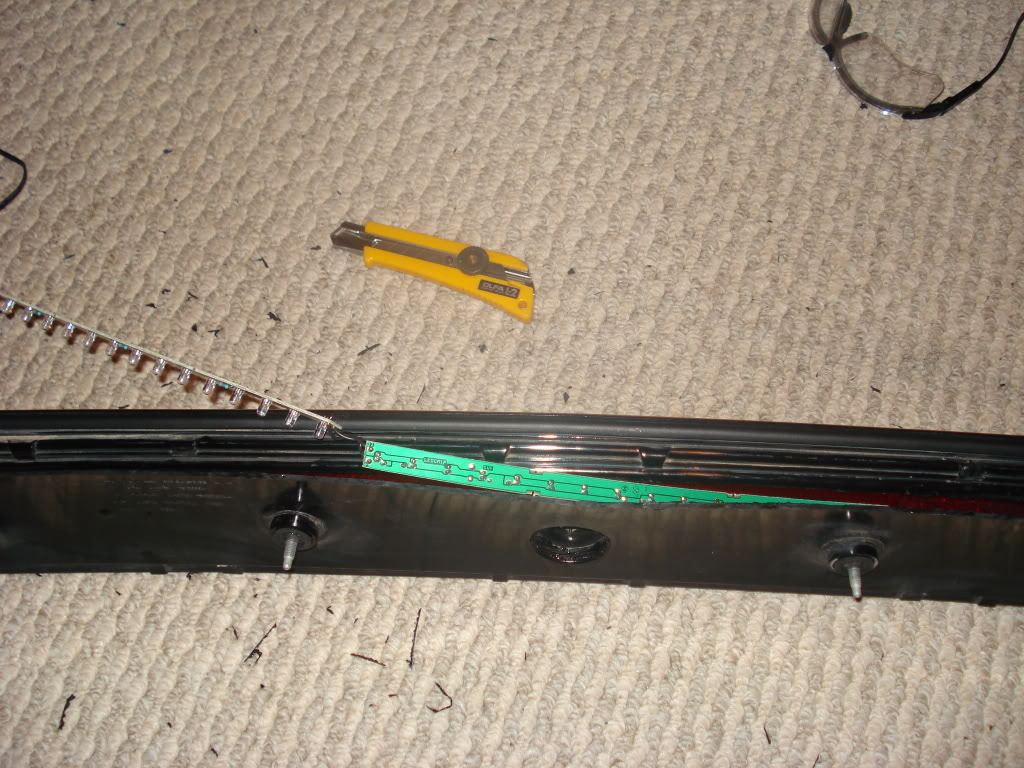
Keep working your way all around... make sure the LEDs stay at the top� if you use the Catera led lights make sure you're super careful... since they are not so flexible and they are soldered on a circuit board, you can easily break the solder and you won�t even notice
Close to be done... all the LEDs are in and set at the top of the center tail piece... make sure you test them and make sure they are all working and it looks decent
Then turn it and look at the front
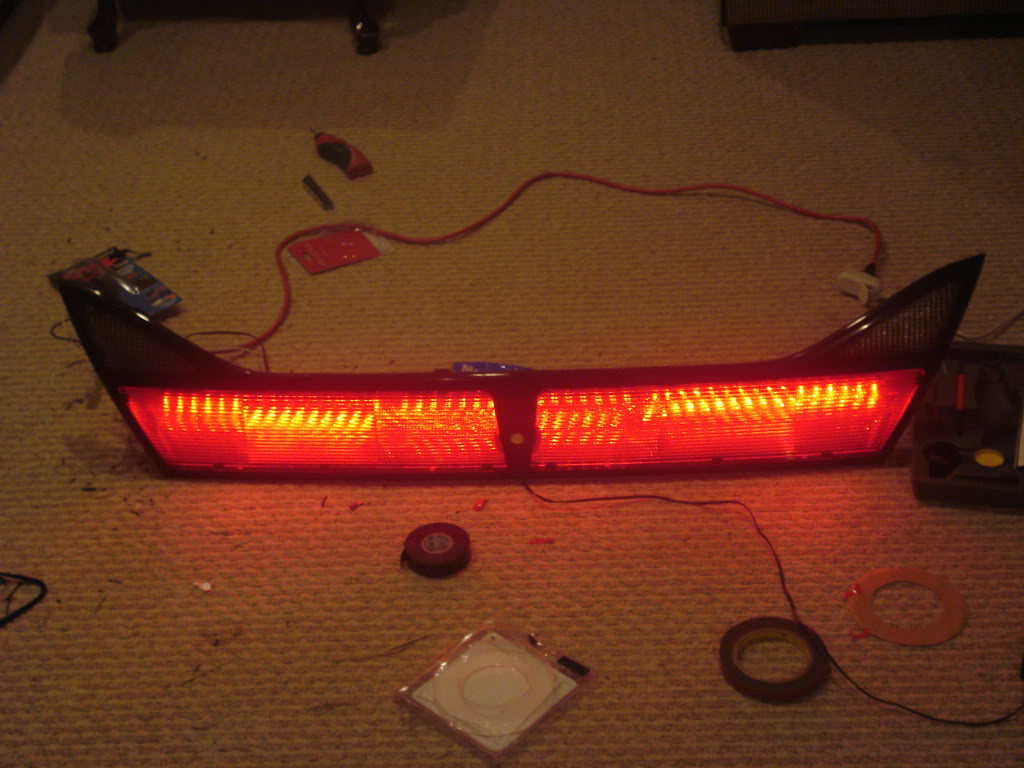
It might look like there�* a pattern but there isn�t any� it�* just that I can�t use a camera with the proper setting... god bless auto modes
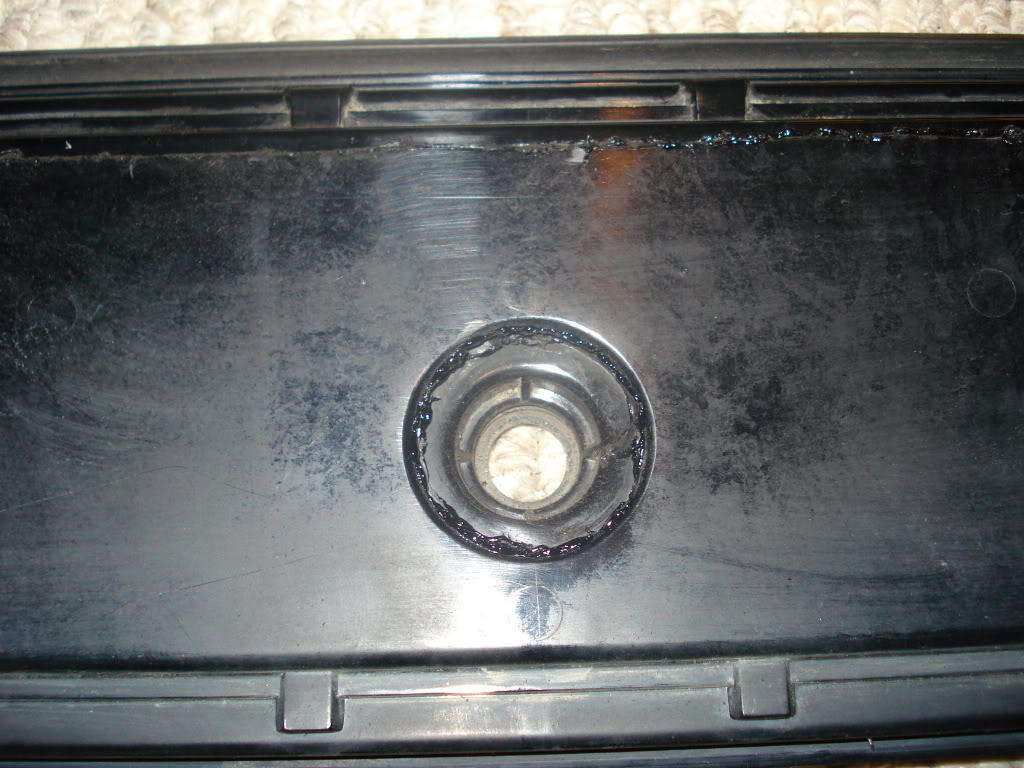
So now you're pretty much done...all you have to do is seal it...
Don�t go super crazy on sealing it, remember you need to throw this back at the trunk... too much glue might leave a gap so use it wisely...
The way I did I used goop glue, I put a little on my finger tip and wipe it across the gap to avoid big amounts of glue and also to avoid glue leaking into the light.
After putting a fine layer of glue, wait about 30 minutes for it to dry a little bit then put as much as you want... nice thick layer� and make sure you spread it around good... so water doesn�t leak in... I put total of 4 fine layers of glue with about 4 hours of wait between each layer... and ever since then I never saw any water or condensation... and where I live... If I didn�t do it right... I would see it right away�
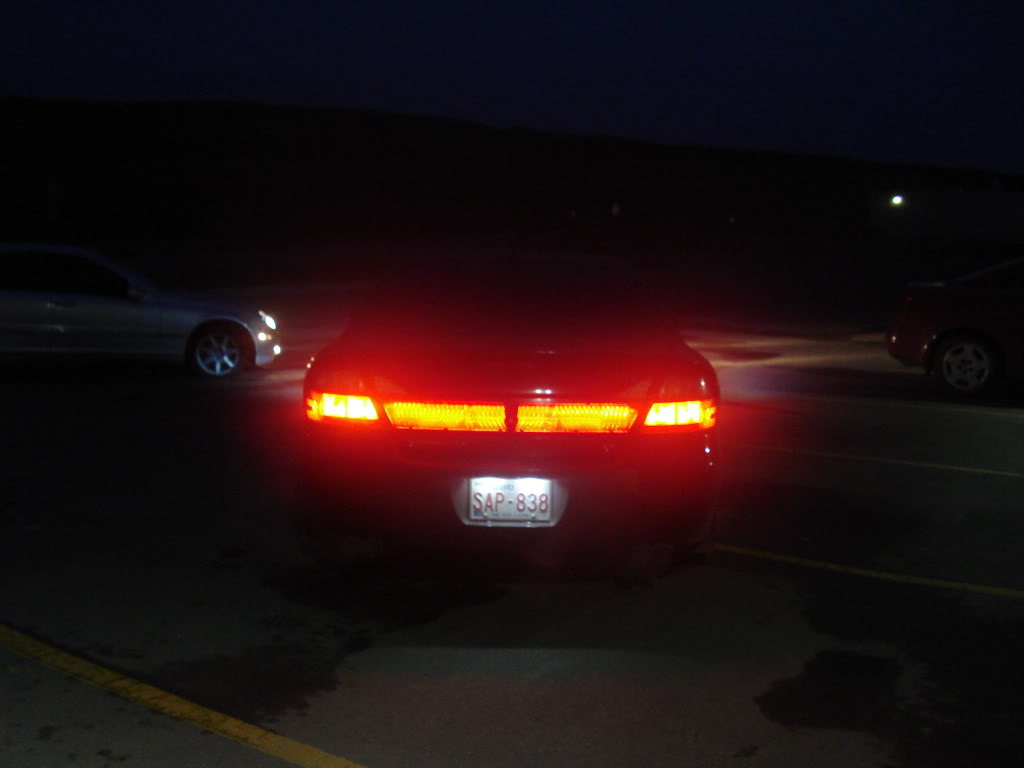
After it dries� you're all done and ready to throw it back on the car� you can run the wires from the trunk lid into the black hose that holds the wires for the trunk release latch� run it through all the way down, then keep it running down to right below the CD changer in the trunk.
Now decide when you want it to light up... I have it lighting up with the rear side markers...
That�* one option� another is to light up when you hit the brakes... that�* totally up to you
Wires were tapped in the trunk under the CD changer... they were tapped on the purple wire for the 194 bulb outside... which will keep them running with your parking lights, if you want it to flash with your brakes� check which wire goes into the 3157 bulbs in the tails... there are three wires, black for ground, purple for parking lights, and the last one for the brake light� can�t remember which color.. I THINK white
After its all wires up set your clips back in tighten the screws and start your car!
As I mentioned before... it might seem like there is a pattern... but it�* not there� it�* just the way the light plays with the reflectors


Now go take it for a cruise

you will need the following:
A dremel (I recommend the one with adjustable speed)
A dremel cutting disk (diamond wheel was the best I ever used)
Glue/sealant (make sure its water and weather proof)
I used goop glue and sealant... so far so good... the thicker the glue the better I�d say. Reason behind that the glue won�t leak as bad inside (had that problem before with clearing my GTP'* tail lights)
LED strips
I used the Catera tail light but after taking it apart I realized that it wasn�t a must.
any good strong LED strips will work just fine.. something like this would work even better than the Catera lights, reason is the thickness of the strips
I wish I knew that all I had to use was LED strips I would have bought this over the Catera anytime and it would have made it a lot easier
http://www.oznium.com/led-flex-strips
MAKE SURE YOU WEAR SAFETY GLASSES WHILE CUTTING THE TAIL LIGHT.
Get ready and the fun begins here
First you start with removing the carpet in the back of the trunk lid, then you would have to remove 4 nuts using a 10mm socket, this will set the bottom of the center tail piece free. From there you have to remove the top right and left clips... and you have to do is pull. Most likely you will break the clips... and good luck finding replacements because most GM dealers will tell you that you must buy the full trunk piece to replace them... idiots... I�m still looking for replacements, I think I got somewhere... I�ll keep this thread updated... I have a part number, just waiting for my order to come in to confirm
Top right and left are the clips that you even know they are there, trunk is sealed at the back were they sit.
Bottom 4 holes are the nuts, 10mm I believe
Then
Using the Catera light all you have to do is remove the LED strips inside... there should be a total of four you will only need 3 of them.
Picture above shows all 4 led strips on top of the Bonneville center piece. You can tell they are a little too long for the bonnie, so removing one will fit just perfect
Picture above shows the LEDs on the outside just to give me an idea what it looks like.
Oh yeah... by the way� you might wanna test and make sure all LEDs are working� because it would really really suck doing all the work and finding out you have some LEDs that don�t work
Then the hard/fun part begins... this job will determine how easy you will finish at the end.. I set the dremel on low speed and I made a line all across the back... I didn�t cut it all the way in,, because of the high RPM if you start cutting straight you will end up with melting plastic all around, so you will end up with a huge gap instead of a small fine crack.
so after marking it all the way around the top and sides set the dremel to a high speed and start cutting all the way in.. Again don�t keep the dremel on the same spot for too long� it will only make the opening wider... which you wanna avoid to make it easier to close
Do exact same to the center piece were the key cylinder is
From there you have some play... it would be nice to have some help here� someone can open the plastic for you while you insert the LED strips
Little testing
As you can see� I didn�t use anything to mount the LED because they were wide I just insert them there and by force they stayed at the top.
Keep working your way all around... make sure the LEDs stay at the top� if you use the Catera led lights make sure you're super careful... since they are not so flexible and they are soldered on a circuit board, you can easily break the solder and you won�t even notice
Close to be done... all the LEDs are in and set at the top of the center tail piece... make sure you test them and make sure they are all working and it looks decent
Then turn it and look at the front
It might look like there�* a pattern but there isn�t any� it�* just that I can�t use a camera with the proper setting... god bless auto modes
So now you're pretty much done...all you have to do is seal it...
Don�t go super crazy on sealing it, remember you need to throw this back at the trunk... too much glue might leave a gap so use it wisely...
The way I did I used goop glue, I put a little on my finger tip and wipe it across the gap to avoid big amounts of glue and also to avoid glue leaking into the light.
After putting a fine layer of glue, wait about 30 minutes for it to dry a little bit then put as much as you want... nice thick layer� and make sure you spread it around good... so water doesn�t leak in... I put total of 4 fine layers of glue with about 4 hours of wait between each layer... and ever since then I never saw any water or condensation... and where I live... If I didn�t do it right... I would see it right away�
After it dries� you're all done and ready to throw it back on the car� you can run the wires from the trunk lid into the black hose that holds the wires for the trunk release latch� run it through all the way down, then keep it running down to right below the CD changer in the trunk.
Now decide when you want it to light up... I have it lighting up with the rear side markers...
That�* one option� another is to light up when you hit the brakes... that�* totally up to you
Wires were tapped in the trunk under the CD changer... they were tapped on the purple wire for the 194 bulb outside... which will keep them running with your parking lights, if you want it to flash with your brakes� check which wire goes into the 3157 bulbs in the tails... there are three wires, black for ground, purple for parking lights, and the last one for the brake light� can�t remember which color.. I THINK white
After its all wires up set your clips back in tighten the screws and start your car!
As I mentioned before... it might seem like there is a pattern... but it�* not there� it�* just the way the light plays with the reflectors
Now go take it for a cruise
 01-09-2010, 12:19 AM
#3
Administratus Emeritus

Certified Car Nut
Great writeup Sam, and Thank You for your excellent contribution. Lets please get a copy of this to Gearheads, Forum host the pics and polish, wrap, and into the Tech Section. Also some tags on the original left here. Thanx.
01-09-2010, 01:05 AM
#4
Senior Member
True Car Nut
It'* already underway Venom. Dan'* working it up and I'm standing on the sideline ready to jump in and help a brother out!
01-09-2010, 01:34 AM
#5
Administratus Emeritus
Certified Car Nut
Cool. Wasn't sure how well General Chat was being covered. I moved 4 threads from this Section tonight, nope 5. This original thread is going to Detail And Appearance. 
Thread moved to Proper Section for better visibility and search indexing. Lets get some tags on this please.
Thread moved to Proper Section for better visibility and search indexing. Lets get some tags on this please.
02-22-2010, 01:23 PM
#7
Senior Member
True Car Nut
Thread Starter
Join Date: Mar 2009
Location: Fort crack homie
Posts: 2,894
Likes: 0
Received 0 Likes
on
0 Posts
for anyone whos interested in this project.. you might brake a clip
most gm idiotships said you cant buy replacement clips...
and i finally found the part number
part number 16520199 works... they are the right clips..
and they are not cheap...
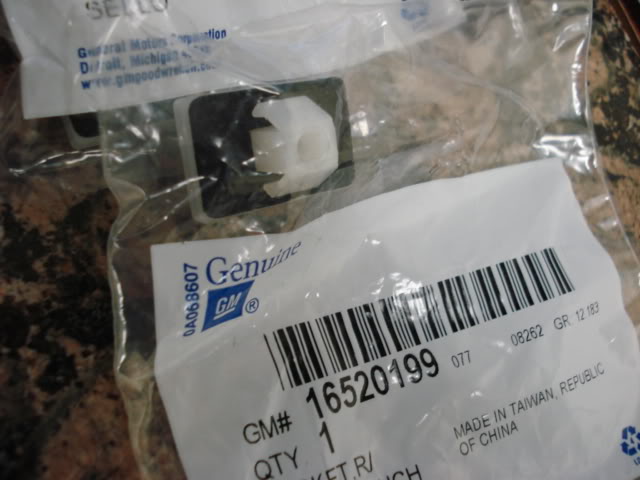
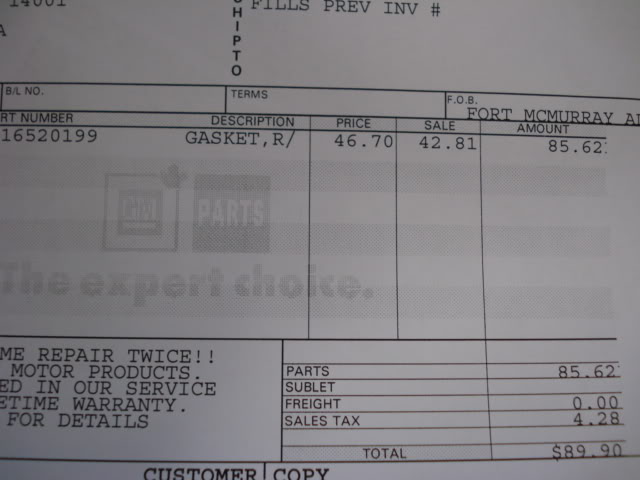
yep.. $42.81 a piece... alot cheaper on gmpartsdirect.com.. around 14 bucks.. But they dont ship to canada... sucks...
most gm idiotships said you cant buy replacement clips...
and i finally found the part number
part number 16520199 works... they are the right clips..
and they are not cheap...
yep.. $42.81 a piece... alot cheaper on gmpartsdirect.com.. around 14 bucks.. But they dont ship to canada... sucks...
Last edited by SAMzGXP; 02-22-2010 at 01:33 PM.

Thread
Thread Starter
Forum
Replies
Last Post

