Coolant Leak Intake
 12-16-2014, 05:10 PM
#81
Senior Member
True Car Nut


i used simple green to get the majority of it and brake cleaner, it gets rid of any residue that might screw up the silicone adhesion.
i think i got the plugs at home depot, lowes should have had them, just not the ones with internal hex. they have the square head ones that you have to grind down a little.
i think i got the plugs at home depot, lowes should have had them, just not the ones with internal hex. they have the square head ones that you have to grind down a little.
 12-17-2014, 09:24 PM
#82
Senior Member
Posts like a Turbo
Thread Starter

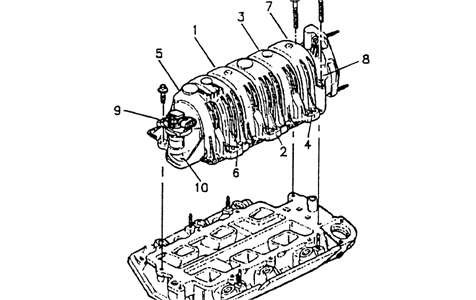
I put the lower intake manifold on this evening. It turned into a bit of a job. I was trying to install the intake with the coolant elbow but I could not do it; maybe with some help but not by myself. The gasket would not stay in place on the back/right head; it seemed to have a bit of a spring in it but I did not want to try any adjustments due to the cost of these gaskets. I finally installed the intake without the coolant elbow so now I will have to take the belt tensioner off in order to get the coolant elbow in place. I hope I did not damage the lower intake gaskets. I should have asked for more information on assembly.
12-17-2014, 09:32 PM
#83
Senior Member
Posts like a Turbo
Normally that'* how I do the job myself. I also leave the throttle body on as well. Nothing wrong with having the job take longer than expected.
12-18-2014, 07:25 AM
#84
Senior Member
True Car Nut
there should be silicone holding the bottom just put a couple dots on the top to hold it down, then i put the elbow in and lower the manifold
12-18-2014, 10:52 AM
#85
Senior Member
Posts like a Turbo
Thread Starter
Thanks, hopefully it won't be coming off again if I did not mess up the gaskets. I will just have to take the tensioner lose now; part of the work is already done for that anyway since the alternator is off. I figured it could be done but when I tried, the gasket kept slipping on me. I figured more work to take the tensioner off but better safe than sorry later.
Anything I should know about the upper intake/plenum installation?
Anything I should know about the upper intake/plenum installation?
12-18-2014, 11:37 AM
#86
Senior Member
True Car Nut
on the tensioner there was, another seal you have to worry about in the back if you disturb that. i think it was an oring on the ones before 2000, would put new oring and silicone on that
12-18-2014, 07:45 PM
#87
Retired


Certified Car Nut

Thanks, hopefully it won't be coming off again if I did not mess up the gaskets. I will just have to take the tensioner lose now; part of the work is already done for that anyway since the alternator is off. I figured it could be done but when I tried, the gasket kept slipping on me. I figured more work to take the tensioner off but better safe than sorry later.
Anything I should know about the upper intake/plenum installation?
Anything I should know about the upper intake/plenum installation?
Torque in sequence and use a torque wrench...
89 inch lbs
__________________
Retired Administrator
2002 *-10 5.7 V8
2023 Jeep Rubicon Diesel
Retired Administrator
2002 *-10 5.7 V8
2023 Jeep Rubicon Diesel
12-23-2014, 12:41 PM
#88
Senior Member
Posts like a Turbo
Thread Starter
I am trying to install the PVC valve assembly onto the upper intake that came with the Dorman kit. I put the O-ring on the PVC valve and the spring and the large O-ring as per the instructions. I press down as hard as I can but I can not rotate the assembly into place. Is it that I am just not able to apply enough pressure to compress the O-rings. Help please.
While I wait for an answer I am going to work on replacing other things.
While I wait for an answer I am going to work on replacing other things.
 12-23-2014, 11:58 PM
#90
Senior Member
Posts like a Turbo
Thread Starter
I got the PCV valve assembly in place but it was very difficult; I guess I just did not have the strength to push hard enough. I took the dorman O-ring off the PCV valve and replaced it with one from the Fel-pro gasket set and it was still hard. I read a tip elsewhere about using a socket on a ratchet and that made it easier to push down and use the ratchet to carefully turn when you have it depressed enough. Still was a touch job for me to get something so simple in place. Strength is one area that men have an advantage when it comes to working on cars.