2001 SE Front door removal
 02-16-2007, 06:16 PM
#1
Senior Member
Posts like a Turbo
Thread Starter
Join Date: Dec 2006
Location: Cincinnati, Ohio
Posts: 484
Likes: 0
Received 0 Likes
on
0 Posts

I thought I started this thread before but couldn't find it. Can anyone tell me how to take my front doors apart so I can get to my crossovers on my components? My tweeters are awful quiet and I wanted to check where they have the points set.
 02-16-2007, 06:21 PM
#2
Senior Member
True Car Nut

its just as bad as every other car door I've taken apart.
if you have a door panel removal tool it makes the job easier. otherwise you need to locate the plastic clips around the door. be careful not to break them.
heres what harofreak00 posted a few months ago, I found it very helpful when taking my doors appart.
if you have a door panel removal tool it makes the job easier. otherwise you need to locate the plastic clips around the door. be careful not to break them.
heres what harofreak00 posted a few months ago, I found it very helpful when taking my doors appart.
Originally Posted by harofreak00
Trim Panel Replacement - Side Front Door
Tools Required
J 36796 Clip Zip Tool
J 38778 Door Trim Pad Clip Remover
Removal Procedure
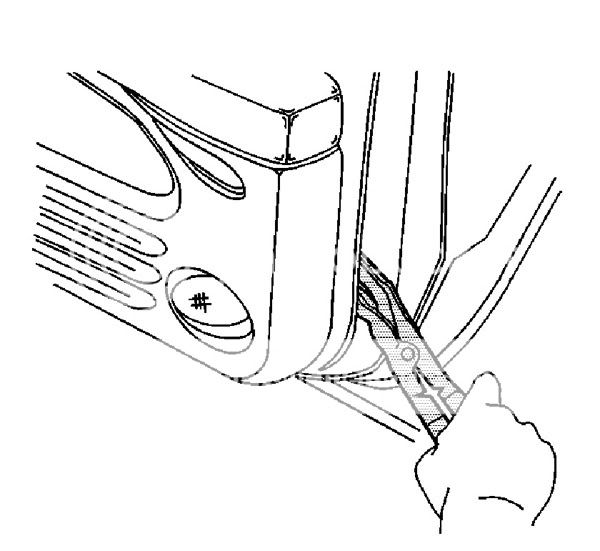
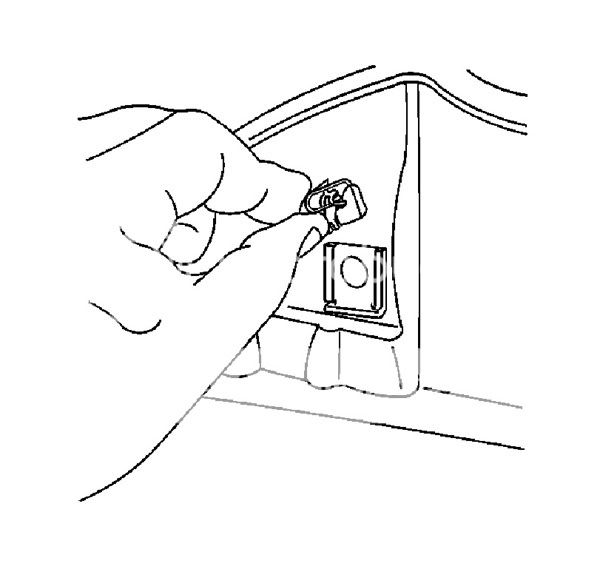
Remove the inside door handle bezel. The front inside door handle bezel has electrical connectors, the rear does not.
Insert a flat bladed tool behind the forward upper edge of the door handle bezel.
Gently pry the upper portion of the bezel away from the door trim panel.

Pull the bezel forward over the inside door handle.
Disconnect the electrical connector.

Remove the upper door trim panel.
Use the J 38778 in order to release the retainer at the top of the upper door trim panel.
Lift the upper door trim panel upwards in order to remove.
Disconnect the wire harness to the tweeter.
Use the J 36796 in order to release the retainers around the outside edges of the door trim panel. Start at the bottom and work around.
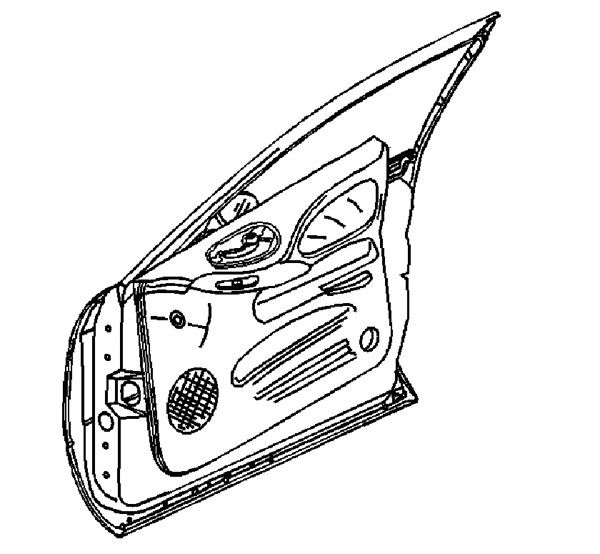
Starting at the bottom rear of the door trim panel pull inwards, while lifting upwards in order to remove.
Disconnect the door trim panel wiring harness.
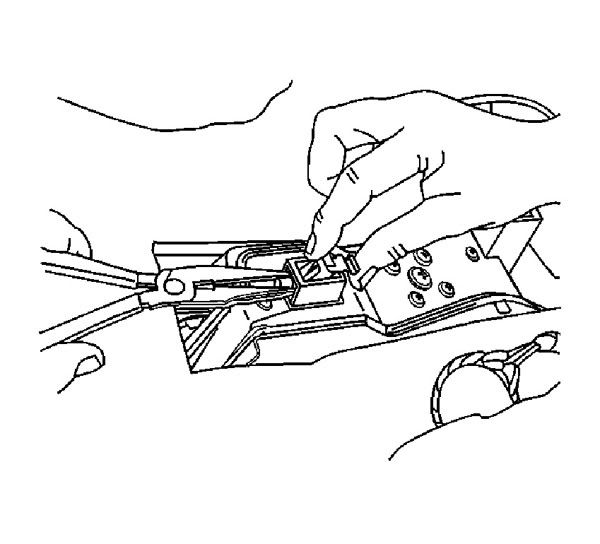
Remove the armrest pull cup retainers from the inside of the door trim panel.
Use needle nose pliers to compress the 360 clip.
Pull the 360 clip out of the nylon nut on the door trim panel.
Installation Procedure
Install the 360 clip retainers into the nylon nuts on the inner door panel.
Connect the door wire harness to the door trim panel wire harness.
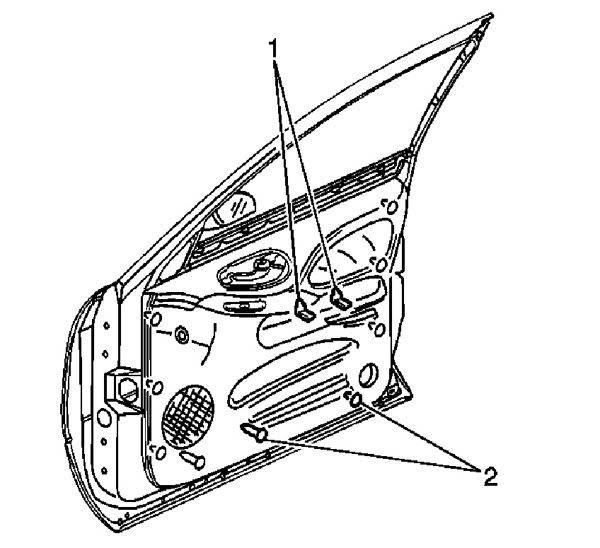
Starting at the bottom, secure the door trim panel around the outside edges with the retainers (2).
Align the door trim panel to the 360 clip retainers (1).
Snap the retainers in to secure the center of the door trim panel to the inner door panel.
Pull on the armrest to assure proper fit.
Push outwards near the top of the door trim panel in order to snap the top door trim panel retainer into the channel in the window inner belt seal strip.
Install the inside door handle bezel.

Connect the electrical connectors, if any, to the inside door handle bezel.
Guide the inside door handle through the opening in the door handle bezel.
Snap the door handle bezel into place.
Work the rubber around and behind both the manual lock **** and the inside door handle.
Install the upper door trim panel (1).
Connect the wire harness to the tweeter.
Insert the tabs into the slots on the door trim panel.
Insert the retainer into the hole in the door frame.
Trim Panel Replacement - Side Rear Door
Tools Required
J 36796 Clip Zip Tool
Removal Procedure
Remove the inside door handle bezel. The front inside door handle bezel has electrical connectors, the rear does not.
Insert a flat bladed tool behind the forward upper edge of the door handle bezel.
Gently pry the upper portion of the bezel away from the door trim panel.
Pull the bezel forward over the inside door handle.
Disconnect the electrical connector.

Use the J 36796 in order to release the retainers around the outside edges of the door trim panel.
Rock the door trim panel (1) upwards, starting at the rear, while lifting upwards to remove.
Disconnect the door trim panel wiring harness.
Remove the armrest pull cup retainers from the inside of the door trim panel.
Use needle nose pliers to compress the 360 clip.
Pull the 360 clip out of the nylon nut on the door trim panel.
Installation Procedure
Install the 360 clip to the nylon nuts on the inner door panel by sliding the 360 clip down into the grooves in the nylon nuts.
Connect the trim panel electrical connector to the door wiring harness connector.
Starting at the bottom, secure the door trim panel around the outside edges with the retainers (2).
Align the door trim panel to the armrest pull cup retainers (1).
Snap the retainers in to secure the center of the door trim panel to the inner door panel.
Pull on the armrest to assure proper fit.
Push outwards near the top of the door trim panel in order to snap the top door trim panel retainer into the channel in the window inner belt seal strip.
Install the inside door handle bezel.
Connect the electrical connectors, if any, to the inside door handle bezel.
Guide the inside door handle through the opening in the door handle bezel.
Snap the door handle bezel into place.
Work the rubber around and behind both the manual lock **** and the inside door handle.
Install the upper door trim panel (1).
Connect the wire harness to the tweeter.
Insert the tabs into the slots on the door trim panel.
Insert the retainer into the hole in the door frame.
Tools Required
J 36796 Clip Zip Tool
J 38778 Door Trim Pad Clip Remover
Removal Procedure
Remove the inside door handle bezel. The front inside door handle bezel has electrical connectors, the rear does not.
Insert a flat bladed tool behind the forward upper edge of the door handle bezel.
Gently pry the upper portion of the bezel away from the door trim panel.
Pull the bezel forward over the inside door handle.
Disconnect the electrical connector.
Remove the upper door trim panel.
Use the J 38778 in order to release the retainer at the top of the upper door trim panel.
Lift the upper door trim panel upwards in order to remove.
Disconnect the wire harness to the tweeter.
Use the J 36796 in order to release the retainers around the outside edges of the door trim panel. Start at the bottom and work around.
Starting at the bottom rear of the door trim panel pull inwards, while lifting upwards in order to remove.
Disconnect the door trim panel wiring harness.
Remove the armrest pull cup retainers from the inside of the door trim panel.
Use needle nose pliers to compress the 360 clip.
Pull the 360 clip out of the nylon nut on the door trim panel.
Installation Procedure
Install the 360 clip retainers into the nylon nuts on the inner door panel.
Connect the door wire harness to the door trim panel wire harness.
Starting at the bottom, secure the door trim panel around the outside edges with the retainers (2).
Align the door trim panel to the 360 clip retainers (1).
Snap the retainers in to secure the center of the door trim panel to the inner door panel.
Pull on the armrest to assure proper fit.
Push outwards near the top of the door trim panel in order to snap the top door trim panel retainer into the channel in the window inner belt seal strip.
Install the inside door handle bezel.
Connect the electrical connectors, if any, to the inside door handle bezel.
Guide the inside door handle through the opening in the door handle bezel.
Snap the door handle bezel into place.
Work the rubber around and behind both the manual lock **** and the inside door handle.
Install the upper door trim panel (1).
Connect the wire harness to the tweeter.
Insert the tabs into the slots on the door trim panel.
Insert the retainer into the hole in the door frame.
Trim Panel Replacement - Side Rear Door
Tools Required
J 36796 Clip Zip Tool
Removal Procedure
Remove the inside door handle bezel. The front inside door handle bezel has electrical connectors, the rear does not.
Insert a flat bladed tool behind the forward upper edge of the door handle bezel.
Gently pry the upper portion of the bezel away from the door trim panel.
Pull the bezel forward over the inside door handle.
Disconnect the electrical connector.
Use the J 36796 in order to release the retainers around the outside edges of the door trim panel.
Rock the door trim panel (1) upwards, starting at the rear, while lifting upwards to remove.
Disconnect the door trim panel wiring harness.
Remove the armrest pull cup retainers from the inside of the door trim panel.
Use needle nose pliers to compress the 360 clip.
Pull the 360 clip out of the nylon nut on the door trim panel.
Installation Procedure
Install the 360 clip to the nylon nuts on the inner door panel by sliding the 360 clip down into the grooves in the nylon nuts.
Connect the trim panel electrical connector to the door wiring harness connector.
Starting at the bottom, secure the door trim panel around the outside edges with the retainers (2).
Align the door trim panel to the armrest pull cup retainers (1).
Snap the retainers in to secure the center of the door trim panel to the inner door panel.
Pull on the armrest to assure proper fit.
Push outwards near the top of the door trim panel in order to snap the top door trim panel retainer into the channel in the window inner belt seal strip.
Install the inside door handle bezel.
Connect the electrical connectors, if any, to the inside door handle bezel.
Guide the inside door handle through the opening in the door handle bezel.
Snap the door handle bezel into place.
Work the rubber around and behind both the manual lock **** and the inside door handle.
Install the upper door trim panel (1).
Connect the wire harness to the tweeter.
Insert the tabs into the slots on the door trim panel.
Insert the retainer into the hole in the door frame.
02-27-2007, 08:41 PM
#3
Senior Member
Posts like a Supercharger

Join Date: Jan 2007
Location: Missouri
Posts: 186
Likes: 0
Received 0 Likes
on
0 Posts
Maybe this should be added to Techinfo interior. I know I'm going to take my doors apart in a couple years and I hope I can find a thread with pictures like this. Of course real pictures would be better, but then everyone would see the broken clips. 
08-18-2007, 12:23 PM
#5
Senior Member
Posts like a Northstar

Join Date: Mar 2007
Location: Maumee, OH
Posts: 529
Likes: 0
Received 0 Likes
on
0 Posts
Just use the normal trim panel tool, it will work fine. You will have to find an edge you can pull away more than any other. Actually, pulling the tweeter pod out, and then working down from there may be your best bet.
On the 2000+ Bonne'*, they used a newer style of door panel clip (I've found the same style of clip on many higher end vehicles). Anyways, this clip is much tighter, and much easier for you to break something, because of the tightness. So... please, take your time while doing this.
Anything pre-2000, if you don't have the door panel off in less than 3 minutes, well.... thats besides the point. I love doing door panel speakers at work, probably one of the easiest things to do. LOL, we actually have races. Sad... I know.
08-18-2007, 01:40 PM
#6
Senior Member
Posts like a Supercharger

Join Date: Dec 2005
Location: Fresno, California
Posts: 163
Likes: 0
Received 0 Likes
on
0 Posts
Thanks...Ijust wound up using my hands and carefully popped them loose. I did loose one so I will have to try and jerry-rig something there but I have it off and reg out just waiting for a reply to message left in 2000-2005 section! Thanks for your input though!
Mac
Mac

Thread
Thread Starter
Forum
Replies
Last Post
ShadeTree
Buick
0
04-11-2015 11:51 AM
radomirthegreat
Your Other Rides: Pics & Videos
4
12-31-2009 02:27 AM
black_friday
Audio (and aftermarket electronics)
3
12-19-2006 12:53 PM