04MonteLS's "Project SQ Monte"
 12-12-2010, 07:33 PM
#31
Senior Member
Posts like a Turbo
Join Date: May 2009
Location: Hibbing MN
Posts: 327
Likes: 0
Received 0 Likes
on
0 Posts

haha yeah i suppose your close enough to some big dogs if your ever in need of an ear raping huh lol. i broke up with that girl and since the car ended up being in here moms name its gone lol oh well hard pill to swallow but it i what it is. theres millions of cars out there so ill get something going, and got a new girl whos a real woman so i got support with it all now hahaaa wait n see. and if i can get on SMD ill have some 18+ booty pics of her soon enough too hahaaa lol
 12-12-2010, 07:51 PM
#32
Senior Member
Posts like a Turbo
Thread Starter
Join Date: Jul 2010
Location: Sacramento, CA.
Posts: 326
Likes: 0
Received 0 Likes
on
0 Posts
haha yeah i suppose your close enough to some big dogs if your ever in need of an ear raping huh lol. i broke up with that girl and since the car ended up being in here moms name its gone lol oh well hard pill to swallow but it i what it is. theres millions of cars out there so ill get something going, and got a new girl whos a real woman so i got support with it all now hahaaa wait n see. and if i can get on SMD ill have some 18+ booty pics of her soon enough too hahaaa lol
 12-12-2010, 08:09 PM
#33
Senior Member
Posts like a Turbo
Join Date: May 2009
Location: Hibbing MN
Posts: 327
Likes: 0
Received 0 Likes
on
0 Posts
nah didnt see he got it up and working yet, last i seen he was working on it though. that jeep is no joke either lol. ill def let ya know bout the pics lol
01-21-2011, 02:13 AM
#34
Senior Member
Posts like a Turbo
Thread Starter
Join Date: Jul 2010
Location: Sacramento, CA.
Posts: 326
Likes: 0
Received 0 Likes
on
0 Posts
Well, the time has come to get my system back up and running, it'* been a long time coming. First thing I did was sold my P880PRS with blown pico fuse and with the money from that I ordered an Alpine CDA-117

I also picked up a DD 2512

The rest of the system will remain the same
So to build a custom box for the new sub I picked up some 3/4" MDF and cut it all out for the box which will be 2.26cu.ft. tuned to 34Hz. At first my plan was just to use resin in the corners to make 45'* but I've decided to go ahead and coat the entire inside of the box with resin. This will give the box a little more strength and ensure it'* sealed. To add even more strength, when I do the resin 45'* i'm going to staple some fiberglass matt into the corners. So I picked up a gallon of resin, screws, glue and the nuts, bolts and washers that will be the speaker connection terminals on the back of my box. Instead of carpeting it, i'm going to paint it, it'* gonna be black with a red port. WalMart has the paint for cheap, the black was .98ea and the red was 1.22ea, I got 4 cans of black and 2 red.
I won't get the deck until the end of next week but the box build will begin tomorrow after work. I'm gonna round over the port walls and get that glued and screwed first....probably won't get much done on the box tomorrow as I only have 2 clamps and will try to use as few screws as possible. If I have time I might stop at Harbor Freight tomorrow while i'm out and about at work and pick up a few more clamps to help speed up the process. I'll take pics of the box building process and will post them up tomorrow evening and as I proceed with the build. Saturday it should be fully resined, assembled and just waiting for the 45'd corners to harden.
I also picked up a DD 2512
The rest of the system will remain the same
So to build a custom box for the new sub I picked up some 3/4" MDF and cut it all out for the box which will be 2.26cu.ft. tuned to 34Hz. At first my plan was just to use resin in the corners to make 45'* but I've decided to go ahead and coat the entire inside of the box with resin. This will give the box a little more strength and ensure it'* sealed. To add even more strength, when I do the resin 45'* i'm going to staple some fiberglass matt into the corners. So I picked up a gallon of resin, screws, glue and the nuts, bolts and washers that will be the speaker connection terminals on the back of my box. Instead of carpeting it, i'm going to paint it, it'* gonna be black with a red port. WalMart has the paint for cheap, the black was .98ea and the red was 1.22ea, I got 4 cans of black and 2 red.
I won't get the deck until the end of next week but the box build will begin tomorrow after work. I'm gonna round over the port walls and get that glued and screwed first....probably won't get much done on the box tomorrow as I only have 2 clamps and will try to use as few screws as possible. If I have time I might stop at Harbor Freight tomorrow while i'm out and about at work and pick up a few more clamps to help speed up the process. I'll take pics of the box building process and will post them up tomorrow evening and as I proceed with the build. Saturday it should be fully resined, assembled and just waiting for the 45'd corners to harden.
01-22-2011, 11:04 PM
#35
Senior Member
Posts like a Turbo
Thread Starter
Join Date: Jul 2010
Location: Sacramento, CA.
Posts: 326
Likes: 0
Received 0 Likes
on
0 Posts
Well, got some good news today and did some work on the box too. I'm a little long winded so I apologize up front 
First the good news.....my deck shipped today and is expected to be in my possession on Wednesday the 26th. Also heard that my girlfriends co-worker wants to buy my old box....He had been talking to my girl about getting a system in his car and my girl mentioned the one I had in my car. He emailed me one day and I kind of schooled him on car audio. One day I went to go pick up my girl from work and he came out and wanted a demo.....I blew his wig back! From that day on he has been in love with Sundown Audio and ended up picking up the same setup I have, an SAZ-1500D and a pair of SA-12'*. He said he hasn't been able to get the same bottom end from his setup as I did from mine so he wants to buy my box.
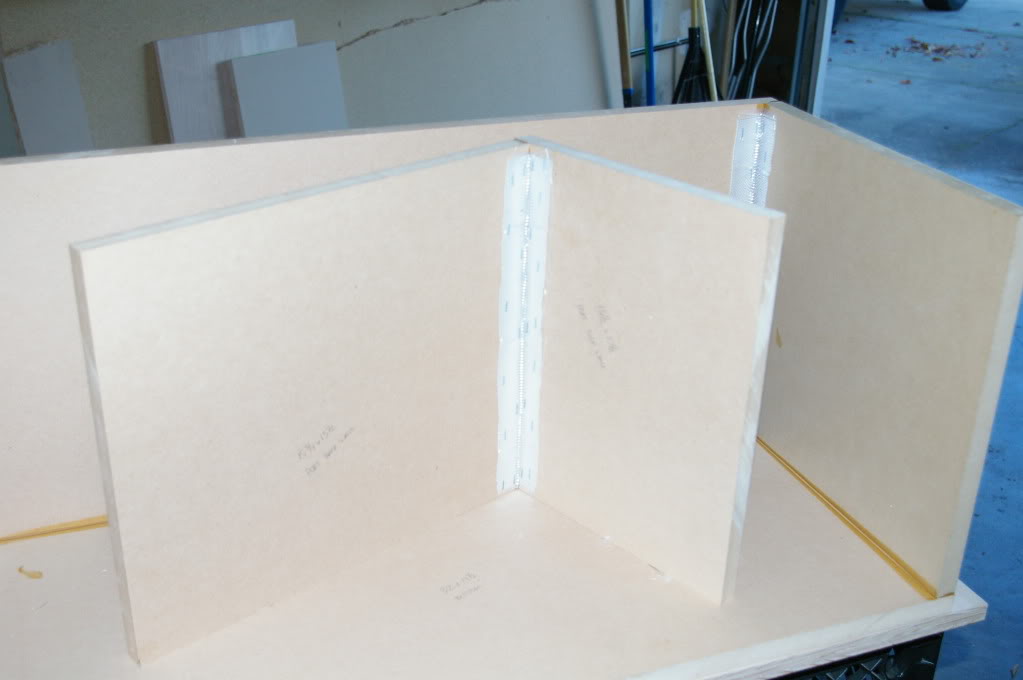
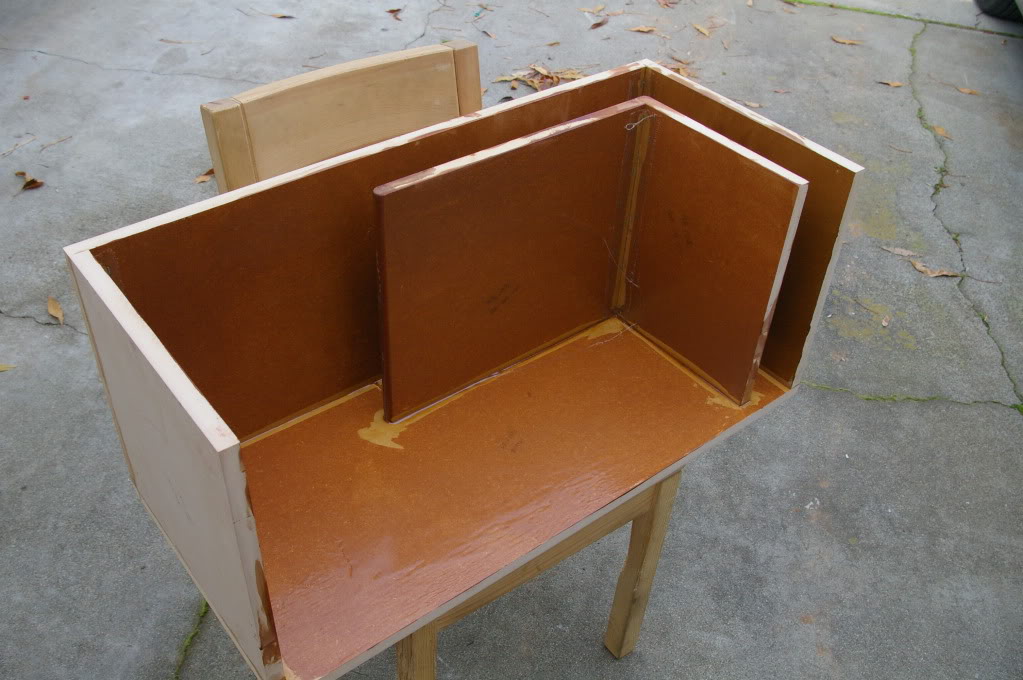
Now the good stuff, my box build for my DD 2512. As I mentioned previously, the box is 2.26 cu.ft. and tuned to 34Hz. I bought a full sheet of 3/4" MDF from Home Depot for $30 and had them cut it for me with the cut sheet diagram I supplied. Apparently I was either tired or in a rush when I did the diagram (or a combination of both) cause I had the 2nd baffle the wrong height and one of the sides the wrong width. After getting the cuts done the first time (Wednesday) I had a quarter sheet left over which was plenty to get the new cuts I needed so I took it to HD this afternoon to have them cut it. I didn't pay a dime for either set of cuts they did for me, very cool.
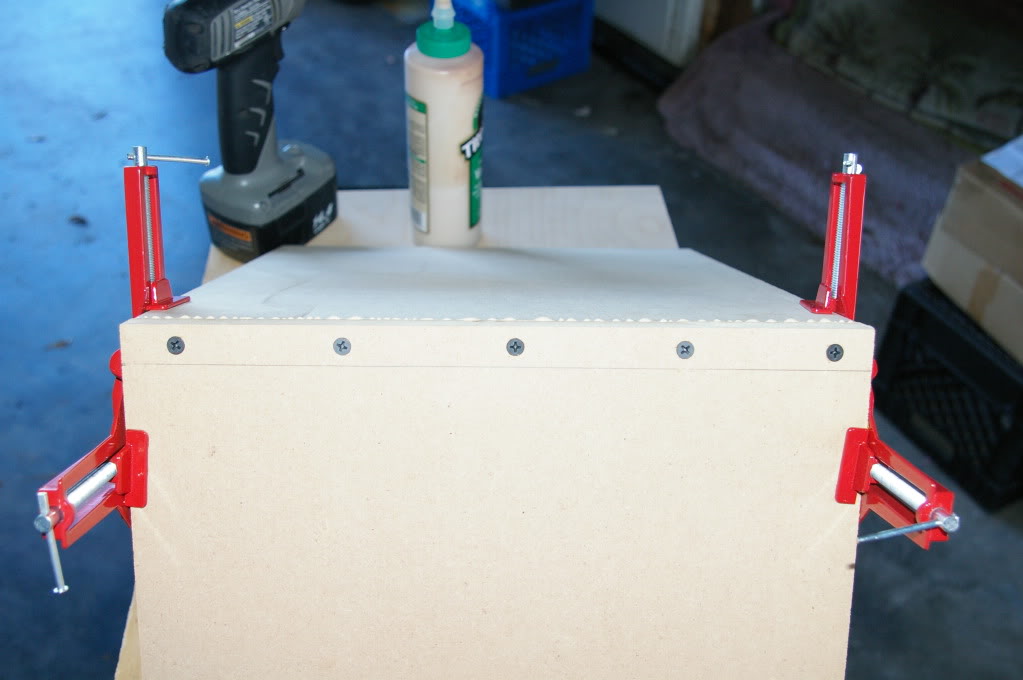
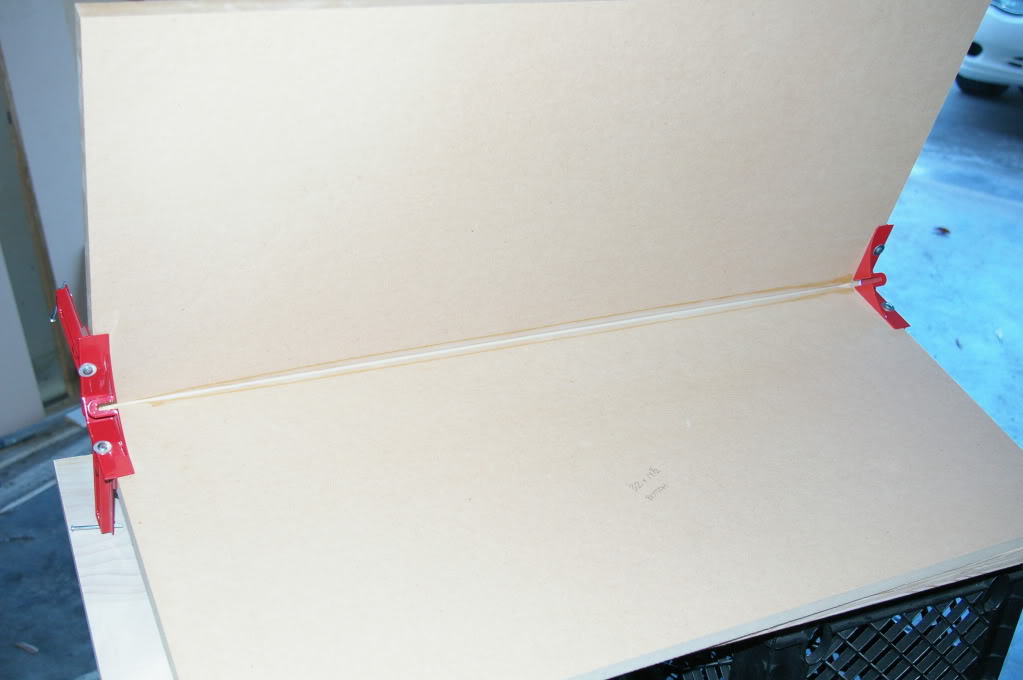
With all my panels cut to the right dimensions it was time to get busy, first was gluing and screwing the port walls.
Used a 90 degree clamp to align the panels, then I predrilled the screw holes with a 3/32" bit, then laid down and spread out a nice bead of Titebond III wood glue. Dropped the panel down back in place and attached the screws. I know I said I wasn't going to use many screws.....well, i'm gonna use them only to hold the panels in place until the glue dries, then I'm going to remove all the screws, fill in the holes with wood filler and sand it all down.
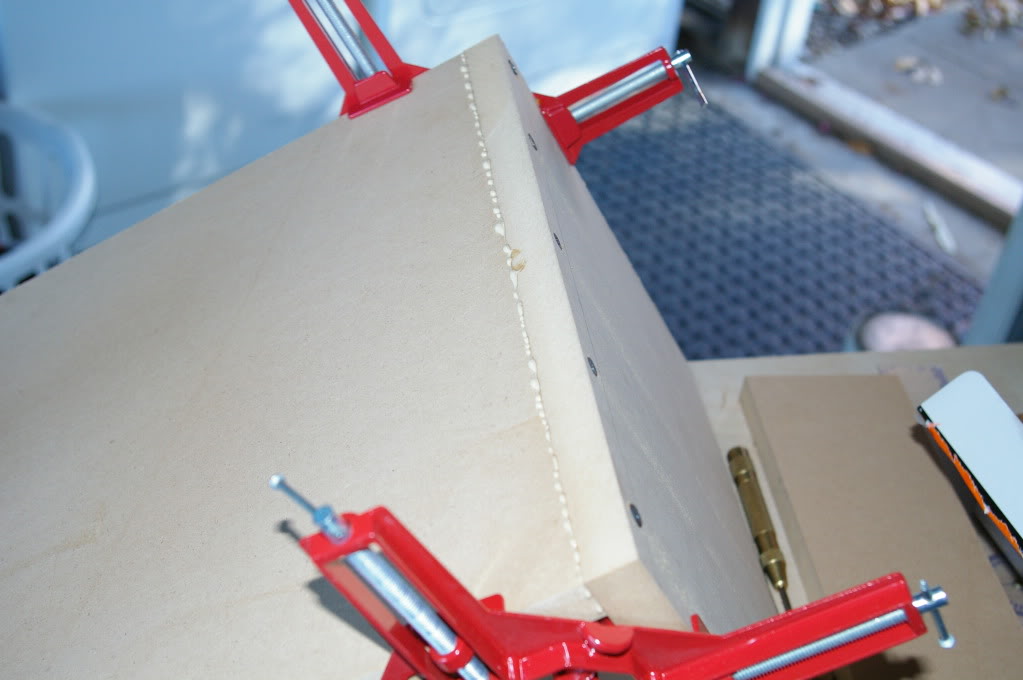
I wiped away the excess glue, set it aside and moved on the the rest of the box. I laid the bottom panel down and first to get installed to it was the back piece. Installation was the exact as on the port walls above.

Then the side pieces. I made a mistake here. The previous two pieces that got assembled were done one side at a time so when I got to this one that'* how I did it, not good considering there'* another side that you have to consider when doing this. So as soon as I drove in the last screw on the one side, I realized what I had done....I quickly predrilled the holes on the other side, removed the screws I had just installed, laid down a bead on the side I just predrilled, and another bead on the side I just took apart and then reassembled the side piece. Rookie move, I know. Didn't make that mistake on the other side

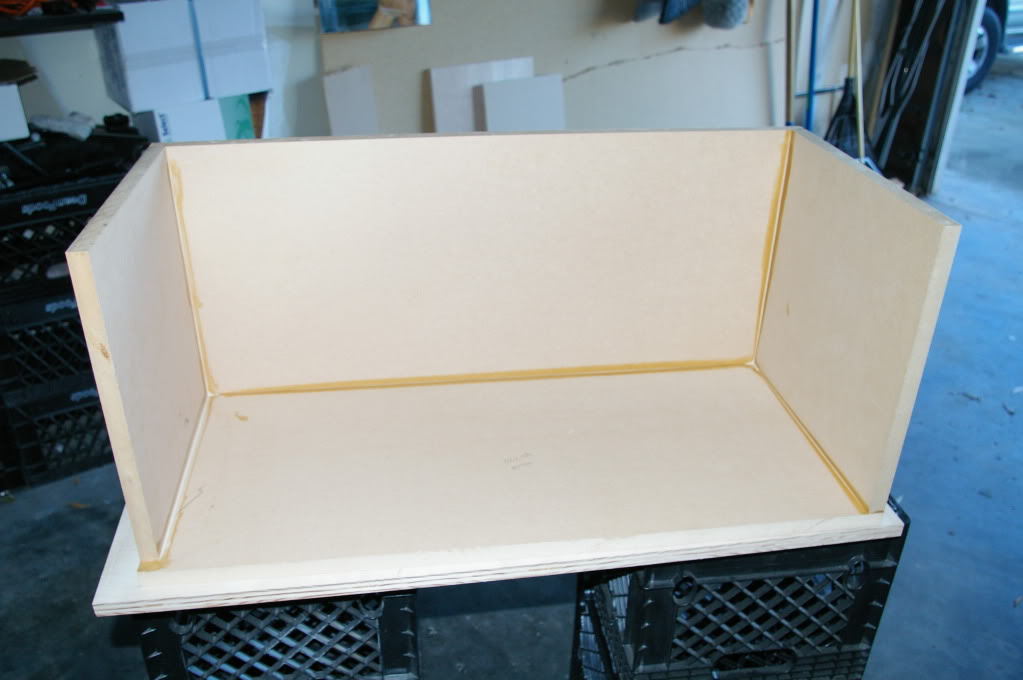
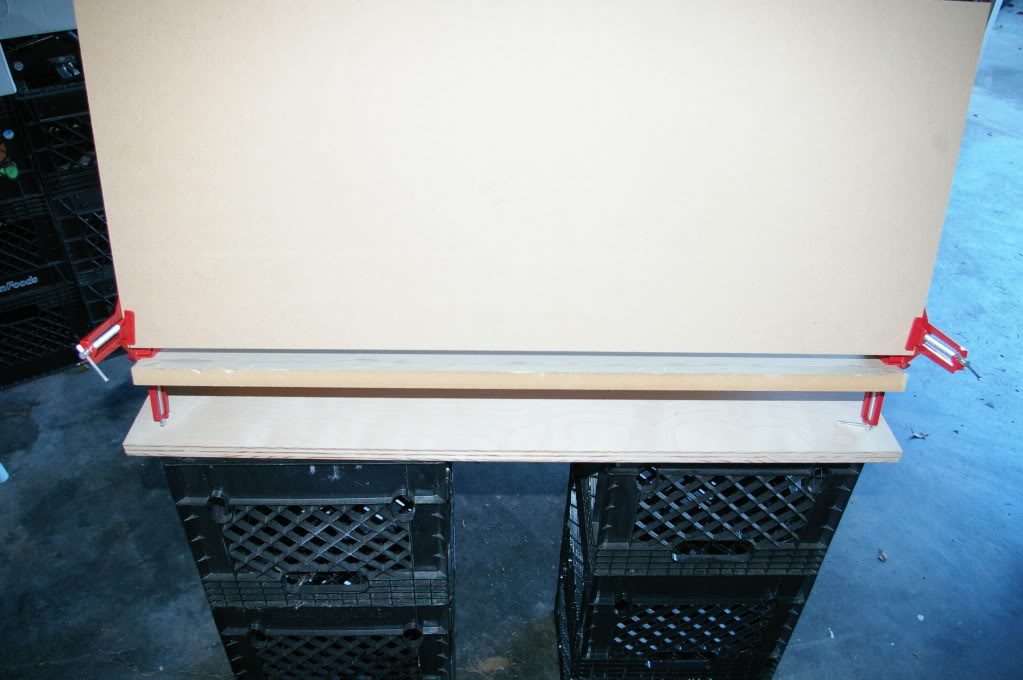
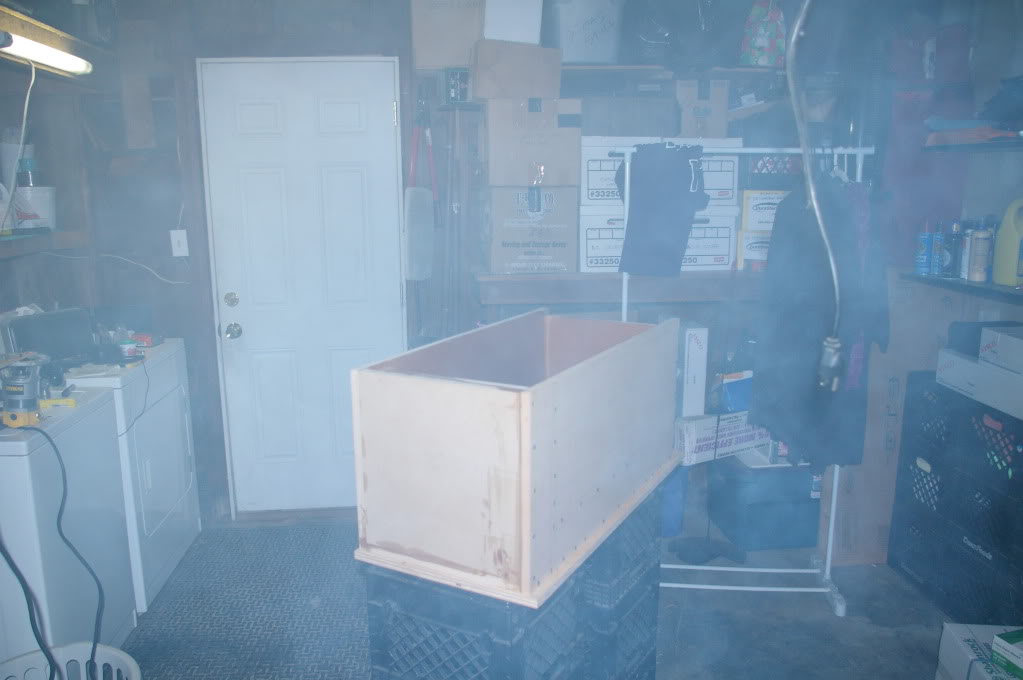
Oh yeah, you guys like my workbench? Milk crates and some scrap birch I had laying around
First the good news.....my deck shipped today and is expected to be in my possession on Wednesday the 26th.
Also heard that my girlfriends co-worker wants to buy my old box....He had been talking to my girl about getting a system in his car and my girl mentioned the one I had in my car. He emailed me one day and I kind of schooled him on car audio. One day I went to go pick up my girl from work and he came out and wanted a demo.....I blew his wig back! From that day on he has been in love with Sundown Audio and ended up picking up the same setup I have, an SAZ-1500D and a pair of SA-12'*. He said he hasn't been able to get the same bottom end from his setup as I did from mine so he wants to buy my box. Now the good stuff, my box build for my DD 2512. As I mentioned previously, the box is 2.26 cu.ft. and tuned to 34Hz. I bought a full sheet of 3/4" MDF from Home Depot for $30 and had them cut it for me with the cut sheet diagram I supplied. Apparently I was either tired or in a rush when I did the diagram (or a combination of both) cause I had the 2nd baffle the wrong height and one of the sides the wrong width. After getting the cuts done the first time (Wednesday) I had a quarter sheet left over which was plenty to get the new cuts I needed so I took it to HD this afternoon to have them cut it. I didn't pay a dime for either set of cuts they did for me, very cool.
With all my panels cut to the right dimensions it was time to get busy, first was gluing and screwing the port walls.
Used a 90 degree clamp to align the panels, then I predrilled the screw holes with a 3/32" bit, then laid down and spread out a nice bead of Titebond III wood glue. Dropped the panel down back in place and attached the screws. I know I said I wasn't going to use many screws.....well, i'm gonna use them only to hold the panels in place until the glue dries, then I'm going to remove all the screws, fill in the holes with wood filler and sand it all down.
I wiped away the excess glue, set it aside and moved on the the rest of the box. I laid the bottom panel down and first to get installed to it was the back piece. Installation was the exact as on the port walls above.
Then the side pieces. I made a mistake here. The previous two pieces that got assembled were done one side at a time so when I got to this one that'* how I did it, not good considering there'* another side that you have to consider when doing this. So as soon as I drove in the last screw on the one side, I realized what I had done....I quickly predrilled the holes on the other side, removed the screws I had just installed, laid down a bead on the side I just predrilled, and another bead on the side I just took apart and then reassembled the side piece. Rookie move, I know. Didn't make that mistake on the other side
Oh yeah, you guys like my workbench? Milk crates and some scrap birch I had laying around
01-22-2011, 11:26 PM
#36
Senior Member
True Car Nut
Join Date: Mar 2010
Location: Eaton Rapids MI
Posts: 2,964
Likes: 0
Received 0 Likes
on
0 Posts
from the pics ur port width only seems to be about an inch... Could just be the pic tho, but if it is only an inch or so wont u experience port turbulence noise/ port distortion? Looks like a solid build tho. R u going to carpet or paint it? I know when i had the box with my Fi in the trunk it slide around EVERYWHERE every time we turned, accelerated or braked, even with L brackets and self tapping screws. Because it was bare wood.
01-22-2011, 11:58 PM
#37
Senior Member
Posts like a Turbo
Thread Starter
Join Date: Jul 2010
Location: Sacramento, CA.
Posts: 326
Likes: 0
Received 0 Likes
on
0 Posts
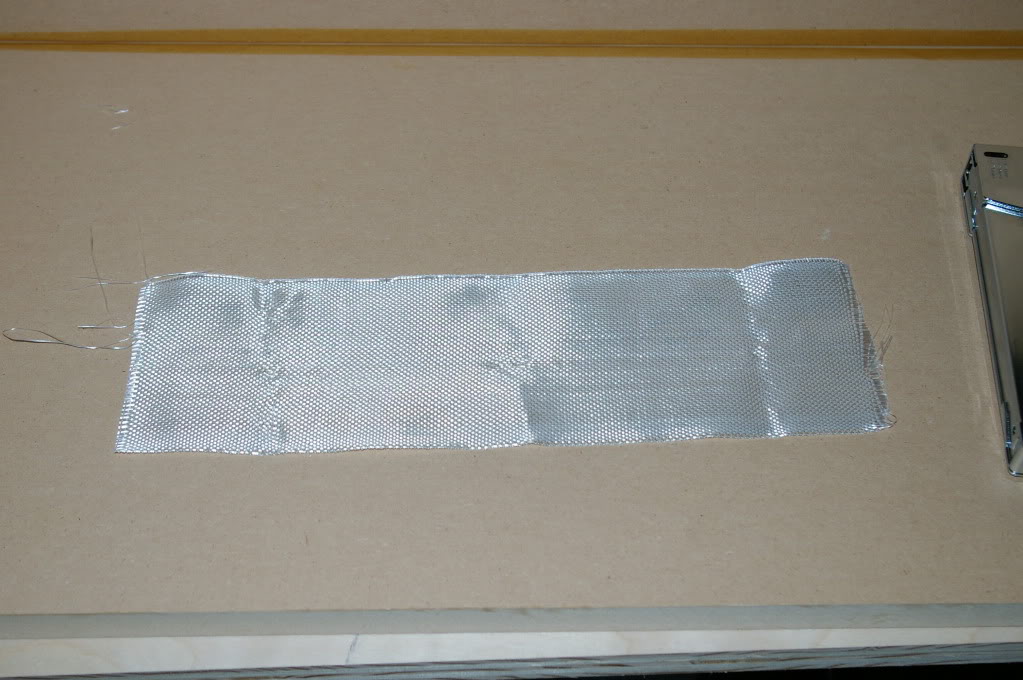
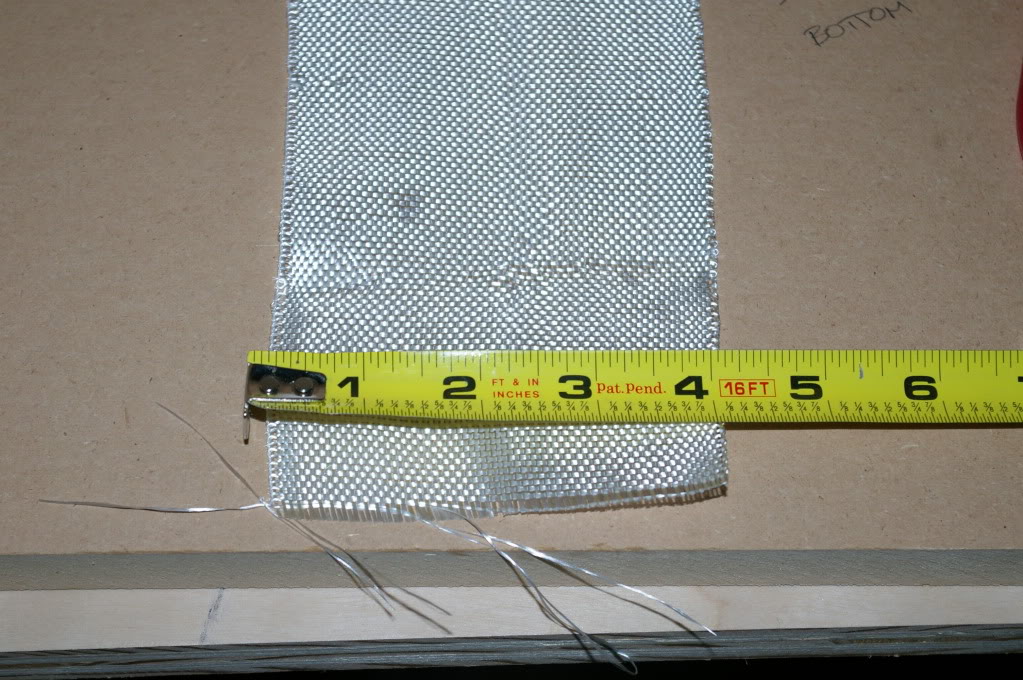
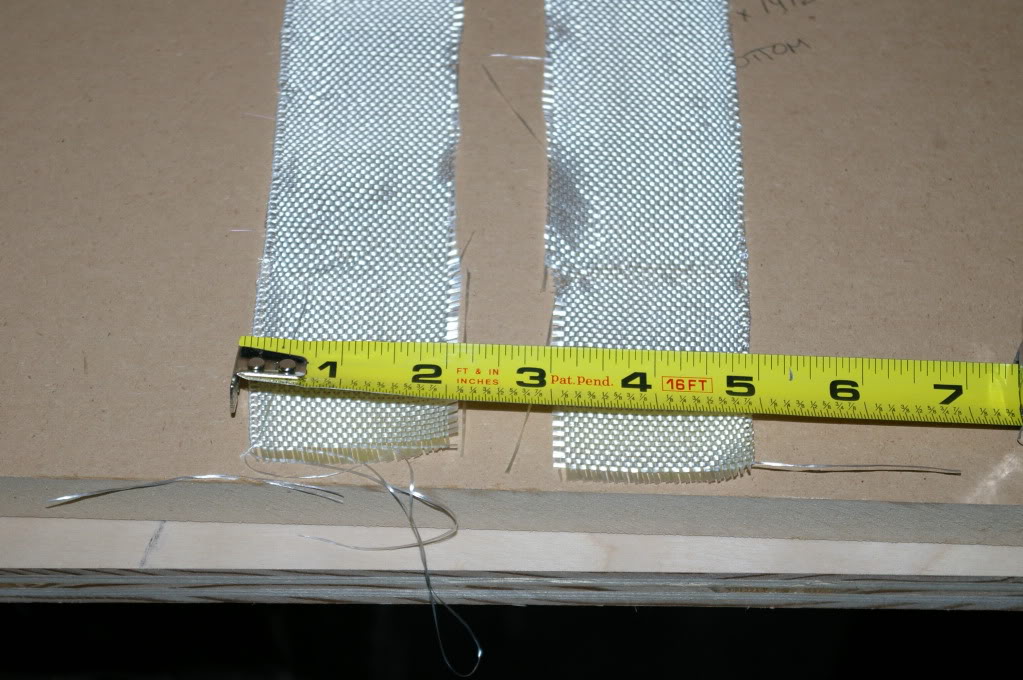
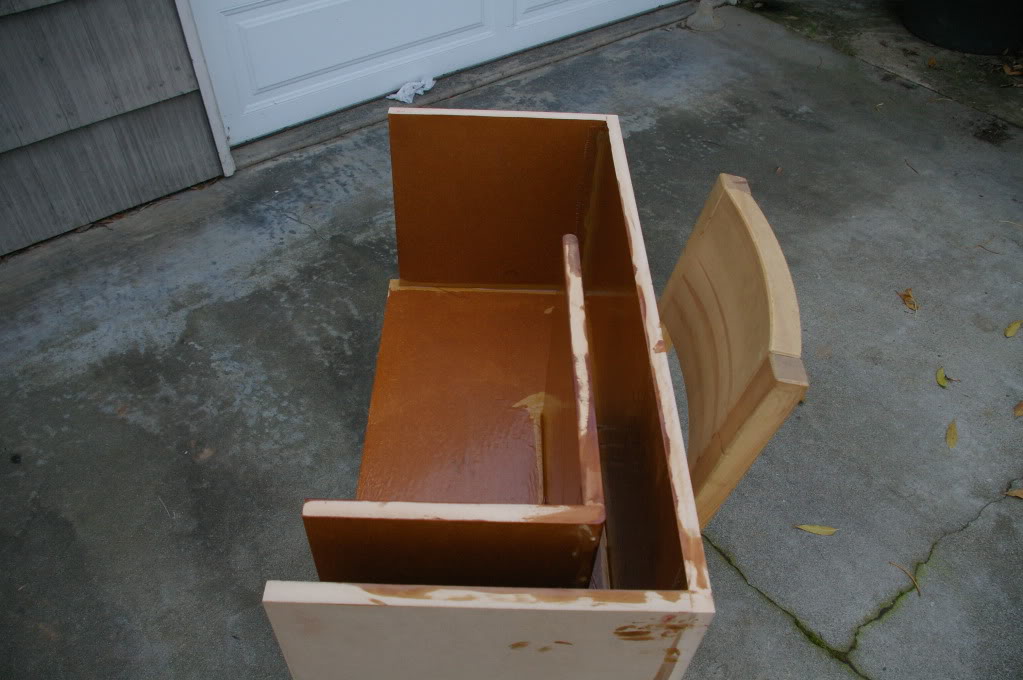
I'm going to be doing 45 degree corners inside the box with resin, and since aside from the port wall there'* no bracing inside the box so I figured it would be a good idea to reinforce the corners with a little fiberglass to make the box that much stronger. After all, I am going to be giving this sub twice it'* rated rms power so I want to make sure the box can hang.
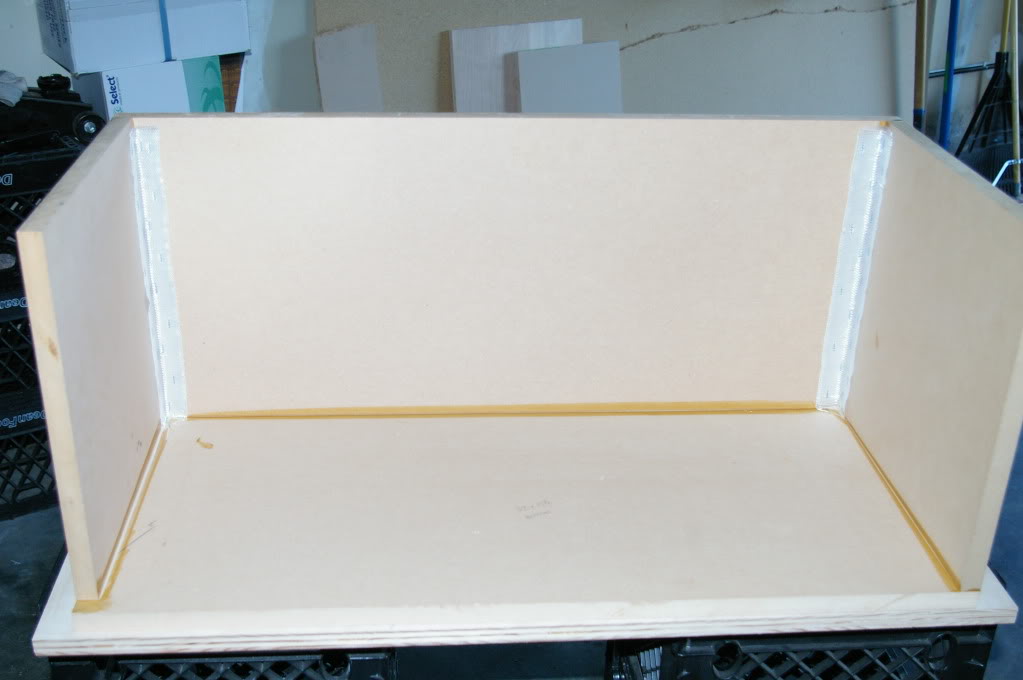
I decided stapling some fiberglass matt in the corners would do the trick so I bought what'* called fiberglass tape, it'* basically a 4" wide "roll" of fiberglass matt, about 2 yard long if I remember right. So I cut the length I needed and then cut that in half long ways to give me two 2" strips of matt, stapled each strip into the back corner of the box leaving an inch of matt on each side. Did the same for the port wall corner.
At this point I wanted to get the port installed but I needed to roundover the end of it as well as the corner of it. Pulled a rookie move here too. This was my first time using a router since freshmen year in high school....I graduated in 1993 
After testing out 3 different roundover bits I decided 3/8" would be the way to go so I got my router all setup and rounded over the end of the port wall and it came out nice!
I was so proud of myself that I proceeded with the tedious process of installing the port which included drawing it'* layout out on both the inside and outside of the box to ensure proper positioning when it was time to predrill and install it. After finally being happy with my layout I drilled all the holes, broke my drill bit on my second to last hole but I had another on hand so it was all good.....actually it was a blessing in disguise cause when it broke it was about 3/8" into the port wall and it broke about halfway down into the bottom panel so it was only sticking out from the port wall into the bottom piece, which acted as a guide to ensure I was putting it back in the same exact spot it was when I drilled the holes
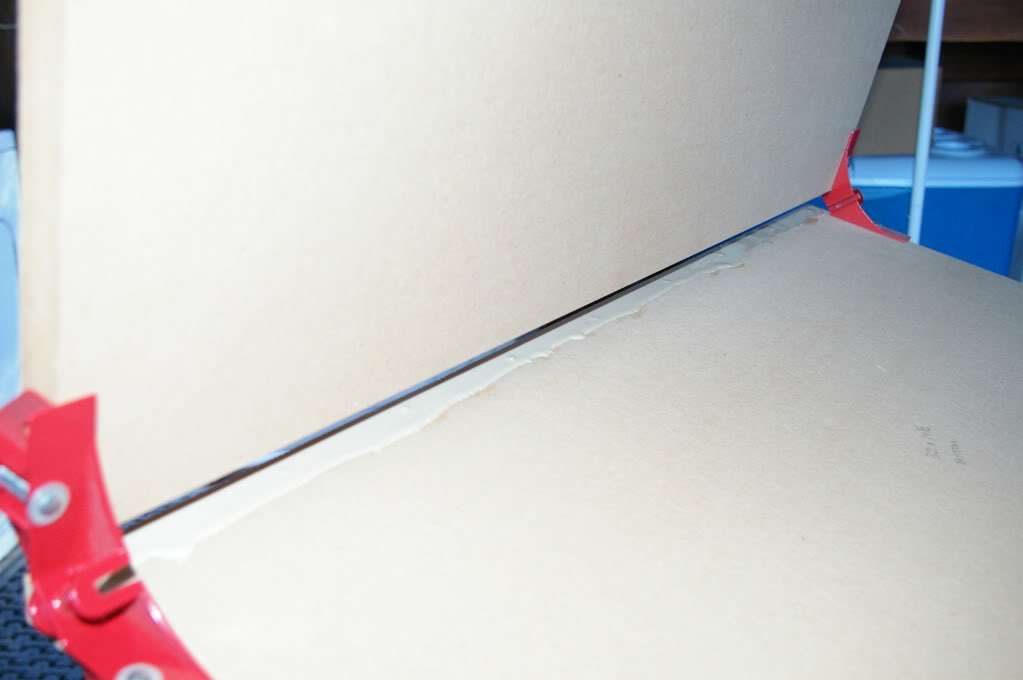
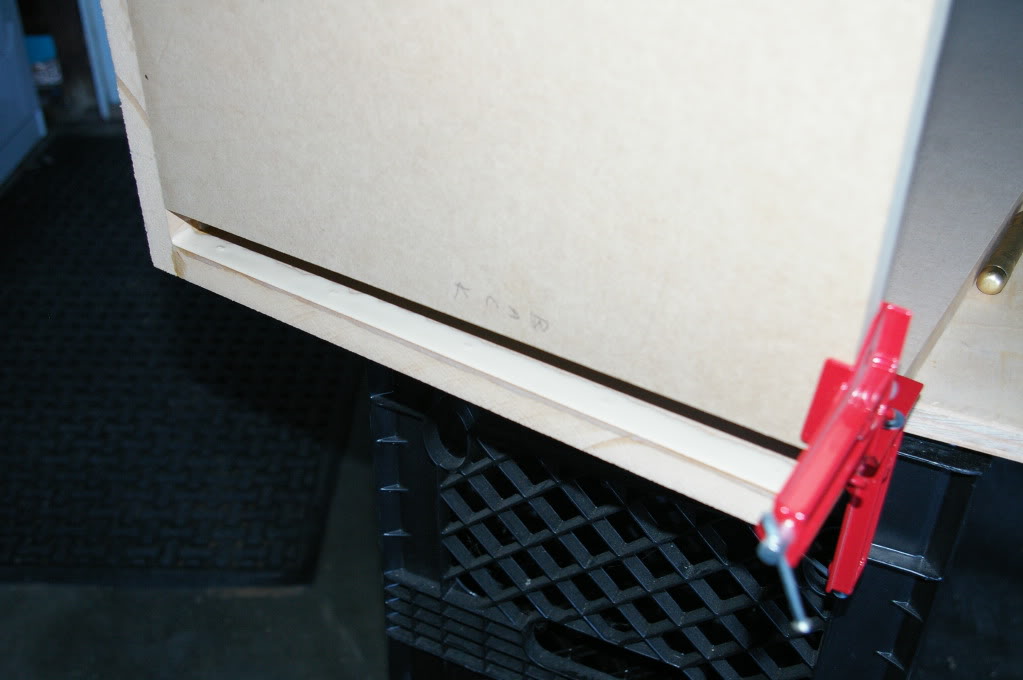
But the problem was that I install the port without removing the screws that held the panels together as the glue dried and didn't roundover the corner like I was supposed to. Sometimes I just gotta slow down a little....but I have an excuse, my girl had just finished up with dinner, it was smelling so good and she made my plate already so I put a rush on it so I could get my grub on.
The bad part was that I didn't realize I had done this until after dinner when I got on the comp to take a look at the pics I had taken......I was done for the night until I seen that. I ran to the garage, removed the port, took the screws out, filled the holes with wood filler, rounded over the corner and reinstalled the port. Dodged one there....if I would have had to leave it that way it would have bugged me to no end.
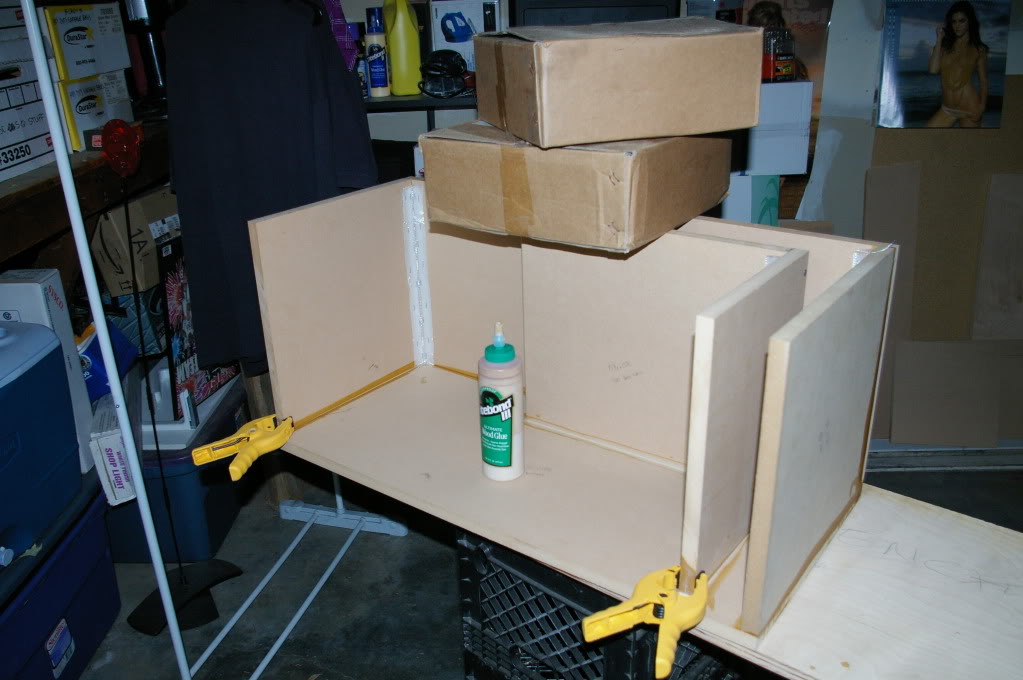
Here you can see the screws and no round over where the two panels come together to make the port wall.
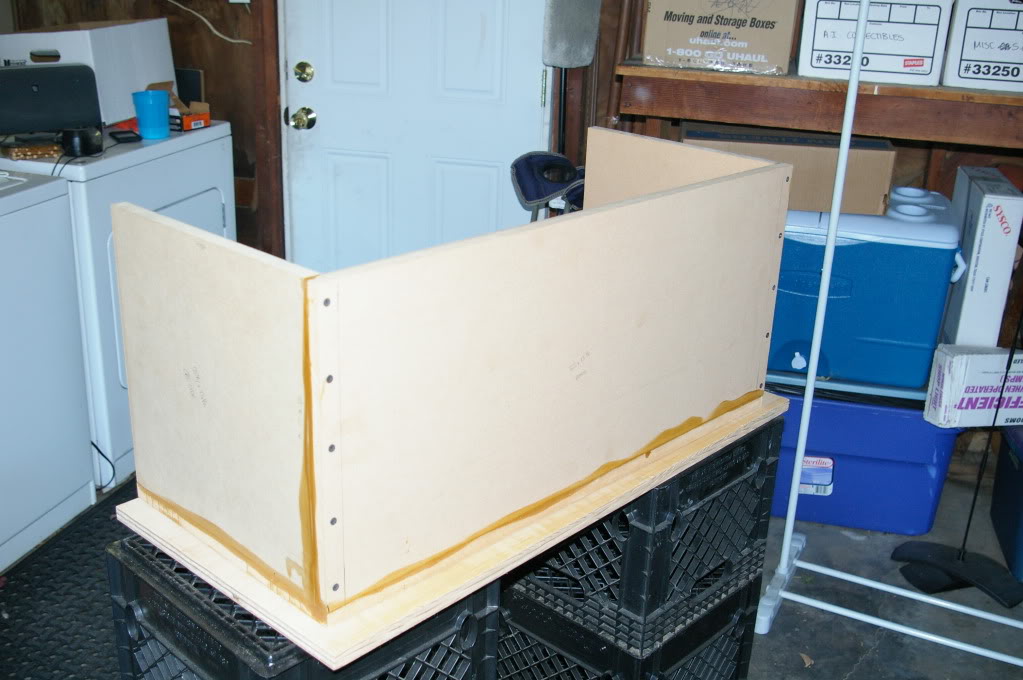
This is how the box sits for tonight

Tomorrow i'm going to resin the port walls first then get the top panel of the box on, then I can resin the rest of the box. After the resin dries I'll paint the port. Once that dries I can do the resin 45'*....this might take a day or two as I have to let them fully cure before I can rotate the box to do the other corners. But since my deck won't be here until Wednesday, and I won't be able to get it installed until Sunday at the earliest, it won't be a big deal. So if all goes as according to plan, I should be bangin' again on Sunday
I decided stapling some fiberglass matt in the corners would do the trick so I bought what'* called fiberglass tape, it'* basically a 4" wide "roll" of fiberglass matt, about 2 yard long if I remember right. So I cut the length I needed and then cut that in half long ways to give me two 2" strips of matt, stapled each strip into the back corner of the box leaving an inch of matt on each side. Did the same for the port wall corner.
At this point I wanted to get the port installed but I needed to roundover the end of it as well as the corner of it. Pulled a rookie move here too.
This was my first time using a router since freshmen year in high school....I graduated in 1993 After testing out 3 different roundover bits I decided 3/8" would be the way to go so I got my router all setup and rounded over the end of the port wall and it came out nice!
I was so proud of myself that I proceeded with the tedious process of installing the port which included drawing it'* layout out on both the inside and outside of the box to ensure proper positioning when it was time to predrill and install it. After finally being happy with my layout I drilled all the holes, broke my drill bit on my second to last hole
but I had another on hand so it was all good.....actually it was a blessing in disguise cause when it broke it was about 3/8" into the port wall and it broke about halfway down into the bottom panel so it was only sticking out from the port wall into the bottom piece, which acted as a guide to ensure I was putting it back in the same exact spot it was when I drilled the holes But the problem was that I install the port without removing the screws that held the panels together as the glue dried and didn't roundover the corner like I was supposed to. Sometimes I just gotta slow down a little....but I have an excuse, my girl had just finished up with dinner, it was smelling so good and she made my plate already so I put a rush on it so I could get my grub on.
The bad part was that I didn't realize I had done this until after dinner when I got on the comp to take a look at the pics I had taken......I was done for the night until I seen that. I ran to the garage, removed the port, took the screws out, filled the holes with wood filler, rounded over the corner and reinstalled the port. Dodged one there....if I would have had to leave it that way it would have bugged me to no end.
Here you can see the screws and no round over where the two panels come together to make the port wall.
This is how the box sits for tonight
Tomorrow i'm going to resin the port walls first then get the top panel of the box on, then I can resin the rest of the box. After the resin dries I'll paint the port. Once that dries I can do the resin 45'*....this might take a day or two as I have to let them fully cure before I can rotate the box to do the other corners. But since my deck won't be here until Wednesday, and I won't be able to get it installed until Sunday at the earliest, it won't be a big deal. So if all goes as according to plan, I should be bangin' again on Sunday
01-23-2011, 12:04 AM
#38
Senior Member
Posts like a Turbo
Thread Starter
Join Date: Jul 2010
Location: Sacramento, CA.
Posts: 326
Likes: 0
Received 0 Likes
on
0 Posts
from the pics ur port width only seems to be about an inch... Could just be the pic tho, but if it is only an inch or so wont u experience port turbulence noise/ port distortion? Looks like a solid build tho. R u going to carpet or paint it? I know when i had the box with my Fi in the trunk it slide around EVERYWHERE every time we turned, accelerated or braked, even with L brackets and self tapping screws. Because it was bare wood.
Do you not realize by now that i'm not a car audio noob? A 1" port? Really? Who does that? You didn't really think that I, of all people, would build a custom box with a 1" port did you? C'mon man, can I get SOME credit?
FYI, my port is 2.5" wide, 28.5" long, L shaped.
I'm going to paint the box, the port will be red and the rest of the box will be black. Gonna anchor it down with L brackets and bolts, no self tappers here! LOL. It didn't slide around because it was bare wood, it slid around cause you didn't secure it properly.
01-24-2011, 02:52 AM
#40
Senior Member
Posts like a Turbo
Thread Starter
Join Date: Jul 2010
Location: Sacramento, CA.
Posts: 326
Likes: 0
Received 0 Likes
on
0 Posts
Well I got started on the box today much earlier, and while it may seem like I didn't get that much done, just know that I got started on it at about 10am and called it a day at 9:30pm. Between then I took about a 2hr lunch break (had to run to Home Depot and ran some errands) and also went with my boy to pick up the subs for his new build, that was about an hour too. But beyond that me and my boy were in the garage doing work. Here'* goes:
First thing we did was resin the inside of the box. It sucked getting the port walls done cause the port is only 2.5" wide, but we got it done.
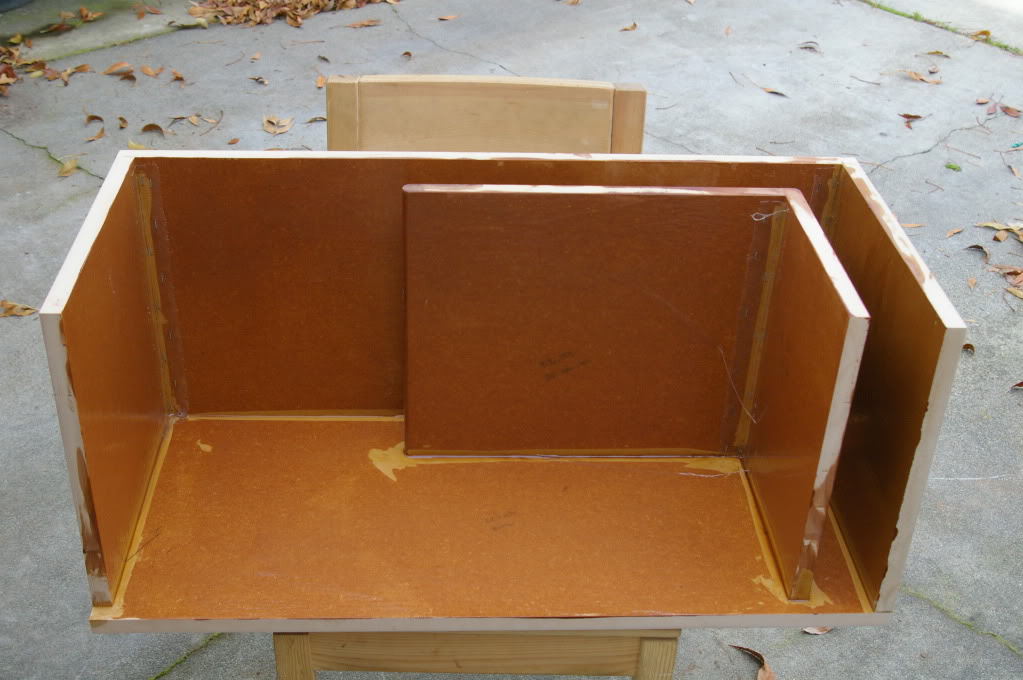
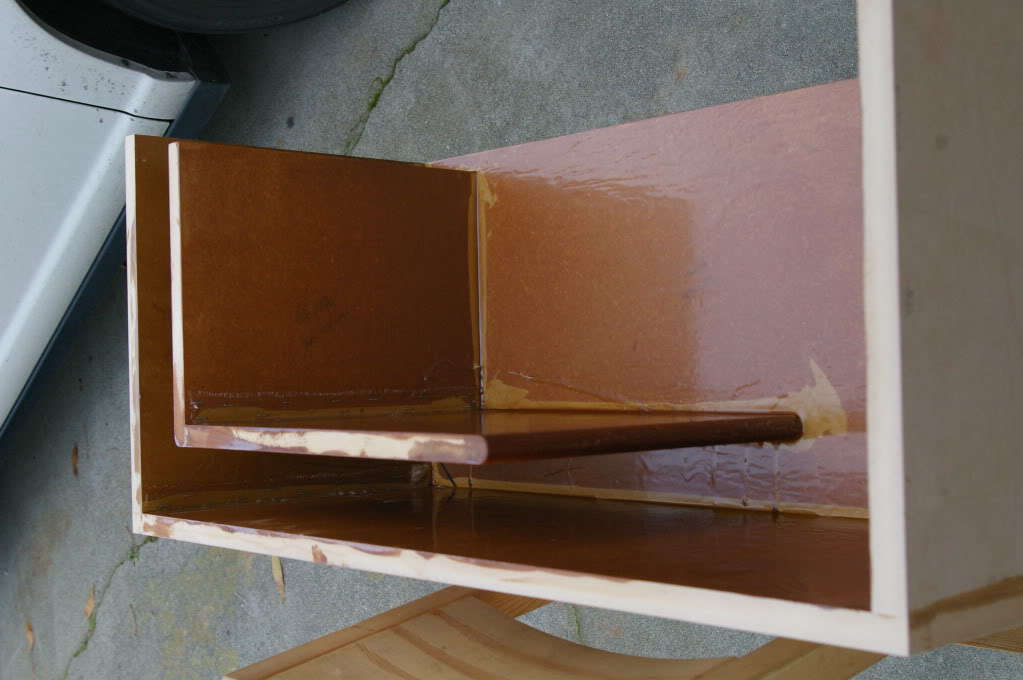
Don't fret, before we glued and screwed the top part on to the box I sanded down the edges of the panels that got resin on them so they were nice and smooth.
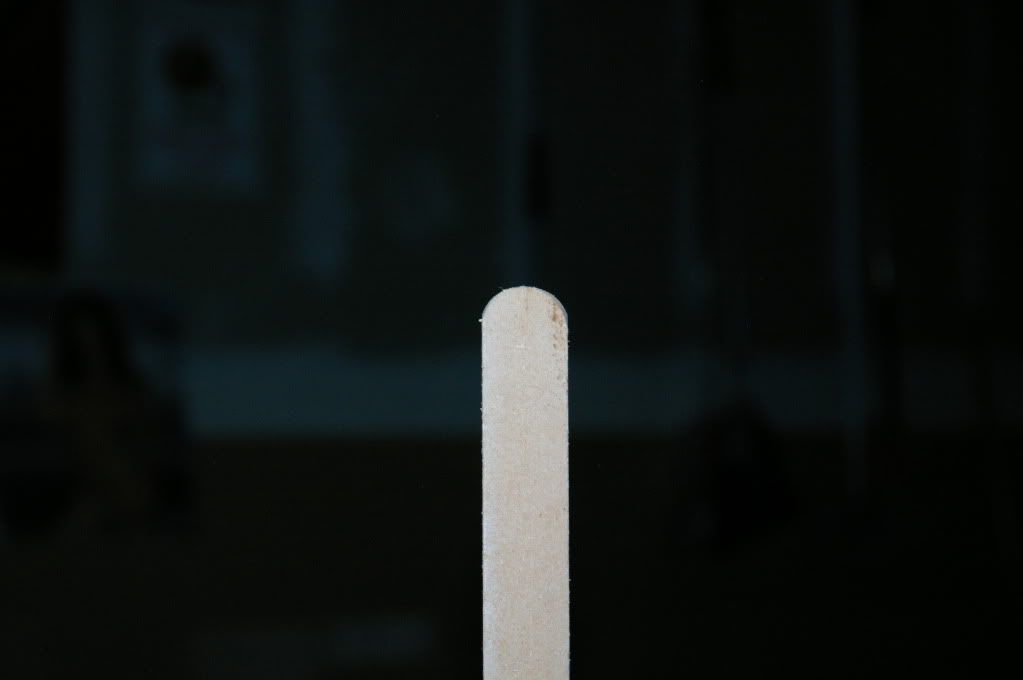
After that I had to figure out how the heck I was going to cut out the sub opening on the baffles. All I had was a jigsaw.....didn't like that idea too much...I mean it would be fine for the first baffle since you wouldn't be able to see it anyway once the sub gets installed but the opening in the second baffle would be visible so it needed to be perfect. After tossing around some ideas off each other (some of which I'd be embarrassed to even repeat) I had an epiphany when I caught a glimpse of the extra stir stick I got from Home Depot that I used to mix up the resin. This is what I came up with......
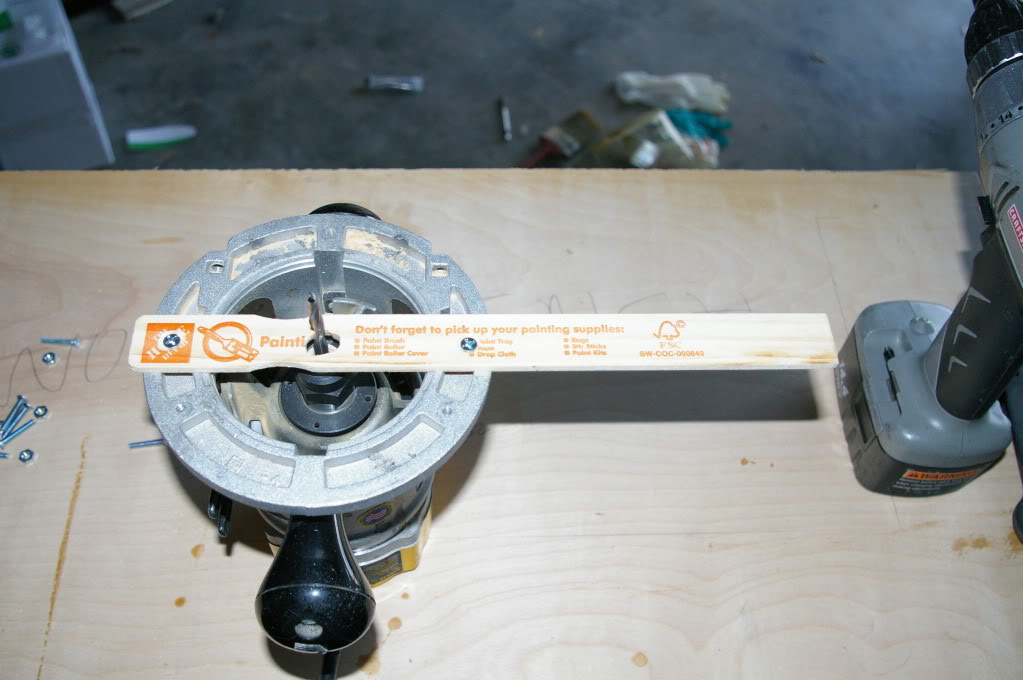
So for $1.07 (the cost of the pack of nuts/bolts) I made a homemade Jasper jig for my router.....Jasper Jigs cost $35 and up. I countersunk the screws in the stir stick for the bolts that attach it to the router to ensure I wouldn't damage my box when cutting my circles. This allows me to cut perfect circles with a spiral upcut bit in my router. How'* that for making something out of nothing?
Then I put the first baffle in place on the box, it was held in nice and tight just from the friction of the other panels, nice tight fit. I then laid the 2nd baffle on top of that and made sure it was in the exact spot it would be in permanently and I connected the two baffles together by putting in a couple screws to hold them in place together. I then laid out my reference points on the top baffle, found center and drilled my pilot hole through it and through both baffles to ensure that when I cut the sub opening in both baffles, the center point will be exactly the same. Then it was time to cut some holes.
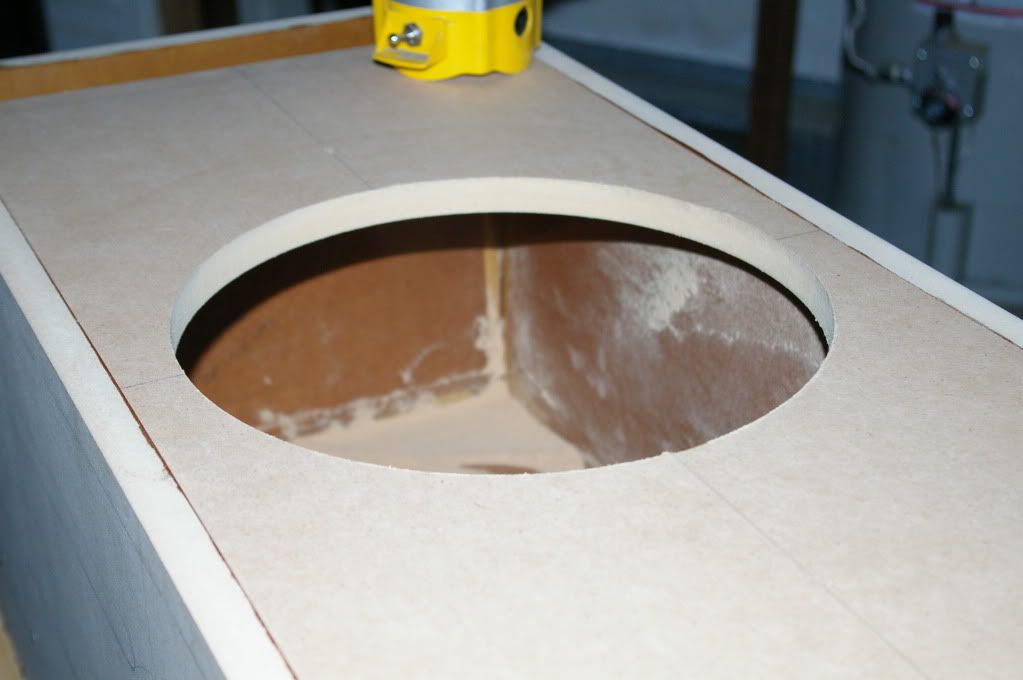
First I had to measure the distance on my jig to ensure the opening would be the right size and drill a hole in it the same size as the pilot hole I drilled in the baffles. I found what the mounting diameter of my sub is, halved that and measured from the outer edge of the spiral upcut bit out towards the long end of the jig, marked my spot and drilled my hole. I took the drill bit I drilled the hole with and put it through the hole I just drilled in my jig, shank side first...I set the jig and router onto the baffle so the end of the drill bit was in the pilot hole I drilled earlier. I had loosened the collar on the router so I could raise the bit to allow me to set the router on the baffle without the bit touching it, the plan was to drop the bit down and through the panel once I turned it on.....what I didn't realize at the time was that by doing so, the cutting part of the bit would go all the way through the baffle and to the shaft. Since this was my first time using a sprial upcut bit I didn't know what to expect so when the bit went through the baffle and I could barely move the router/make my circle cut it didn't dawn on my something was wrong until I started smelling the burning wood. I turned the router off and set it aside and noticed a slight stream of smoke coming from the obviously burned hole in my baffle.....When I pulled the baffle off the box, this is what I was greeted with.....
A nice huge plume of smoke! The box was filled!!
I checked the bit on the router to see what happened and that'* when I seen the burn marks around the shaft and realized what I had done. Didn't make that mistake again. So I set everything up and went at it again, this time setting the depth of the bit properly. What a difference! The bit cut the circle flawlessly and with ease. And once it was cutout I test fit the sub....fit like a glove
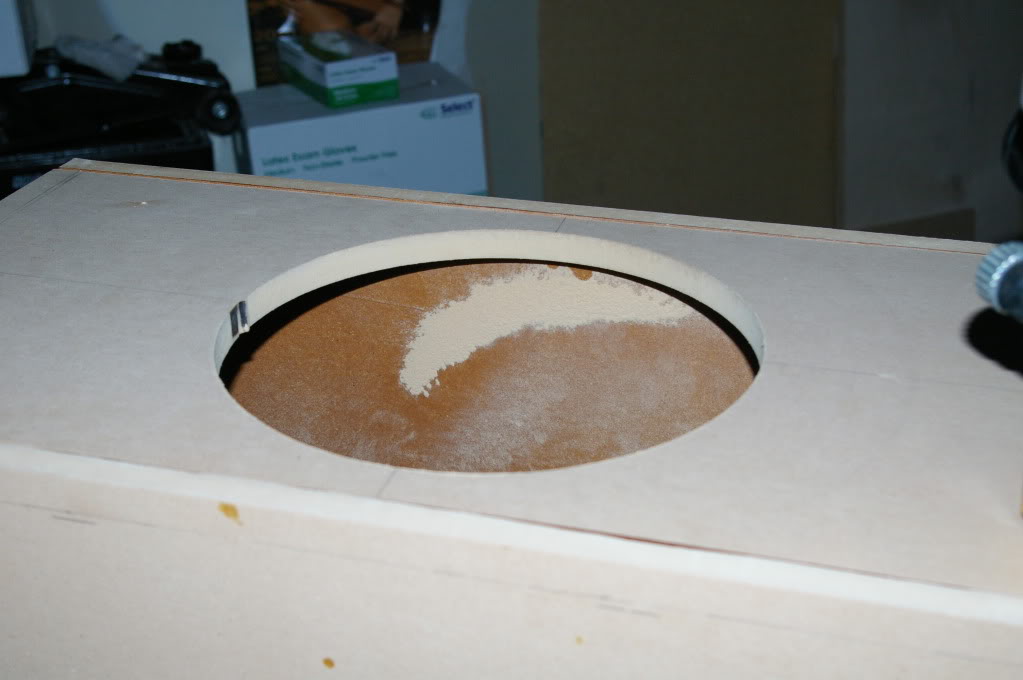
See the burn mark? Haha. I sanded it away so the circle is now nice and smooth, can't even tell what I had done.
Set that aside and moved on to the second baffle. This one I needed to cut the opening to the outside diameter of the sub so I can have that flush mounted look, and a baffle twice as strong. So again I measured from the outer edge of the bit towards the long end of the jig, marked and drilled the hole and cut the circle. This one went much smoother since I knew to adjust the bit depth properly. After I cut it out I test fit the sub.....didn't fit! Too small of an opening, by about an 1/8".
The issue was the gasket around the mounting surface of the sub....the outside diameter measurement on DD'* website did not include the thickness of that gasket. I figured that out when I removed it and test fit the opening and it fit like a glove. Not a happy camper! I had to spend the next hour to hour and a half sanding the opening with my palm sander very carfully to ensure I didn't end up with an oblong opening and ruin the look I was going for. It took some time but I got it done and like the first hole I cut out, it fit like a glove! I'd be surprised if I had an 1/8" wiggle room. This is what the box looks like with both baffles cut (except for the port opening on the 2nd baffle, gonna get that done tomorrow).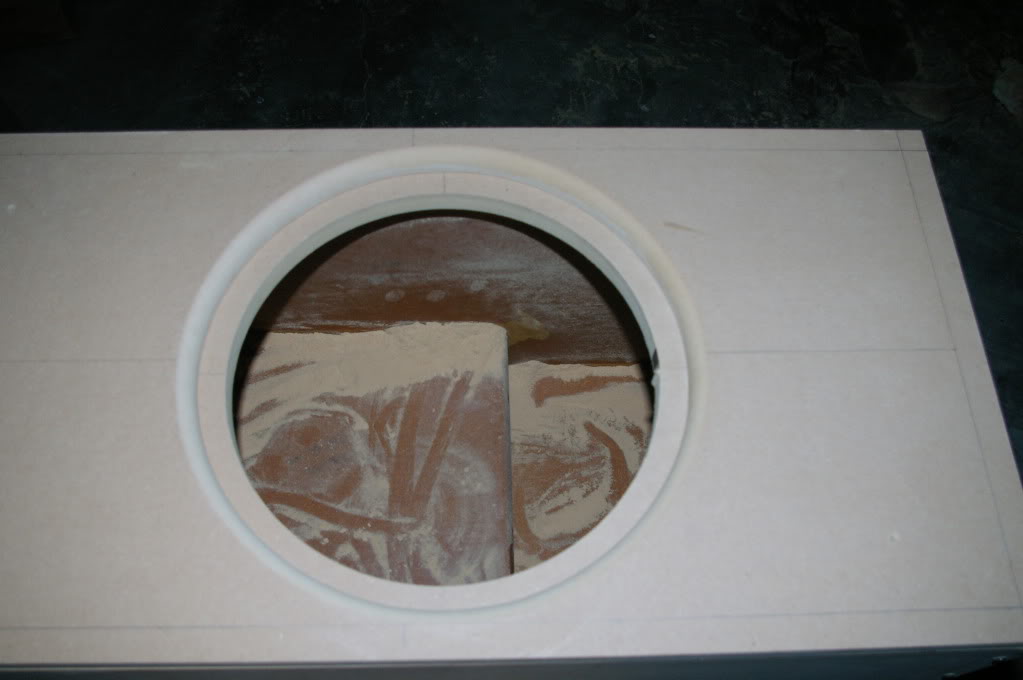
Note the 1/2" roundover I did on the second baffle'* opening, with the sub in place you can't see the first baffle at all
So tomorrow I will be rough cutting the port opening on that second baffle, this cut will be just to get the majority of the opening cut out, I'll use my flush trim bit to cut away the rest of the material and ensure the opening is perfectly flush with the port walls.....but this will have to wait until later in the week to be done. After doing the rough cut I'll clean out the box, mix up some resin and pout it into the back corners of the port wall and the box at the back of the port and let that cure overnight. Then on Tuesday I'll tilt the box to the other corner and mix up some resin, pour it in that corner and let that cure overnight. Wednesday I'll paint the port red, glue and screw both baffles to the box and use the flush trim bit to finish off the port opening on the second baffle and at that point the box assembly will be complete. I'll double check all my edges and flush trim any that need it. Then I'll remove all the screws in the box, fill all the holes with wood filler and sand down the whole box nicely. Thursday I'll primer the box and let that cure overnight. Friday I'll paint the box black. I should be all finished with it Friday night. Saturday my son has a wrestling tournament out of town all day so won't be working on it that day. My deck will arrive Wednesday and Sunday I'll get it installed and get this box in the trunk and making some noise!