Replace Half Shaft
 03-04-2010, 01:44 PM
#1
Junior Member
Thread Starter

Join Date: Feb 2010
Posts: 5
Likes: 0
Received 0 Likes
on
0 Posts

I have searched the forums and not found a solid answer. Can you remove the drivers side half shaft without splitting the ball joint? 2001 Bonneville SLE
Got a bad CV joint, got a new half shaft from Rock Auto (thanks for that tip) and am planning on doing it tonight, but I don't have a ball joint tool.
There is a ton a great info here, thanks for a great site!
Thanks,
Eric
Got a bad CV joint, got a new half shaft from Rock Auto (thanks for that tip) and am planning on doing it tonight, but I don't have a ball joint tool.
There is a ton a great info here, thanks for a great site!
Thanks,
Eric
 03-04-2010, 03:36 PM
#2
DINOSAURUS BOOSTUS


Expert Gearhead

Some of the below was originally for another member, but applies. So if there'* any stupid comments..they aren't toward you. 
You really have two choices. Unbolt the strut to knuckle, which screws up your alignment, or pop the balljoint. I don't use a pickle fork either. That kills the boots, I use a long prybar in the below procedure. Pretty much identical to your car.
Jack and support the car.
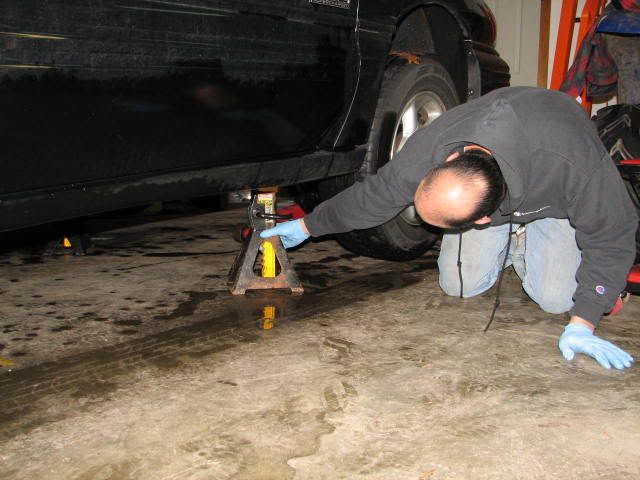
Zip the tire out of the way
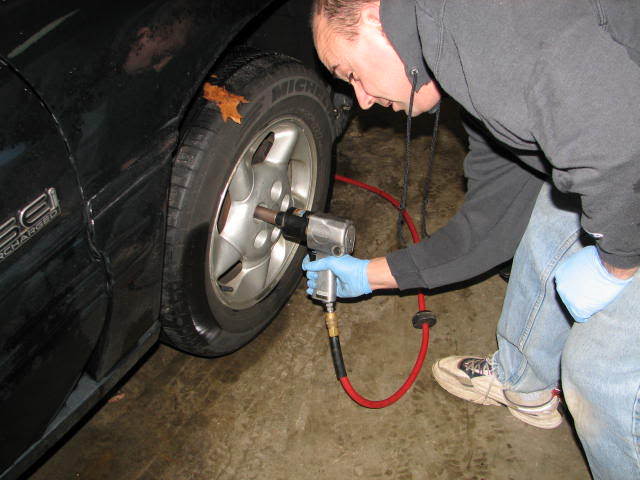
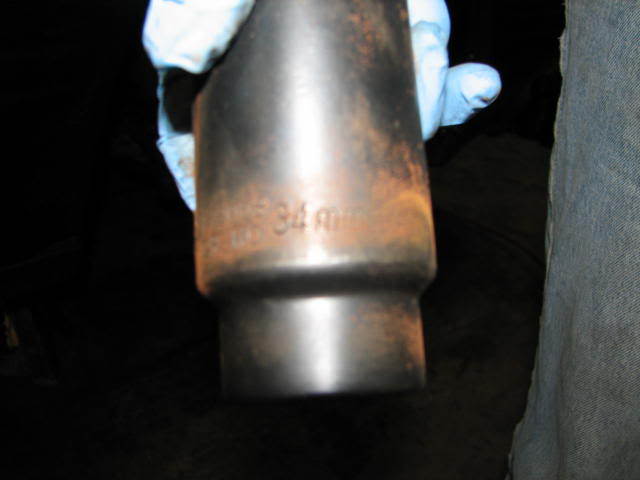
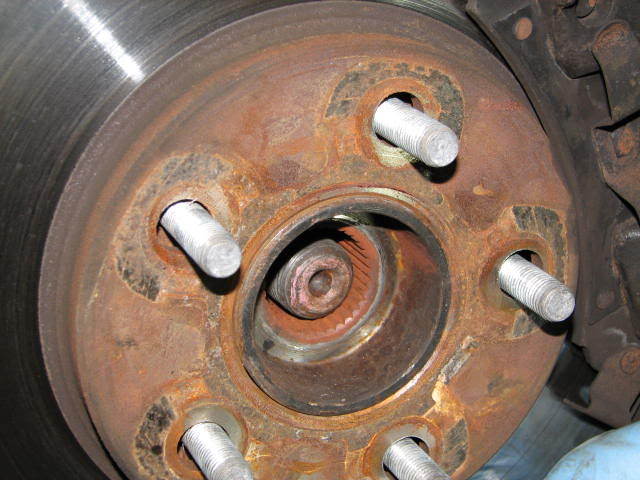
34mm socket for Bonneville axle nuts, remove axle nut
Thread nut back on so it'* flush with the end of the axle. This way when you hit it, the threads on the axle do not become hurt. Hit until you see axle move inward. This is to free it from the tapered splines of the hub/bearing.
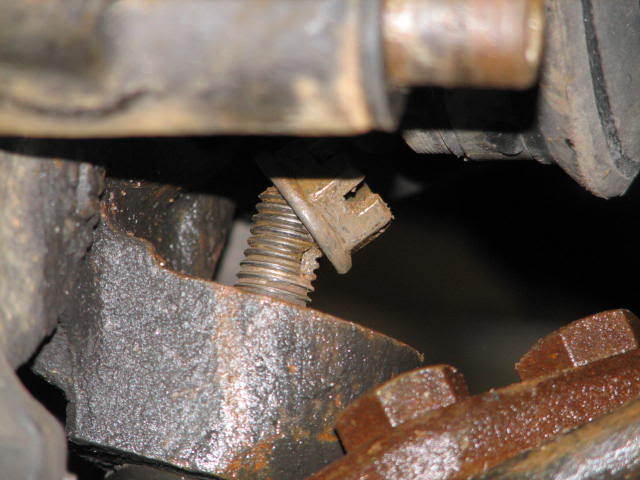
Remove cotter pin from the castle nut on the balljoint
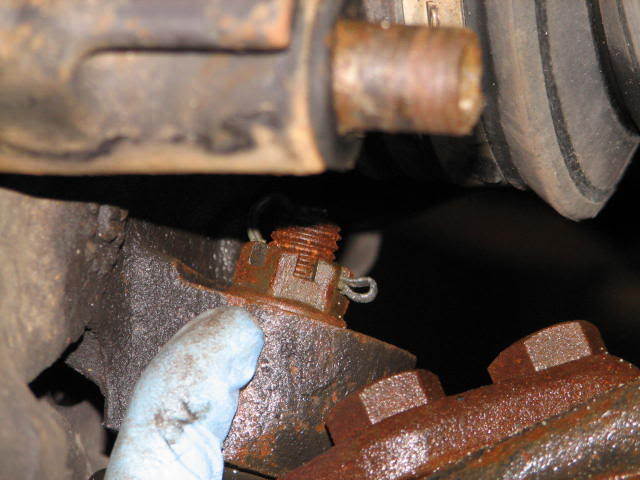
Using your 18mm wrench remove the castle nut from the balljoint
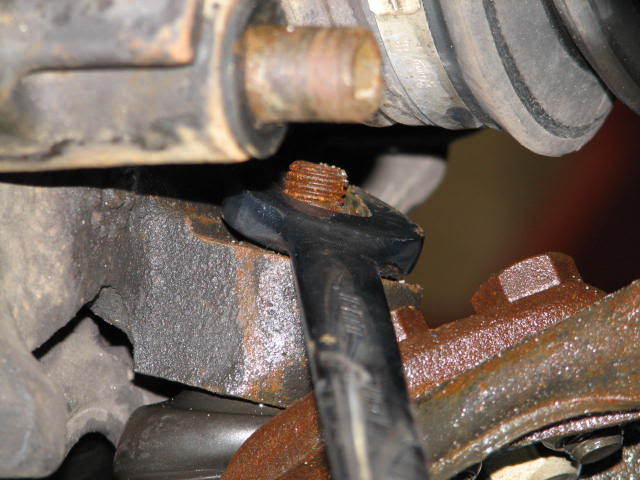
If the nut won't come out.. do your best to have it fully loosened.
Undo your endlink to facilitate the control arm moving.
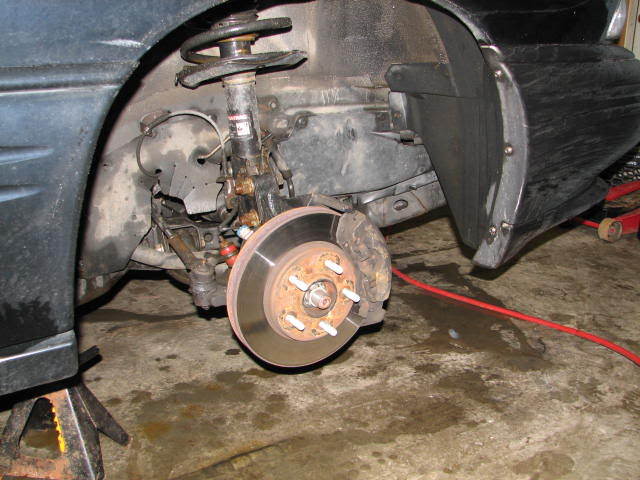
Unbolt the brake like from the body.
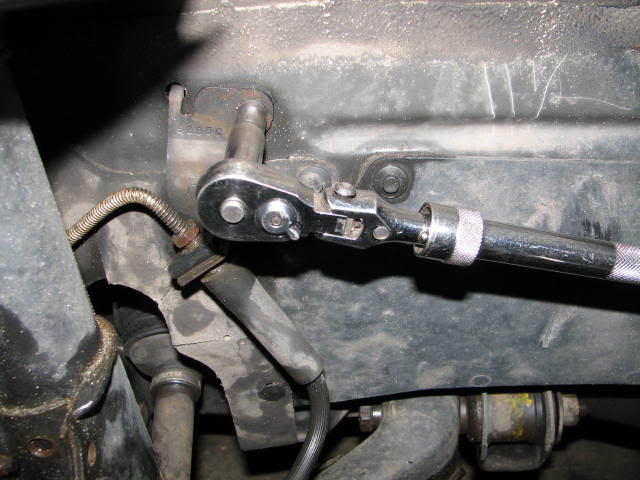
Bring in a 4-5 foot prybar (I use my steel floor jack handle) from by the front bumper where the wheel well meets it toward the body between the body edge and subframe bolts. Slide it under the axle and over the control arm.
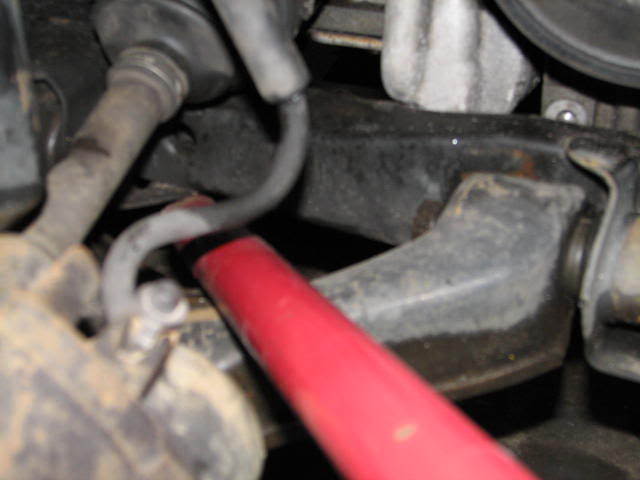
Pry down. It helps to have a helper. At the same time as the prying, hit the balljoing on the side (not where the grease zerk is, other side ) and after a few hits the ball joint will come free from the knuckle. Move the strut/knuckle behind the ball joint before letting the control arm back up.
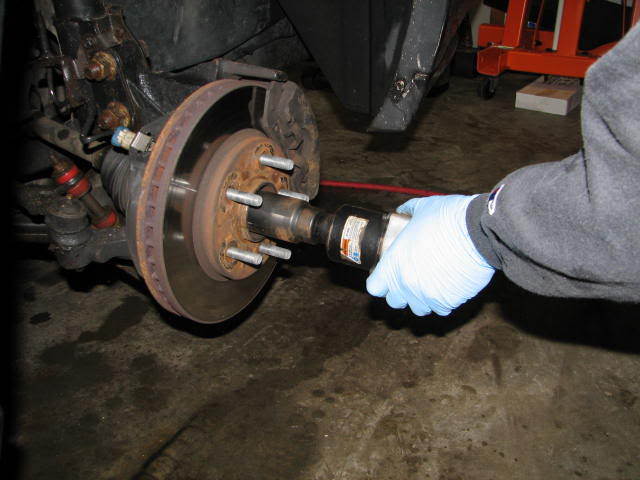
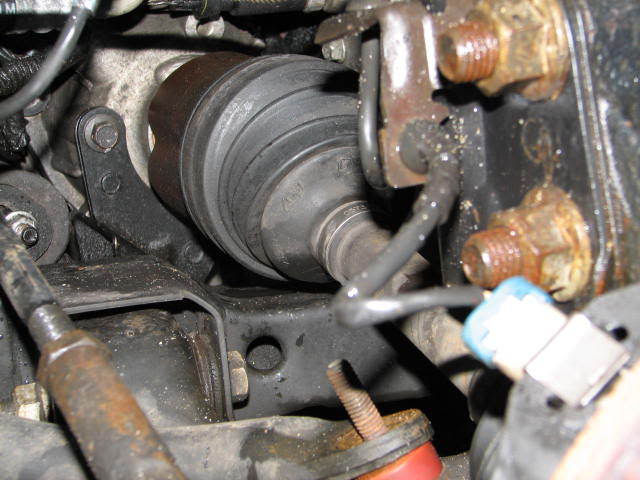
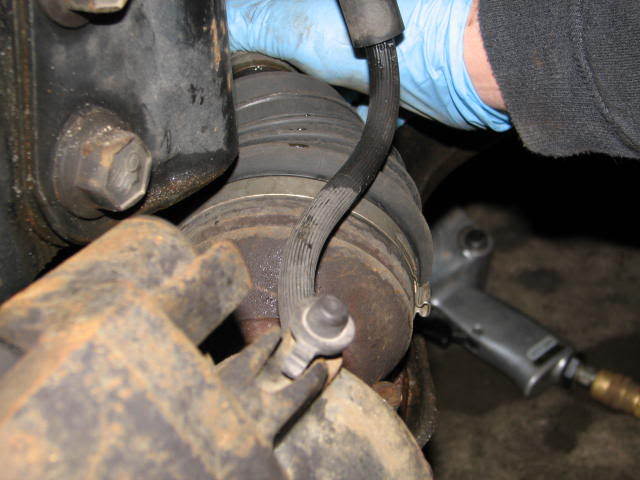
I like to sit/kneel facing the hub. My hand that is closer to the rear of the vehicle grabs the caliper and pulls outward and toward the rear of the vehicle. At the same time, the hand that is closer to the front of the car reaches around and cups the CV between the hub an the outter CV joint. Pushing backward on the CV and outward and back on the knuckle you pull the axle out of the hub and then lay it on the control arm. Pics for this part are poor because I was basically blocking all the shots with my body to do the work.
I moved my hand off the CV for a second for this shot. My hand was between the hub and the outter boot of the CV.
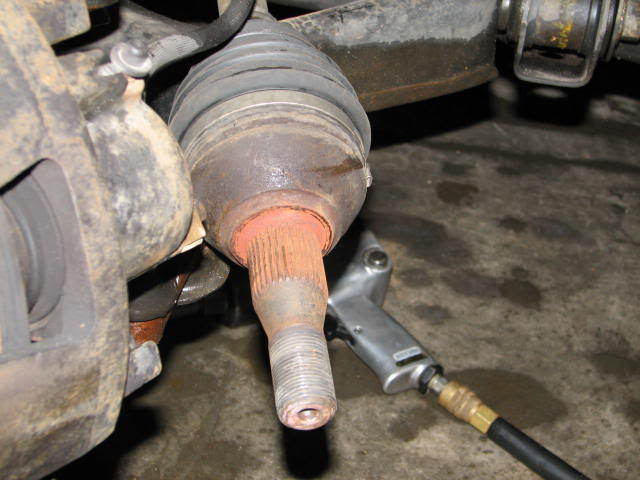
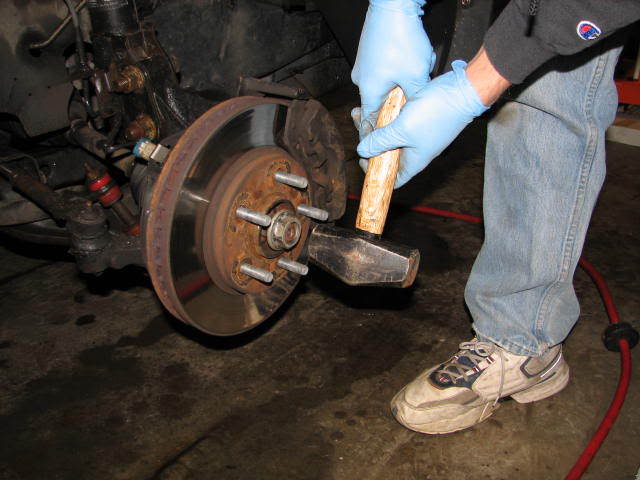
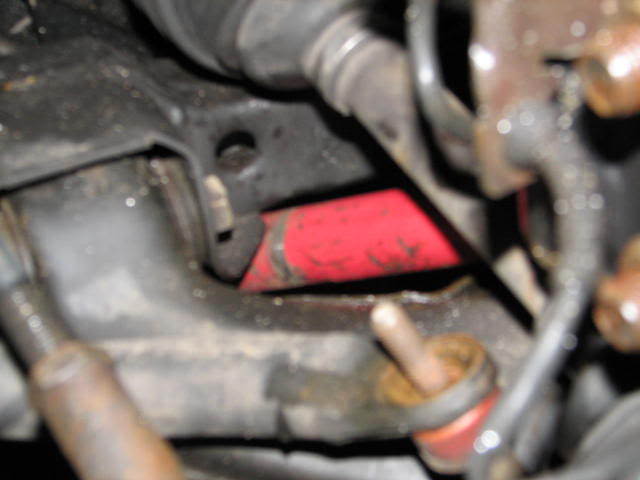
Crawl under and use a prybar etc (usually I use a block of wood and hammer on the pass side and prybar on driverside). to give the CV a quick pop like hit from the back. If you put tension on it the clip will hold it in. A quick pop is what is needed to remove it. Here we have the prybar in place.
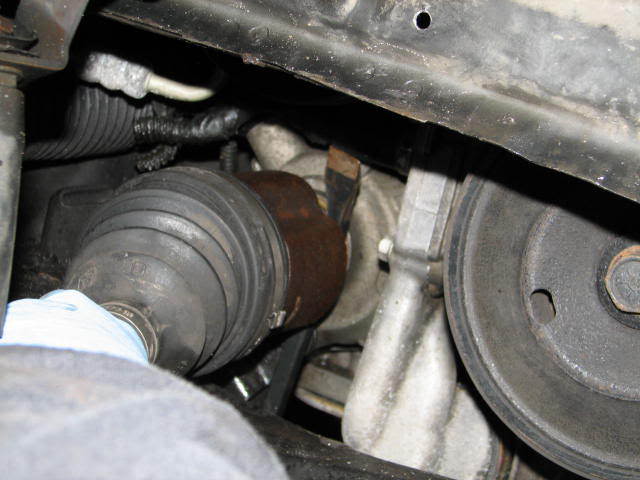
And the axle is out.
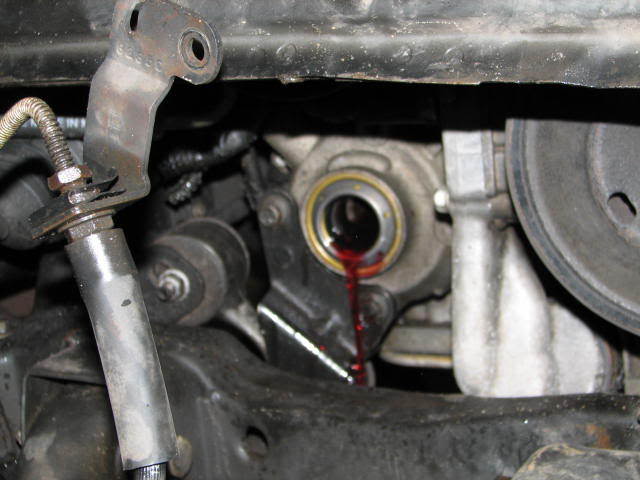
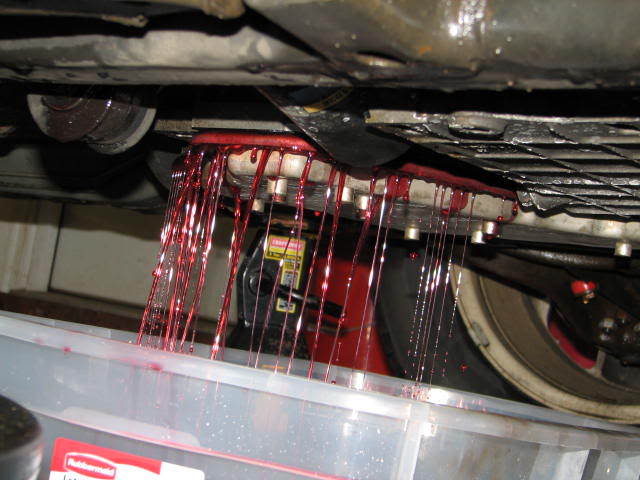
You may notice that somebody forgot that the axle seals, seal the axles from leaking trans fluid because the level of fluid is above them.")

That someone then got under the car and drained the trans.
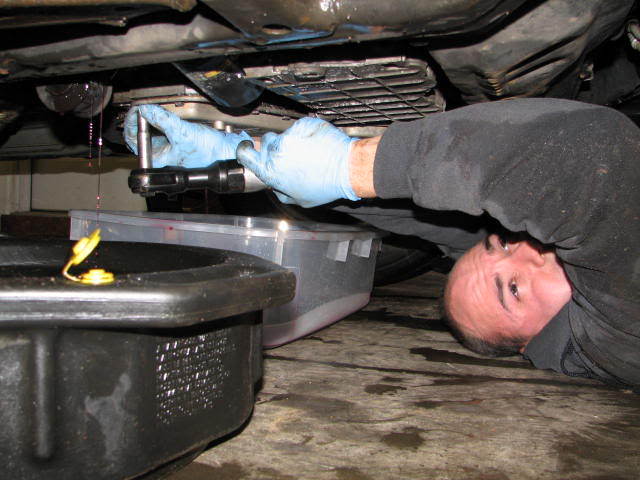
Technically this step should be before now. For anyone wondering $5 Steralite or Rubbermaid from Walmarts storage section.
Hope this helps.... feel free to turn this post into a write up .. I'm probaby off to bed soon.
You really have two choices. Unbolt the strut to knuckle, which screws up your alignment, or pop the balljoint. I don't use a pickle fork either. That kills the boots, I use a long prybar in the below procedure. Pretty much identical to your car.
Jack and support the car.
Zip the tire out of the way
34mm socket for Bonneville axle nuts, remove axle nut
Thread nut back on so it'* flush with the end of the axle. This way when you hit it, the threads on the axle do not become hurt. Hit until you see axle move inward. This is to free it from the tapered splines of the hub/bearing.
Remove cotter pin from the castle nut on the balljoint
Using your 18mm wrench remove the castle nut from the balljoint
If the nut won't come out.. do your best to have it fully loosened.
Undo your endlink to facilitate the control arm moving.
Unbolt the brake like from the body.
Bring in a 4-5 foot prybar (I use my steel floor jack handle) from by the front bumper where the wheel well meets it toward the body between the body edge and subframe bolts. Slide it under the axle and over the control arm.
Pry down. It helps to have a helper. At the same time as the prying, hit the balljoing on the side (not where the grease zerk is, other side
) and after a few hits the ball joint will come free from the knuckle. Move the strut/knuckle behind the ball joint before letting the control arm back up.I like to sit/kneel facing the hub. My hand that is closer to the rear of the vehicle grabs the caliper and pulls outward and toward the rear of the vehicle. At the same time, the hand that is closer to the front of the car reaches around and cups the CV between the hub an the outter CV joint. Pushing backward on the CV and outward and back on the knuckle you pull the axle out of the hub and then lay it on the control arm. Pics for this part are poor because I was basically blocking all the shots with my body to do the work.
I moved my hand off the CV for a second for this shot. My hand was between the hub and the outter boot of the CV.
Crawl under and use a prybar etc (usually I use a block of wood and hammer on the pass side and prybar on driverside). to give the CV a quick pop like hit from the back. If you put tension on it the clip will hold it in. A quick pop is what is needed to remove it. Here we have the prybar in place.
And the axle is out.
You may notice that somebody forgot that the axle seals, seal the axles from leaking trans fluid because the level of fluid is above them.
That someone then got under the car and drained the trans.
Technically this step should be before now.
For anyone wondering $5 Steralite or Rubbermaid from Walmarts storage section. Hope this helps.... feel free to turn this post into a write up .. I'm probaby off to bed soon.
03-04-2010, 04:23 PM
#4
Junior Member
Thread Starter
Join Date: Feb 2010
Posts: 5
Likes: 0
Received 0 Likes
on
0 Posts
Wow thanks, my buddy wanted to undo the strut, we'll do the ball joint for sure. You guys are great!
You mentioned that you forgot that the axles seals tranny, can you just quickly reinstall the new half shaft do you have to drain the tranny?
THANKS!
You mentioned that you forgot that the axles seals tranny, can you just quickly reinstall the new half shaft do you have to drain the tranny?
THANKS!
Last edited by echap; 03-04-2010 at 04:28 PM.
03-05-2010, 08:22 AM
#5
Junior Member
Thread Starter
Join Date: Feb 2010
Posts: 5
Likes: 0
Received 0 Likes
on
0 Posts
Thanks alot, the pictures where perfect and the project went excellent. My inner joint was shot and all of the vibration is now gone. Really glad I did this, thanks for the help!
Eric
Eric
03-05-2010, 10:05 AM
#6
DINOSAURUS BOOSTUS
Expert Gearhead
Rockstar, some axles fit through...some don't depending on model make etc. Our wheel bearings like to adhere the ABS part to the knuckle. This can break the bearing and require a new one to be purchased for reinstallation. As well, 1 balljoint nut vs 3 wheel bearing bolts. A mechanic buddy taught me to think in a quicker/flat rate paying process.
A little late...however the amount of time it takes to remove and reinstall an axle will likely be long enough that most of the fluid drains. You would need to replace probably half of the amount by pulling the axle and not draining at the pan. Good suggestion.
A little late...however the amount of time it takes to remove and reinstall an axle will likely be long enough that most of the fluid drains. You would need to replace probably half of the amount by pulling the axle and not draining at the pan. Good suggestion.
03-19-2010, 02:41 PM
#7
Junior Member
Thread Starter
Join Date: Feb 2010
Posts: 5
Likes: 0
Received 0 Likes
on
0 Posts
Rockstar, some axles fit through...some don't depending on model make etc. Our wheel bearings like to adhere the ABS part to the knuckle. This can break the bearing and require a new one to be purchased for reinstallation. As well, 1 balljoint nut vs 3 wheel bearing bolts. A mechanic buddy taught me to think in a quicker/flat rate paying process.
A little late...however the amount of time it takes to remove and reinstall an axle will likely be long enough that most of the fluid drains. You would need to replace probably half of the amount by pulling the axle and not draining at the pan. Good suggestion.
A little late...however the amount of time it takes to remove and reinstall an axle will likely be long enough that most of the fluid drains. You would need to replace probably half of the amount by pulling the axle and not draining at the pan. Good suggestion.
Billboost- Not a drop of tranny fluid dripped out when I had the shaft out. I have a 01 SLE.
thanks again for the help, it went perfect.
Eric
10-11-2010, 05:18 PM
#8
Member
Posts like a V-Tak

Join Date: May 2010
Posts: 52
Likes: 0
Received 0 Likes
on
0 Posts
While this thread is several months old, I wanted to publicly acknowledge and thank Billboost for that pictorial. I had driven the 01 SSEi to my parent'* house about 300 miles from home. I had a nice loud growl coming from driver'* side. Pulled the wheel and saw that inner cv had thrown all its grease. Used my iphone to Google and this thread came up. Because of this thread and O'Reilly auto parts, I was able to replace the driver side transaxle without my garage full of nice tools. Only had to borrow a 1/2 breaker bar from their neighbor to get the spindle nut off. It was a bit fortunate that I had my nice 3/8 socket set with me because I knew I had to replace their garage door opener when I got there.
Since I was replacing the transaxle, I decided the wheel bearing assembly didn't sound too smooth either, and the tie rod end had a torn boot so they also get replaced. Drover her home last night and she was quiet as a church mouse.
So Bill, where do I send the beer money to?
Sincere thanks,
GregB
Thanks all for a wonderful forum. I would have been at the dealer'* mercy without this thread.
10-11-2010, 05:26 PM
#10
Member
Posts like a V-Tak
Join Date: May 2010
Posts: 52
Likes: 0
Received 0 Likes
on
0 Posts
I was going to edit my original post, but after thinking for a few moments, I went and put my money down to be a site supporter. That was a lot less money than I would have paid for that job to be done at a shop.
I also forgot to mention that prying down on the lower control arm to get the ball joint stud back in wasn't working with just one person. The easy trick was to loosen up the sway bar bolt. That allows the arm to free fall low enough to easily put the ball joint stud back into the steering knuckle.
I also forgot to mention that prying down on the lower control arm to get the ball joint stud back in wasn't working with just one person. The easy trick was to loosen up the sway bar bolt. That allows the arm to free fall low enough to easily put the ball joint stud back into the steering knuckle.

