Radio display light bulb
#1
Senior Member
Posts like a Turbo
Thread Starter
Join Date: Jan 2006
Location: Brighton, Michigan
Posts: 255
Likes: 0
Received 0 Likes
on
0 Posts

I had a big surprise. My radio display went dead. Everything else works fine.
2005 Bonneville GXP 111,000 miles.
Thank goodness for forums like this one.
This was probably the most useful link: https://www.gmforum.com/2000-2005-90/radio-light-fix-00-a-231450/page2/
So, I can go to the dealer who'll replace my radio for $300-400
Or pull the radio and send out for repair for $80-$100
Or I can buy the bulbs from Corvetteradio.com for $23: http://www.corvetteradios.com/corvetteradios_013.htm
Well I can contribute some additional information.
Corvetteradios.com also sells some bulbs on Ebay
My 3 bulbs were $19 delivered (well, they're ordered anyway).
Search for Ebay name: corvetteradioscom
Or search for: GM Radio Pontiac bulbs
I'll let you know how the repair goes, and thanks again to everyone who contributes.
#2
Senior Member
True Car Nut
Definitely let us know how the repair goes. If you can take some pictures as you go through the repair, that would be great. We can add it to one of the repair sections.
Hopefully you have a good soldering tool with a small tip and some de-soldering devices. Good luck!
Hopefully you have a good soldering tool with a small tip and some de-soldering devices. Good luck!
#4
Senior Member
Posts like a 4 Banger
Join Date: Jan 2005
Location: Pennsylvania
Posts: 112
Likes: 0
Received 0 Likes
on
0 Posts

#6
Senior Member
True Car Nut
The system shorted your link to another forum that we not only don't care about, we could care less about.
Please become familiar with the sites rules and policies and look at the section on spamming.
#7
Senior Member
Posts like a Turbo
Thread Starter
Join Date: Jan 2006
Location: Brighton, Michigan
Posts: 255
Likes: 0
Received 0 Likes
on
0 Posts

No problem with pictures. Soldering tools...? Well, most of my experience has been electrical, not electronics. But, I think I still have my solder pen. The desoldering is more of a challenge. Without a sucker, I use masking tape and my air compressor: Poof!
#8
Senior Member
True Car Nut
Join Date: Jun 2007
Location: New Lenox, IL
Posts: 2,478
Likes: 0
Received 0 Likes
on
0 Posts

Pictures will definitely be helpful. I have a few burned bulbs across my instrument cluster.
#9
Senior Member
Posts like a Turbo
Thread Starter
Join Date: Jan 2006
Location: Brighton, Michigan
Posts: 255
Likes: 0
Received 0 Likes
on
0 Posts

I finished the bulb change today. Here'* the pictures and instructions.
Replacing the Pontiac Radio Display bulbs – R Veldman (Zeevert) 8/29/2010
Replacing the three display bulbs doesn’t take long, especially if you can solder. Removing & replacing the radio and disassembling & reassembling the radio will take about 30-45 minutes. Solder time depends on your skill and tools.
My car is a bonneville GXP, so your car may be a little different.
Other than solder tools, all you need is a couple simple screw drivers for prying and a really small socket set is real handy.
Removing the Radio:
1. Remove your keys from the ignition. I didn’t, but you may want to disconnect the battery.
2. Tilt the steering wheel all the way down.
3. Remove the ignition trim circle. Pull straight out.
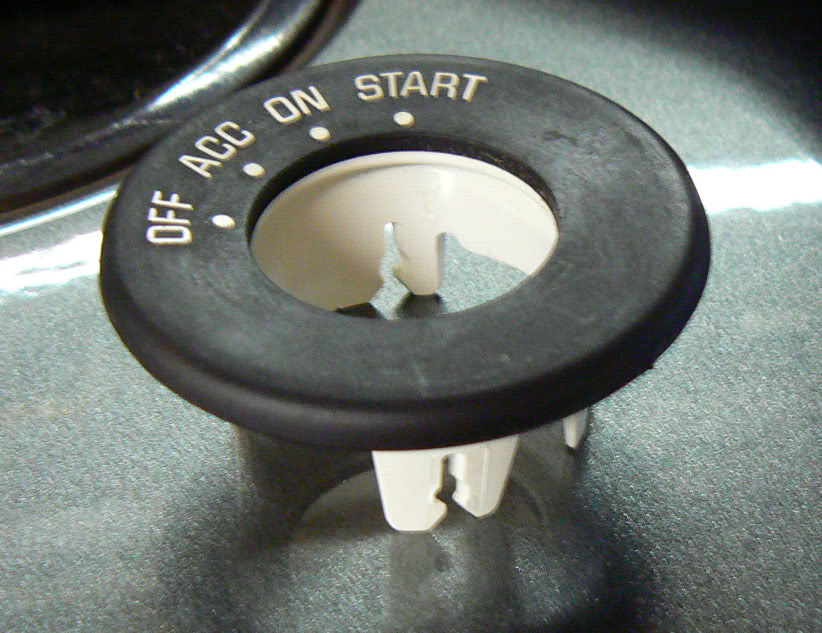
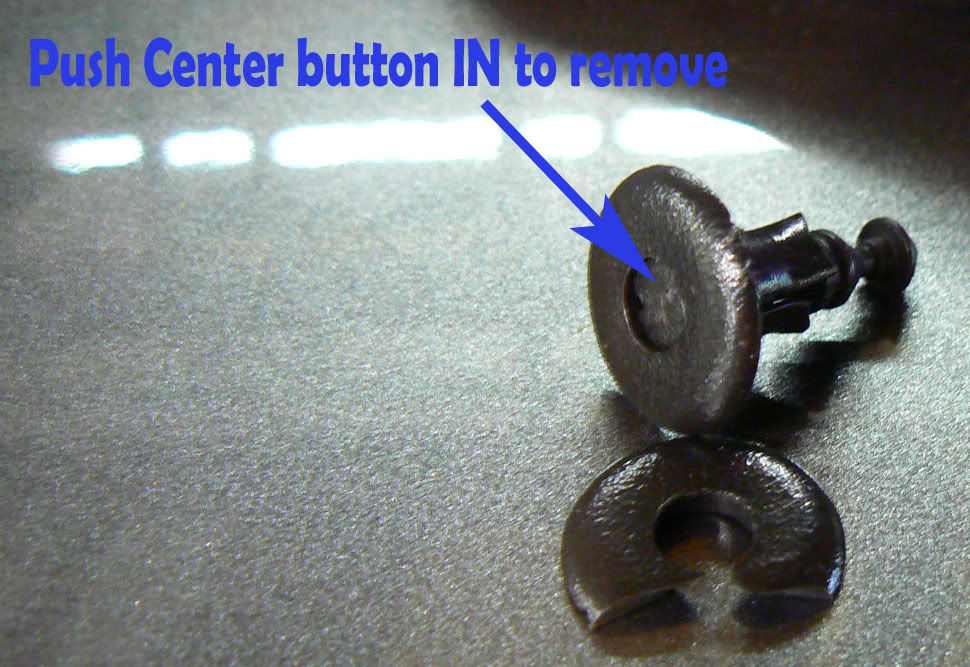
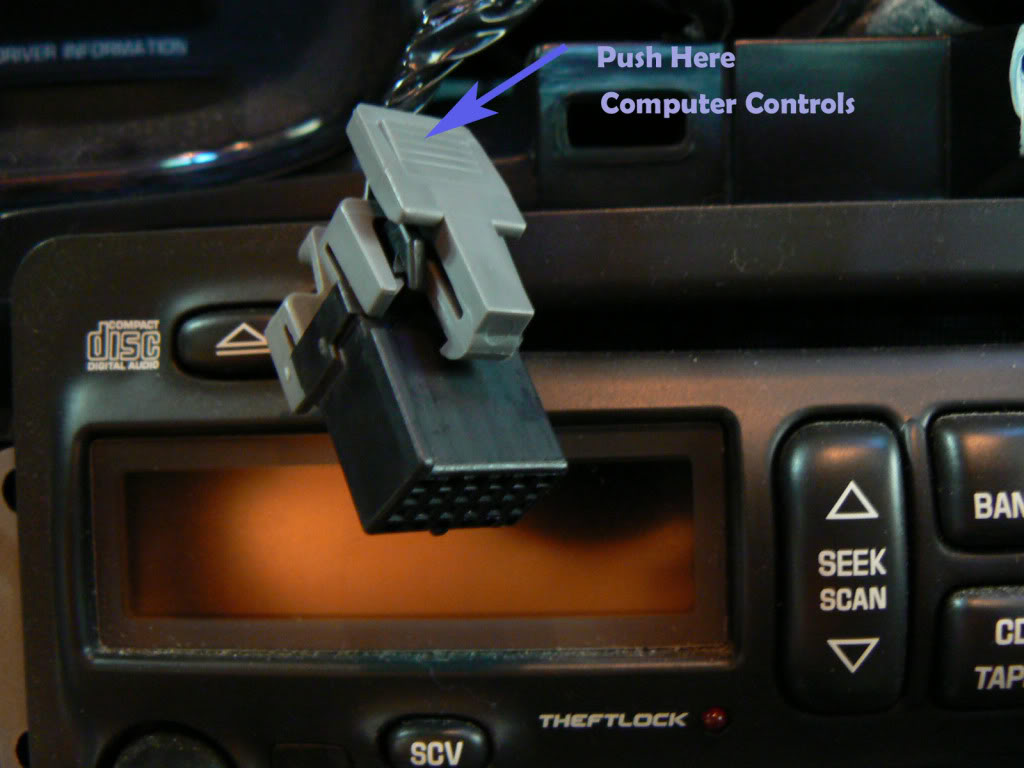
4. There are two push button clips to remove above the speedometer. I broke mine. But, I pretty sure you need to push the center button in and the clip will slide out. After it’* out, I think you reset it, by pushing the button, so it sticks out a little.
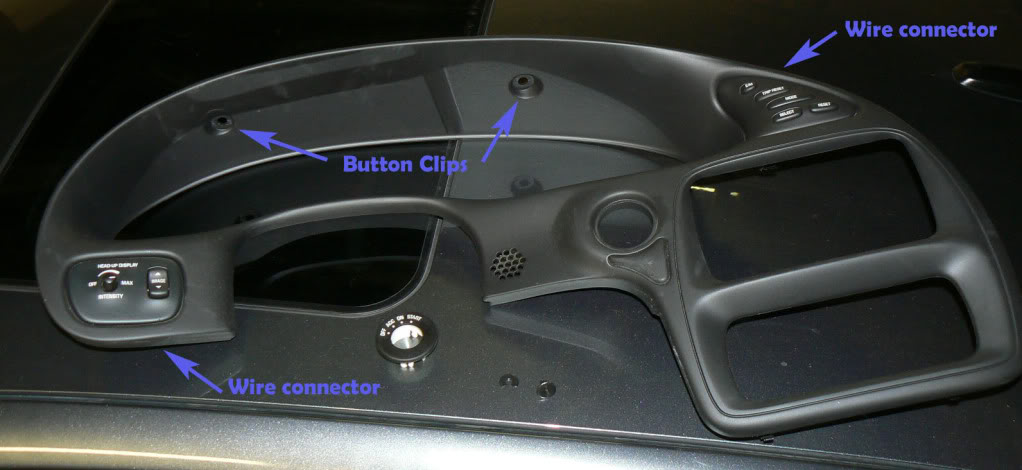
5. Remove the dash cover by pulling straight back. Mine also had two wire connectors to unplug from the cover. I recall that you need to squeeze the release that’* on the passenger side of the clip.
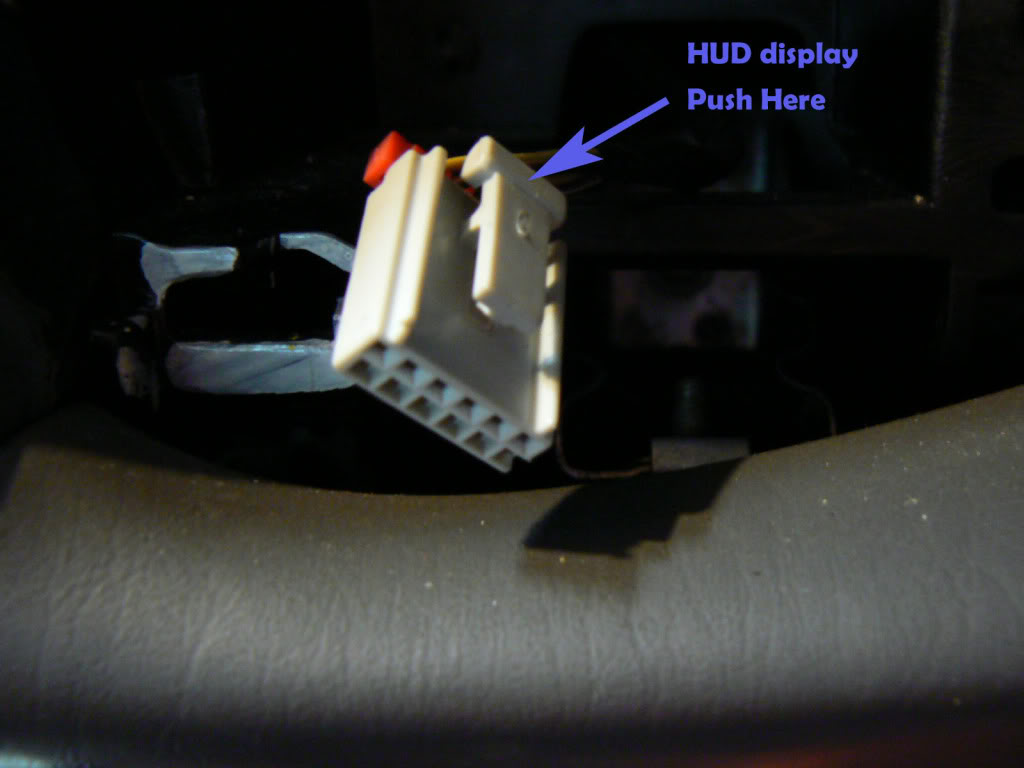
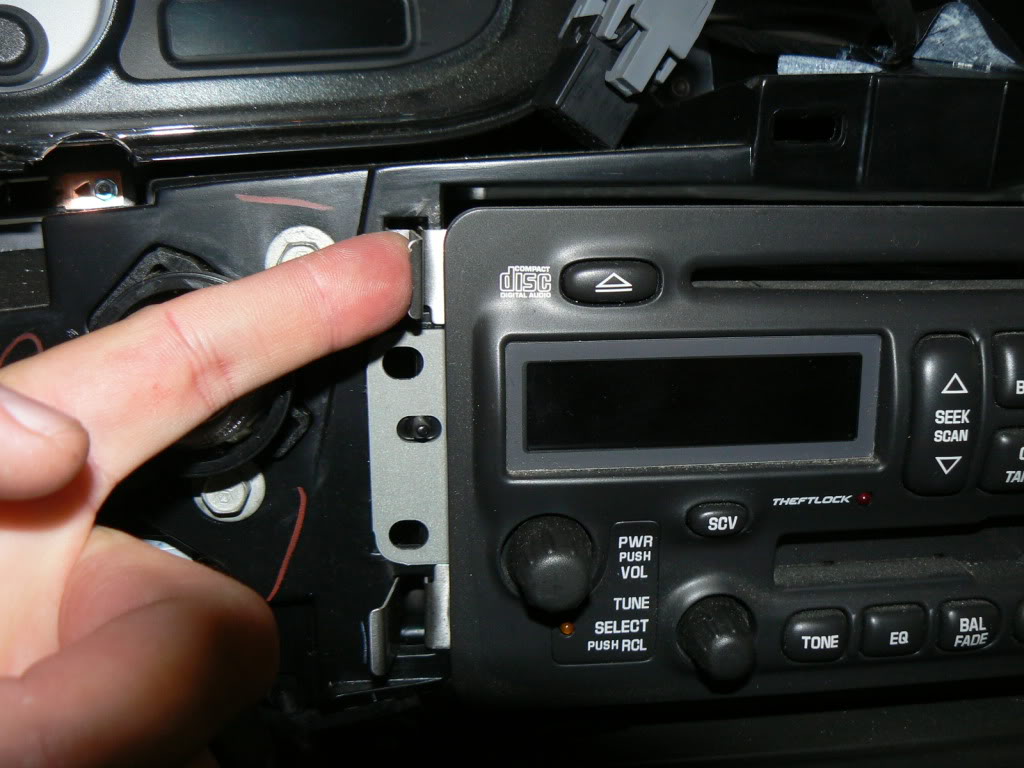
6. Depress the four metal clips and the radio slides right out.
Disassemble the Radio:
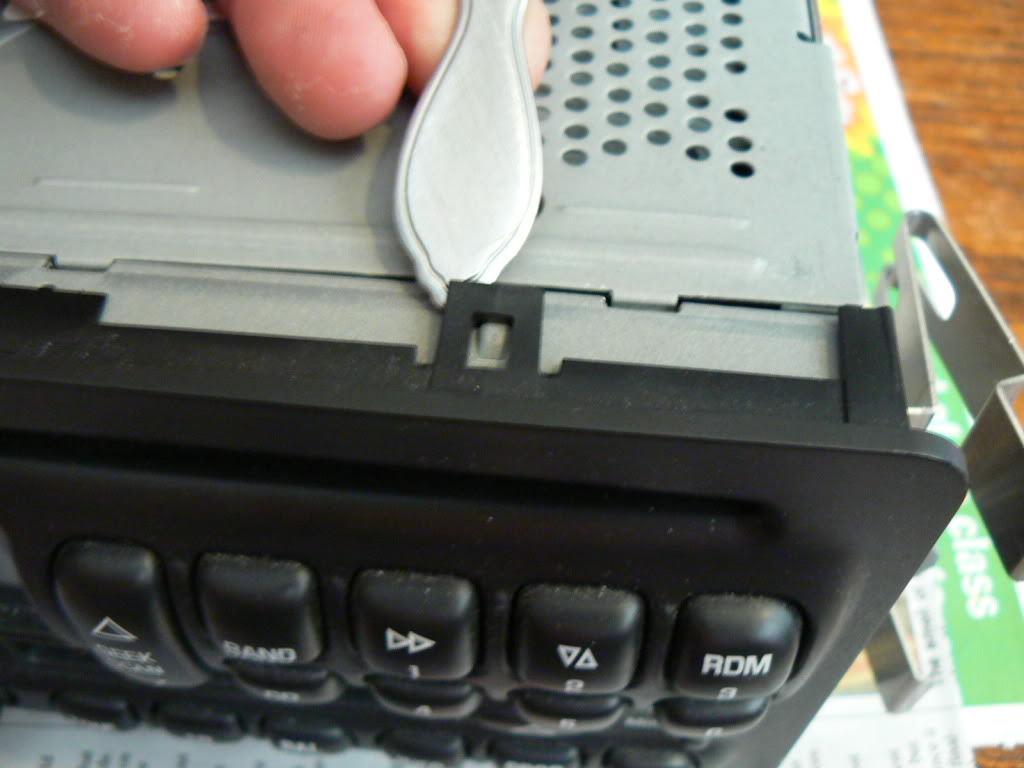
7. Pry up the eight black plastic clips and remove the front face.
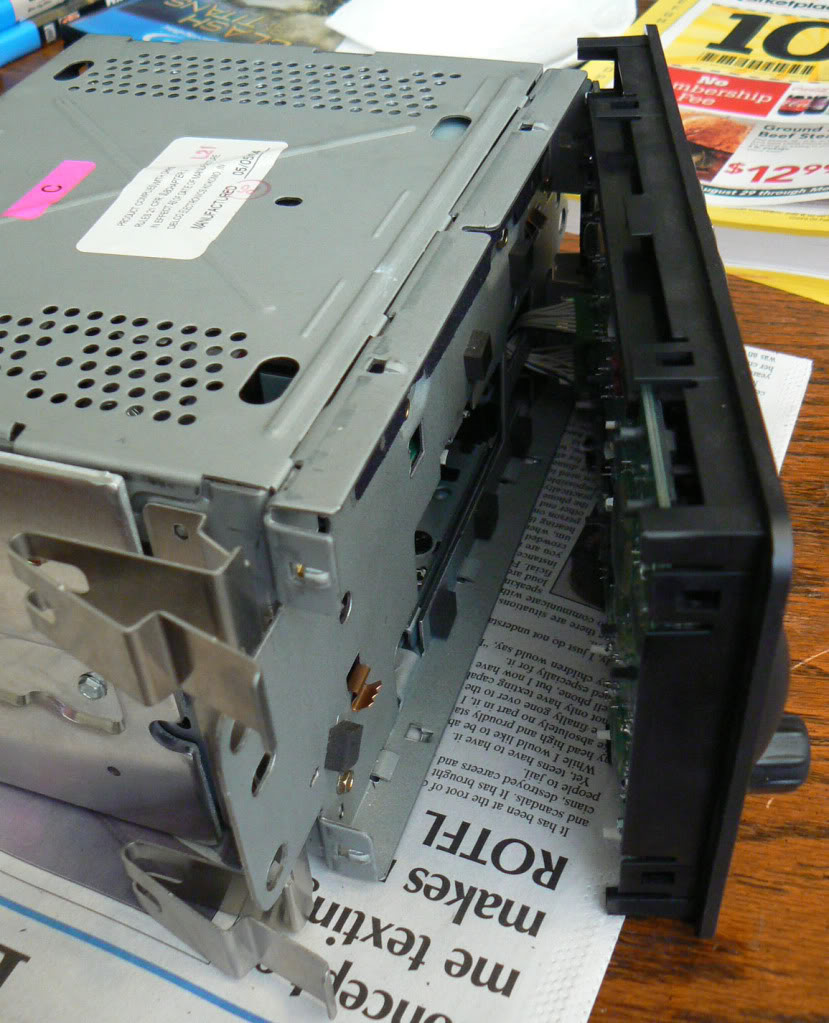
8. NOTE: Those are NOT wire connectors on the back of the face plate. The plugs are inside the radio. You can reach into the radio and unplug the wires, but it’* easier to remove the metal cover and the cassette mechanism.
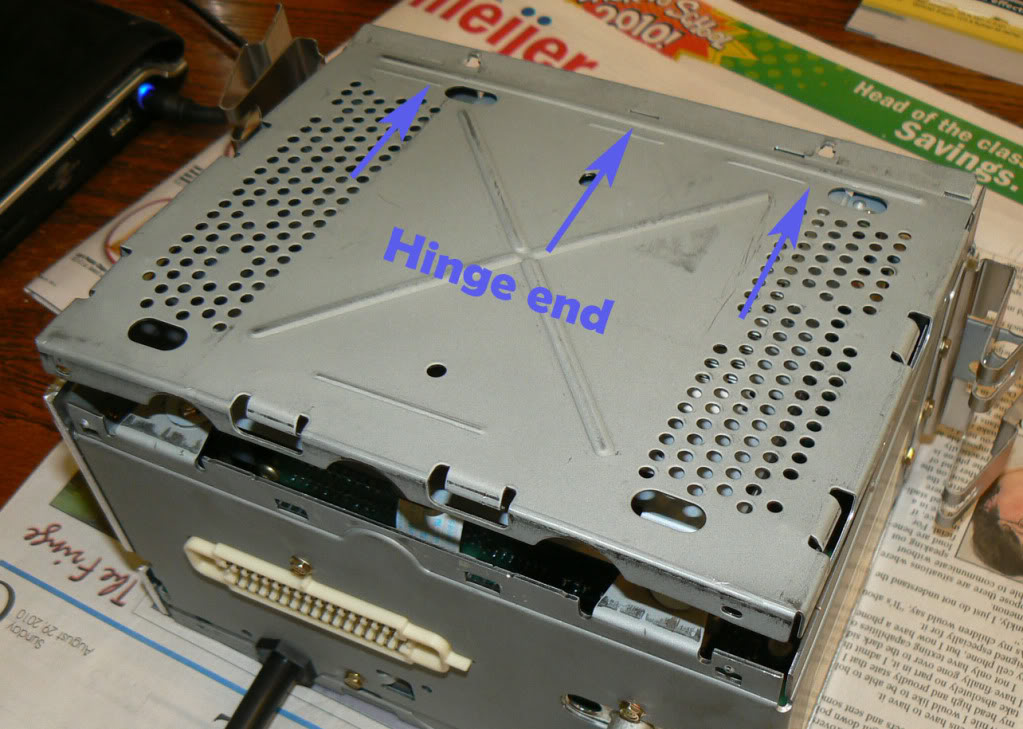
9. Pry up the cover. No screws, just pry it up and it hinges up.
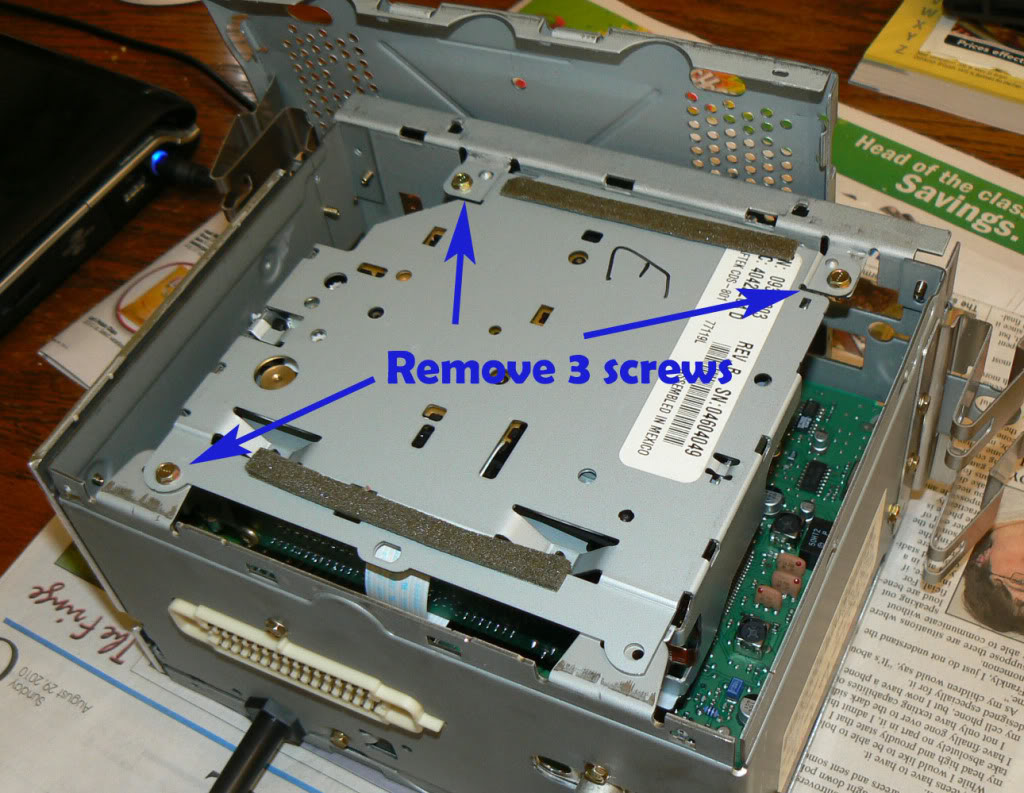
10. Remove the cassette mechanism. There are 3 screws (mine looked like it was missing a fourth). I used a 3/16” socket. I left the cassette plugs connected.
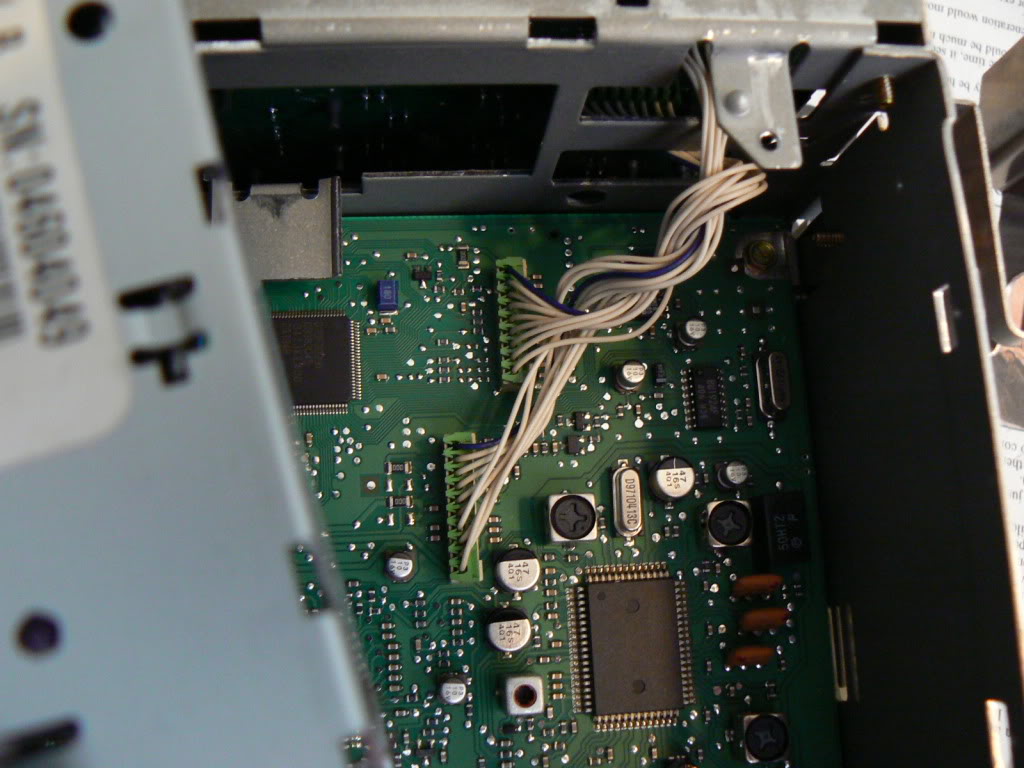
11. Unplug the two connectors for the face plate.
Face Plate:
12. Remove the two round ***** from the front face. They pull straight off.
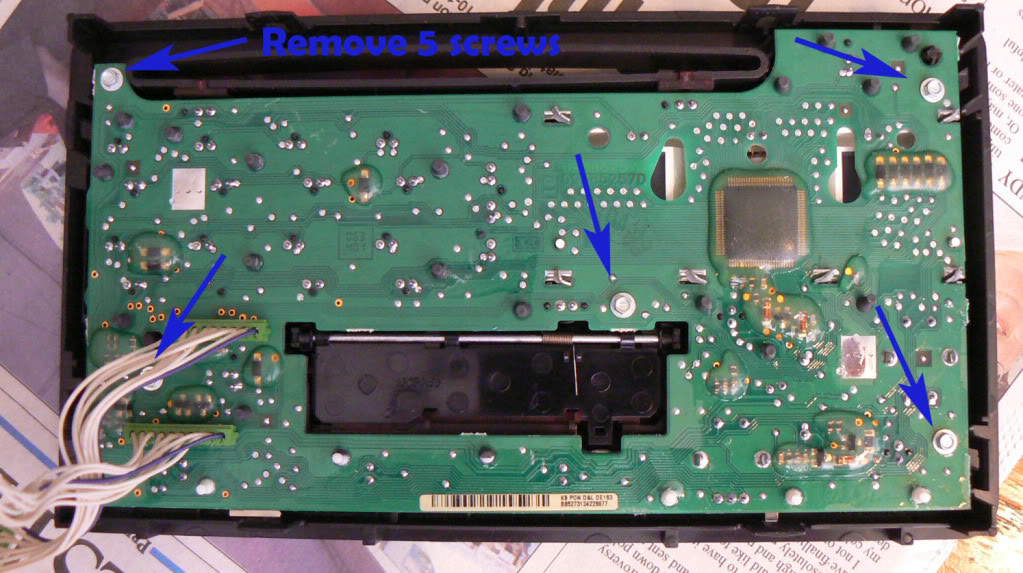
13. Remove the circuit board from the face plate. Remove the five screws from the back of the face plate. I’m not sure what size they were, but they were smaller than 4mm or 3/16”. I used needle nose pliers to unscrew them.
14. Leave the face plate face down when you remove the circuit board, or all the buttons will fall out.
15. Untwist the six tabs and gently remove the display from the circuit board.
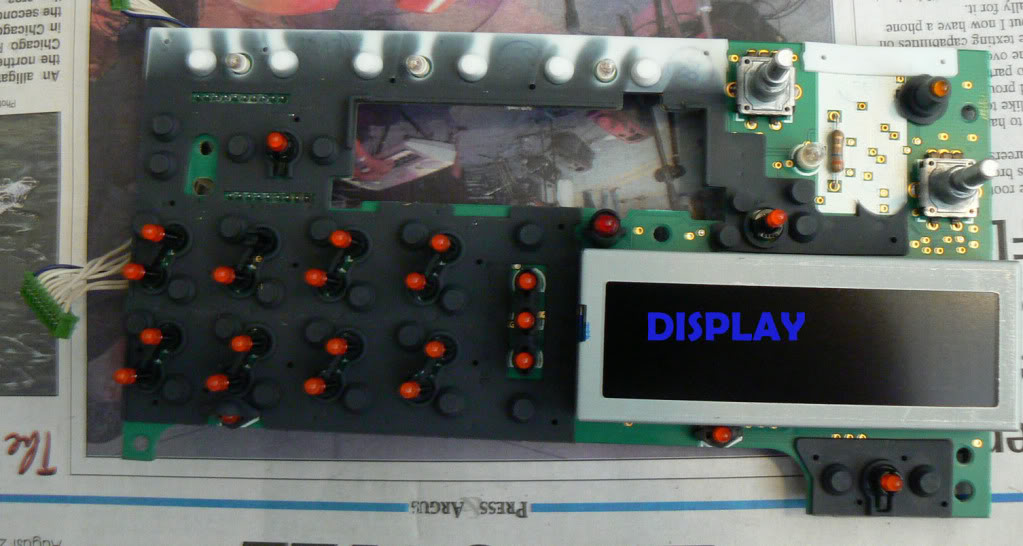
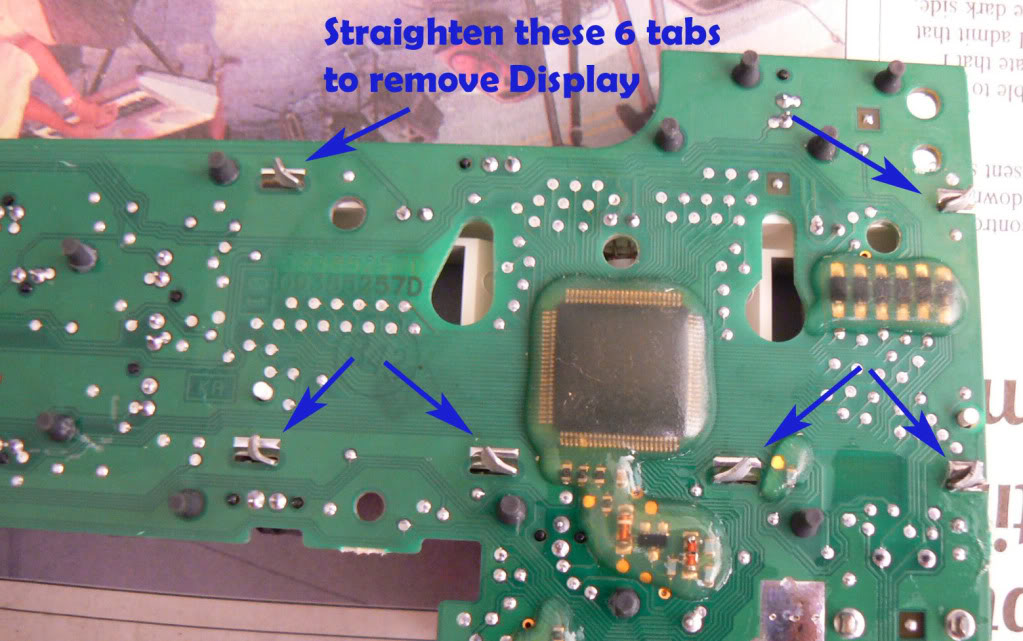
16. This will expose the 3 bulbs that need to be replaced.
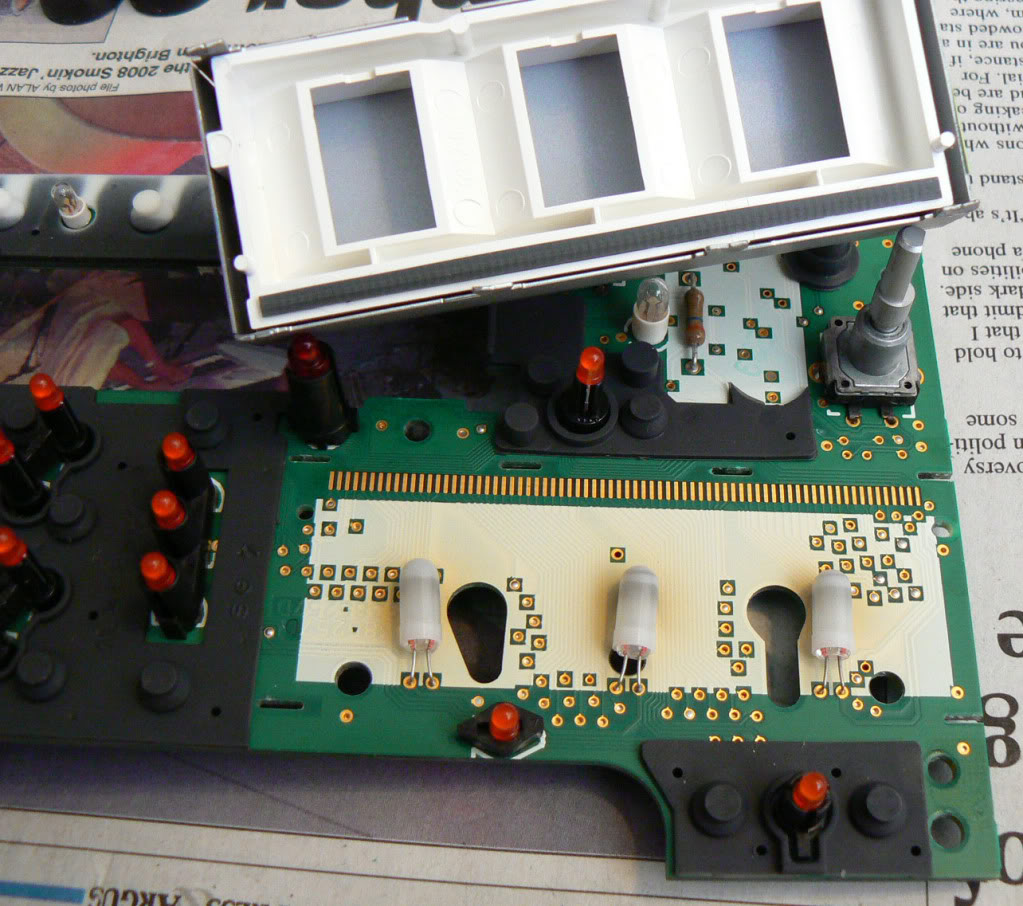
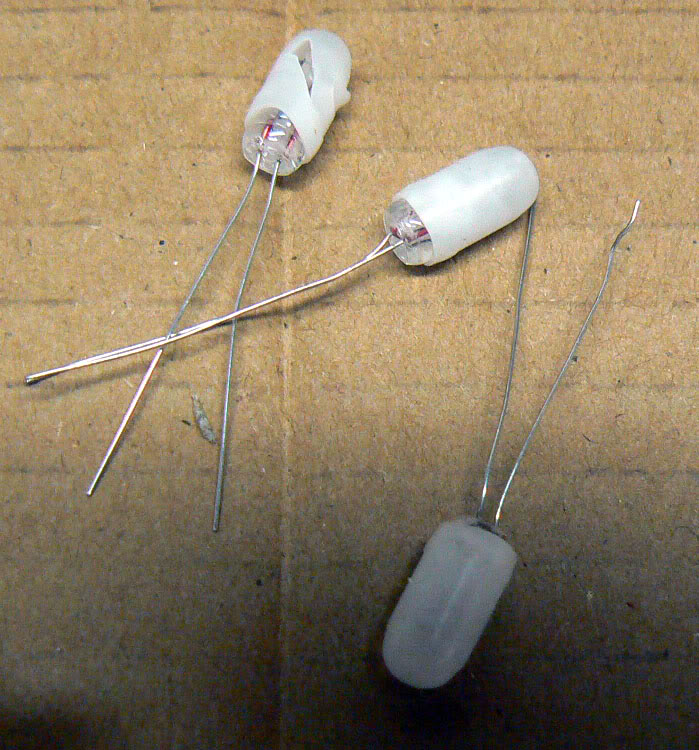
17. Each bulb is covered by a white rubber sleeve that reminds me of something, but I just can’t place it…. Anyway, remove the sleeve by rolling or sliding it off.
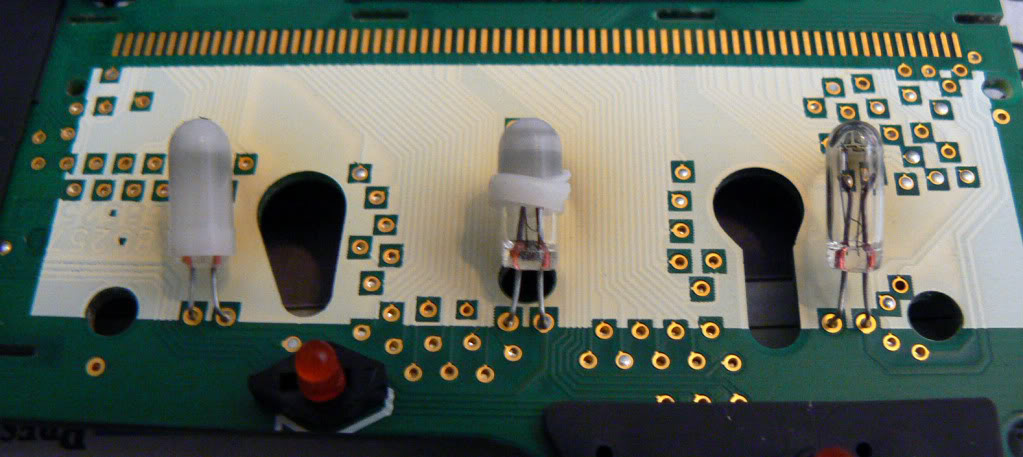
18. Install the sleeves on the new bulbs. Or you can wait until the bulbs are soldered in. I tore one of mine. I imagine that replacement sleeves are hard to find.
Solder and Reassemble:
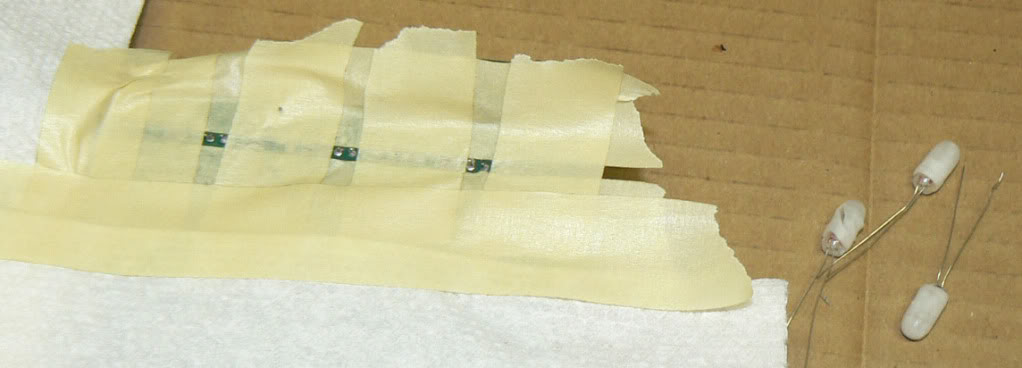
19. I like to mask off the board before unsolder and solder. I won’t go into details on unsolder and solder. I know enough to be dangerous and messy. Solder in the bulbs. Fold them in place.
20. Reattach the display to the circuit board and twist the six tabs.
21. Reattach the circuit board to the face plate with the five screws. Make sure all the buttons are there and they all click like they should.
22. Plug the face plate into the radio.
23. Reattached the faceplate to the radio… snaps in.
24. Press on the two front *****.
25. Reattached the cassette mechanism with the three (or four) screws.
26. Reattached the radio cover… snaps in.
27. Reinstall the radio… clips in. This is a good time to check your work and power up. Connect battery.
28. Reconnect the two plugs to the dash cover.
29. Snap in the dash cover
30. Reinstall the ignition cover
31. Reinstall the two push pins, if you didn’t break them.
Before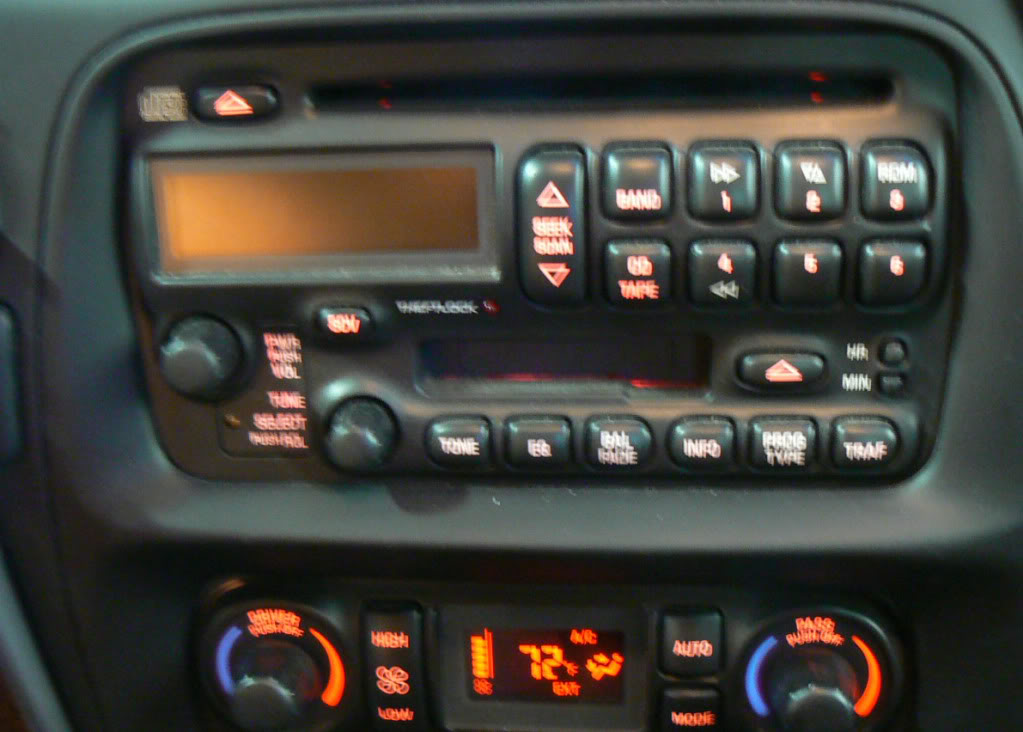
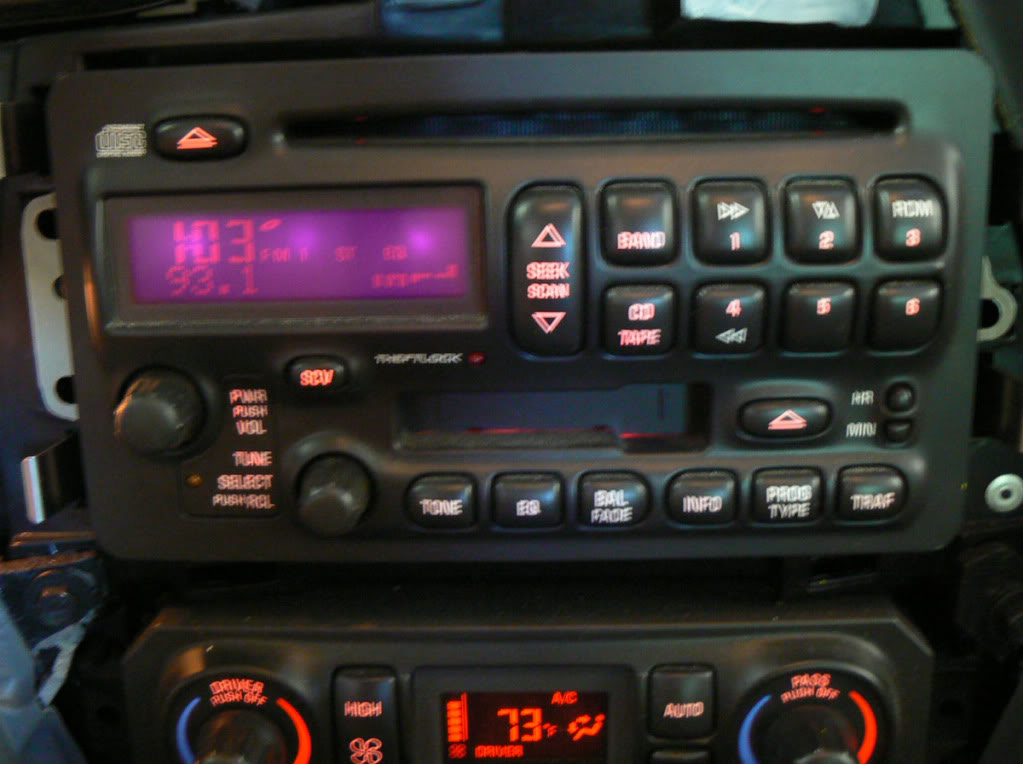
After
Replacing the Pontiac Radio Display bulbs – R Veldman (Zeevert) 8/29/2010
Replacing the three display bulbs doesn’t take long, especially if you can solder. Removing & replacing the radio and disassembling & reassembling the radio will take about 30-45 minutes. Solder time depends on your skill and tools.
My car is a bonneville GXP, so your car may be a little different.
Other than solder tools, all you need is a couple simple screw drivers for prying and a really small socket set is real handy.
Removing the Radio:
1. Remove your keys from the ignition. I didn’t, but you may want to disconnect the battery.
2. Tilt the steering wheel all the way down.
3. Remove the ignition trim circle. Pull straight out.

4. There are two push button clips to remove above the speedometer. I broke mine. But, I pretty sure you need to push the center button in and the clip will slide out. After it’* out, I think you reset it, by pushing the button, so it sticks out a little.

5. Remove the dash cover by pulling straight back. Mine also had two wire connectors to unplug from the cover. I recall that you need to squeeze the release that’* on the passenger side of the clip.


6. Depress the four metal clips and the radio slides right out.

Disassemble the Radio:
7. Pry up the eight black plastic clips and remove the front face.


8. NOTE: Those are NOT wire connectors on the back of the face plate. The plugs are inside the radio. You can reach into the radio and unplug the wires, but it’* easier to remove the metal cover and the cassette mechanism.
9. Pry up the cover. No screws, just pry it up and it hinges up.

10. Remove the cassette mechanism. There are 3 screws (mine looked like it was missing a fourth). I used a 3/16” socket. I left the cassette plugs connected.

11. Unplug the two connectors for the face plate.

Face Plate:
12. Remove the two round ***** from the front face. They pull straight off.
13. Remove the circuit board from the face plate. Remove the five screws from the back of the face plate. I’m not sure what size they were, but they were smaller than 4mm or 3/16”. I used needle nose pliers to unscrew them.

14. Leave the face plate face down when you remove the circuit board, or all the buttons will fall out.
15. Untwist the six tabs and gently remove the display from the circuit board.


16. This will expose the 3 bulbs that need to be replaced.

17. Each bulb is covered by a white rubber sleeve that reminds me of something, but I just can’t place it…. Anyway, remove the sleeve by rolling or sliding it off.

18. Install the sleeves on the new bulbs. Or you can wait until the bulbs are soldered in. I tore one of mine. I imagine that replacement sleeves are hard to find.

Solder and Reassemble:

19. I like to mask off the board before unsolder and solder. I won’t go into details on unsolder and solder. I know enough to be dangerous and messy. Solder in the bulbs. Fold them in place.
20. Reattach the display to the circuit board and twist the six tabs.
21. Reattach the circuit board to the face plate with the five screws. Make sure all the buttons are there and they all click like they should.
22. Plug the face plate into the radio.
23. Reattached the faceplate to the radio… snaps in.
24. Press on the two front *****.
25. Reattached the cassette mechanism with the three (or four) screws.
26. Reattached the radio cover… snaps in.
27. Reinstall the radio… clips in. This is a good time to check your work and power up. Connect battery.
28. Reconnect the two plugs to the dash cover.
29. Snap in the dash cover
30. Reinstall the ignition cover
31. Reinstall the two push pins, if you didn’t break them.
Before

After

#10
Senior Member
Posts like a Turbo
Thread Starter
Join Date: Jan 2006
Location: Brighton, Michigan
Posts: 255
Likes: 0
Received 0 Likes
on
0 Posts

Oh!
Please add comments or facts that you have.
Solder lessons, for example.
Or even better, does anyone have a good button pin/clip and can demonstarte how it works. (Mine are broken)
Please add comments or facts that you have.
Solder lessons, for example.
Or even better, does anyone have a good button pin/clip and can demonstarte how it works. (Mine are broken)


