Heated Seat Repair
 04-07-2008, 03:19 PM
#11
Senior Member
Posts like a 4 Banger

Join Date: Oct 2005
Location: Alexnandria MN
Posts: 108
Likes: 0
Received 0 Likes
on
0 Posts

It is done pretty easily without seat removal as the seat cover is only held in by black plasitc clips that are sewn into the cover. I've replaced the elements on the Bonnie and two Aurora'*. I don't want to seem negative, but I tried the same repair and while it worked, it only lasted about a month, then it opens again. It is almost like it heats to much in the repaired area due to more resistance?
Remember, the kit costs around 120 bucks at rock auto. It comes with the complete element package including the back of the seat. I only replaced the bottom.........which, if memory serves was three pieces? Two years later on the Bonnie it is still good. The Aurora is going on 8 months and the other Rora I sold.
Remember, the kit costs around 120 bucks at rock auto. It comes with the complete element package including the back of the seat. I only replaced the bottom.........which, if memory serves was three pieces? Two years later on the Bonnie it is still good. The Aurora is going on 8 months and the other Rora I sold.
 04-07-2008, 05:06 PM
#12
Senior Member
Posts like a Northstar

I'm looking forward to the pictures. I may do the seat on my wife'* car 2003 if it looks like I can do it without removing the seats from the car.
01-20-2013, 03:17 PM
#13
Junior Member

Join Date: Jan 2013
Posts: 2
Likes: 0
Received 0 Likes
on
0 Posts
i've been able to remove & replace the seat heating pad but not sure how to take apart the seat back - my heated seats also quit working & ordered a replacement set thru my buddy who works in a GM dealership that used to be Pontiac til they bit the dust - i'm pretty sure it it'* only the bottom of the seat but the POS new replacement pads dont have the same connectors as the stock ones so now i need to tear the back apart & replace that pad as well but cant figure out how to get it apart
thanks!
Paul
thanks!
Paul
01-20-2013, 10:02 PM
#14
Senior Member
Posts like a Supercharger
Join Date: Jan 2013
Location: Enfield, CT
Posts: 194
Likes: 0
Received 0 Likes
on
0 Posts
01-14-2014, 09:34 PM
#15

If you look at Roadrunners post:
This is a repair of the Thermistor connection, not the heating element. There is no part number or printed characteristics on the thermistor themselves. It would appear to be a small wire covered in plastic with a black wire on each end, then covered in plastic and embedded in the leather cover. There are three thermistors wired in series on the bottom cover, (not on the cushion) The wires pass thru the foam and end up at the six wire connector as the two gray wires. two of mine are open. All of my heating elements are fine. Only the temperature sensing portion of the circuit has failed. Seems like throwing the baby out with the bathwater to overlay heating pad that are fine. Just wondering if anyone has replaced the thermistors and is aware of the proper characteristics.
I just got around to doing my heater today too. After seeing this post yesterday, I was starting to regret buying the service kit in the hopes of an easy repair. When I got it apart, I found a burned spot similar to what Mike described. The foam and seat cover backing looked like they had cigarette burns.
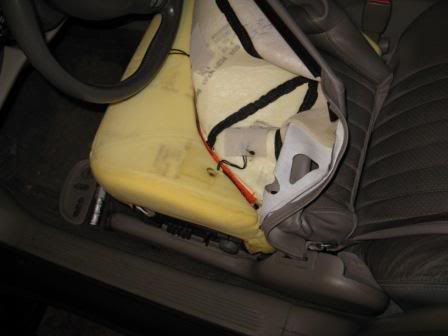

Since the black wires leading to this location had been overheated and were stiff for about 3” back from this spot, I decided to install the service kit (since I already had it too). I guess this is one of those cases where you have to get lucky.
Also, as I suspected, the service kit does not heat up quite as fast as the original one that was sewn into the seat - so there is an advantage to doing Mike’* repair if you can.
---------------------
I did the deed without removing the seat and didn’t have any problems. With the seat motors wired up you can move or tilt the seat as needed for convenience. For safety, before you stick your hand under there you should disconnect battery or fuse after you have the seat in the desired position.

The following users liked this post:
Robo (01-15-2014)
02-08-2014, 07:03 PM
#18
Junior Member

Join Date: Feb 2014
Location: Midwest
Posts: 3
Likes: 0
Received 0 Likes
on
0 Posts
If you look at Roadrunners post:
This is a repair of the Thermistor connection, not the heating element. There is no part number or printed characteristics on the thermistor themselves. It would appear to be a small wire covered in plastic with a black wire on each end, then covered in plastic and embedded in the leather cover. There are three thermistors wired in series on the bottom cover, (not on the cushion) The wires pass thru the foam and end up at the six wire connector as the two gray wires. two of mine are open. All of my heating elements are fine. Only the temperature sensing portion of the circuit has failed. Seems like throwing the baby out with the bathwater to overlay heating pad that are fine. Just wondering if anyone has replaced the thermistors and is aware of the proper characteristics.
This is a repair of the Thermistor connection, not the heating element. There is no part number or printed characteristics on the thermistor themselves. It would appear to be a small wire covered in plastic with a black wire on each end, then covered in plastic and embedded in the leather cover. There are three thermistors wired in series on the bottom cover, (not on the cushion) The wires pass thru the foam and end up at the six wire connector as the two gray wires. two of mine are open. All of my heating elements are fine. Only the temperature sensing portion of the circuit has failed. Seems like throwing the baby out with the bathwater to overlay heating pad that are fine. Just wondering if anyone has replaced the thermistors and is aware of the proper characteristics.
They are rated by their resistance value at room temp. This value then changes as the temperature does. See example on Digikey.com - part no. 490-2446-2-ND scroll down to read their "Data Sheet".
NOTE: this is NOT the right part for your seat; only an example of what a thermistor does.
So if all 3 are wired in Series, we should be able to measure what the resistance is between the 2 grey wires on the seat; seat unplugged from vehicle (working heater at Room Temp); Divide this by 3 and we have the value. Next plug the seat back in & turn on the heater for a minute or two; quickly disconnect and recheck resistance (before it cools) between same two grey wires. It should be different. It will tell us whether the resistance goes up with temperature or down. All that is left is to identify the package type of the thermistor.
Anybody have a working seat heater & Ohm Meter?
01-12-2016, 06:32 PM
#19
Junior Member

Join Date: Jan 2016
Posts: 1
Likes: 0
Received 0 Likes
on
0 Posts
I did everything that was mentioned in the post fixed the broken wire and now when I push the heated seat button it cuts off immediately. I used to come on for a second or two before cutting off now if cuts off as soon as I push the button on. Very frustrated. HELP
01-12-2016, 10:13 PM
#20
Senior Member


True Car Nut
Basically, the first thing you do is get an ohm reading at the harness to the seat module under the seat.....If open, I repair nothing, it gets the kit for both the seat cushion and the back cushion....very easy to do....just remove the seat covers.....take a resistance reading before putting the covers back on...can even test it before putting the covers on....