96 Bonne SE Heater Core replacement
 02-04-2009, 12:25 PM
#1
Member
Posts like a V-Tak
Thread Starter

Join Date: Feb 2009
Posts: 30
Likes: 0
Received 0 Likes
on
0 Posts

I've read many posts. I'm trying to change the heater core without removing the Dash.
Must I remove the airmix actuator to change the heater core?
Space is very tight and not sure I can get to the two bolts.
Can I just disconnect the actuator rod and the two 5.5 mm bolts to the core cover? Reinstall may be very differcult because of space.
I have the dash about 1/3 disassembled and am leary of lowering the steering column, SIR, and all the wiring.
If I remove the dash how heavy is it and how far must I move it to get at the heater core box.
Thanks
 02-04-2009, 01:02 PM
#2
Retired Senior Admin


Expert Gearhead
Join Date: May 2006
Location: Sheboygan Wisconsin
Posts: 29,661
Likes: 0
Received 28 Likes
on
24 Posts

I'll try to do this quick and easy.
under hood
Drain cooling system
Disconnect heater hoses
In car
Remove lower trim plate
remove gain control connector
remove cluster trim plate screws
remove plug on cig lighter
remove screws holding light switch rod
remove cluster trim plate after releasing light switch rod
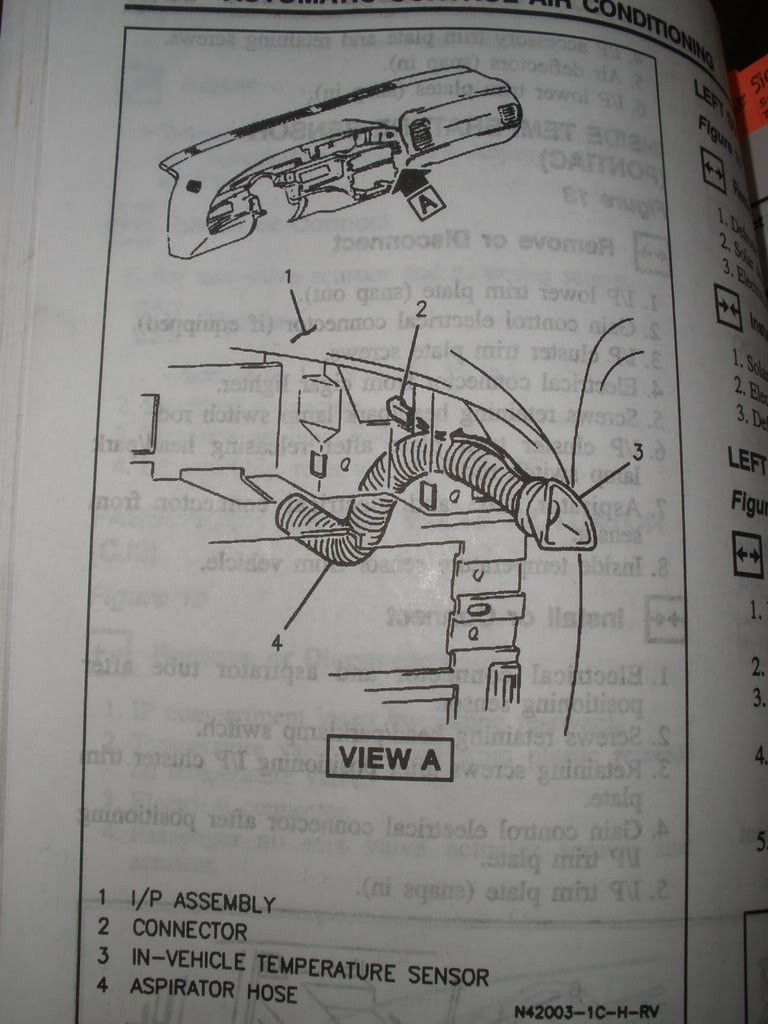
disconnect aspirator tube and electrical from sensor
disconnect inside temp sensor
Disconnect PCM from attaching bracket, let PCM hang, leave wires attached
Disconnect vac and side electrical connector from programer
Disconnect temp valve link rod, reach up threw PCM brackets to gain access
Remove programmer screws
Disconnect temp valve actuator connector. reach up threw PCM brackets to gain access
Remove programmer.
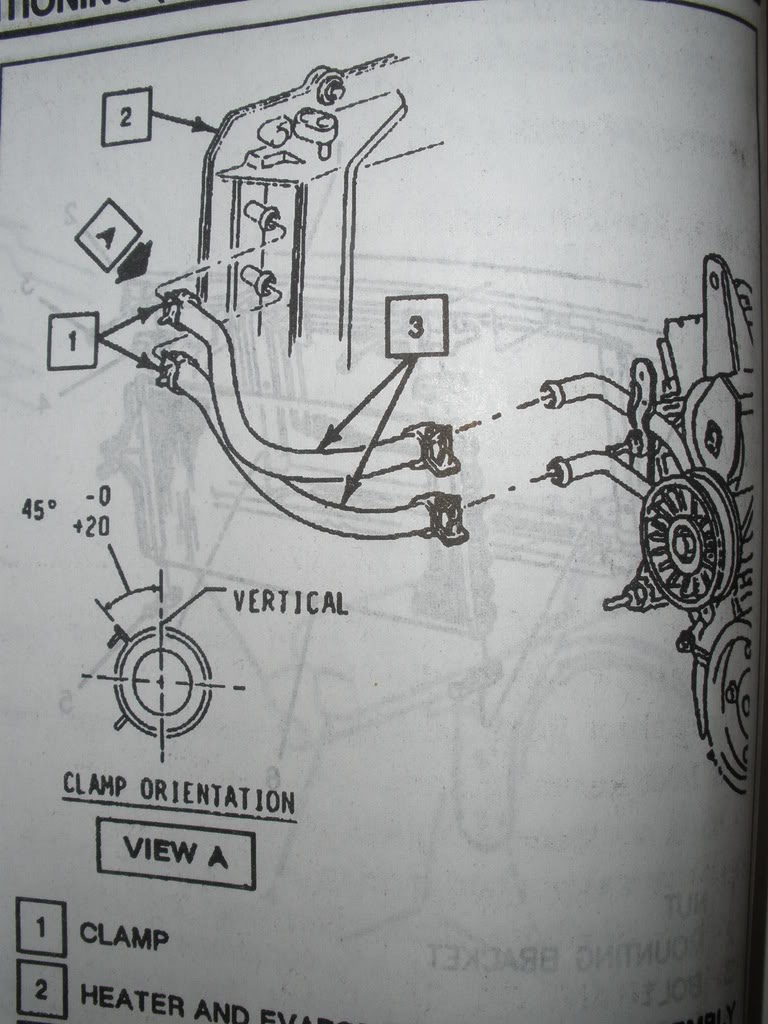
Remove retaining screws and heater core cover
Remove heater core from car.
Reverse order to install.
Hope I got that right.
under hood
Drain cooling system
Disconnect heater hoses
In car
Remove lower trim plate
remove gain control connector
remove cluster trim plate screws
remove plug on cig lighter
remove screws holding light switch rod
remove cluster trim plate after releasing light switch rod
disconnect aspirator tube and electrical from sensor
disconnect inside temp sensor
Disconnect PCM from attaching bracket, let PCM hang, leave wires attached
Disconnect vac and side electrical connector from programer
Disconnect temp valve link rod, reach up threw PCM brackets to gain access
Remove programmer screws
Disconnect temp valve actuator connector. reach up threw PCM brackets to gain access
Remove programmer.
Remove retaining screws and heater core cover
Remove heater core from car.
Reverse order to install.
Hope I got that right.
02-04-2009, 01:48 PM
#3
DINOSAURUS BOOSTUS
Expert Gearhead
Where'* the wide eye'd smiley? OMG Dan.. nooooooooooooo please not the upper dash panel. The FSM is evil sick and twisted for this procedure.
I've been there and done this too many times...kinda. I've replaced a bunch of actuators and remove the cover in the process.
First off, I'd suggest new heater hoses. They are going to be a pain and fight and the razor knife is likely to join you in that fight.
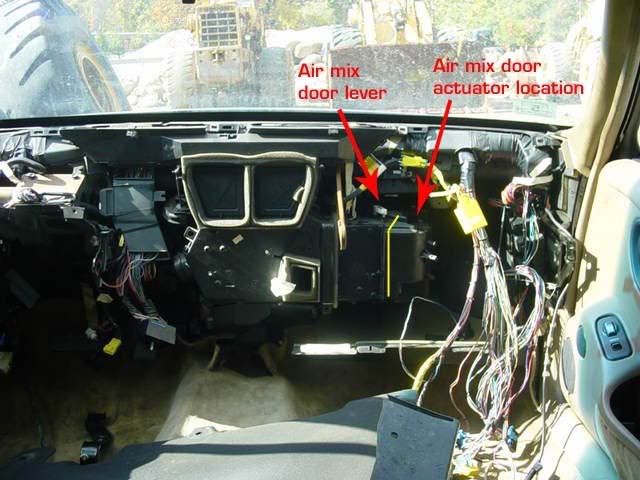
Inside the car. Vacuum the passenger front carpet. You'll be dropping stuff. Remove the kick panel (passenger side). Looking up you have a box with 6 or 7 colored vacuum lines going to it. Remove the two 7mm screws that hold it to the heater box cover. This is your HVAC unit, you will only be able to lower it about 2-3 inches because on top is the connector for the air mix actuator. If you remove whatever module is behind the hvac unit you will have easier access for your arm. Reach up and unhook the actuator plug. Then the hvac will move to the limit of it'* vacuum lines which should give you enough room. Reach up and pop the air mix actuating rod out of the heater door side clip. Remove the two 5.5mm heater box cover screws and I find pulling back the carpet and padding helps sneak it out. You are now staring at your heater core.
I've been there and done this too many times...kinda. I've replaced a bunch of actuators and remove the cover in the process.
First off, I'd suggest new heater hoses. They are going to be a pain and fight and the razor knife is likely to join you in that fight.
Inside the car. Vacuum the passenger front carpet. You'll be dropping stuff. Remove the kick panel (passenger side). Looking up you have a box with 6 or 7 colored vacuum lines going to it. Remove the two 7mm screws that hold it to the heater box cover. This is your HVAC unit, you will only be able to lower it about 2-3 inches because on top is the connector for the air mix actuator. If you remove whatever module is behind the hvac unit you will have easier access for your arm. Reach up and unhook the actuator plug. Then the hvac will move to the limit of it'* vacuum lines which should give you enough room. Reach up and pop the air mix actuating rod out of the heater door side clip. Remove the two 5.5mm heater box cover screws and I find pulling back the carpet and padding helps sneak it out. You are now staring at your heater core.
02-04-2009, 01:59 PM
#4
Retired Senior Admin
Expert Gearhead
Join Date: May 2006
Location: Sheboygan Wisconsin
Posts: 29,661
Likes: 0
Received 28 Likes
on
24 Posts
Tell me about it Bill. The procedure was sending me to pages that didn't exist, so I had to hunt for it. Your way is much better. At least I have some nice diagrams to use.
02-04-2009, 02:23 PM
#5
DINOSAURUS BOOSTUS
Expert Gearhead
I've got scratches on my arm to follow when I go in each time. If the marks line up...I'm going to suceed.
Love that 97 incomplete manual.
Love that 97 incomplete manual.
02-04-2009, 02:36 PM
#6
Member
Posts like a V-Tak
Thread Starter
Join Date: Feb 2009
Posts: 30
Likes: 0
Received 0 Likes
on
0 Posts
Thanks for the excelleent information. Old hoses are off; have new hoses.
I have one grey three legged plastic clip that mount into 3 holes in the lower heater case. This clip protects 1 ea vacuum line. I can't seem to to release the clip and the vacuum line rest against the heater core cover.
I need to to release this clip and relieve tension on the vacuum so that the line is not cut or pinched in the removal of the core cover. Space is very tight. Thanks for any info. and advice.
02-04-2009, 08:54 PM
#8
DINOSAURUS BOOSTUS
Expert Gearhead
If the clip won't release..I didn't tell you to break it. (wink wink) It'* of no stated value except to hold the lines and be a pain when you need to move it.
02-19-2009, 12:49 PM
#9
Member
Posts like a V-Tak
Thread Starter
Join Date: Feb 2009
Posts: 30
Likes: 0
Received 0 Likes
on
0 Posts
Thank you everyone for your timely advice and posting. I was successful in changing Heater Core without removal of dash. Tight very tight; if GM engineers would just have given a couple of inches of space and access; job would have been more tolerable. For me this was a difficult job.
I'm not sure I have the heater door properly adjusted since I did not note the "exact" position of actuator arm on the plastic clip during actuator arm removal; But given limited space through the glove box opening to operate, I hope it is close; may be off 1/4 to 1/2 inch or less or be exactly correct.
On reassembly of actuator arm to clip, I used a 5 in one painters tool through the glove box opening to support the bottom of the actuator arm clip and reached up with my hand and connected the arm to the clip. I was concerned of breaking the plastic heater door arm that the clip is attached to. The painters tool provided adequate support for the heater door arm in my case.
Thanks again for the timely advice.
02-19-2009, 03:13 PM
#10
DINOSAURUS BOOSTUS
Expert Gearhead
Glad to have helped out. Keep in mind though..if this was a Dodge Cherokee you would have to remove the entire dash to see the heater cover.
GM was at least reasonable and knew the cover had some flex in it and that the scratches would heal.
GM was at least reasonable and knew the cover had some flex in it and that the scratches would heal.

Thread
Thread Starter
Forum
Replies
Last Post
SSE Motorhead
Classics (Star Chief and 1957 to 1986)
19
05-09-2008 01:15 PM

