2000+ front seats removal & airbag disable
#1
BANNED
Thread Starter
Join Date: Mar 2004
Location: Purgatory
Posts: 0
Likes: 0
Received 0 Likes
on
0 Posts

Seat Replacement - Front Bucket
Removal Procedure
Caution
When you are performing service on or near the SIR components or the SIR wiring, you must disable the SIR system. Refer to Disabling the SIR System. Failure to follow the correct procedure could cause air bag deployment, personal injury, or unnecessary SIR system repairs.
Disable the SIR system.
Turn the steering wheel so that the vehicle'* wheels are pointing straight ahead.
Turn the ignition switch to the OFF position.
Remove the key from the ignition switch.
Important
With the SIR fuse removed and the ignition switch in the ON position, The AIR BAG warning lamp illuminates. This is normal operation, and does not indicate an SIR system malfunction.
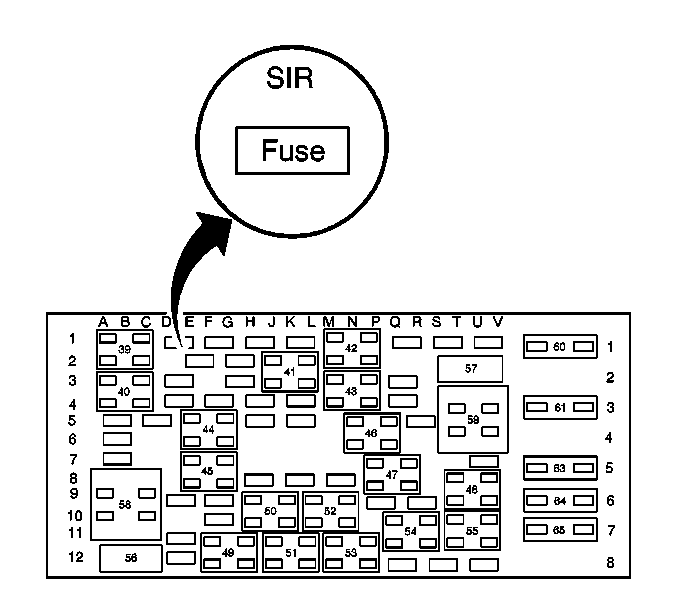
Remove the SIR fuse from the rear fuse block.
Rear fuse block is located under the rear seat.
Remove the driver sound insulator.
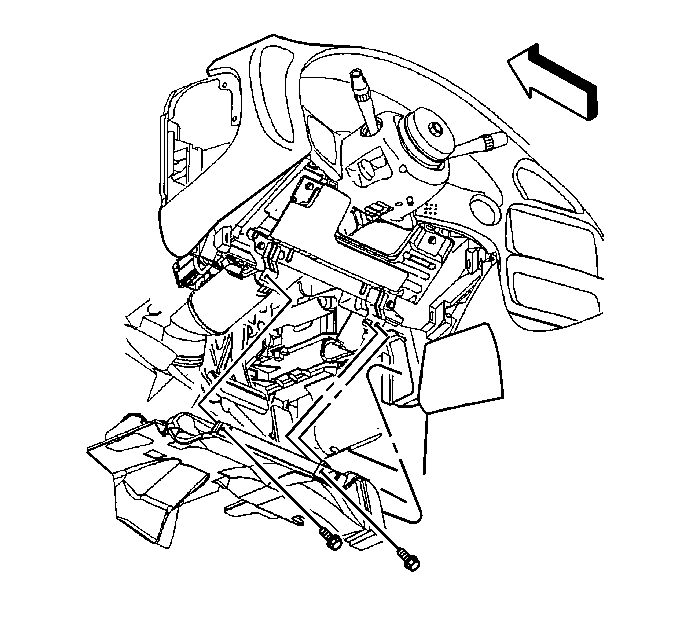
Remove the fasteners at the rear edge of the insulator to disengage from the lower instrument panel.
Pry out the retainers to release.
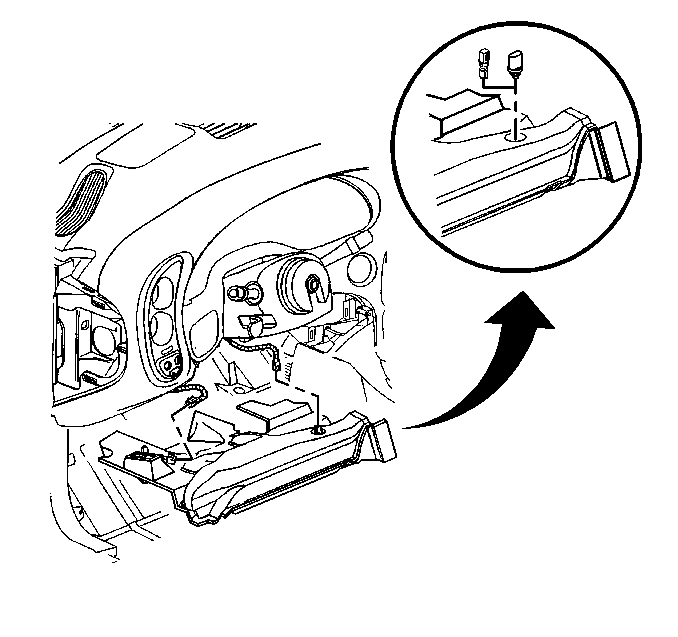
Turn the heater temperature sensor 1/4 turn to release and allow to remain connected to its wire (CJ2 vehicles only).
Disconnect the remaining electrical connectors as necessary.
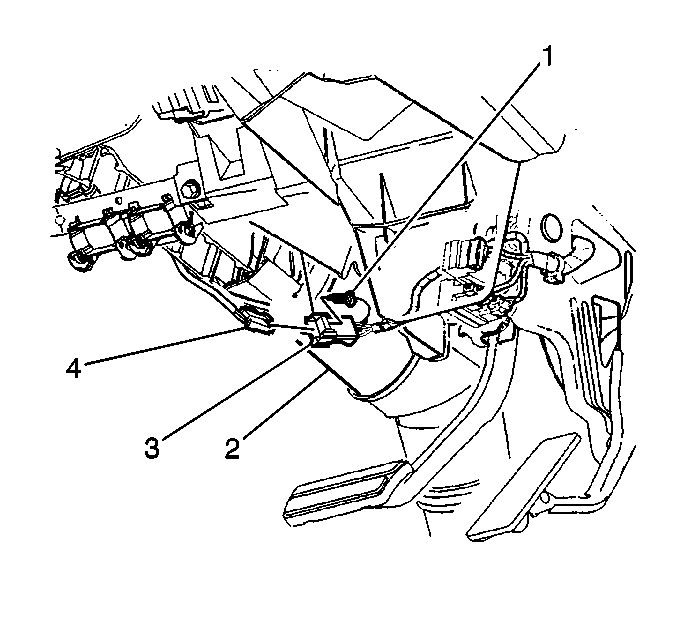
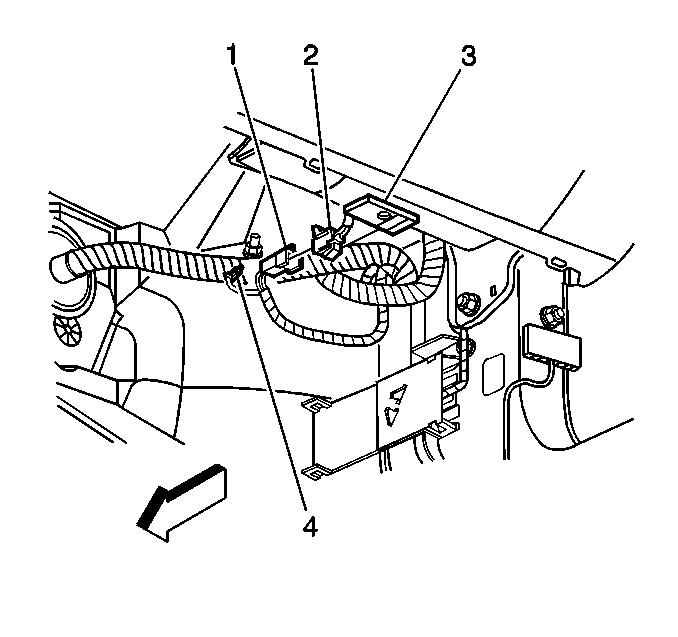
Remove the Connector Position Assurance (CPA) (1) from the driver yellow 2-way connector (3) located next to steering column (2).
Disconnect the driver fontal air bag yellow 2-way connector (4) from the vehicle harness yellow 2-way connector (3).
Remove the passenger sound insulator.
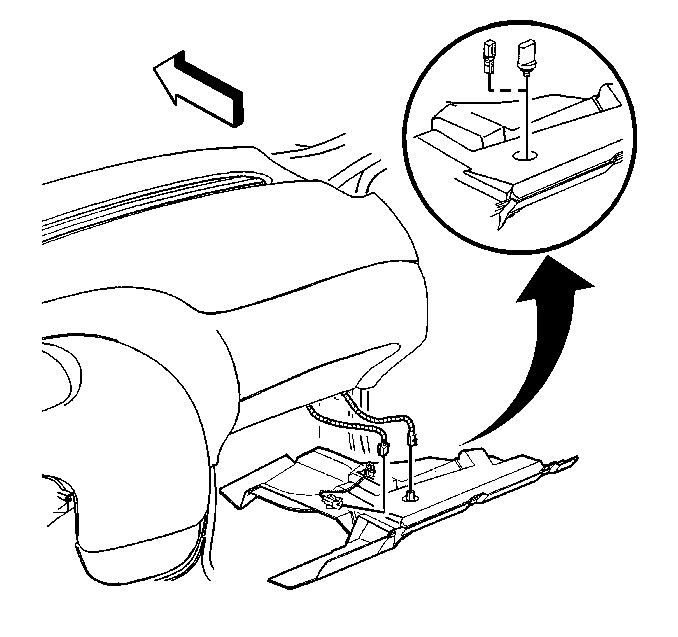
Remove the fasteners at the rear edge of the insulators in order to disengage from the lower instrument panel.
Pry out the retainers in order to release.
Turn the heater temperature sensor 1/4 turn in order to release and allow to remain connected to its wire (CJ2 vehicles only).
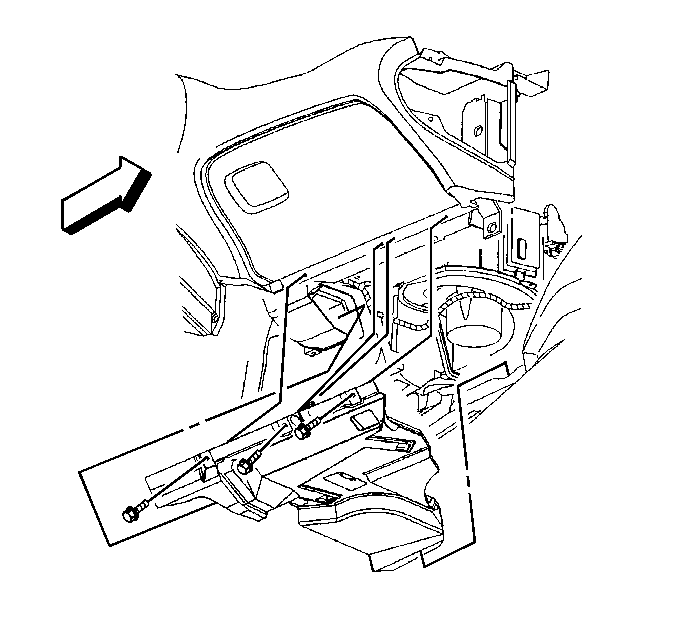
Disconnect the electrical connectors.
Slide the insulator rearward in order to remove.
Remove the Connector Position Assurance (CPA) (4) from the passenger yellow 2-way connector (1) located above the passenger sound insulator.
Disconnect the passenger (IP) fontal air bag yellow 2-way connector (2) from the vehicle harness yellow 2-way connector (1).
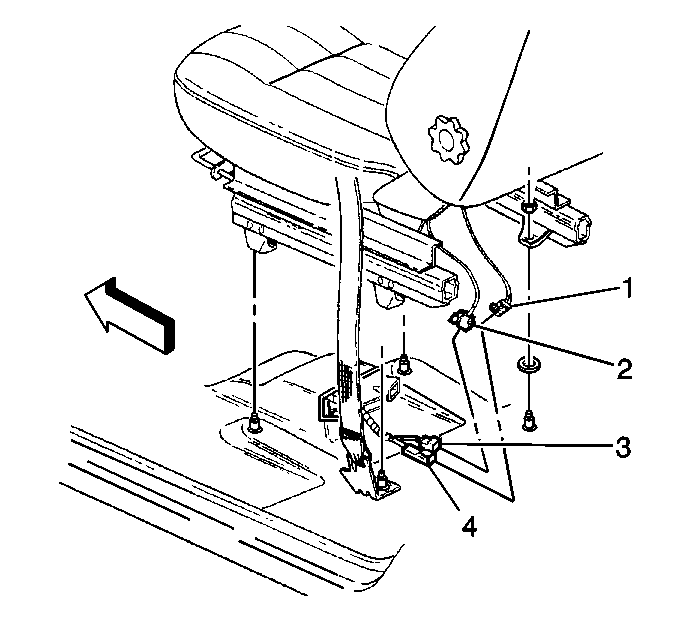
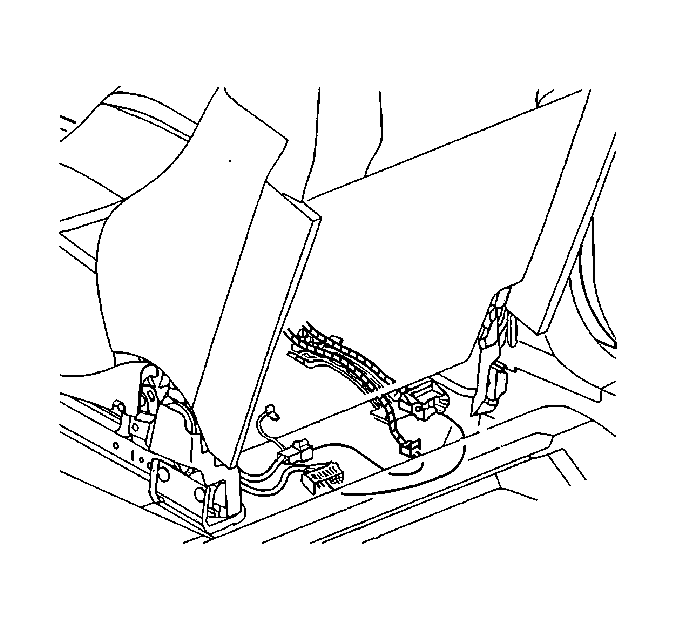
Remove the Connector Position Assurance (CPA) from the driver side air bag yellow 2-way connector (4) located under the driver seat.
Disconnect the driver side air bag yellow 2-way connector (1) from the vehicle harness yellow 2-way connector (4).
Remove the Connector Position Assurance (CPA) from the passenger side air bag yellow 2-way connector (4) located under the passenger seat.
Disconnect the passenger side air bag yellow 2-way connector (1) from the vehicle harness yellow 2-way connector (4).
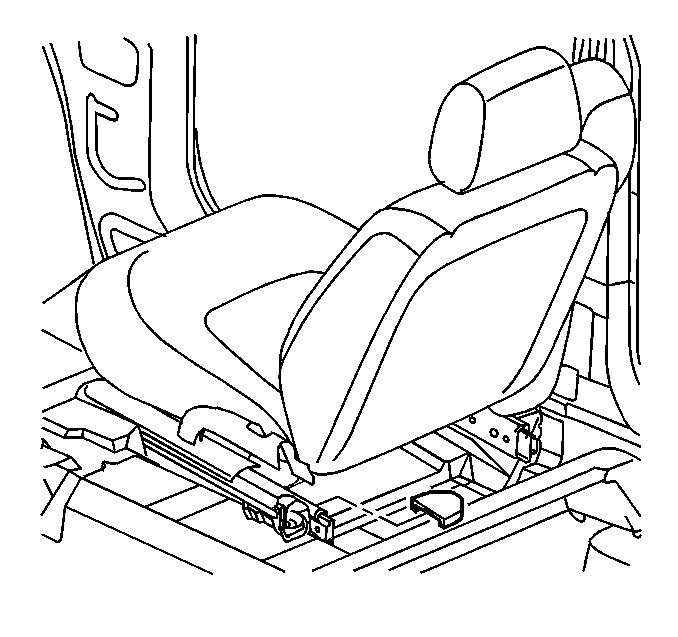
Move the seat to the full forward position.
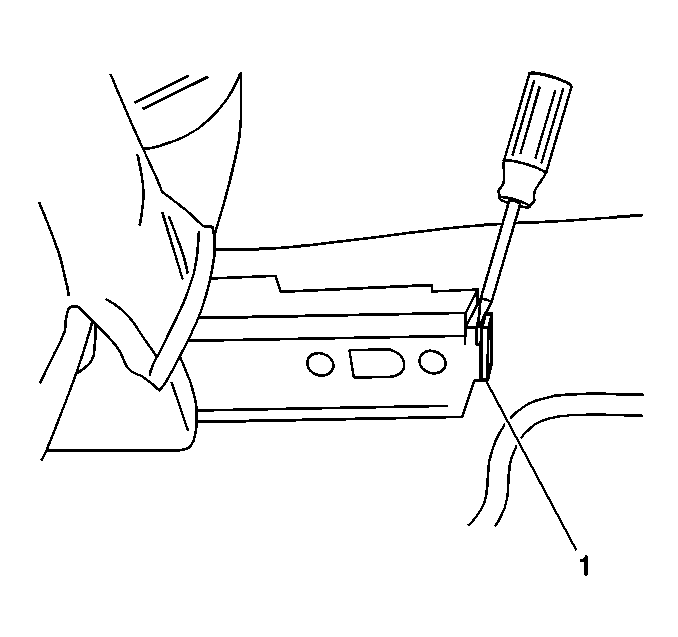
Remove the rear seat track bolt trim cover on the inboard seat track.
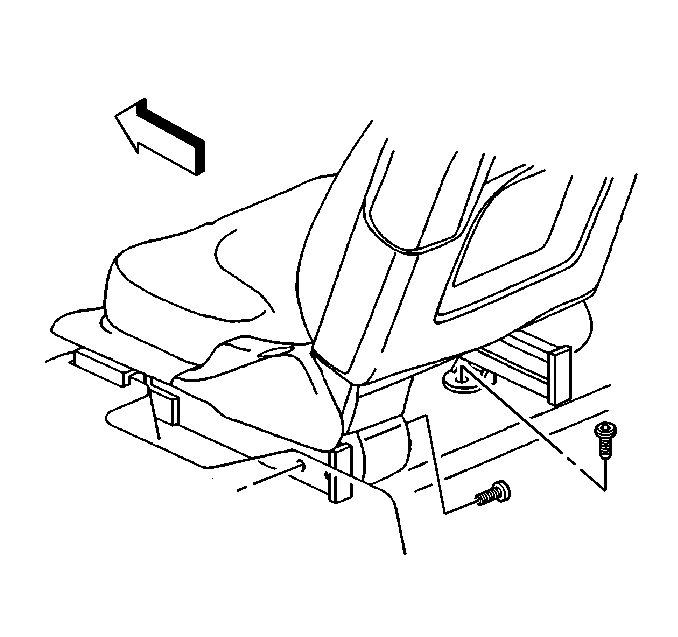
Remove the rear seat track trim cover (1) from the outboard seat track.
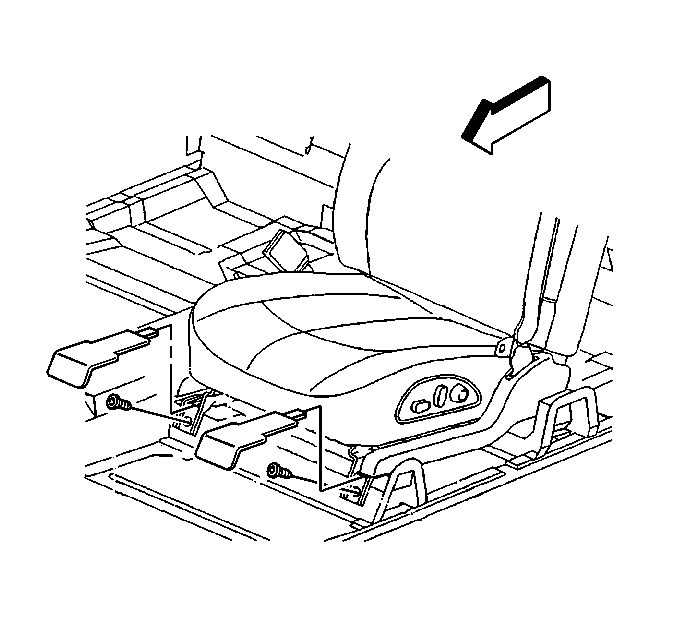
Remove the seat track retainer bolts.
Move the seat to the full rearward position.
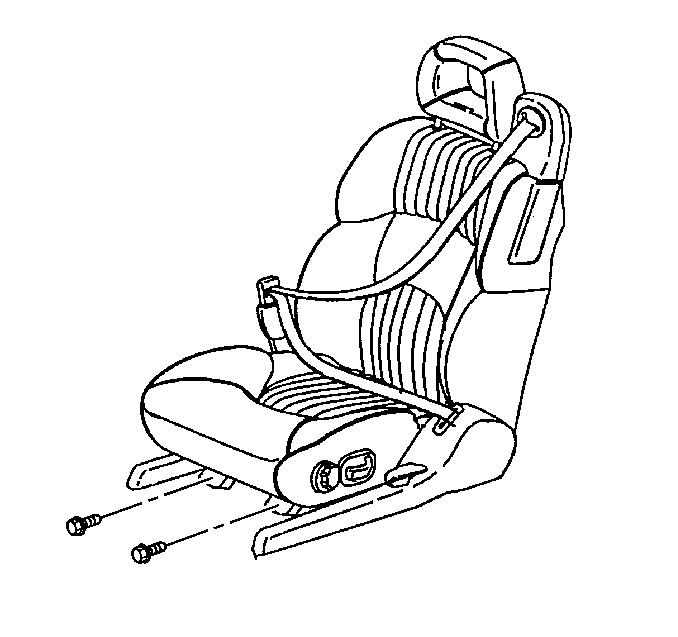
Remove the front seat track bolt trim covers.
Remove the front seat track bolts.
Disconnect the electrical connectors.
Remove the seat from the vehicle.
Installation Procedure

Install the seat into the vehicle.

Connect the electrical connectors.
Notice
Use the correct fastener in the correct location. Replacement fasteners must be the correct part number for that application. Fasteners requiring replacement or fasteners requiring the use of thread locking compound or sealant are identified in the service procedure. Do not use paints, lubricants, or corrosion inhibitors on fasteners or fastener joint surfaces unless specified. These coatings affect fastener torque and joint clamping force and may damage the fastener. Use the correct tightening sequence and specifications when installing fasteners in order to avoid damage to parts and systems.

Install the track retainer bolts. Tighten
Tighten the seat track retainer bolts to 30 N·m (22 lb ft).

Install the seat track bolt trim covers.

Install the front seat retainer bolts. Tighten
Tighten the front seat track retainer bolts to 30 N·m (22 lb ft).

Install the front seat track retainer bolt covers.
Reposition the seat.
Enable the SIR system.

Remove the key from the ignition switch.
Connect the passenger side air bag yellow 2-way connector (1) to vehicle harness yellow 2-way connector (4) located under the passenger seat.
Install the Connector Position Assurance (CPA) to the passenger side air bag yellow 2-way connector (4).
Connect the driver side air bag yellow 2-way connector (1) to vehicle harness yellow 2-way connector (4) located under the driver seat.
Install the Connector Position Assurance (CPA) to the driver side air bag yellow 2-way connector (4).

Connect the passenger (IP) fontal air bag yellow 2-way connector (2) to the vehicle harness yellow 2-way connector (1) located above the passenger sound insulator.
Install the Connector Position Assurance (CPA) (4) to the passenger yellow 2-way connector (1).
Install the passenger sound insulator.

Set the forward edge of the insulator onto the shelf of the dash mat.
Install the heater temperature sensor (CJ2 vehicles only).
Connect the electrical connector.

Align the insulator to the floor duct at the heating, ventilating and air conditioning module.
Align the snap tab fasteners to the lower instrument panel and push upward in order to engage.
Notice
Use the correct fastener in the correct location. Replacement fasteners must be the correct part number for that application. Fasteners requiring replacement or fasteners requiring the use of thread locking compound or sealant are identified in the service procedure. Do not use paints, lubricants, or corrosion inhibitors on fasteners or fastener joint surfaces unless specified. These coatings affect fastener torque and joint clamping force and may damage the fastener. Use the correct tightening sequence and specifications when installing fasteners in order to avoid damage to parts and systems.
Install the fasteners. Tighten
Tighten the fasteners to 2 N·m (18 lb in).

Connect the driver fontal air bag yellow 2-way connector (4) to the vehicle harness yellow 2-way connector (3) located next to steering column (2).
Install the Connector Position Assurance (CPA) (1) to the driver yellow 2-way connector (3).
Install the driver sound insulator.

Position and turn 1/4 turn to install the heater temperature sensor (CJ2 vehicles only).
Connect the remaining electrical connectors.

Set the forward edge of the insulator onto the shelf of the dash mat.
Important
Correct installation is necessary for the correct heater air distribution.
Align the insulator to the floor duct at the heating, ventilation and air conditioning module.
Align the snap tab fasteners to the lower instrument panel and push upward to engage.
Notice
Use the correct fastener in the correct location. Replacement fasteners must be the correct part number for that application. Fasteners requiring replacement or fasteners requiring the use of thread locking compound or sealant are identified in the service procedure. Do not use paints, lubricants, or corrosion inhibitors on fasteners or fastener joint surfaces unless specified. These coatings affect fastener torque and joint clamping force and may damage the fastener. Use the correct tightening sequence and specifications when installing fasteners in order to avoid damage to parts and systems.
Install the fasteners into the lower instrument panel. Tighten
Tighten the fasteners to 2 N·m (18 lb in).

Rear fuse block is located under the rear seat.
Install the SIR fuse to the rear fuse block.
Staying well away from all air bags, turn the ignition switch to the ON position.
The AIR BAG warning lamp will flash 7 times.
The AIR BAG warning lamp will then turn OFF.
Removal Procedure
Caution
When you are performing service on or near the SIR components or the SIR wiring, you must disable the SIR system. Refer to Disabling the SIR System. Failure to follow the correct procedure could cause air bag deployment, personal injury, or unnecessary SIR system repairs.
Disable the SIR system.
Turn the steering wheel so that the vehicle'* wheels are pointing straight ahead.
Turn the ignition switch to the OFF position.
Remove the key from the ignition switch.
Important
With the SIR fuse removed and the ignition switch in the ON position, The AIR BAG warning lamp illuminates. This is normal operation, and does not indicate an SIR system malfunction.

Remove the SIR fuse from the rear fuse block.
Rear fuse block is located under the rear seat.

Remove the driver sound insulator.

Remove the fasteners at the rear edge of the insulator to disengage from the lower instrument panel.
Pry out the retainers to release.

Turn the heater temperature sensor 1/4 turn to release and allow to remain connected to its wire (CJ2 vehicles only).
Disconnect the remaining electrical connectors as necessary.
Remove the Connector Position Assurance (CPA) (1) from the driver yellow 2-way connector (3) located next to steering column (2).
Disconnect the driver fontal air bag yellow 2-way connector (4) from the vehicle harness yellow 2-way connector (3).

Remove the passenger sound insulator.

Remove the fasteners at the rear edge of the insulators in order to disengage from the lower instrument panel.
Pry out the retainers in order to release.
Turn the heater temperature sensor 1/4 turn in order to release and allow to remain connected to its wire (CJ2 vehicles only).

Disconnect the electrical connectors.
Slide the insulator rearward in order to remove.
Remove the Connector Position Assurance (CPA) (4) from the passenger yellow 2-way connector (1) located above the passenger sound insulator.
Disconnect the passenger (IP) fontal air bag yellow 2-way connector (2) from the vehicle harness yellow 2-way connector (1).

Remove the Connector Position Assurance (CPA) from the driver side air bag yellow 2-way connector (4) located under the driver seat.
Disconnect the driver side air bag yellow 2-way connector (1) from the vehicle harness yellow 2-way connector (4).
Remove the Connector Position Assurance (CPA) from the passenger side air bag yellow 2-way connector (4) located under the passenger seat.
Disconnect the passenger side air bag yellow 2-way connector (1) from the vehicle harness yellow 2-way connector (4).

Move the seat to the full forward position.

Remove the rear seat track bolt trim cover on the inboard seat track.

Remove the rear seat track trim cover (1) from the outboard seat track.

Remove the seat track retainer bolts.
Move the seat to the full rearward position.

Remove the front seat track bolt trim covers.

Remove the front seat track bolts.
Disconnect the electrical connectors.
Remove the seat from the vehicle.
Installation Procedure

Install the seat into the vehicle.

Connect the electrical connectors.
Notice
Use the correct fastener in the correct location. Replacement fasteners must be the correct part number for that application. Fasteners requiring replacement or fasteners requiring the use of thread locking compound or sealant are identified in the service procedure. Do not use paints, lubricants, or corrosion inhibitors on fasteners or fastener joint surfaces unless specified. These coatings affect fastener torque and joint clamping force and may damage the fastener. Use the correct tightening sequence and specifications when installing fasteners in order to avoid damage to parts and systems.

Install the track retainer bolts. Tighten
Tighten the seat track retainer bolts to 30 N·m (22 lb ft).

Install the seat track bolt trim covers.

Install the front seat retainer bolts. Tighten
Tighten the front seat track retainer bolts to 30 N·m (22 lb ft).

Install the front seat track retainer bolt covers.
Reposition the seat.
Enable the SIR system.

Remove the key from the ignition switch.
Connect the passenger side air bag yellow 2-way connector (1) to vehicle harness yellow 2-way connector (4) located under the passenger seat.
Install the Connector Position Assurance (CPA) to the passenger side air bag yellow 2-way connector (4).
Connect the driver side air bag yellow 2-way connector (1) to vehicle harness yellow 2-way connector (4) located under the driver seat.
Install the Connector Position Assurance (CPA) to the driver side air bag yellow 2-way connector (4).

Connect the passenger (IP) fontal air bag yellow 2-way connector (2) to the vehicle harness yellow 2-way connector (1) located above the passenger sound insulator.
Install the Connector Position Assurance (CPA) (4) to the passenger yellow 2-way connector (1).
Install the passenger sound insulator.

Set the forward edge of the insulator onto the shelf of the dash mat.
Install the heater temperature sensor (CJ2 vehicles only).
Connect the electrical connector.

Align the insulator to the floor duct at the heating, ventilating and air conditioning module.
Align the snap tab fasteners to the lower instrument panel and push upward in order to engage.
Notice
Use the correct fastener in the correct location. Replacement fasteners must be the correct part number for that application. Fasteners requiring replacement or fasteners requiring the use of thread locking compound or sealant are identified in the service procedure. Do not use paints, lubricants, or corrosion inhibitors on fasteners or fastener joint surfaces unless specified. These coatings affect fastener torque and joint clamping force and may damage the fastener. Use the correct tightening sequence and specifications when installing fasteners in order to avoid damage to parts and systems.
Install the fasteners. Tighten
Tighten the fasteners to 2 N·m (18 lb in).

Connect the driver fontal air bag yellow 2-way connector (4) to the vehicle harness yellow 2-way connector (3) located next to steering column (2).
Install the Connector Position Assurance (CPA) (1) to the driver yellow 2-way connector (3).
Install the driver sound insulator.

Position and turn 1/4 turn to install the heater temperature sensor (CJ2 vehicles only).
Connect the remaining electrical connectors.

Set the forward edge of the insulator onto the shelf of the dash mat.
Important
Correct installation is necessary for the correct heater air distribution.
Align the insulator to the floor duct at the heating, ventilation and air conditioning module.
Align the snap tab fasteners to the lower instrument panel and push upward to engage.
Notice
Use the correct fastener in the correct location. Replacement fasteners must be the correct part number for that application. Fasteners requiring replacement or fasteners requiring the use of thread locking compound or sealant are identified in the service procedure. Do not use paints, lubricants, or corrosion inhibitors on fasteners or fastener joint surfaces unless specified. These coatings affect fastener torque and joint clamping force and may damage the fastener. Use the correct tightening sequence and specifications when installing fasteners in order to avoid damage to parts and systems.
Install the fasteners into the lower instrument panel. Tighten
Tighten the fasteners to 2 N·m (18 lb in).

Rear fuse block is located under the rear seat.
Install the SIR fuse to the rear fuse block.
Staying well away from all air bags, turn the ignition switch to the ON position.
The AIR BAG warning lamp will flash 7 times.
The AIR BAG warning lamp will then turn OFF.
#5
Senior Member
Posts like a Corvette
Join Date: Nov 2005
Location: Hamilton, Ontario , Canada
Posts: 1,201
Likes: 0
Received 0 Likes
on
0 Posts

I didnt do half of that, I never took anything out of insulator panel.
Took out SIR fuse,
Took out seat bolts and moved seat up, disconnect battery ,undid connectors under seat
Took seat out.
Hope its ok .Thanks Haro, appreciate it
Now I need front part of console , if you got it .Thanks
Took out SIR fuse,
Took out seat bolts and moved seat up, disconnect battery ,undid connectors under seat
Took seat out.
Hope its ok .Thanks Haro, appreciate it
Now I need front part of console , if you got it .Thanks
#7
Senior Member
True Car Nut
Join Date: Oct 2002
Location: Groton, CT _NEBF 05, 06, 07_
Posts: 2,703
Likes: 0
Received 0 Likes
on
0 Posts

Originally Posted by jdq
I didnt do half of that, I never took anything out of insulator panel.
Took out SIR fuse,
Took out seat bolts and moved seat up, disconnect battery ,undid connectors under seat
Took seat out.
Hope its ok .Thanks Haro, appreciate it
Now I need front part of console , if you got it .Thanks
Took out SIR fuse,
Took out seat bolts and moved seat up, disconnect battery ,undid connectors under seat
Took seat out.
Hope its ok .Thanks Haro, appreciate it
Now I need front part of console , if you got it .Thanks
#8
Senior Member
Certified Car Nut
Join Date: Oct 2003
Posts: 19,756
Likes: 0
Received 0 Likes
on
0 Posts

Originally Posted by markwb
Agreed, if you remove the SIR fuse, no need to go through all those other iterations. Additionally, if you disconnect the battery then there is really no need to remove the SIR fuse. Still a good write up & grahphic.
IIRC the SIR system still may deploy even without battery voltage....the system can still go off even with the fuse pulled....I would NOT doing anything but what the FSM says....the Airbag system is not something to fool around with
#10
Senior Member
Posts like a Corvette
Join Date: Nov 2005
Location: Hamilton, Ontario , Canada
Posts: 1,201
Likes: 0
Received 0 Likes
on
0 Posts

I agree I just didnt know, I didnt see your thread till after I removed them I guess Im lucky I didnt get bagged in the head. 

