Power Mirror Replacement instructions? 07 GP GT
 06-09-2011, 08:46 AM
#1
Member
Posts like a V-Tak
Thread Starter

Join Date: Apr 2011
Location: Orland Park, IL
Posts: 47
Likes: 0
Received 0 Likes
on
0 Posts

Does anybody have any kind of tutorial on how to replace the passenger side power mirror motor on an 07 GP GT? I ordered the part from RockAuto and was thinking they probably wouldn't include instructions.
Thanks for your help.
Thanks for your help.

 06-09-2011, 10:32 AM
#3
Member
Posts like a V-Tak
Thread Starter
Join Date: Apr 2011
Location: Orland Park, IL
Posts: 47
Likes: 0
Received 0 Likes
on
0 Posts
Actually the motor itself, The part that holds the glass to the motor has been broken and now the mirror just kinda flops around fairly loosely.
06-09-2011, 12:30 PM
#4
Senior Member

True Car Nut
I'm sorry. I re-read your post and you want to change the motor. I don't know if there is a write up, but this is a simple repair.
If what you are replacing includes the wire harness, you have to remove the mirror housing from the vehicle. If the wire harness is not part of what you are replacing, you can skip the first 3 steps and do the repair on the car.
To remove the mirror assembly from the car: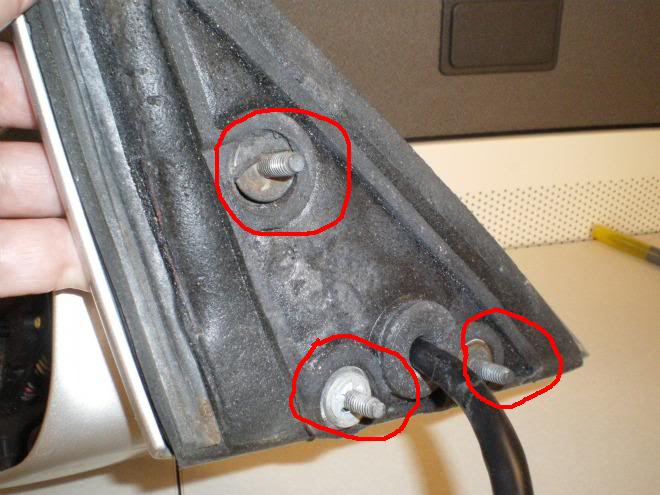
The rest is done on car or off.
1. tilt the mirror so the outboard edge is pointed rearward, and the inboard edge is pointing forward. In other words, if you were sitting in the car looking at the mirror, tip it all the way so you are looking at your car, not the grass next to the car.
2. Grab the outboard edge of the mirror glass and pull rearwards until it dis-engages from the housing. It just snaps in and out. Takes a fair amount of effort. Almost the the point where you think you will break it.
3. If applicable, remove the two wires between the mirror and the housing from the connectors on the mirror. This is only if you have heated mirrors.
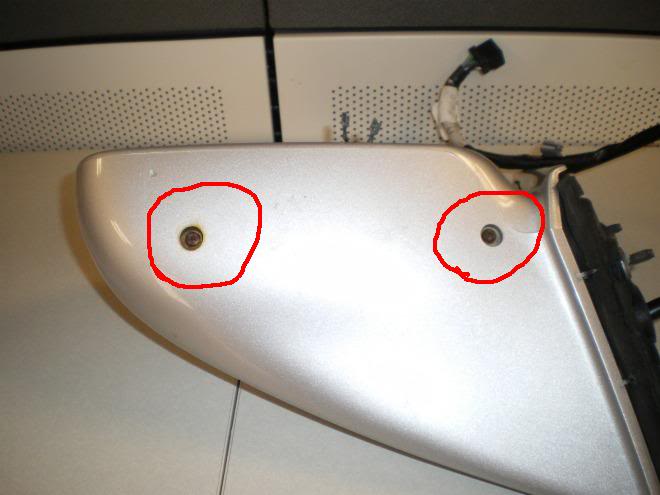
4. There should be 2 screws on the bottom outside of the mirror housing. Remove those screws.
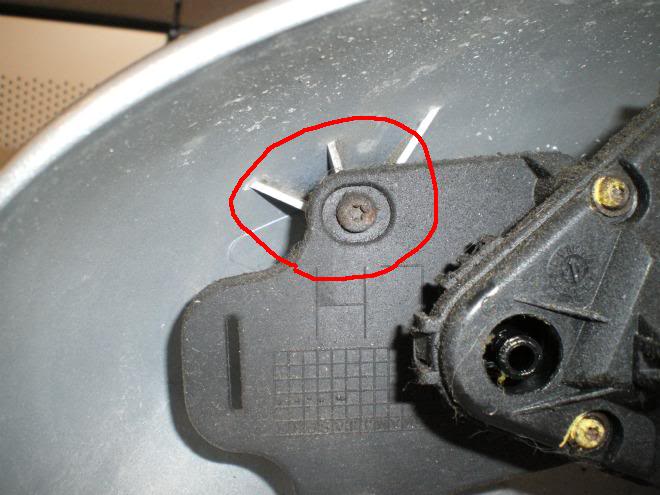
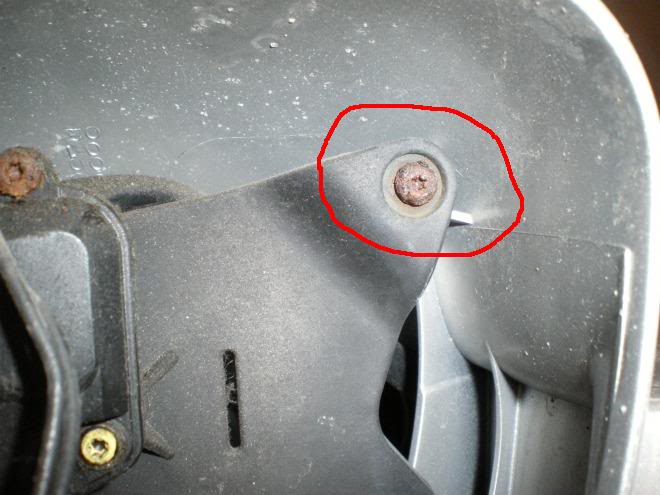
5. Inside the mirror housing, remove the 2 screws holding the motor mechanism, one in each top corner.
Replace the entire mechanism, or dissassemble and replace the pieces you bought if it is not the whole mechanism.
Reverse the process to put it all back together.
When you put is all back togther, the tricky part is lining the glass up to the housing and snapping it back in place.
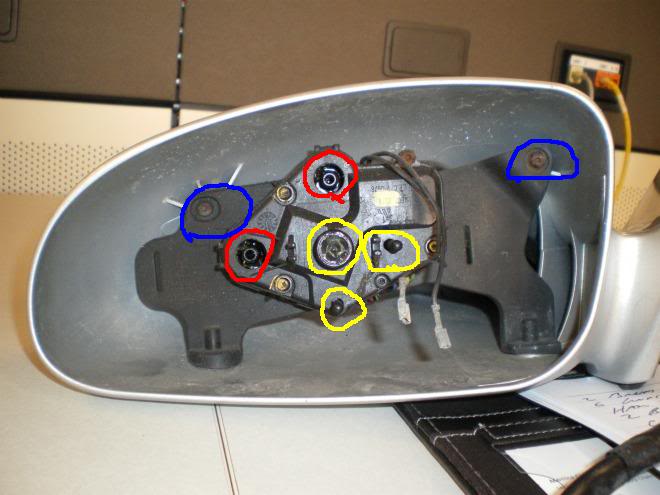
In the next picture, the red circles show where the jack screws go. If, when you took it apart, the jack screws stayed with the housing, pull them off and snap them on to the glass. Line the jack screws on the glass up to their sockets on the motor assembly (red circles) first. As you start to push the mirror on, make sure the features circled in yellow line up, partularly the large socket in the middle. Once everything is lined up, you need to smack the mirror glass with the palm of your hand to snap everything home. Line your palm strike up with the large socket in the middle (top left yellow circle). Gentle taps aren't going to do it. You have to hit it to the point where you almost think it will break if you hit it any harder.
If what you are replacing includes the wire harness, you have to remove the mirror housing from the vehicle. If the wire harness is not part of what you are replacing, you can skip the first 3 steps and do the repair on the car.
To remove the mirror assembly from the car:
- remove the door trim panel, and the sail panel (small triangular plastic piece immediately behind the mirror)
- Follow the wire from the mirror, find and disconnect the connector
- remove 3 10mm nuts securing the mirror housing to the door (picture shows the 3 bolts)
The rest is done on car or off.
1. tilt the mirror so the outboard edge is pointed rearward, and the inboard edge is pointing forward. In other words, if you were sitting in the car looking at the mirror, tip it all the way so you are looking at your car, not the grass next to the car.
2. Grab the outboard edge of the mirror glass and pull rearwards until it dis-engages from the housing. It just snaps in and out. Takes a fair amount of effort. Almost the the point where you think you will break it.
3. If applicable, remove the two wires between the mirror and the housing from the connectors on the mirror. This is only if you have heated mirrors.
4. There should be 2 screws on the bottom outside of the mirror housing. Remove those screws.
5. Inside the mirror housing, remove the 2 screws holding the motor mechanism, one in each top corner.
Replace the entire mechanism, or dissassemble and replace the pieces you bought if it is not the whole mechanism.
Reverse the process to put it all back together.
When you put is all back togther, the tricky part is lining the glass up to the housing and snapping it back in place.
In the next picture, the red circles show where the jack screws go. If, when you took it apart, the jack screws stayed with the housing, pull them off and snap them on to the glass. Line the jack screws on the glass up to their sockets on the motor assembly (red circles) first. As you start to push the mirror on, make sure the features circled in yellow line up, partularly the large socket in the middle. Once everything is lined up, you need to smack the mirror glass with the palm of your hand to snap everything home. Line your palm strike up with the large socket in the middle (top left yellow circle). Gentle taps aren't going to do it. You have to hit it to the point where you almost think it will break if you hit it any harder.
06-09-2011, 02:26 PM
#5
Senior Member
True Car Nut
By the way, the pictures I took are of a Bonneville mirror housing, which I believe is similar in construction to yours. I have a GP mirror housing at home and will take a look at it tonight to see if there are any significant differences.
06-09-2011, 10:15 PM
#6
Member
Posts like a V-Tak
Thread Starter
Join Date: Apr 2011
Location: Orland Park, IL
Posts: 47
Likes: 0
Received 0 Likes
on
0 Posts
Cool writeup!
It should be similar I would think, This isn't for me btw, it is for one of my friends...
Anyway, Thanks for your help I'm looking forward to a rockauto box showing up...
It should be similar I would think, This isn't for me btw, it is for one of my friends...
Anyway, Thanks for your help I'm looking forward to a rockauto box showing up...

Thread
Thread Starter
Forum
Replies
Last Post
options13
Everything Electrical & Electronic
11
08-13-2006 01:42 PM