Series 1 Intercooler. working well, VIDS on page 11.
 02-15-2008, 12:35 AM
#91
Junior Member
Posts like a Ricer Type-R
Thread Starter

Many updates here:
http://www.bonnevilleclub.com/forum/...ic.php?t=93422
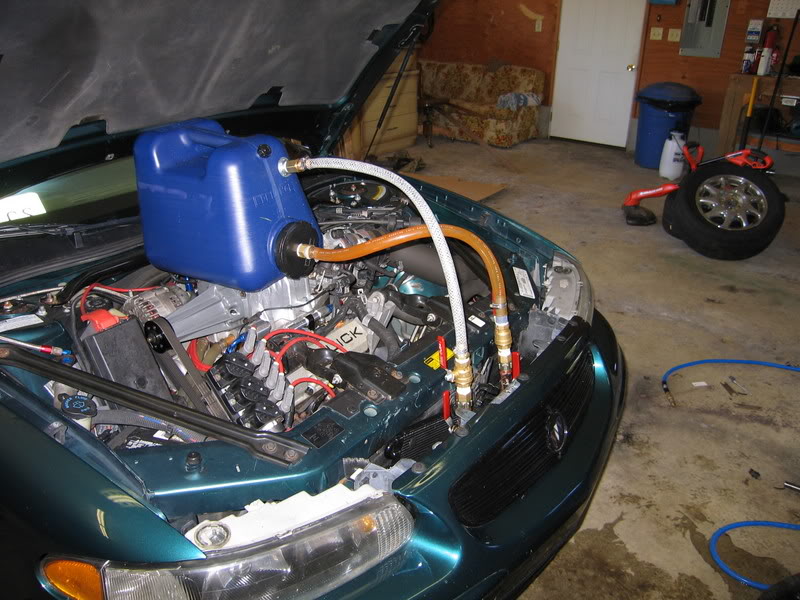
Intercooler is leak-free, and the top of the motor is ready to go back on.
http://www.bonnevilleclub.com/forum/...ic.php?t=93422
Intercooler is leak-free, and the top of the motor is ready to go back on.
 02-16-2008, 11:54 AM
#92
Junior Member
Posts like a Ricer Type-R
Thread Starter
Today I'll be working on plumbing and wiring, and my gauge is due today as well. I have to plumb the radiator, inside core, reservior/burp valve, flow switch (for safety) and pump together, wire in and install the gauge, pump wiring harness, switch, and then find good mounting locations for all of it.
Some interesting reading for those that are interested in the meantime:
In my first test, with low radiator fan speed and about 50% flow, I raised ambient temps to 180 in the LIM from 68 in the house. That'* an increase of simulated boost charge temp of 112 degrees over ambient. I lowered the temp to 105 degrees, which is 37 degrees above ambient. That'* an efficiency of only 33%, but we have to remember my goal was enough to get me back down to my smallest pulley (2.0") from the 2.3" and 2.2" that I ran last year. Getting the flow back to effieciency (fully filled with no air pockets, and the fact that I removed the restrictive IC core fittings and more than doubled the flow through there), I don't expect to double that 33%, but it should improve. I'm hoping for 50% at this point. That would remove half the heat the supercharger creates while making boost.
I'm still undecided as to what to fill it with, but if I do any testing in the near future, I'll have to add antifreeze, as we are still seeing some freezing temperatures here. I expect to be running distilled water with water-wetter later, and perhaps a small amount of food coloring to be able to better see filled lines and air pockets if they exist. I may still need some antifreeze in the long-term simply for pump lubrication and lifetime. I'm still investigating that. I'm using distilled water to prevent problems with minerals and contaminants in the water. I don't want them building up in the system. If I use antifreeze, I'll use the Prestone mixes with any type so that if I have a leak, I know it'* not my green glycol coolant in the motor.
Should be a fun day today.
Some interesting reading for those that are interested in the meantime:
Typically, a liquid-to-air intercooler achieves higher efficiencies than an air-to-air intercooler, starting at 75% efficiency and reaching peaks of 95% efficiency. Another advantage is the optional use of ice as a coolant, which is the only way to reduce the charge-air temperature below the ambient air temperature.
The efficiency is defined as the ratio of the temperature removed from the air charge by the intercooler relative to how much temperature is put into the charge by the turbo/supercharger.
For example: If the turbo/supercharger puts 150 degrees F into the charge when compressing the air, and the intercooler removes 110 of those degrees, then the efficiency is:
Eff = 110 / 150 = .733, or 73.3%
For example: If the turbo/supercharger puts 150 degrees F into the charge when compressing the air, and the intercooler removes 110 of those degrees, then the efficiency is:
Eff = 110 / 150 = .733, or 73.3%
I'm still undecided as to what to fill it with, but if I do any testing in the near future, I'll have to add antifreeze, as we are still seeing some freezing temperatures here. I expect to be running distilled water with water-wetter later, and perhaps a small amount of food coloring to be able to better see filled lines and air pockets if they exist. I may still need some antifreeze in the long-term simply for pump lubrication and lifetime. I'm still investigating that. I'm using distilled water to prevent problems with minerals and contaminants in the water. I don't want them building up in the system. If I use antifreeze, I'll use the Prestone mixes with any type so that if I have a leak, I know it'* not my green glycol coolant in the motor.
Should be a fun day today.
02-16-2008, 12:28 PM
#93
Senior Member
True Car Nut

Join Date: Aug 2004
Location: In your garage, swipin' da lug nutz
Posts: 3,067
Likes: 0
Received 1 Like
on
1 Post

What do the Ford Lightnings use for intercooler fluid? I want to say they used the green coolant as well, but I can't remember...I never did any work on them when I worked at a Ford dealership many moons ago 
Though...they WERE fun to drive
Though...they WERE fun to drive
02-16-2008, 02:52 PM
#94
Senior Member
Posts like a Northstar

Join Date: Jul 2006
Location: Meridian, ID
Posts: 508
Likes: 0
Received 0 Likes
on
0 Posts
I have been testing with Prestone because it has been below freezing temps over here. Working on an ice box to help with summer cooling.
02-16-2008, 09:32 PM
#97
Senior Member
Posts like a Northstar
Join Date: Jul 2006
Location: Meridian, ID
Posts: 508
Likes: 0
Received 0 Likes
on
0 Posts
Originally Posted by willwren
I'll build a slushbox, not an icebox. I believe I'll still have room for it behind the headlight after everything else.
On another note with cooling in mind WildGS worked up a fluid exchanger last year that cycled the water through an ice bottle between runs and worked pretty well. Here is a pic
 02-16-2008, 09:43 PM
#98
Junior Member
Posts like a Ricer Type-R
Thread Starter
For the other guys, an icebox just dumps the water in from the top, it filters down mixing with the ice, and continues out the bottom through the system.
A slushbox (at least my definition which I'm going with possibly) is a canister with a coil of copper or aluminum tubing in it. The intercooler water circulates through the coil, surround by the ice. No ice mixes with the water that way. I'm running distilled water to keep the minerals out.
Still plumbing it, but almost done. Wiring will probably be tomorrow. Unless I stay up late.
Got my gauge and sender too, so I have some fabrication to do on that also. Pics will be up with the day'* progress a bit later.
02-16-2008, 10:35 PM
#99
Junior Member
Posts like a Ricer Type-R
Thread Starter
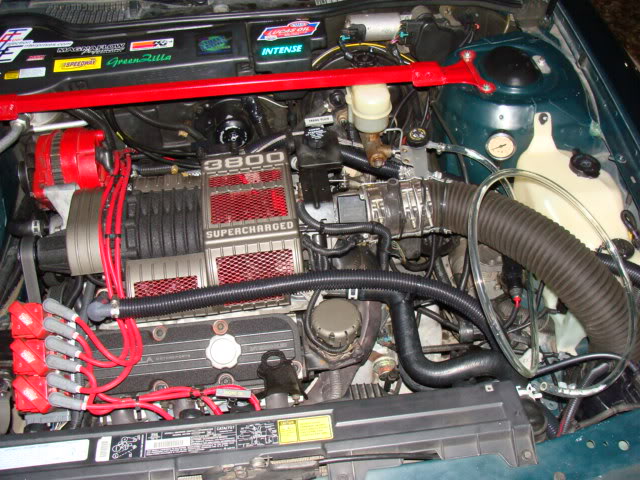
Plumbing so far is pretty well hidden:
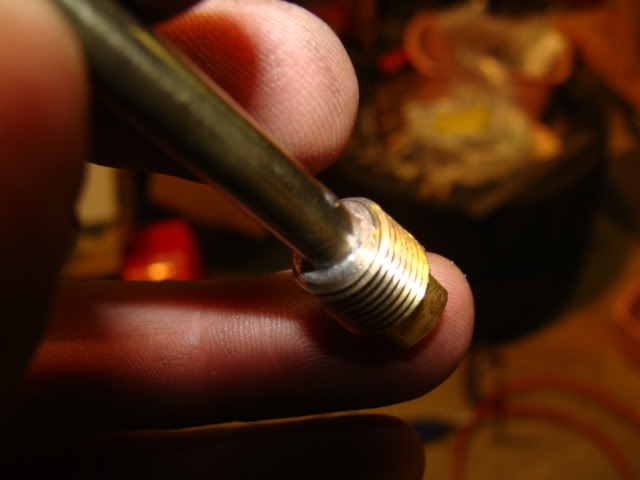
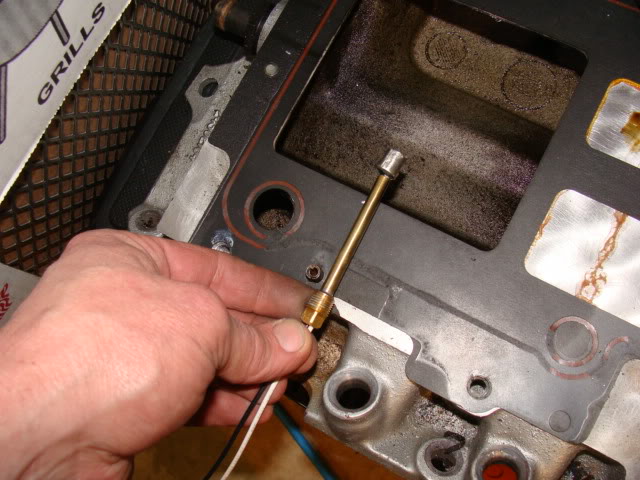
Now onto the temp gauge and sender to determine how well it'* working, and if I have problems. Gotta turn this into a probe that can be inserted into the 1/8" NPT hole I've already drilled and tapped (and temporarily plugged) in the LIM:

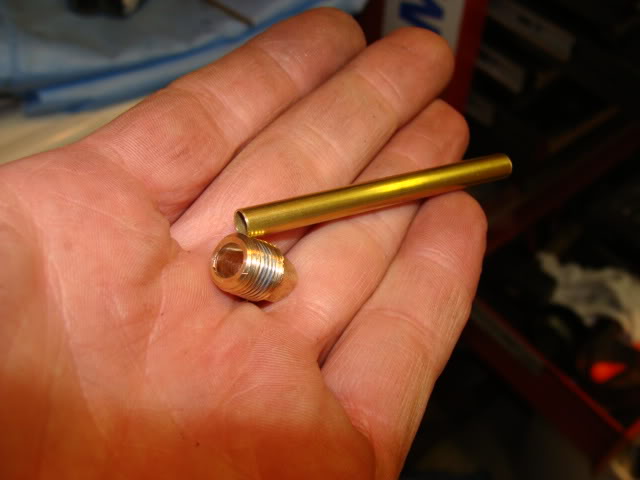
Remember the plug I already drilled out (in the Meet topic in Your Ride)? Here it is. I drilled out the inside pocket to slightly larger than the 7/32" outside diameter of the brass tubing:
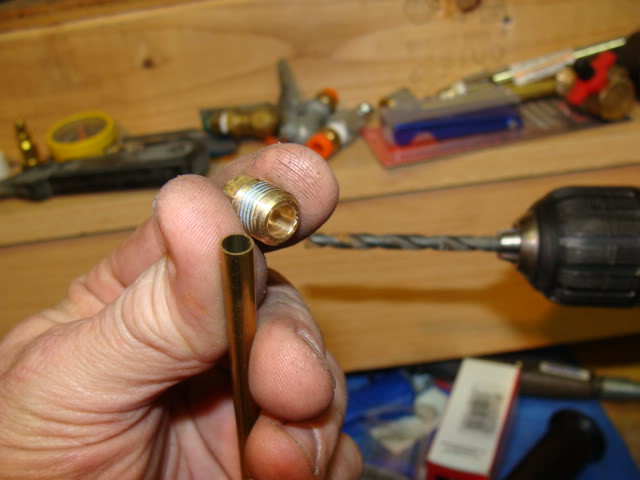
Then drilled the hole through the square end the same as the inside diameter of the brass tubing:
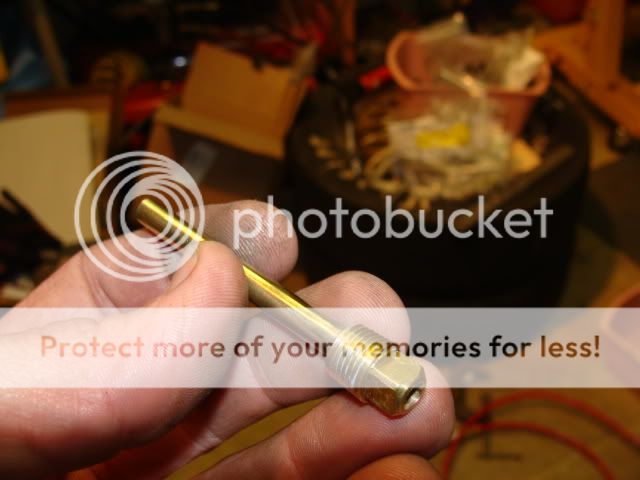
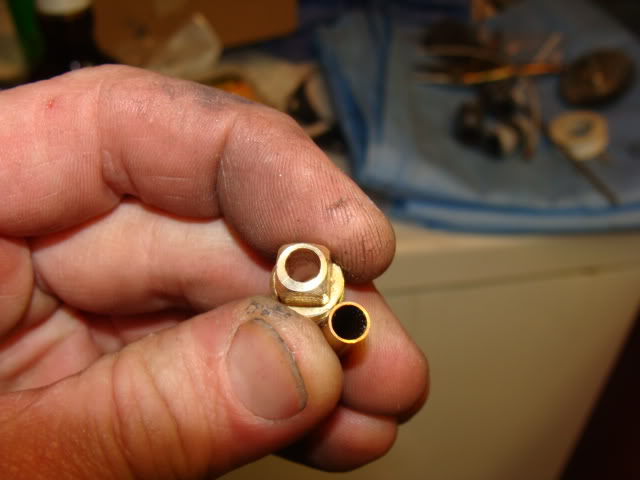
Then soldered the two together, and insert the temp probe:
The wires will be sealed into the tube the entire length of the probe.
They'll go to this:
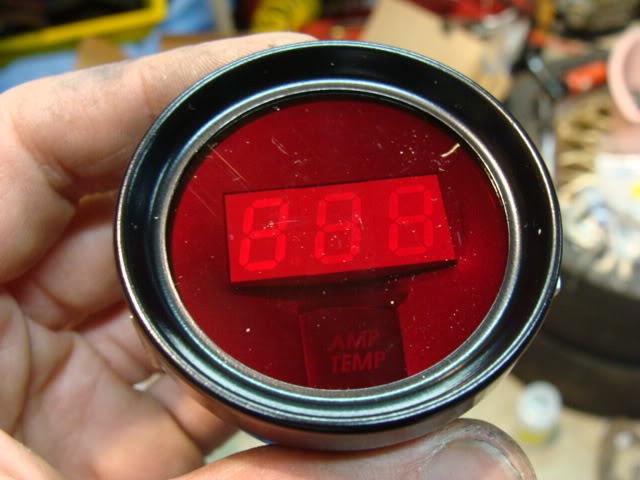
It will replace my voltmeter above the trans temp gauge on my A-Pillar, and the voltmeter will go to the center console for periodic checks if needed (front radar detector warns me of low voltage).
Specs:
RED Amplifier Temperature Gauge
Part # A223E061Y-Black Bezel w/memory
Gauge requires 2 1/16� hole for mounting with back clamp provided. Gauge includes required
Cyberdyne sender. Features include �Lo� and �Hi� scrolling warning and user adjustable �flashing� warning. Range is 40-212 F.
Available with �Lo� and �Hi� memory recall. Order using part numbers listed above.
A perfect candidate. The highest post-rotor temps recorded on the silverbullet is 180 degrees. This will tell me how well the intercooler works, and be an indication to me later if something goes wrong with it (pump failure, leak, etc).
Now onto the temp gauge and sender to determine how well it'* working, and if I have problems. Gotta turn this into a probe that can be inserted into the 1/8" NPT hole I've already drilled and tapped (and temporarily plugged) in the LIM:
Remember the plug I already drilled out (in the Meet topic in Your Ride)? Here it is. I drilled out the inside pocket to slightly larger than the 7/32" outside diameter of the brass tubing:
Then drilled the hole through the square end the same as the inside diameter of the brass tubing:
Then soldered the two together, and insert the temp probe:
The wires will be sealed into the tube the entire length of the probe.
They'll go to this:
It will replace my voltmeter above the trans temp gauge on my A-Pillar, and the voltmeter will go to the center console for periodic checks if needed (front radar detector warns me of low voltage).
Specs:
RED Amplifier Temperature Gauge
Part # A223E061Y-Black Bezel w/memory
Gauge requires 2 1/16� hole for mounting with back clamp provided. Gauge includes required
Cyberdyne sender. Features include �Lo� and �Hi� scrolling warning and user adjustable �flashing� warning. Range is 40-212 F.
Available with �Lo� and �Hi� memory recall. Order using part numbers listed above.
A perfect candidate. The highest post-rotor temps recorded on the silverbullet is 180 degrees. This will tell me how well the intercooler works, and be an indication to me later if something goes wrong with it (pump failure, leak, etc).
02-17-2008, 12:13 AM
#100
Junior Member

Join Date: Jun 2002
Posts: 0
Likes: 0
Received 0 Likes
on
0 Posts
I hope that temp probe will be fast enough to react to the very quick changes in temp. I'm talking about a rate of rise of 50 deg per second or more.
The probe on my Autometer is very thin in comparison.
You are very innovative Bill. No doubt about that.
The probe on my Autometer is very thin in comparison.
You are very innovative Bill. No doubt about that.