Bullet's 2007 Winter Projects
 12-26-2007, 01:07 PM
#121
Senior Member
Certified GM nut

Join Date: Oct 2006
Location: burb of detroit. 2 miles north of 8 mile Rd.
Posts: 2,028
Likes: 0
Received 1 Like
on
1 Post

Originally Posted by 2000SilverBullet
 You know, I'm going to be patient and enjoy the next couple of days, stalled at this point, until the GM Dealer is open, to enquire about borrowing a socket.......if one even exists :? ......and then if not, out comes the big hammer.
*edit- heres a pic i found in a quick google
http://www.corvettemagazine.com/2005...sending/05.jpg
 12-26-2007, 01:24 PM
#122
Junior Member
Thread Starter

Join Date: Jun 2002
Posts: 0
Likes: 0
Received 0 Likes
on
0 Posts
Thanks Sam.
But that pic the tool is so small compared to the size of one I would require. My ring is about twice that diameter and I would need a powerbar to crank it off.
There is a GM specific 1/2" drive socket Part J39765 in the Service Manual fuel pump installation guide.
But that pic the tool is so small compared to the size of one I would require. My ring is about twice that diameter and I would need a powerbar to crank it off.
There is a GM specific 1/2" drive socket Part J39765 in the Service Manual fuel pump installation guide.
 12-28-2007, 12:29 AM
#125
Senior Member
Posts like a Northstar

Join Date: Jul 2006
Location: Meridian, ID
Posts: 508
Likes: 0
Received 0 Likes
on
0 Posts
Originally Posted by 2000SilverBullet
Lubing was the first thing I did. 
I wacked it a few more times and it didn't budge. :?
I wacked it a few more times and it didn't budge. :?
12-28-2007, 02:58 PM
#126
Junior Member
Thread Starter
Join Date: Jun 2002
Posts: 0
Likes: 0
Received 0 Likes
on
0 Posts
Thanks Jared. The trick of bending the tabs worked. 
But that wasn't before a night of contemplation.
One of three piles after BuckWheat'* Boxing Day Bash.
I'm still picking them out of the shrubbery.

And BulletMom contemplated over some red stuff under the watchful eyes of our cat Neo.
The 'kit' has been very busy Bill.

The screwdriver worked best and it didn't even spark.....doh.
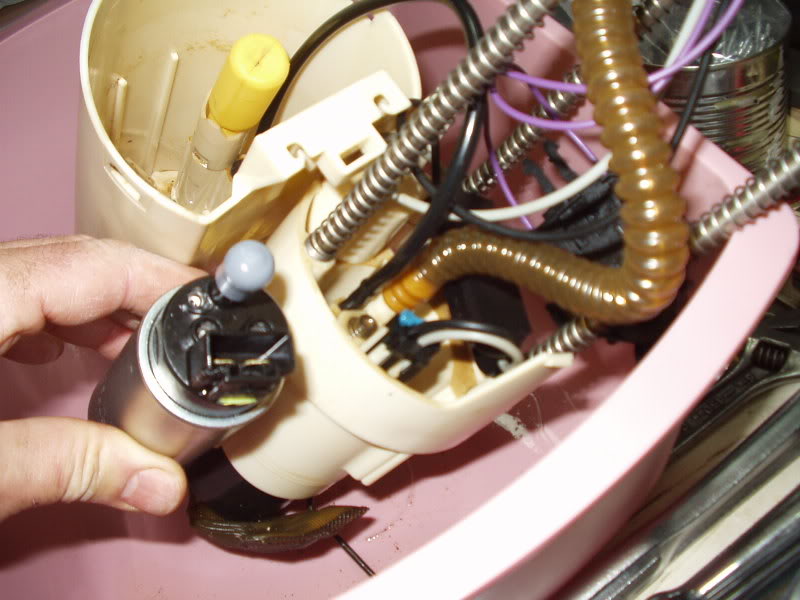
Here'* the complete assembly. The pump is inside with its own strainer bag.
The container stays full of fuel regardless of the amount of fuel in the tank.
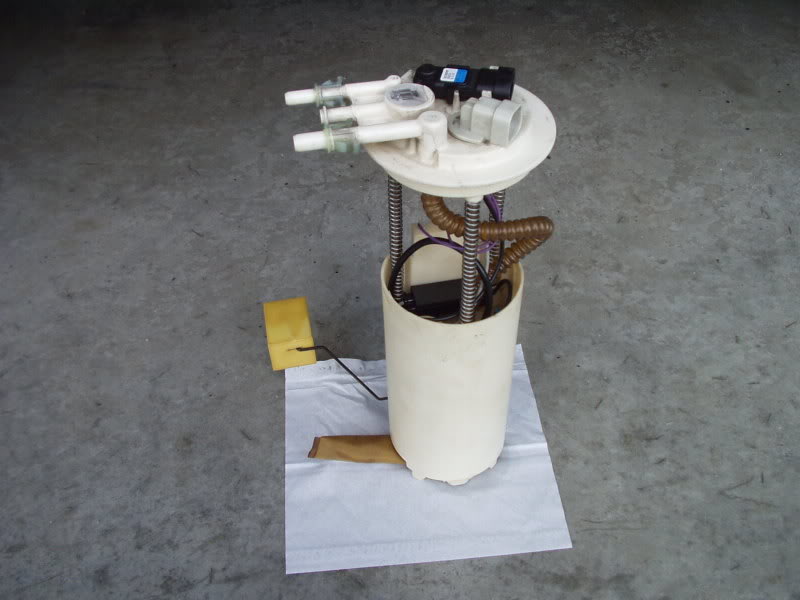
Here you can see the rheostat for the level sensor and float.
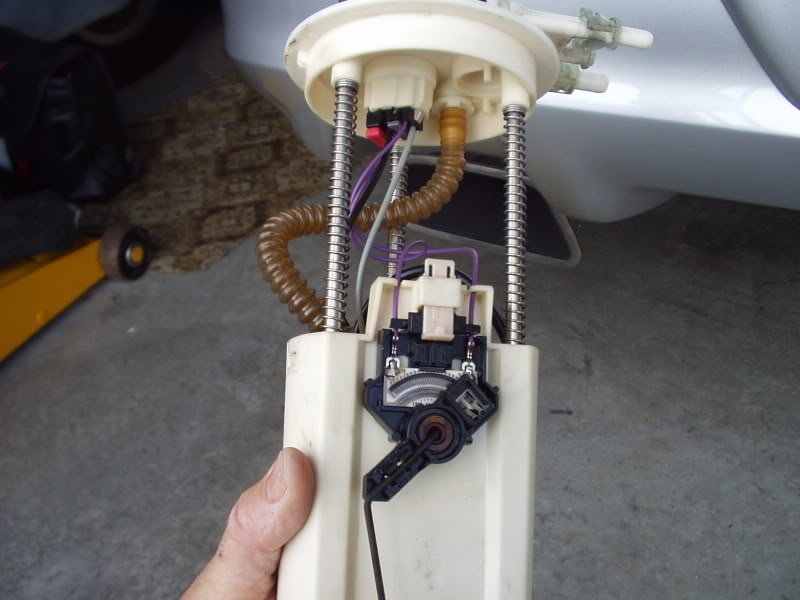
Disconnect this and pull out the pump. The three spring posts ensure the can sits on the bottom. You can see the bottom 3 rubber pads where is sits on the tank bottom, the inlet check valve and the suction sock strainer.
Now think carefully about how this system works and understand my dilema.
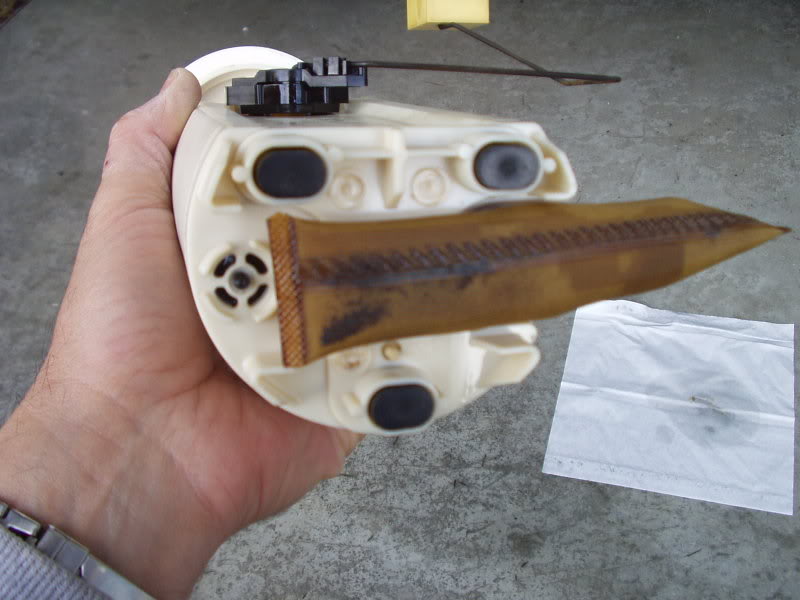
Here you can see inside the cannister with the pump assembly pulled out. Notice the small black tube that goes from the fuel pump to the cannister.
Notice the new Walbro unit does not have a connection for the small black tube. There is a little plastic mini bottle that acts as a float check valve next to it.
I have been told that this is the suction line that induces the fuel flow into the cannister thru the filter sock.
So now I'm hesitant to install the new pump after all this. :?
Need some feed back fast before all the fuel in my tank evaporates.
But that wasn't before a night of contemplation.
One of three piles after BuckWheat'* Boxing Day Bash.
I'm still picking them out of the shrubbery.
And BulletMom contemplated over some red stuff under the watchful eyes of our cat Neo.
The 'kit' has been very busy Bill.
The screwdriver worked best and it didn't even spark.....doh.
Here'* the complete assembly. The pump is inside with its own strainer bag.
The container stays full of fuel regardless of the amount of fuel in the tank.
Here you can see the rheostat for the level sensor and float.
Disconnect this and pull out the pump. The three spring posts ensure the can sits on the bottom. You can see the bottom 3 rubber pads where is sits on the tank bottom, the inlet check valve and the suction sock strainer.
Now think carefully about how this system works and understand my dilema.
Here you can see inside the cannister with the pump assembly pulled out. Notice the small black tube that goes from the fuel pump to the cannister.
Notice the new Walbro unit does not have a connection for the small black tube. There is a little plastic mini bottle that acts as a float check valve next to it.
I have been told that this is the suction line that induces the fuel flow into the cannister thru the filter sock.
So now I'm hesitant to install the new pump after all this. :?
Need some feed back fast before all the fuel in my tank evaporates.
12-28-2007, 03:47 PM
#127
Junior Member
Thread Starter
Join Date: Jun 2002
Posts: 0
Likes: 0
Received 0 Likes
on
0 Posts
R&D on the Walbro fuel pump by Dig Ken
The Walbro will not suck your tank dry.
How bad is the problem?:
Some people never �experience� a problem with the Walbro. This is because of a couple reasons.
#1 They never run their tank down below 3-4 Gallons.
#2 They dont race their cars at the track.
#3 They dont realize they have a problem.
#1 The Walbro fuel pump as it is being installed sits up inside the fuel pump module with the suction a few inches from the floor of the tank. There are no previsions for the Walbro to suck gas from the sock thats on the bottom of the assembly. As long as the level of the tank is a bit above the suction level of the walbro you will not run out of gas. However your 15 gallon tank has been reduced to an 11-12 gallon tank. Its possible to be stranded on the highway with 80 miles worth of gas in your tank. Some people will say that it doesnt matter because they always run with atleast 4 gallons anyway.. Well now if they want to maintain that same safety margin they have to fill up at 1/2 a tank to maintain their statement true.
#2 This problem is exaserbated at the track. First off its horrible trying to be weight concious when you are being forced to lug around another 20-30 lbs of gas that you cant even use. Worse than that if there is 3-4 gallons that you CANNOT pump out and you put in race gas, how effective is that mix? 1 Gallon of 104 and 4 gallons of 93 is going to net you 95.2 octane.. Yippy skippy. This leads into #3
#3 If you dont realize that this is occuring, everytime you go to the track and put in race gas you are shorting yourself to a huge degree and dont even realize it. 1 point of octane is significant. 9 points of octane is VERY significant. Even if you are content to race with 5 gallons of gas, the only way you are going to get 104 octane into the engine at the track is:
A. Running the car for a long time adding only race gas.
B. Draining the tank by some external means.
Why does the problem exist?
Our competitor did not do their homework on integrating the Walbro fuel pump into the factory assembly. For years customers have complained and our competitor has told them that they installed their pump incorrectly and must follow their instructions on their website. However their instructions DO NOT make any provisions to solve this problem. In fact there are gross conceptual errors in their instructions. Customers have been brushed off time and time again. Shouldnt a company promoting a product as an upgrade understand how the system works? I had brought this issue up with Scott personally many times in the past. They did not bother to look into why and how to fix it..
In order to understand why the Walbro doesnt suck from the tank, we must fully understand how the stock assembly works.
The Stock pump sits in the assembly housing exactly like the Walbro does, but for some reason the stock pump is capible of sucking almost every ounce of fuel out of a tank. This did not make sense to me so I looked for what is different.
Hmm.. What is that small black tube?
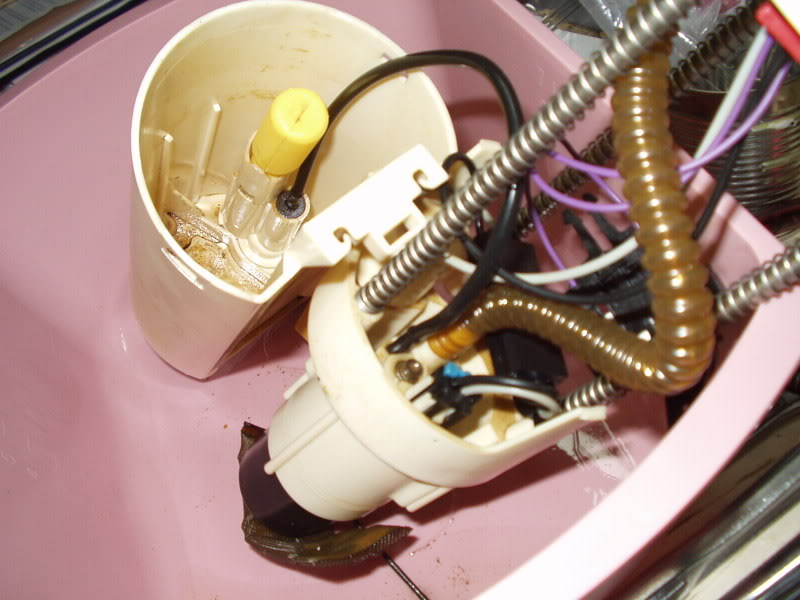
Scott told me that it was a return tube and not important for operation. Steered me down the wrong path for quite a while. But what IS that tube really? You can see it connects to a white cylinder and at the bottom of that cylinder is THE sock that dips down to the very bottom of the fuel tank. I had an assumption about what it might be so I broke that piece out of the stock assembly.
Sure enough.. Its another pump. A venturi pump to be exact. Not only is it a pump but its an entire canister level regulating system. This pump soley provides means for sucking from the bottom of the fuel tank.
Its an ingenious way of scavenging the tank as a venturi pump is not effected by sucking air or foam through it. Our rollervane electric pumps are cooled from fuel flowing through them and its very bad to suck up air because they can burn up. Plus since the pumps are positive displacement, any air that is sucked up by the stock pump can get forced through it and into the fuel lines.
A venturi type pump (also known as a jet pump, scrubber, or eductor) works by jetting a liquid or gas through a converging and diverging diffuser throat. A vacuum is created at the nozzle entrance by the motive fluid entraining the static fluid in its stream. Its a very interesting principle that I will not be going in to great detail as I could devote an entire thread to that principle alone. Theres plenty of information on the web.
Now we know that a vacuum is created in the blue areas of the diagram. The venturi pump will now suck from the bottom of the tank until the level in the canister rises to a point where the float lifts. When the float lifts, fuel will be sucked from the canister and returned to the canister primarily. This is because the float is higher up than the entrance to the fuel sock and has less restriction (no sock on the float). The whole time this is happening, the stock pump is sucking from the canister and providing fuel to the engine. As the engine consumes this fuel, the level of the canister will drop, the float will close, and the venturi will suck from the tank again.
In this regard, the stock pump suction port is maintained submerged at ALL times and the venturi is constantly scavenging the bottom of the tank to keep the canister full. In this manner a stock fuel assembly is VERY efficient at getting every last ounce of fuel out of the tank.
Without the venturi line being connected, the canister is gravity fed only and makes it very difficult for Any fuel to get into the canister unless the level of the tank is relatively high.
The venturi line MUST be connected to the high pressure outlet for proper operation.
Our competitor calls this line the �return line� and suggests you insert it into the safety pressure relief hole of the walbro pump. If you look carefully into the hole you can see the relief spring. I wonder what they think its "returning"?
Step 8: yes this is the brass fitting that the stock pump uses to provide pressure to the venturi
Step 11: SET the brass fitting into the safety pressure relief hole????? This hole only provides pressure when the pump exceeds 90PSI from being deadheaded. Even IF it did provide pressure all the time, how is �setting� it in there without sealing it going to provide ANY pressure to the venturi pump?
Step 14: Suggests using a band clamp to hold the fitting in place, once again illustrating that it is not being fastened to the system and provided pressure.
Top of a walbro fuel pump.. There is no place to connect the venturi.
The underside of the top of a stock pump. You can see that the venturi port is in the same cavity as the primary discharge and therefore at the same pressure.
I have heard of many people drilling holes into their canister. While this does allow the walbro to suck lower it still doesnt allow it to drain the tank. It also does not provide the safety margin as the pump will be sucking air as fuel is sloshing around. Intense has repeatedly told people to reinstall their fuel pump and ensure its seated deep enough. However, because of the venturi level regulating system, this depth shouldnt matter as it will maintain a HIGH level in the canister IF its connected properly!! So I can say for a fact that 100% of the walbros that are installed into Grand Prix' right now are installed incorrectly and performing poorly all the while, the vendor that promotes these pretends the problem doesnt exist.
I have given ZZP specific information on how to make the walbro function properly. They will be releasing a retrofit kit as well as a 3800 specific pump. Im sure others will be tempted to follow suit and will NOT apologize to the consumers they have mislead. They will also unashamedly use this IP that they should have gathered themselves prior to their marketing of the walbro pump.
Other interesting information. The Walbro pump flows approximately 10% more fuel than the stock fuel pump at a given supply voltage and discharge pressure. Raising the voltage of the stock pump a few volts by using a boost-a-pump or similar will make the stock pump outperform the walbro by a large margin. Installing a walbro in a stock vehicle without upgrading the fuel pump wiring will reduce the 10% greater flow because it draws more amperage and will have more voltage drop in the lines. This will effectively reduce the voltage to the walbro and thus its flow capability to levels potentially below the stock pump.
-DK
