Power window repair.
 09-16-2008, 12:35 AM
#1
Junior Member
Posts like a V-Tak
Thread Starter
Join Date: Sep 2008
Location: Phoenix, AZ
Posts: 26
Likes: 0
Received 0 Likes
on
0 Posts

Step 1- Clamp window. I used a pair of quick-clamps. You could also use masking tape. It just has to hold the weight of the window in the channel - Not too much.

Step 2- Remove Door panel. First remove the door handle cover by gently pulling outward from the "X". There is a tab tucked in on the left side that will come out once the right side is taken out. Next, each of the red marks shows where there is a plastic door clip. Carefully stick in a flat-blade screwdriver or your fingers and give a gentle tug outward at each of these points.
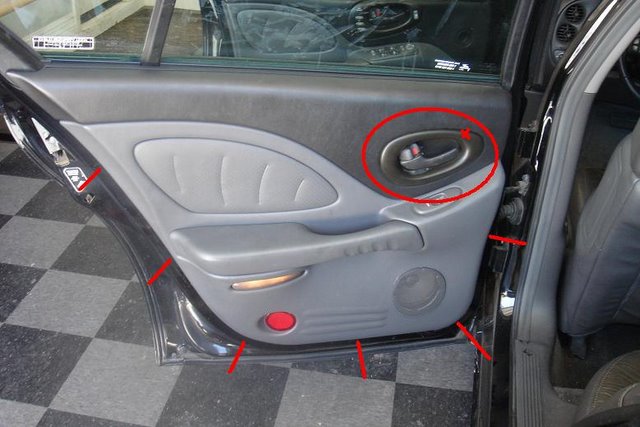
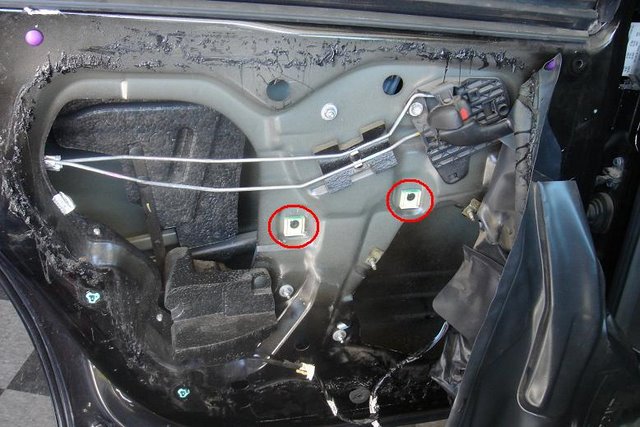
Step 3- Remove Regulator from door. The red circles are the 3 nuts that hold the regulator inside the door. The 2 blue circles are the bolts that attach to the window (be gentile with these...) Remove the 3 regulator nuts and loosen the 2 window bolts. Also remove the 2-wire harness from the window motor.

Step 4- Remove motor from Regulator assembly. 3 bolts, circled in red. Set motor aside.
FYI - If you want to test to motor apply 12v and Gnd to the pins and the motor should run. Reverse polarity to make motor reverse.

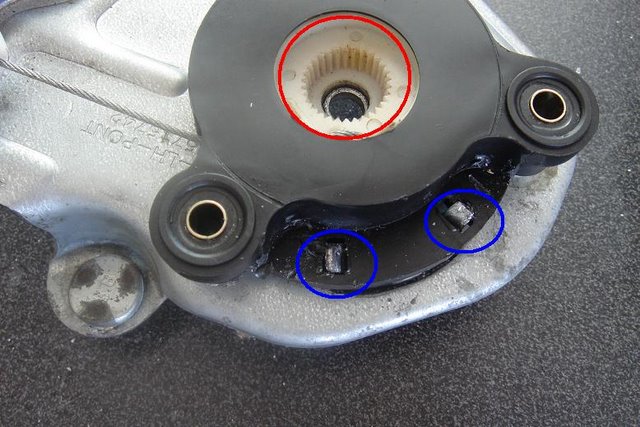
Step 5- Access pulley. This is where you probably have a garbled mess of cable...Inside this cover. Provided the cover isn't too damaged, or the pulley underneath damaged, you should be able to perform this rebuild. My pulley was pretty manged on the pass-rear door and it'* still working for over 2 years now. FIRST - put a temporary bolt/nut thru the center hole to hold the pulley in place (red circle). Then use a screwdriver or pliers to bend these tabs up (blue circles). A slight pinch on the tab on the back with a pliers will release the black cover.
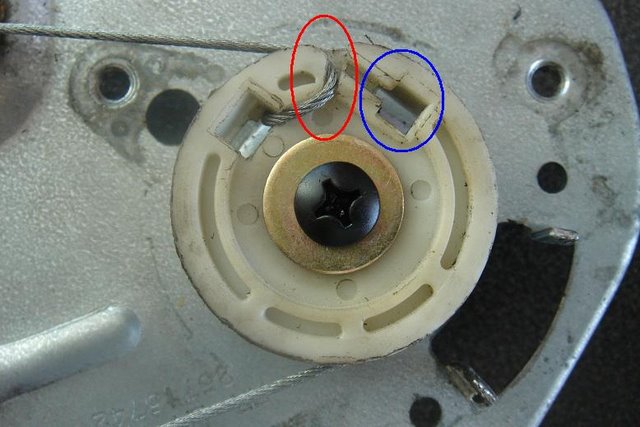
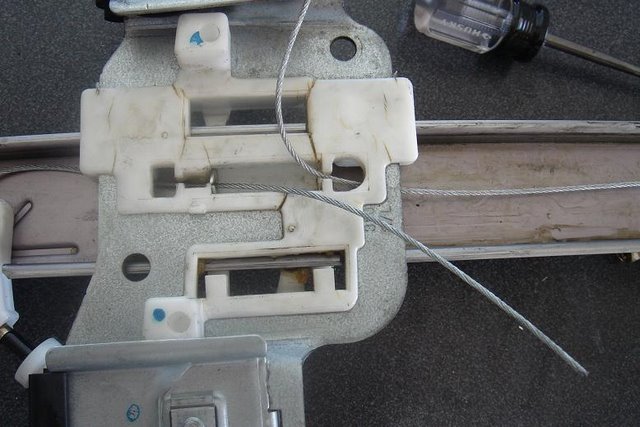
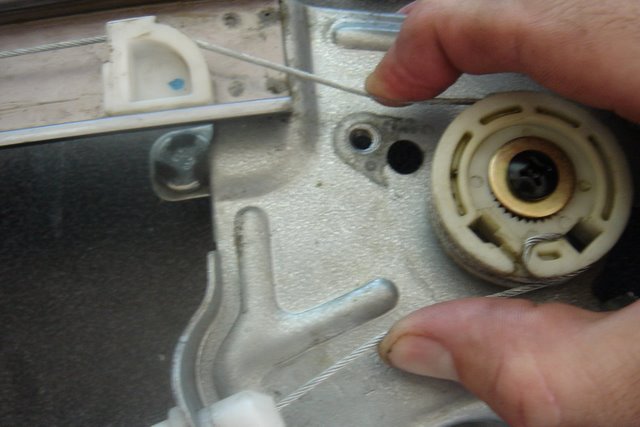
Step 6- Cut a new channel in the pulley. In the red circle you need to cut this channel. The blue circle shows where the 2nd cable used to attach. This is way too weak and can fail very easily. When you cut the channel, you can use only 1 cable, strung thru the pulley for added strength. You can see my cable bending around (use a pliers to bend the cable to a 90 degree so it doesn't rub on the black housing.)
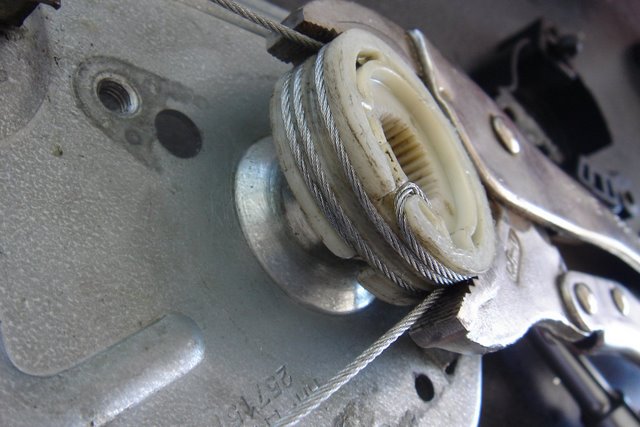
Step 7- Re-Wind the pulley with new cable. When you start to rewind the pulley, start with about 5-6 feet of cable on each side of the pulley - Wind one clockwise 1-1/2 turns, and the other counter-clockwise 1-1/2 turns. Should look like picture below...

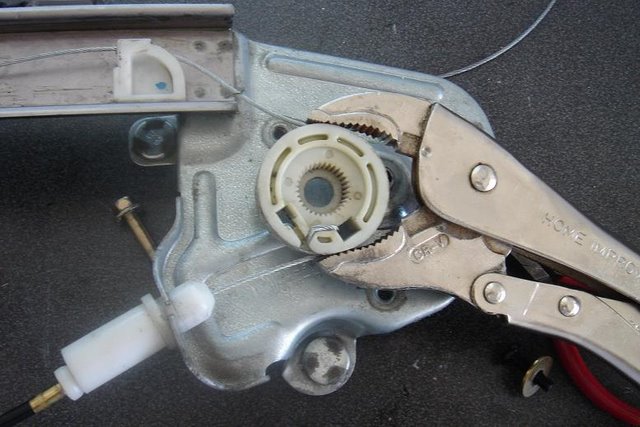
Step 8- Clamp in vise-grip (or similar tool) and temporarily bolt to regulator frame. The vise grip will hold your re-wind in place while you re-string the rest of the system.
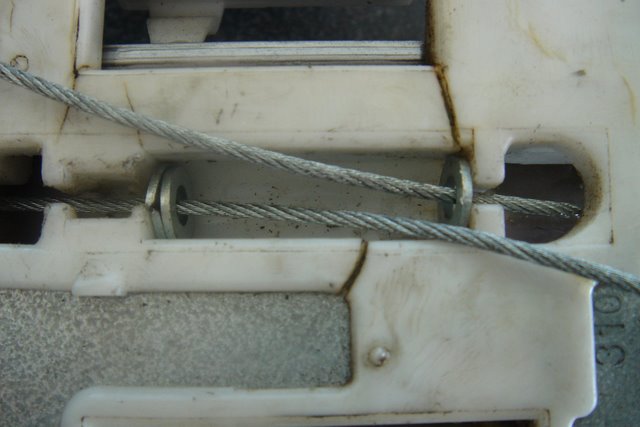
Step 9- String thru top pulley and bottom guide, into window carrier. As you can see from my pics, my carrier is dry-rotted pretty badly, so I decided to use small washers for added support to the carrier. Thread cable thru carrier.
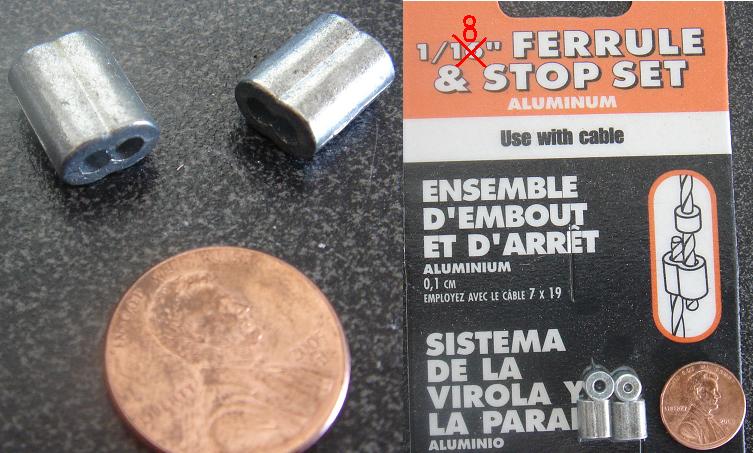
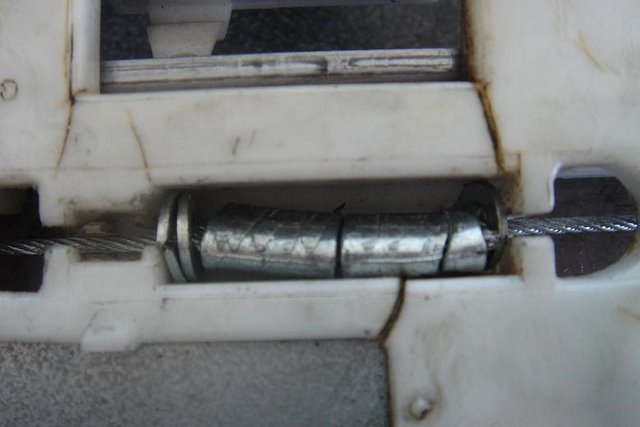
Step 10- Ready Ferrules. I bought both 1/16" and 1/8" ferrules, and found the 1/8" to work the best. They are a little bigger so the cable feeds thru easier, but more importantly they fit in the carrier better and are less likely to break-out. I use 2 of them. Or you can use one ferrule on the top side and the stock spring below it...
Step 11- Feed thru ferrules and clamp securely. I used 2 more vise-grips to secure the cables going thru the ferrules within the carrier. This way I can vary the tightness of the system. I want to have only a 1/8" to 3/16" deflection in the cables...Too little deflection and it is hard for the motor to pull against that tension...Too much deflection and when the window tops-out or bottoms-out you can get too much slack in the line. Then when the window reverses the cable can jump a track in the pulley and get all goobered up again... We don't want that again! Grab a Sharpie and mark the cables where the tension is the best (I used a bright red marker for a visual)
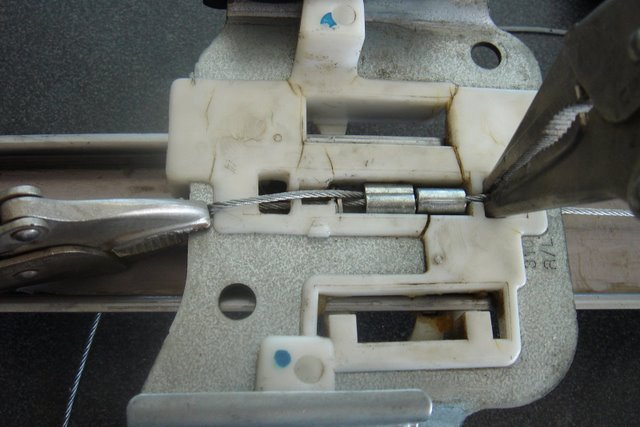
Step 12- Remove Temp bolt/nut for slack. Remove the temporary nut/bolt holding on the pulley (make sure to have a vise-grip on the pulley to hold cables in place). This should give you enough slack to pull-back the ferrules from the carrier, line-up the marks you made, and crimp the ferrules.
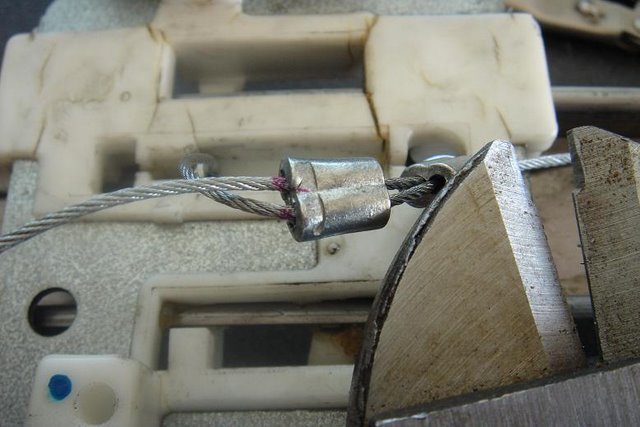
Notice the bolt cutter...I filed off an area of the tip to make it a crimper. It'* the only secure way to get a good crimp.
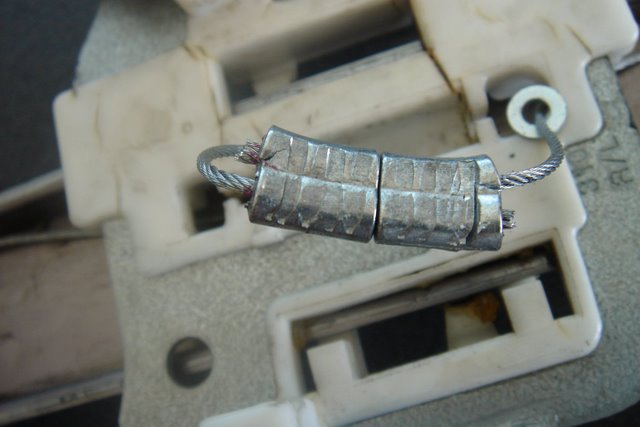
Step 13- Crimp all the way down both ferrules. Crimp each ferrule so it'* tight...But not too tight that you split the ferrule. Then trim the excess cable and seat back into carrier.
Step 14-Reassemble pulley, black cover, and motor. A quick jolt of 12v to make sure everything is working might be worth it... I cut the end off an old 12v lighter plug for testing...
NOTE: Watch very closely how the pulley turns within the cover...If it'* rubbing at all you'll have to redo it...especially where the cable wraps thru the pulley. That bend has to be pretty tight to clear the housing. Also make sure the motor assembly seats well...I had to put in a small washer between the motor and pulley to keep it from grinding the black cover from the inside.
If all is well, reassemble into the door. Make sure to run the motor up to meet the window...SLOWLY. Make sure everything is still lined up, and gently tighten the bolts that hold the window...GENTLY. I don't want to hear anyone saying they busted their window because they over-tightened the bolts. Only a slight pressure is all that'* needed as the window is mostly held in with gravity. There are small rubber gaskets holding the window and that creates a lot of friction without over-tightening. It also allows the window to shift slightly for the best operation up and down the track.
Make sure to get the large door handle to seat on these clips (circled in red). I believe once the door is assembled just vigorously shake the handle and it should seat itself in these channels.
Step 2- Remove Door panel. First remove the door handle cover by gently pulling outward from the "X". There is a tab tucked in on the left side that will come out once the right side is taken out. Next, each of the red marks shows where there is a plastic door clip. Carefully stick in a flat-blade screwdriver or your fingers and give a gentle tug outward at each of these points.
Step 3- Remove Regulator from door. The red circles are the 3 nuts that hold the regulator inside the door. The 2 blue circles are the bolts that attach to the window (be gentile with these...) Remove the 3 regulator nuts and loosen the 2 window bolts. Also remove the 2-wire harness from the window motor.
Step 4- Remove motor from Regulator assembly. 3 bolts, circled in red. Set motor aside.
FYI - If you want to test to motor apply 12v and Gnd to the pins and the motor should run. Reverse polarity to make motor reverse.
Step 5- Access pulley. This is where you probably have a garbled mess of cable...Inside this cover. Provided the cover isn't too damaged, or the pulley underneath damaged, you should be able to perform this rebuild. My pulley was pretty manged on the pass-rear door and it'* still working for over 2 years now. FIRST - put a temporary bolt/nut thru the center hole to hold the pulley in place (red circle). Then use a screwdriver or pliers to bend these tabs up (blue circles). A slight pinch on the tab on the back with a pliers will release the black cover.
Step 6- Cut a new channel in the pulley. In the red circle you need to cut this channel. The blue circle shows where the 2nd cable used to attach. This is way too weak and can fail very easily. When you cut the channel, you can use only 1 cable, strung thru the pulley for added strength. You can see my cable bending around (use a pliers to bend the cable to a 90 degree so it doesn't rub on the black housing.)
Step 7- Re-Wind the pulley with new cable. When you start to rewind the pulley, start with about 5-6 feet of cable on each side of the pulley - Wind one clockwise 1-1/2 turns, and the other counter-clockwise 1-1/2 turns. Should look like picture below...
Step 8- Clamp in vise-grip (or similar tool) and temporarily bolt to regulator frame. The vise grip will hold your re-wind in place while you re-string the rest of the system.
Step 9- String thru top pulley and bottom guide, into window carrier. As you can see from my pics, my carrier is dry-rotted pretty badly, so I decided to use small washers for added support to the carrier. Thread cable thru carrier.
Step 10- Ready Ferrules. I bought both 1/16" and 1/8" ferrules, and found the 1/8" to work the best. They are a little bigger so the cable feeds thru easier, but more importantly they fit in the carrier better and are less likely to break-out. I use 2 of them. Or you can use one ferrule on the top side and the stock spring below it...
Step 11- Feed thru ferrules and clamp securely. I used 2 more vise-grips to secure the cables going thru the ferrules within the carrier. This way I can vary the tightness of the system. I want to have only a 1/8" to 3/16" deflection in the cables...Too little deflection and it is hard for the motor to pull against that tension...Too much deflection and when the window tops-out or bottoms-out you can get too much slack in the line. Then when the window reverses the cable can jump a track in the pulley and get all goobered up again... We don't want that again! Grab a Sharpie and mark the cables where the tension is the best (I used a bright red marker for a visual)
Step 12- Remove Temp bolt/nut for slack. Remove the temporary nut/bolt holding on the pulley (make sure to have a vise-grip on the pulley to hold cables in place). This should give you enough slack to pull-back the ferrules from the carrier, line-up the marks you made, and crimp the ferrules.
Notice the bolt cutter...I filed off an area of the tip to make it a crimper. It'* the only secure way to get a good crimp.
Step 13- Crimp all the way down both ferrules. Crimp each ferrule so it'* tight...But not too tight that you split the ferrule. Then trim the excess cable and seat back into carrier.
Step 14-Reassemble pulley, black cover, and motor. A quick jolt of 12v to make sure everything is working might be worth it... I cut the end off an old 12v lighter plug for testing...
NOTE: Watch very closely how the pulley turns within the cover...If it'* rubbing at all you'll have to redo it...especially where the cable wraps thru the pulley. That bend has to be pretty tight to clear the housing. Also make sure the motor assembly seats well...I had to put in a small washer between the motor and pulley to keep it from grinding the black cover from the inside.
If all is well, reassemble into the door. Make sure to run the motor up to meet the window...SLOWLY. Make sure everything is still lined up, and gently tighten the bolts that hold the window...GENTLY. I don't want to hear anyone saying they busted their window because they over-tightened the bolts. Only a slight pressure is all that'* needed as the window is mostly held in with gravity. There are small rubber gaskets holding the window and that creates a lot of friction without over-tightening. It also allows the window to shift slightly for the best operation up and down the track.
Make sure to get the large door handle to seat on these clips (circled in red). I believe once the door is assembled just vigorously shake the handle and it should seat itself in these channels.


Thread
Thread Starter
Forum
Replies
Last Post
GunsOfNavarone
Interior
3
09-08-2014 08:33 PM