| Detailed engine oil/filter change procedure |
|
Description
|
Comprehensive step-by-step guide for the DIY crowd, including pictures
|
|
Uploader
|
willwren
|
|
Date
|
Mon Mar 26, 2007 12:05 pm
|
|
Type
|
How-to
|
|
Rating
|
No votes
|
|
Original Author
|
Archon
|
|
Applicable Models
|
All
|
|
Information Source
|
Personal Experience
|
I
braved the cold weather and decided it was time to change the oil in my
car. Even though the oil life monitor showed 57% life left, it hadn't
been done since October and was the first after the oil change from
doing the UIM/LIM gaskets. After I started, I remembered we wanted to
write up procedures for this stuff...so...if you guys wanna critique
this for the "Care & Feeding" section of techinfo, I'd appreciate
it.
One of the most important ways to see that your engine enjoys a long
life is to change the oil on a regular basis. Follow the maintenance
schedule that is listed in your owner’s manual. If you are using
synthetic oil, tests have indicated that the life of the oil could be at
least doubled from that listed in the manual. The recommended
viscosity (10w-30, 5w30, etc) is also listed in the manual, and often on
the oil cap.
The oil used here was Valvoline MaxLife. A Purolator Pure One Filter
was installed, but any good quality oil and filter will do nicely. The
only caveat is that there may be some quality issues with the Fram
filters.
This change was done on a 2000 SSEi, but the basic procedures are the
same for virtually any car. There will be differences in wrench size,
drain plug and oil filter locations, as well as the oil life monitor.
What was used to complete this job:
A 15mm wrench - your choice of type (Socket, box end, open end, etc.)
5 quarts of oil
An oil filter.
An oil drain pan
To make the job a bit easier, an oil filter wrench and oil spout was
used. Some use a funnel in place of the oil spout. If your aim is
good, or you don't mind a bit of a mess (not to mention smoke if it
falls on the exhaust manifold) you can pour it right out of the bottle.
There is little clearance between the oil pan drain plug and the
transmission pan, so it can be hard to get a socket wrench onto the
drain plug. A 15 mm ratcheting end wrench makes the job easier than
just a box or open end wrench.

This set was purchased from Sears, and costs in the area of $90 - $100.
Less expensive sets are available at some auto parts stores.

Driving the car up on ramps, or putting on jack stands is pretty much
required to give enough clearance to do the job. You will be working
under the car, so safety first. Make sure the car is supported safely
on jack stands or with other means designed for the purpose. Set the
parking brake and chock the wheels as needed to ensure that the car
cannot move or roll BEFORE you get under it. NEVER GET UNDER A CAR
SUPPORTED ONLY BY A JACK.
Once the vehicle is raised and secured, place the drain pan under the
car. I like to use this pan, as it has a place to set the filter to
drain, and the oil is easy to pour out of the spout into a container for
recycling.

The drain plug is located on the back end of the oil pan, which is on
the bottom center of the engine. Put the wrench onto the drain plug.
If you are working from the front of the car, you'll be turning the
wrench in a clockwise direction as the plug will be facing away from
you. If working from the side where the plug is facing you, the usual
"lefty-loosy" applies.

Once the plug is loose, remove it the rest of the way by hand. The oil
will drain out several inches back from where the drain plug is, so make
sure you have the drain pan positioned properly. Try to keep your hand
and arm above the stream of oil. Especially if you're using a standard
drain pan, try not to let the plug slip out of your fingers so you
don't have to do a search and rescue mission in the oil to get it back.
Eventually, the oil will slow to a small stream

If you have the time, let it continue to drain until you have just a
small trickle, or just some occasional drips. Depending on the
temperature of the oil, that could take a while. Warming the engine
before changing the oil is a good idea.
If you have a wide enough drain pan to where you can catch the oil
coming out of the pan, as well as what will start to drain when you
loosen the filter, you could start changing out the filter while the oil
finishes draining out of the pan. Due to the small amount of room, it
can be tough to get a good enough grip on the filter to loosen it, so
you may want to consider using a filter wrench. The oil filter is on
the passenger side of the engine, directly in from the passenger tire.
Looking at it from the closed end, it is spun off in a
counter-clockwise direction. The 2000+ engines have the oil filter in
an almost horizontal (on its side) orientation, while the earlier
engines were closer to vertical (up & down).

Once the gasket for the filter separates from the mating surface on the
engine, oil will start to drain here also. Once again, try to keep your
arm out of the way. 
When the filter is totally removed, more oil will come pouring out of
it, so be prepared for that. Turn the filter upside down to finish
draining the oil out of the filter.
Once the oil is done draining out of the pan, clean the drain plug

as well as the surface around the oil pan where the drain plug goes.

This will get any dirt out of the way that could prevent a good seal.
Put the drain plug back in, and snug it up with the wrench.
Now, clean the mating surface around where the filter will be installed.

A larger filter was used, rather than the direct replacement. The one
used is the same as for the 4.3 liter V6. It provides for a larger
filtering area, and allows you to use the full 5 quarts of oil, rather
than about 4 ½ quarts.

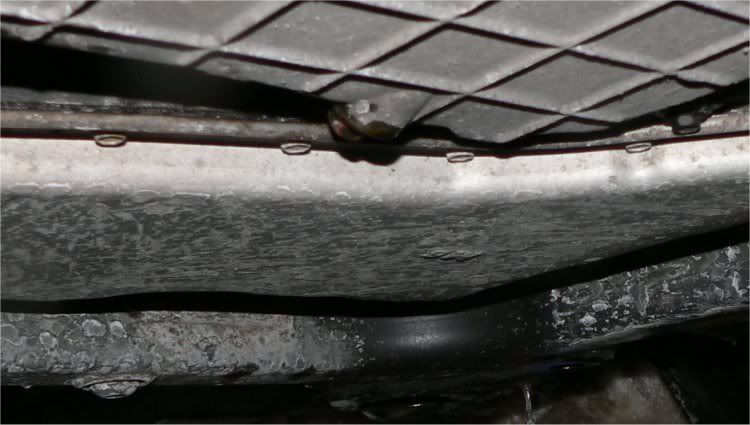
The larger filter fits well on the 2000+ engines, without having it
extend too far below the oil pan and surrounding areas. The angle
required to take the picture shows it lower than it actually is.

Those who have a concern (especially the more vertically mounted
filters) that it may extend down too far may wish to stay with the
regular filter.
Spread a little fresh oil around the filter gasket. This allows for a
good seal by preventing the gasket from sticking and creating gaps.
(Some like to preload the filter with oil, by putting oil in it before
installing. If the filter on your car is in a more vertical position,
you may want to do that. With this one being almost horizontal, very
little can be put into it without losing most of it during
installation.)

Install the filter, and tighten by hand. Once the gasket touches the
mating surface, turn it about another ¾ to full turn. Do not
over-tighten!

You’re done under the car for now. On your way out from underneath, may
as well grab your tools, the drain pan, and old filter. Now it’s time
to work up top.
If you are using a funnel, you can just remove the oil cap. The yellow
handled thing on the left is the dipstick for checking the oil level.

If you have a spout, it is easier to remove both the cap, and the extender.

If there is any dirt around the opening, clean that up so it is not
pushed into the engine. Try to get it by starting on the inside, and
wiping out.

I like to use the spout to cut down on spills.

When the upper part is twisted, one way closes the opening so you the
oil won’t come out until you want it to. Once it is in the valve cover
opening, it can be twisted the other way to allow the oil in.

The size of the spout is just right for getting it in, and having it stay there.

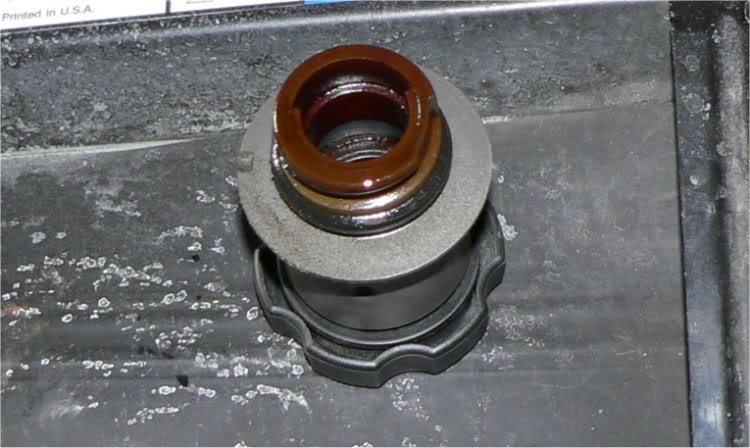
Check the appearance of the oil cap and extender. If it looks like
someone ordered "coffee - heavy cream" that would indicate that moisture
is getting into the coolant. A “normal” one should look a lot like
this.
After all the oil is poured in, clean the O-ring around the extender and put it back on.

Start the car, and watch for the oil pressure to come up to normal.

Check for any leaks, in particular around the oil filter. If all is
normal, back the car off from the ramps (if you used ramps) or take it
down from the jack stands.
After shutting off the engine, let it sit for a few minutes to allow the
oil to drain back into the pan. Then pull out the oil dipstick

Wipe the oil off

Then put the dipstick back in, leave it for a second or two, pull it
out, and check the oil level. It should be at the full mark.
This section is for those with the DIC and oil life monitor.
Turn the ignition on, or start the car. Use the select button on the DIC

until the percent of oil life remaining comes up. (You may have to have
other “warnings” like doors open, or parking brake set off.) Press and
hold the reset button until the numbers change to 3 Xs.

Then release the button, and it should show as 100%

Note the mileage, and copy that for your service records. Dispose of
your oil, properly by taking it to a recycling center, or many oil
change companies will take in your drain oil. Most have a limit of 5
gallons at a time, however.
This is a good time to inspect your fluid levels, tire pressure, belts
and pulleys, and do a thorough under hood and under car inspection.
|
| |
|
|
|
DISCLAIMER: Although every effort has been made to ensure the accuracy
of the data within this knowledge base, there are no guarantees; errors
might exist. Don't attempt anything that you're not qualified to do.
Always take safety precautions. BonnevilleClub.com, its owner, and its
staff are not liable for anything that goes wrong as a result of this
information; after all, you're the one doing the work.
|
