How To Replace Tail Light Bulbs on 2000 - 2005 (for Dummies)
 02-18-2007, 03:01 PM
#1
Junior Member
Thread Starter

Join Date: Aug 2005
Location: North of Buffalo, NY *** NEBF '05, '06, '07 *** ***ONBF & NYBF 06; 07*** ***WCBF 06***
Posts: 1
Likes: 0
Received 0 Likes
on
0 Posts

While many think nothing of tearing apart their engine without so much as breaking a sweat, some of us are "not-so-mechanically-inclined". This write up is for those, like me, whose version of "working on the car" is maintaining fluid levels and tire pressure. 
So, when it comes to having a tail light out, we may put it off for the sake of not knowing how to do it. But there are two problems with that:
1) It'* a safety hazard
2) It'* a ticket waiting to happen.
It'* far cheaper to spend $6 on new bulbs ($12 if you do both sides) and 15 mins doing it yourself than waiting for someone to do it for you. So...here we go...
Replacing Tail Light Bulbs on a 2000 - 2005 Bonneville
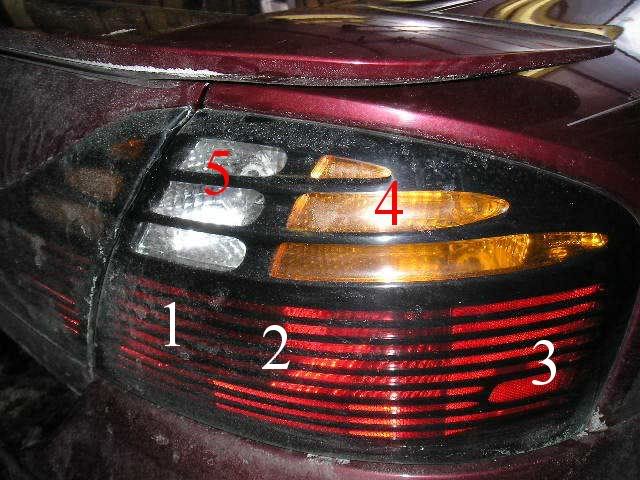
We�ll be removing the entire light assembly and replacing the two tail/brake light bulbs located at #1 and #2 in the pic below. While you're in there, you may also want to replace the other bulbs:
#1 & #2 - Tail / Brake - #3057
#3 - Side marker - # 194
#4 - Turn signal - #3057
#5 - Reverse - #3057
Tools required:
Fingers
Adjustable wrench
Optional: Soft towel
Optional: rubbing alcohol & cotton ball or swab
Parts required:
Bulbs � I used Sylvania 12V 3057 LL (longlife) - 2pk $5.99 Advanced Auto
1) Open trunk�.it may sound dumb, but it isn�t. Remove contents from the center-rear of the truck (the area over the spare tire) if cluttered. You�ll need to lift up the spare tire cover in a moment. Remove cargo net if it�* secured on the plastic *****.
2) Open new bulb package and put them within reach. Again, this may sound dumb, but when you end up with the tail light hanging � you�ll be glad the bulbs are within reach.
NOTE: I wore gloves (it was 10F out) but also wanted to avoid touching the new bulbs to prevent dirt/oils from getting on them. While these are not halogens, it�* probably good practice to not touch the bulbs. But even gloves can be dirty�for good measure, you can swab the bulb with rubbing alcohol on a cotton ball or q-tip after the light is in the socket.
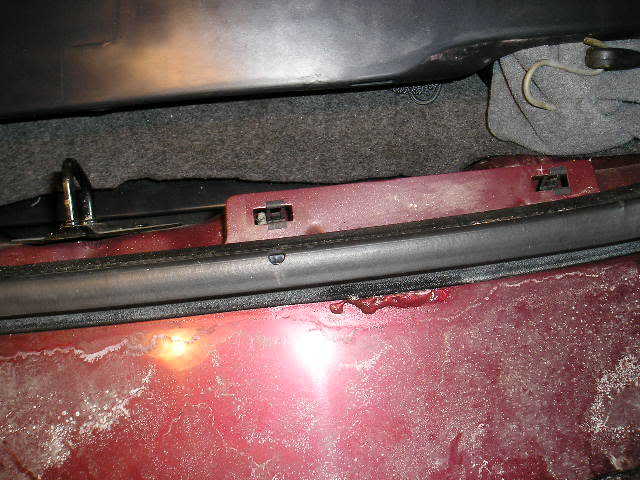
3) Remove interior plastic guard/sill plate � this sill plate goes the entire length of the trunk. Do this by:
a) Carefully pulling back carpet from the spare tire area, lifting the plastic tire cover from the sill plate while gently pushing down on the sill plate. This should allow the tire cover tabs to pull up an out of the slots in the sill plate.
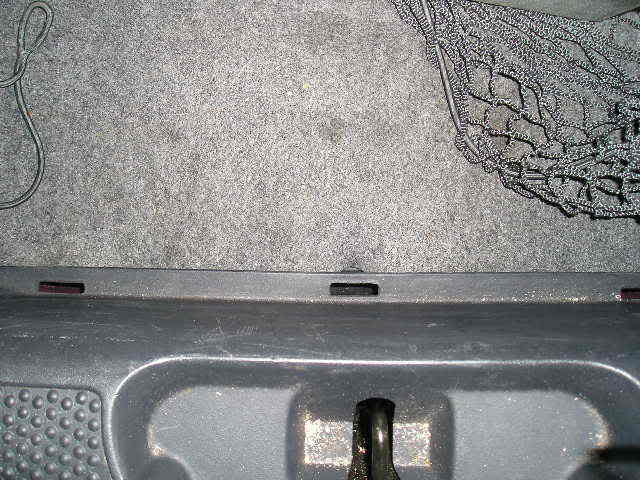
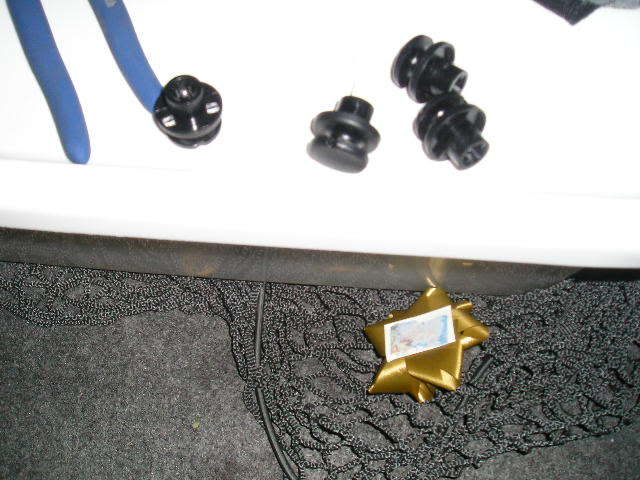
b) Remove the two plastic ***** found on both sides of the interior rear section of the trunk. These are actually called trim retainers and they also hold the cargo net in place.
c) Carefully remove the plastic sill plate by lifting up and then out towards the front of the car.
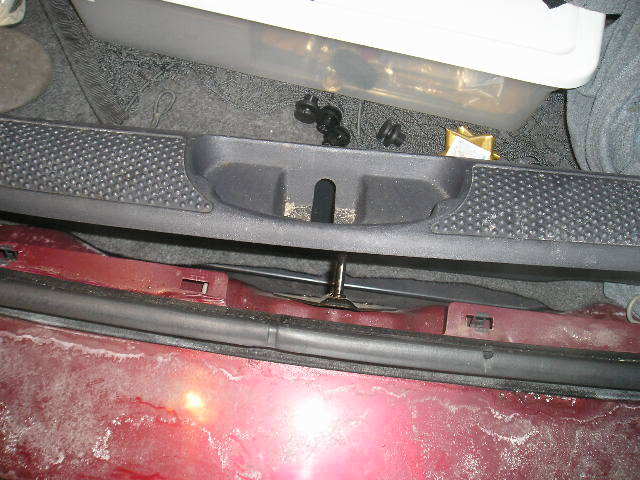
NOTE: The reason for lifting up is that there are four plastic tabs securing it along the length of the trunk � two on either side of the trunk latch.
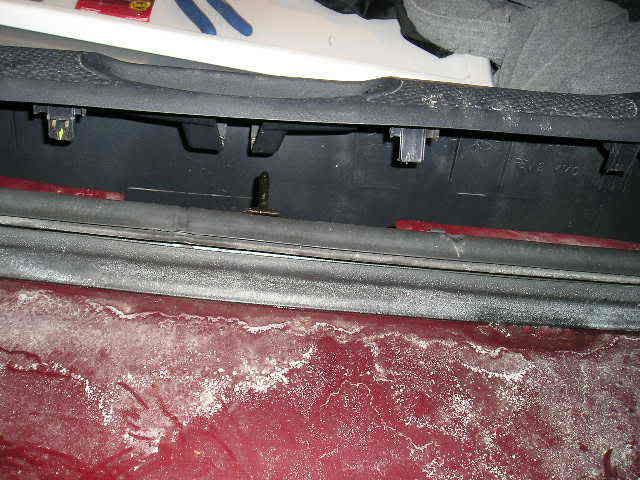
NOTE: Be careful not to lose the metal clips � they tend to pop off with the removal of the plastic guard. If they do, re-insert them into the metal slots on the car: There are two slots on either side of the trunk latch.
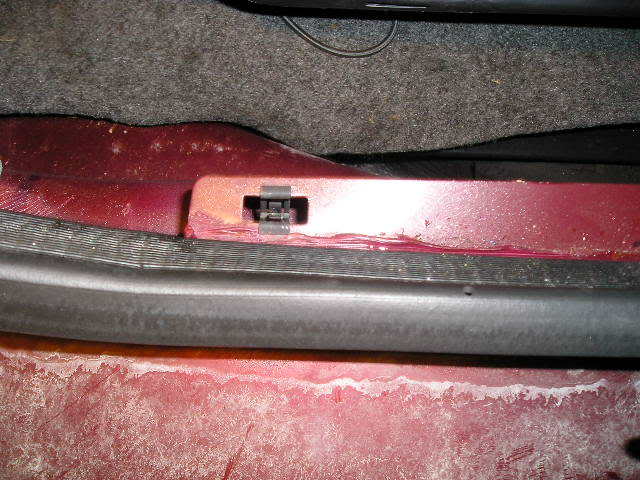
Yes.... I lost one
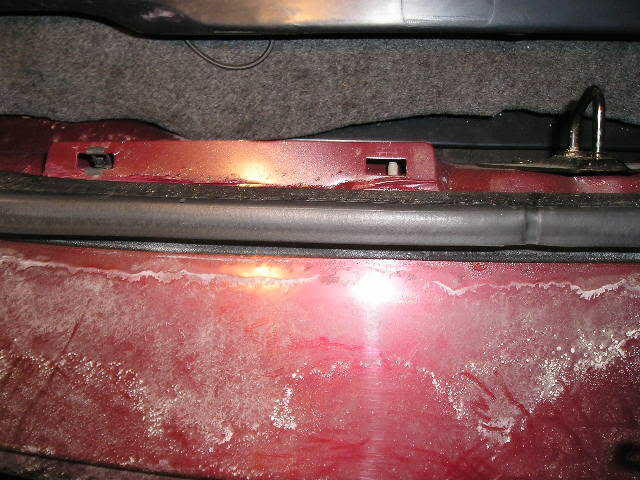
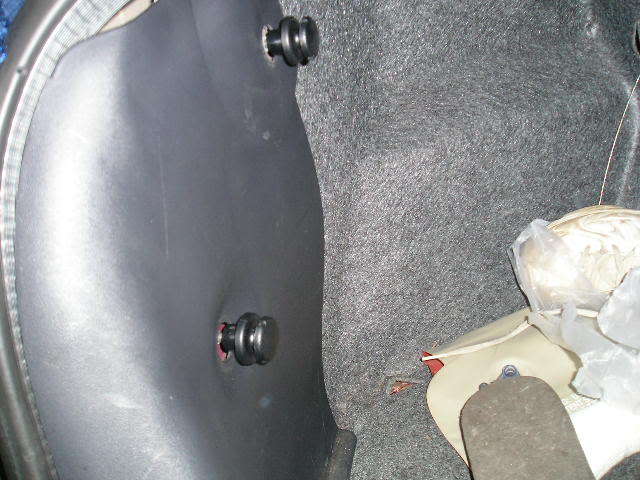
4) Carefully move the felt liner to expose three screws and use the adjustable wrench to remove the nut/washer combo from each screw.
CAUTION: Be sure to support the tail light with your leg� once the nut/washers are removed, the entire light assembly can be pulled out from the body of the car.
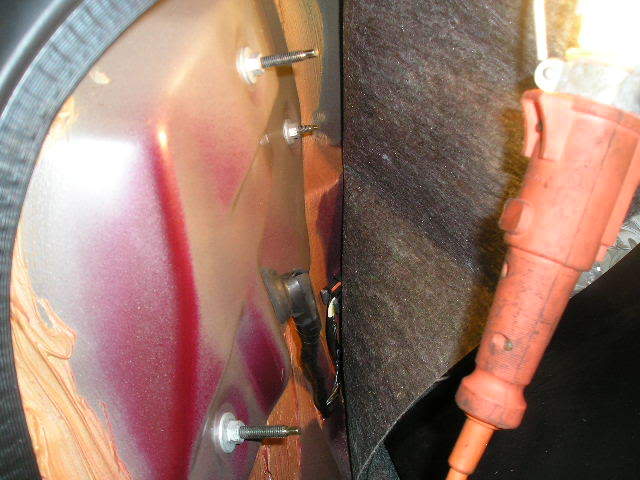
5) I put a soft cloth on the bumper to prevent scratching of the lens, however this made it slippery � your choice. Carefully pull the light assembly away from the car and rotate it upwards to expose the backside, resting in on the bumper and supporting it with your leg.
NOTE: Light Assembly is still connected to the car by the wiring harness. I did not remove it, however it would be safer to do so as you would be less likely to damage the lens and/or drop the assembly.
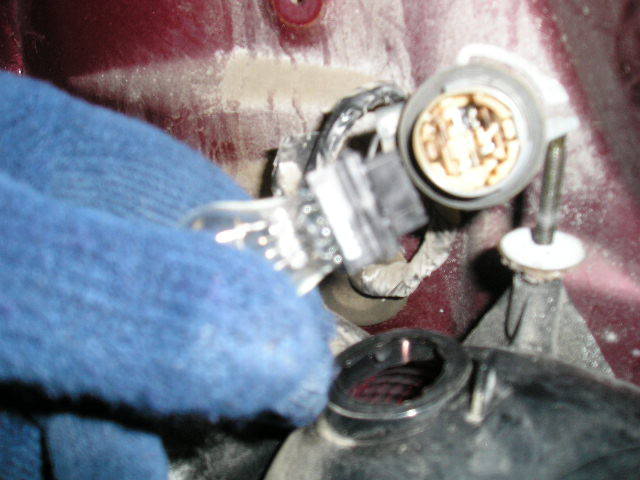
6) Locate the two large grey plastic inserts - These are the Tail / Brake Lights.
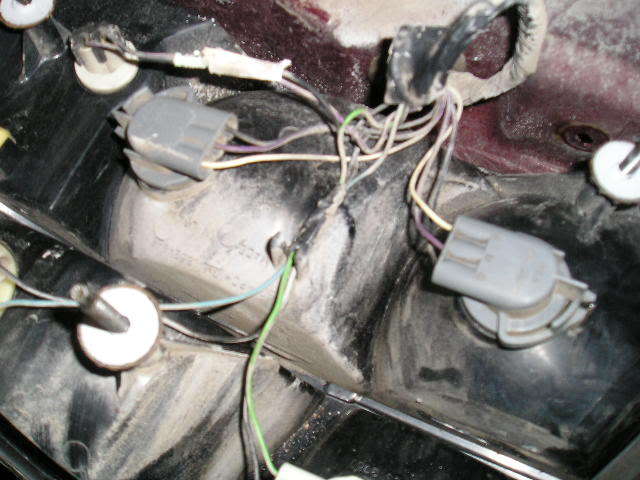
7) Push in the grey tab and turn counter clockwise to get this tab past the black plastic mount. This is similar to the security caps on antifreeze bottle.
You can now lift up the insert and expose the bulb.
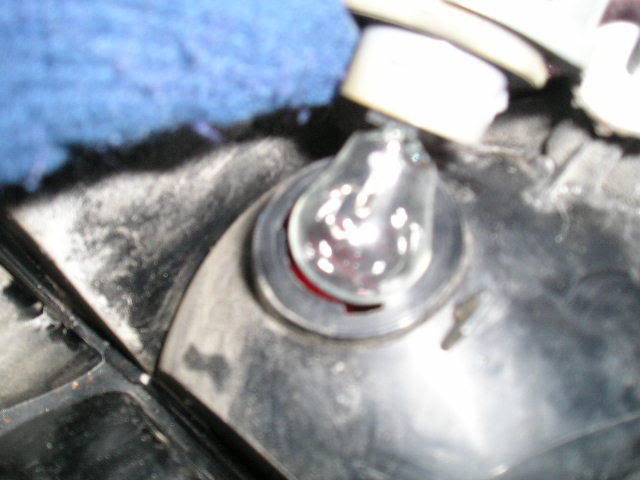
8 ) Remove old bulb by gently pulling it out of the insert � no twisting!!
9) Insert new bulb - Here�* where that cotton ball/swab dipped in rubbing alcohol will come in handy to ensure the bulb is free of dirt/oils. You can treat yourself to a shot of real alcohol soon, if so desired.
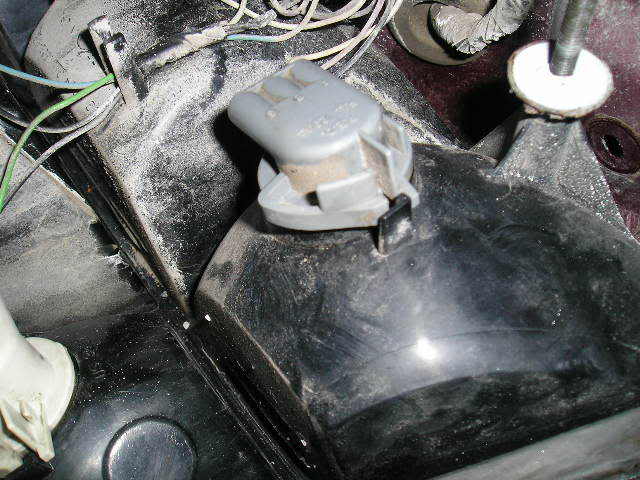
10) Replace the grey plastic insert into the hole. Note the slots in the black plastic housing � this is similar to slots found on the radiator cap.
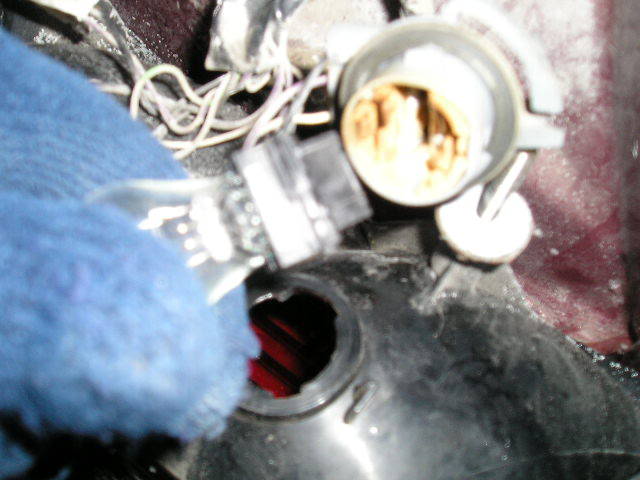
11) Turn the grey insert clockwise, securing it to its original position.
Do this for both bulbs. Again, you may wish to replace the other bulbs at this time since you've got it all apart anyhow.
12) When done, replace the light assembly onto the car and secure the nut/washers onto the screws. While this is not a muscle-man event, you do need to tighten them up using the adjustable wrench fairly tight to ensure there is no play or wiggle in the light assembly.
CHECKPOINT: At this point, it�* a good idea to start the car and check to make sure all lights are working correctly.
13) Final re-assembly:
Replace the felt liner on both sides over the screws
Replace the plastic sill
Re-position the tire cover on the sill
Replace the plastic ***** (cargo net holders.) CAUTION: When replacing the ****, do not tighten them too aggressively - they can strip pretty easy. Been there, done that.
For those who want the All Data instructions, see this link: http://www.bonnevilleclub.com/forum/...ic.php?t=70686 They suggest unplugging the light assembly from the harness and removing it from the car. Again, be careful when handling your tails � you don�t want to scratch them.
That�* it�. Now you can do more than just check the fluids and tire pressure� you are now safer and may have avoided the cost of a fine.
So, when it comes to having a tail light out, we may put it off for the sake of not knowing how to do it. But there are two problems with that:
1) It'* a safety hazard
2) It'* a ticket waiting to happen.
It'* far cheaper to spend $6 on new bulbs ($12 if you do both sides) and 15 mins doing it yourself than waiting for someone to do it for you. So...here we go...
Replacing Tail Light Bulbs on a 2000 - 2005 Bonneville
We�ll be removing the entire light assembly and replacing the two tail/brake light bulbs located at #1 and #2 in the pic below. While you're in there, you may also want to replace the other bulbs:
#1 & #2 - Tail / Brake - #3057
#3 - Side marker - # 194
#4 - Turn signal - #3057
#5 - Reverse - #3057
Tools required:
Fingers
Adjustable wrench
Optional: Soft towel
Optional: rubbing alcohol & cotton ball or swab
Parts required:
Bulbs � I used Sylvania 12V 3057 LL (longlife) - 2pk $5.99 Advanced Auto
1) Open trunk�.it may sound dumb, but it isn�t. Remove contents from the center-rear of the truck (the area over the spare tire) if cluttered. You�ll need to lift up the spare tire cover in a moment. Remove cargo net if it�* secured on the plastic *****.
2) Open new bulb package and put them within reach. Again, this may sound dumb, but when you end up with the tail light hanging � you�ll be glad the bulbs are within reach.
NOTE: I wore gloves (it was 10F out) but also wanted to avoid touching the new bulbs to prevent dirt/oils from getting on them. While these are not halogens, it�* probably good practice to not touch the bulbs. But even gloves can be dirty�for good measure, you can swab the bulb with rubbing alcohol on a cotton ball or q-tip after the light is in the socket.
3) Remove interior plastic guard/sill plate � this sill plate goes the entire length of the trunk. Do this by:
a) Carefully pulling back carpet from the spare tire area, lifting the plastic tire cover from the sill plate while gently pushing down on the sill plate. This should allow the tire cover tabs to pull up an out of the slots in the sill plate.
b) Remove the two plastic ***** found on both sides of the interior rear section of the trunk. These are actually called trim retainers and they also hold the cargo net in place.
c) Carefully remove the plastic sill plate by lifting up and then out towards the front of the car.
NOTE: The reason for lifting up is that there are four plastic tabs securing it along the length of the trunk � two on either side of the trunk latch.
NOTE: Be careful not to lose the metal clips � they tend to pop off with the removal of the plastic guard. If they do, re-insert them into the metal slots on the car: There are two slots on either side of the trunk latch.
Yes.... I lost one
4) Carefully move the felt liner to expose three screws and use the adjustable wrench to remove the nut/washer combo from each screw.
CAUTION: Be sure to support the tail light with your leg� once the nut/washers are removed, the entire light assembly can be pulled out from the body of the car.
5) I put a soft cloth on the bumper to prevent scratching of the lens, however this made it slippery � your choice. Carefully pull the light assembly away from the car and rotate it upwards to expose the backside, resting in on the bumper and supporting it with your leg.
NOTE: Light Assembly is still connected to the car by the wiring harness. I did not remove it, however it would be safer to do so as you would be less likely to damage the lens and/or drop the assembly.
6) Locate the two large grey plastic inserts - These are the Tail / Brake Lights.
7) Push in the grey tab and turn counter clockwise to get this tab past the black plastic mount. This is similar to the security caps on antifreeze bottle.
You can now lift up the insert and expose the bulb.
8 ) Remove old bulb by gently pulling it out of the insert � no twisting!!
9) Insert new bulb - Here�* where that cotton ball/swab dipped in rubbing alcohol will come in handy to ensure the bulb is free of dirt/oils. You can treat yourself to a shot of real alcohol soon, if so desired.
10) Replace the grey plastic insert into the hole. Note the slots in the black plastic housing � this is similar to slots found on the radiator cap.
11) Turn the grey insert clockwise, securing it to its original position.
Do this for both bulbs. Again, you may wish to replace the other bulbs at this time since you've got it all apart anyhow.
12) When done, replace the light assembly onto the car and secure the nut/washers onto the screws. While this is not a muscle-man event, you do need to tighten them up using the adjustable wrench fairly tight to ensure there is no play or wiggle in the light assembly.
CHECKPOINT: At this point, it�* a good idea to start the car and check to make sure all lights are working correctly.
13) Final re-assembly:
Replace the felt liner on both sides over the screws
Replace the plastic sill
Re-position the tire cover on the sill
Replace the plastic ***** (cargo net holders.) CAUTION: When replacing the ****, do not tighten them too aggressively - they can strip pretty easy. Been there, done that.
For those who want the All Data instructions, see this link: http://www.bonnevilleclub.com/forum/...ic.php?t=70686 They suggest unplugging the light assembly from the harness and removing it from the car. Again, be careful when handling your tails � you don�t want to scratch them.
That�* it�. Now you can do more than just check the fluids and tire pressure� you are now safer and may have avoided the cost of a fine.
 02-18-2007, 05:39 PM
#2
Senior Member
Posts like a Camaro

Join Date: Apr 2004
Location: Sioux Falls, SD. Member #2387
Posts: 907
Likes: 0
Received 0 Likes
on
0 Posts
Great write-up!
One tiny tiny detail I could add is when screwing on the black plastic trim retainers (and cargo net holders) be sure to not tighten too aggressively. They can strip pretty easy. My car came with a stripped one when I bought it.
Awesome job, though.
One tiny tiny detail I could add is when screwing on the black plastic trim retainers (and cargo net holders) be sure to not tighten too aggressively. They can strip pretty easy. My car came with a stripped one when I bought it.
Awesome job, though.
 02-18-2007, 09:55 PM
#4
RIP
True Car Nut

Great job! Good recommendation on replacing both bulbs at the same time. Even if only one is burned out, the other one will be right behind it in burning out. While you're in there, you may also want to replace the small running light (maybe a #89 bulb) on the side that often burns out about the same time.
One thing to mention, the plastic trim/sill guard, the center part on the bottom also supports the plastic cover for the spare tire well. Some tabs from that cover slip into slots on the trim piece.
It looks like a good techinfo article to me.
One thing to mention, the plastic trim/sill guard, the center part on the bottom also supports the plastic cover for the spare tire well. Some tabs from that cover slip into slots on the trim piece.
It looks like a good techinfo article to me.
02-19-2007, 09:27 AM
#5
Junior Member
Thread Starter
Join Date: Aug 2005
Location: North of Buffalo, NY *** NEBF '05, '06, '07 *** ***ONBF & NYBF 06; 07*** ***WCBF 06***
Posts: 1
Likes: 0
Received 0 Likes
on
0 Posts
Originally Posted by Archon
One thing to mention, the plastic trim/sill guard, the center part on the bottom also supports the plastic cover for the spare tire well. Some tabs from that cover slip into slots on the trim piece.
Thank you all for your help/suggestions!
 02-19-2007, 11:06 AM
#7
RIP
True Car Nut
Tracy, often you can push down a bit on the trim piece and then slide it under the spare tire cover well enough for it to grab the tabs without having to remove the cover. That is, if the cover doesn't have too much weight on it.


