The How To Do Heated Seats Thread (From start to finish)


 01-21-2006, 11:37 PM
#93
DINOSAURUS BOOSTUS


Expert Gearhead
Thread Starter

Originally Posted by 1993 SLE
WOW that is great......sssoooo we can do mine at NEBF
That'* what it really comes down to.. took me about a week to do the switches only.
01-22-2006, 12:14 AM
#94
Member
Posts like a V-Tak

Join Date: Mar 2005
Location: Maplewood, MN
Posts: 53
Likes: 0
Received 0 Likes
on
0 Posts

Wow.. Looks REAL good Bill.. I aplaud the work! I would be takin a different route for mine as I am adding them to a 94 Cutlass Supreme..
As far as pics go, I cant get them right this second, however, the wires coming off the pads are all gray attaching to light green connectors; with the exception of one black on each side.. THen another group of wires going into a black connector for each side.. As stated I pulled these from an STS.. Prolly pre 95 as with your DeVille.. The only thing I didnt grab was the relay for these as the yard was closing in 5 minutes that day..
I DID get me a non-lumbar switch panel, however one switch is completely broken off.. SO Ill need a new one of these eventually.. It wont be a bother to me as the MN winters are under my skin.. I can handle the cold outside, but I need to be warm and cozy at least for the between trips here and there.. I can get pics, but theyll have to wait until I get my cam back sometime tomorrow or monday afternoon..
As I said though.. Great work.. I tip my hat!
EDIT: I am curious as to wht you did to the panel'* paint/primer to get it back to the stock look.. Thanks!
01-22-2006, 10:16 AM
#95
DINOSAURUS BOOSTUS
Expert Gearhead
Thread Starter
That is easy once you've met Randman1.
He redid many pieces and gathered info from the club and other places. Simply find a paint shop that sells SEM paints and typically they will have a shelf of SEM aerosol cans.
Each can is $12-$15USD, depending where you go. You will finish the molding and sanding, clean well to remove any oils from your hands then spray with Plastic Adhesion Promoter, let dry, Texture Coating, let dry well, and Graphite. Here is a pic of the magic cans.
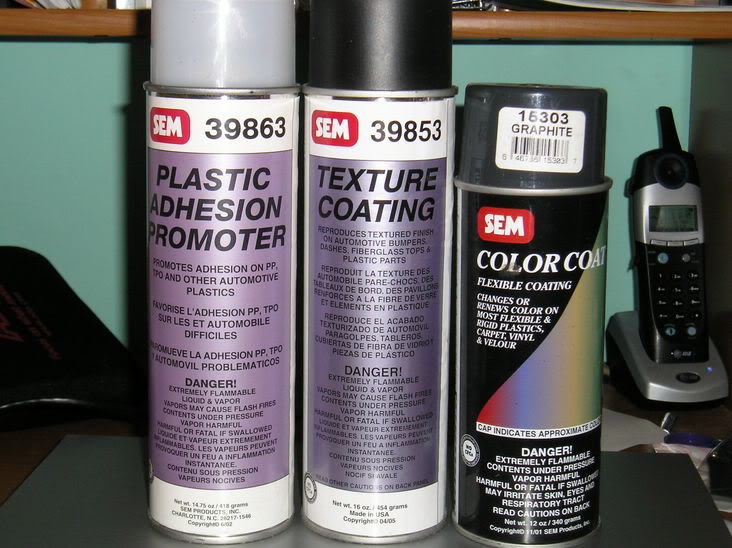
Plastic Adhesion Promoter 39863
Texture Coating 39853
Graphite 15303
I would have never thought about this if the Randman hadn't shown me the way in the early spring. To get the panel looking good, I had to make a normally bent section by the Bose emblem mold into a straight switch holder. JB Weld worked the best for building up material for me, Randman likes fiberglass and bondo. Then the sanding begins....almost all of it is by hand and it'* a slow process. If it doesn't look right, build back up and start again. Got low spots? build them up. Constantly waiting for curing in my case. Bondo is quicker. All the sanding and sculpting is why we have more pics of the dash in progress than anything else.
He redid many pieces and gathered info from the club and other places. Simply find a paint shop that sells SEM paints and typically they will have a shelf of SEM aerosol cans.
Each can is $12-$15USD, depending where you go. You will finish the molding and sanding, clean well to remove any oils from your hands then spray with Plastic Adhesion Promoter, let dry, Texture Coating, let dry well, and Graphite. Here is a pic of the magic cans.
Plastic Adhesion Promoter 39863
Texture Coating 39853
Graphite 15303
I would have never thought about this if the Randman hadn't shown me the way in the early spring. To get the panel looking good, I had to make a normally bent section by the Bose emblem mold into a straight switch holder. JB Weld worked the best for building up material for me, Randman likes fiberglass and bondo. Then the sanding begins....almost all of it is by hand and it'* a slow process. If it doesn't look right, build back up and start again. Got low spots? build them up. Constantly waiting for curing in my case. Bondo is quicker. All the sanding and sculpting is why we have more pics of the dash in progress than anything else.
01-22-2006, 10:44 AM
#96
Member
Posts like a V-Tak
Join Date: Mar 2005
Location: Maplewood, MN
Posts: 53
Likes: 0
Received 0 Likes
on
0 Posts
I DID know that! wasnt sure if thats what you used or not! Like i said, I can get pics of my heated pads for you hopefully this evening and we can maybe figure out the wiring diagrams? I will be using the stock caddy switches as they actually go very well in my Olds interior 


