Dressing up the Engine
 02-07-2007, 09:17 AM
#11
Senior Member
Certified Car Nut

Join Date: Oct 2002
Posts: 11,308
Likes: 0
Received 0 Likes
on
0 Posts

You can paint the alternator while it'* on the engine. In fact, you can paint almost anything without taking things apart. Just use a brush if you have my patience.  Get engine paint and spray it in the cap, and use a decent quality natural hair brush. I do think that painting the coils, valve covers, and things like that to be a bit overboard.
Here'* some examples of my engines.
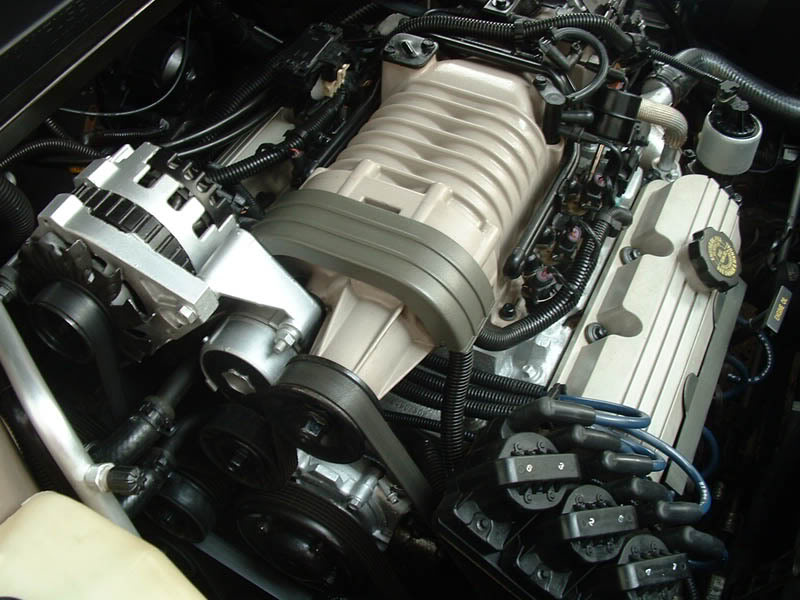
Current 94. I painted too many things to remember alternator, LIM, TB, trans case, water pump, etc, etc. EMs were painted with a black satin thermal coat (not pictured).
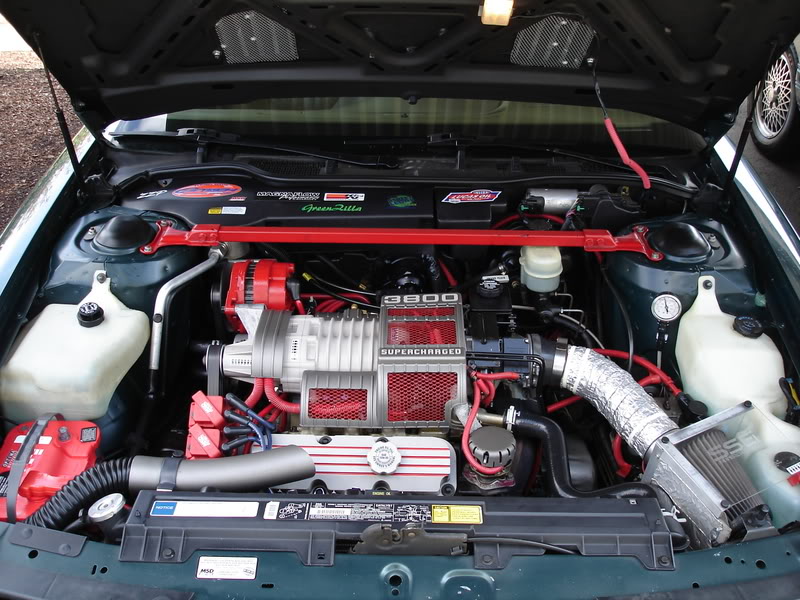
Old 94. I went overboard a bit, but I had a gold theme going with that car.

Get engine paint and spray it in the cap, and use a decent quality natural hair brush. I do think that painting the coils, valve covers, and things like that to be a bit overboard. Here'* some examples of my engines.
Current 94. I painted too many things to remember
Old 94. I went overboard a bit, but I had a gold theme going with that car.
 02-07-2007, 09:46 AM
#12

Originally Posted by LeSabreUltra
I don't want to take off the two bolts on each tower and either lose the bolts or have the suspension fall off the car.
 02-07-2007, 02:19 PM
#14
Senior Member
Posts like a Turbo
Thread Starter
Join Date: Feb 2007
Location: Alabama
Posts: 494
Likes: 0
Received 0 Likes
on
0 Posts
Thanks for all the suggestions. You've given me some great ideas, this weekend will probably be spent cleaning everything up so that next weekend I can start working on painting and wire looming, etc.
Question for you all though, how do you get your black plastic and rubber parts to look so shiny? I tried clearcoating stuff and that worked for a while, but eventually it burned off and made some things look kind of splotchy.
.
.
.
Question for you all though, how do you get your black plastic and rubber parts to look so shiny? I tried clearcoating stuff and that worked for a while, but eventually it burned off and made some things look kind of splotchy.
.
.
.
02-07-2007, 02:23 PM
#15
Junior Member
Posts like a Ricer Type-R

Don't use clearcoat. We (some of us) use CD2 engine detailer. It also makes things easier to clean later.
That was my secret for 2 years, and it 'leaked out' at WCBF05.
That was my secret for 2 years, and it 'leaked out' at WCBF05.


 02-07-2007, 08:20 PM
#18
Junior Member

Join Date: Aug 2005
Posts: 0
Likes: 0
Received 0 Likes
on
0 Posts
Yeah, I think you're going SLIGHTLY overboard. You would be amazed at what simple, small color changes can do. Painting EVERYTHING gives no contrast, and a nice sporty contrast is the point to begin with. But like alot of guys, I'm more of just a fan of a nice...clean..engine. I have not had the chance to give it another cleaning, and it currently looks like trash from all the road crud, but after the first cleaning of the life of the car, I think it looks pretty good.
Before:
After:
Definitely a fan of a clean engine bay. Once you've accomplished that, go slowly, paint different things slowly. Get used to it, decide if you wanna go more or if thats enough, but I definitely don't recommend going all out.
And no, you don't have to take off most things in the bay, but things like the alternator which simply come off with two bolts, two wires and a belt its probably one of the simplest things to replace. Ad far as the STB goes, yeah, you can take the two bolts out, the weight of the car holds it it up. Thats why the nuts aren't very big because they really only keep the struts attached when the car is raised and they keep the strut alignment in place. Just do make sure that when you have them out, to not bump the car, the slightest movement can throw off your alignment, and make sure that when you replace it, that you put it back EXACTLY as removed to retain exact alignment.

 02-07-2007, 08:45 PM
#20
Senior Member
Posts like a Turbo
Thread Starter
Join Date: Feb 2007
Location: Alabama
Posts: 494
Likes: 0
Received 0 Likes
on
0 Posts
Thank you all for the advice!
That worries me, but it should only be out for maybe a couple of hours while it'* drying.
You sure? That orange reflector gives it kind of a surreal look. 
.
.
.
Originally Posted by wjcollier07
Just do make sure that when you have them out, to not bump the car, the slightest movement can throw off your alignment, and make sure that when you replace it, that you put it back EXACTLY as removed to retain exact alignment.
Originally Posted by harofreak00
1. take that sticker off your valve cover
.
.
.