Bad seat heater 2000 Le Sabre


 01-03-2007, 04:44 PM
#2
RIP
True Car Nut

Custom or Limited? I posted a TSB in the 00 section about how to replace the heater element, that most of it applies to the LeSabre also. I can post the difference in the wire routing, but I'll need to know which one.
01-10-2007, 06:12 PM
#4
RIP
True Car Nut
Interior - Front Heated Seat Inoperative/Cold
Bulletin No.: 01-08-50-012B
Date: March 31, 2005
TECHNICAL
Subject:
Front Heated Seat Inoperative/Cold (Install Front Seat Heater Package)
Models:
2000-2005 Buick LeSabre
2001-2003 Oldsmobile Aurora
2000-2005 Pontiac Bonneville
with RPO KA1
Supercede:
This bulletin is being revised to update the model year information. Please discard Corporate Bulletin Number 01-08-50-012A (Section 08-Body and Accessories).
Important: This bulletin is being issued to inform the technician that the Aurora Heater Package, P/N 25730798, is also to be used on the 2003-2005 Bonnevilles that have leather front bucket seats (RPOs A51 - Front Bucket Seat and IB2-Leather). The 2003-2005 Bonneville leather front bucket seats share the same design as the Aurora front bucket seats.
Condition
Some customers may comment that the front seat assembly heat function is not operating properly.
Cause
This condition may be due to a non-functioning heat element in the front heated seat cushion or back trim cover.
Correction
1. Determine if the front seat assembly heat element resistance values are within the specified range. Refer to the Diagnostic Procedure in this bulletin.
2. If the resistance values are NOT within the specified range, install a Front Seat Heater Package between the existing front seat trim cover factory heat elements and the seat cushion and back foam pads. Refer to the Front Seat Heater Package Installation Procedure in this bulletin.
Diagnostic Procedure
1. Remove the front seat assembly from the vehicle. Refer to Seat Replacement-Front Bucket/Split Bench in the Seats sub-section of the appropriate Service Manual for the removal procedure.
2. Disconnect the heated seat module harness gray, 6-way connector C2.
3. Measure the seat heat element total resistance between cavities A and C. Does the resistance measure less than 5 ohms?
^ If yes, go to Step 4.
^ If no, install the Front Seat Heater Package. Refer to the Front Seat Heater Package Installation Procedure in this bulletin.
Important: If the resistance is measured with the seat still warm, the resistance may vary outside of the specified range since the thermistor resistance varies with temperature.
4. Measure the thermistor resistance between cavities D and F. Does the resistance measure between 850 ohms and 11.50 K ohms?
^ If yes, the resistance values of the heat elements are within the specified range. To find the cause of the inoperative/cold heated seat, perform the standard diagnostic procedures in the appropriate Service Manual.
^ If no, install the Front Seat Heater Package. Refer to the Front Seat Heater Package Installation Procedure in this bulletin.
Front Seat Heater Package Installation Procedure
Prior to installation, connect all of the components (elements) of the Front Seat Heater Package together and measure the resistance values. Refer to the applicable illustration shown for element connection information.
^ At the gray 6-way connector C2, between cavities A and C, the total resistance of the service heat elements will be less than 5 ohms.
^ At the gray 6-way connector C2, between cavities D and F, the thermistor resistance of the service heat element will be between 850 ohms and 11.50 K ohms.
1. Remove the seat back and seat cushion trim covers. Refer to the appropriate seat trim cover removal procedures in the Seats sub-section of the appropriate Service Manual.
Important: DO NOT attempt to remove the factory heat elements from the seat trim covers.
Important: ALL of the elements in the Front Seat Heater Package MUST be installed in order for the system to function properly.
2. Remove the factory heat element wiring harnesses from the seat trim covers. Use a pair of diagonal side cutters to cut the wiring as close to the factory heat element as possible.
3. Install each of the service heat elements as follows:
3.1. Remove the backing paper.
3.2. Carefully position the service heat elements, harness side down, onto the seat cushion and back foam pads. For each seat cushion element, insert the harness through a hole in the cushion foam pad.
3.3. Press the heat element onto the seat cushion and back foam pads. Ensure the heat elements are laying flat.
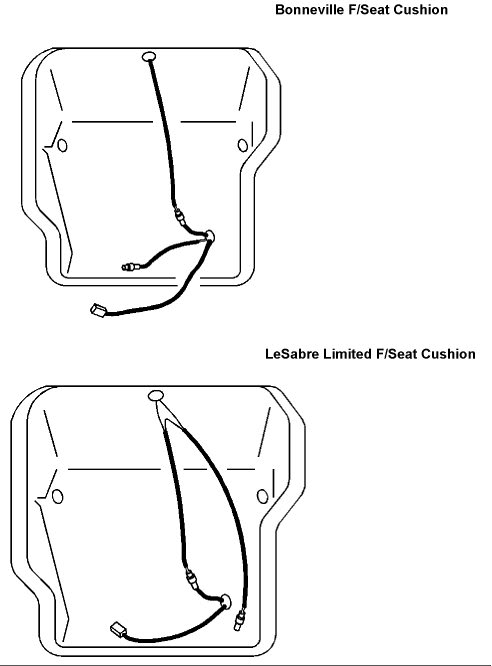
3.4. Connect the service heat element electrical connectors. Refer to the applicable front seat cushion illustration for cushion heat element connection information.
4. Install the seat back and seat cushion trim covers. Refer to the appropriate seat trim cover installation procedures in the Seats sub-section of the appropriate Service Manual.
5. Place the seat assembly inside the vehicle. DO NOT install the seat assembly at this time.
6. Connect the seat assembly electrical connectors.
7. Verify that the seat heat function is operational.
8. Complete seat assembly installation. Refer to Seat Replacement-Front Bucket/Split Bench in the Seats sub-section of the appropriate Service Manual for installation procedures.
Parts Information
Bulletin No.: 01-08-50-012B
Date: March 31, 2005
TECHNICAL
Subject:
Front Heated Seat Inoperative/Cold (Install Front Seat Heater Package)
Models:
2000-2005 Buick LeSabre
2001-2003 Oldsmobile Aurora
2000-2005 Pontiac Bonneville
with RPO KA1
Supercede:
This bulletin is being revised to update the model year information. Please discard Corporate Bulletin Number 01-08-50-012A (Section 08-Body and Accessories).
Important: This bulletin is being issued to inform the technician that the Aurora Heater Package, P/N 25730798, is also to be used on the 2003-2005 Bonnevilles that have leather front bucket seats (RPOs A51 - Front Bucket Seat and IB2-Leather). The 2003-2005 Bonneville leather front bucket seats share the same design as the Aurora front bucket seats.
Condition
Some customers may comment that the front seat assembly heat function is not operating properly.
Cause
This condition may be due to a non-functioning heat element in the front heated seat cushion or back trim cover.
Correction
1. Determine if the front seat assembly heat element resistance values are within the specified range. Refer to the Diagnostic Procedure in this bulletin.
2. If the resistance values are NOT within the specified range, install a Front Seat Heater Package between the existing front seat trim cover factory heat elements and the seat cushion and back foam pads. Refer to the Front Seat Heater Package Installation Procedure in this bulletin.
Diagnostic Procedure
1. Remove the front seat assembly from the vehicle. Refer to Seat Replacement-Front Bucket/Split Bench in the Seats sub-section of the appropriate Service Manual for the removal procedure.
2. Disconnect the heated seat module harness gray, 6-way connector C2.
3. Measure the seat heat element total resistance between cavities A and C. Does the resistance measure less than 5 ohms?
^ If yes, go to Step 4.
^ If no, install the Front Seat Heater Package. Refer to the Front Seat Heater Package Installation Procedure in this bulletin.
Important: If the resistance is measured with the seat still warm, the resistance may vary outside of the specified range since the thermistor resistance varies with temperature.
4. Measure the thermistor resistance between cavities D and F. Does the resistance measure between 850 ohms and 11.50 K ohms?
^ If yes, the resistance values of the heat elements are within the specified range. To find the cause of the inoperative/cold heated seat, perform the standard diagnostic procedures in the appropriate Service Manual.
^ If no, install the Front Seat Heater Package. Refer to the Front Seat Heater Package Installation Procedure in this bulletin.
Front Seat Heater Package Installation Procedure
Prior to installation, connect all of the components (elements) of the Front Seat Heater Package together and measure the resistance values. Refer to the applicable illustration shown for element connection information.
^ At the gray 6-way connector C2, between cavities A and C, the total resistance of the service heat elements will be less than 5 ohms.
^ At the gray 6-way connector C2, between cavities D and F, the thermistor resistance of the service heat element will be between 850 ohms and 11.50 K ohms.
1. Remove the seat back and seat cushion trim covers. Refer to the appropriate seat trim cover removal procedures in the Seats sub-section of the appropriate Service Manual.
Important: DO NOT attempt to remove the factory heat elements from the seat trim covers.
Important: ALL of the elements in the Front Seat Heater Package MUST be installed in order for the system to function properly.
2. Remove the factory heat element wiring harnesses from the seat trim covers. Use a pair of diagonal side cutters to cut the wiring as close to the factory heat element as possible.
3. Install each of the service heat elements as follows:
3.1. Remove the backing paper.
3.2. Carefully position the service heat elements, harness side down, onto the seat cushion and back foam pads. For each seat cushion element, insert the harness through a hole in the cushion foam pad.
3.3. Press the heat element onto the seat cushion and back foam pads. Ensure the heat elements are laying flat.
3.4. Connect the service heat element electrical connectors. Refer to the applicable front seat cushion illustration for cushion heat element connection information.
4. Install the seat back and seat cushion trim covers. Refer to the appropriate seat trim cover installation procedures in the Seats sub-section of the appropriate Service Manual.
5. Place the seat assembly inside the vehicle. DO NOT install the seat assembly at this time.
6. Connect the seat assembly electrical connectors.
7. Verify that the seat heat function is operational.
8. Complete seat assembly installation. Refer to Seat Replacement-Front Bucket/Split Bench in the Seats sub-section of the appropriate Service Manual for installation procedures.
Parts Information

Thread
Thread Starter
Forum
Replies
Last Post
Bugsi
Everything Electrical & Electronic
9
12-22-2005 11:31 AM
BonnieBrougham
Lounge
3
12-16-2004 05:38 PM