Another seat heater & module story
 05-02-2009, 10:36 PM
#1
Senior Member
Posts like a Turbo
Thread Starter
Join Date: Jan 2006
Location: Brighton, Michigan
Posts: 255
Likes: 0
Received 0 Likes
on
0 Posts

The weather warmed up and we didn't lose power this weekend, so I decided to dive into my seat heater problem. There were plenty of clues on this website with a search, but a lot of broken links.
I decided to share my experience with you all.
The passenger heater worked fine.
The driver side heater would flash on and turn off. (Typical)
(Story spoiler - I ended up finding a broken element wire and a bad module.)
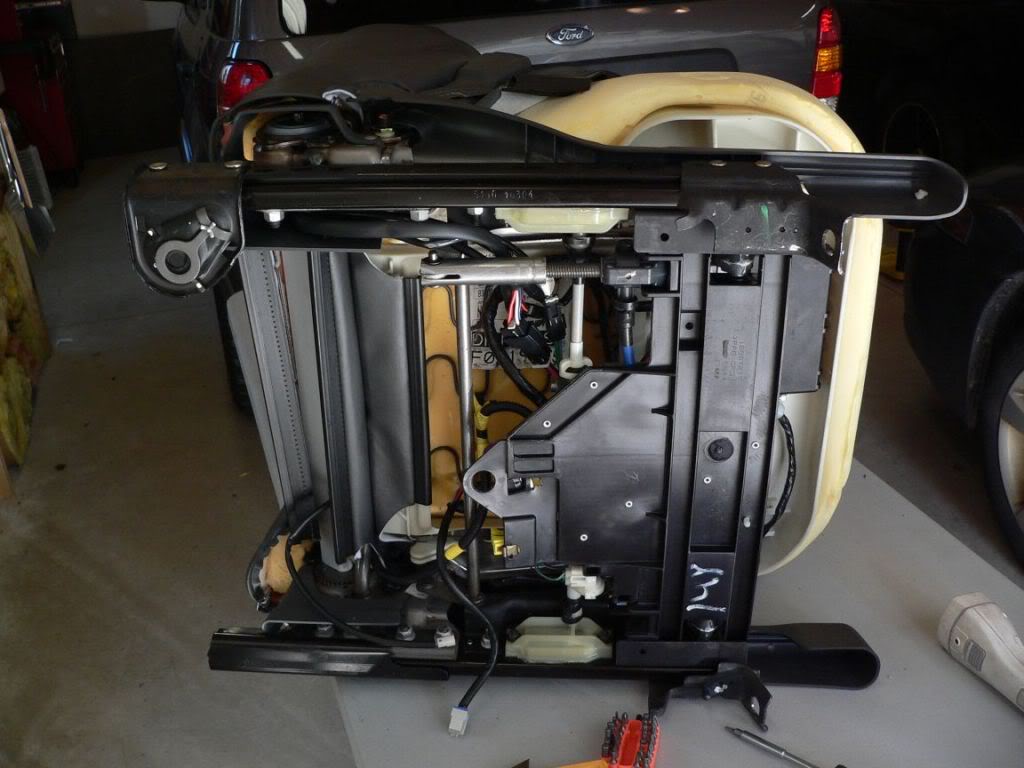
It sounded like the odds were pretty good that it was one of the elements, so I decided to just pull the seat so I could get some working room. The seat comes out pretty easy. All you really need is a T45 Torx socket for the 4 bolts.
This is a GXP and it could be similar to most Bonnevilles.
To remove the seat... move the seat all the way up and forward.
Here'* a picture with the seat removed and the location of the T45 bolts.
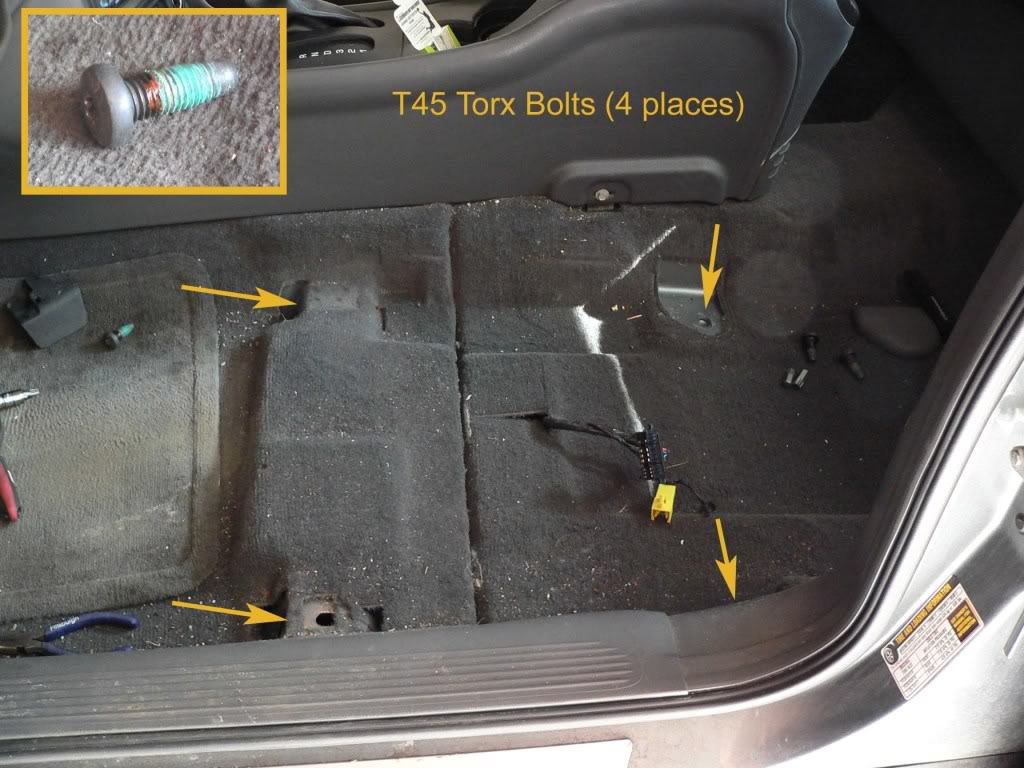
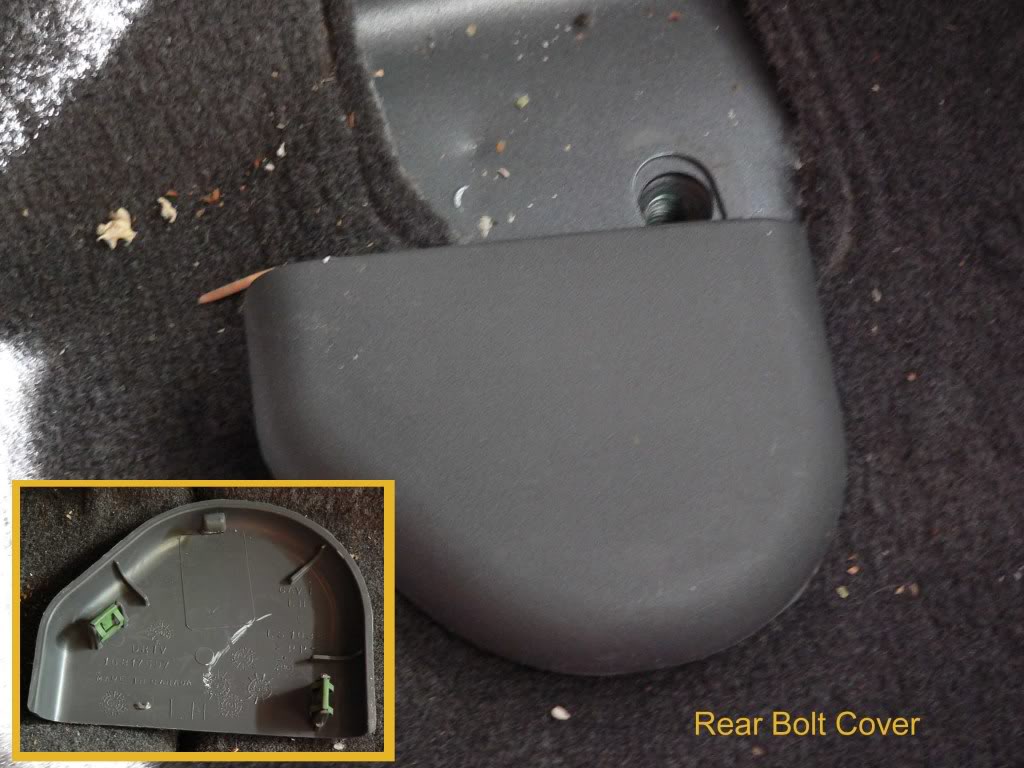
There are two T45 bolts in the back. The first bolt is screwed sideways into the rocker panel.
The other bolt is under this half-round cover:
Move the seat backwards until you can see the front covers. They have these little tabs that need to be squeezed so the covers can be slid straight forward.
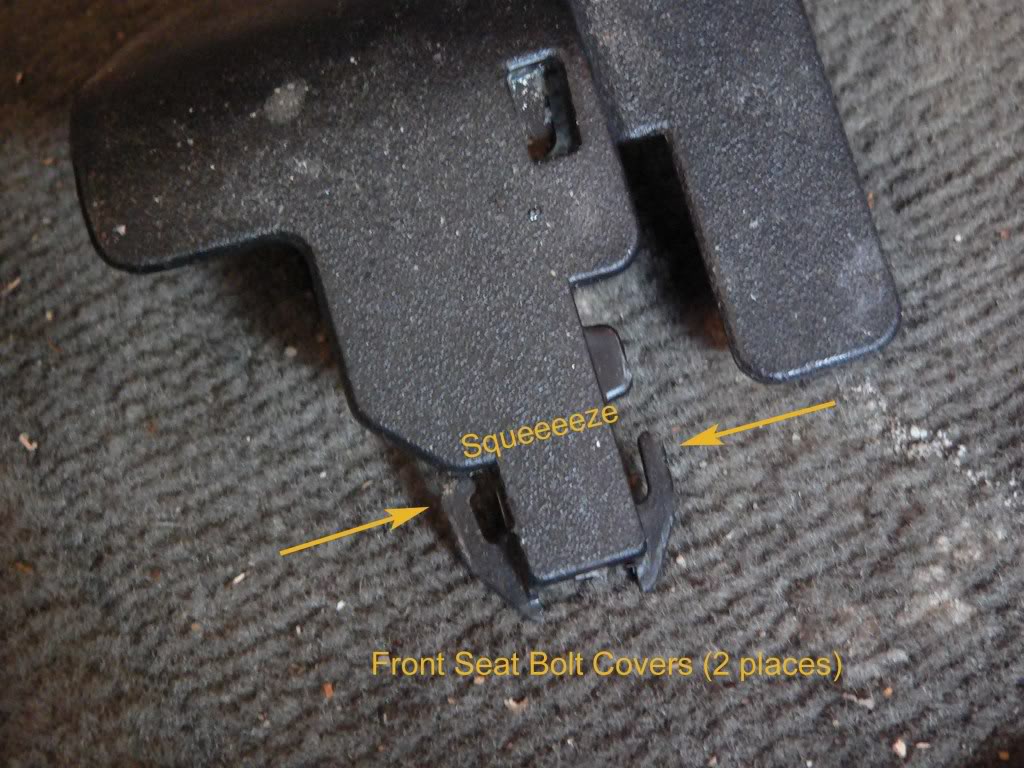
Remove the two covers and remove the two T45 bolts.
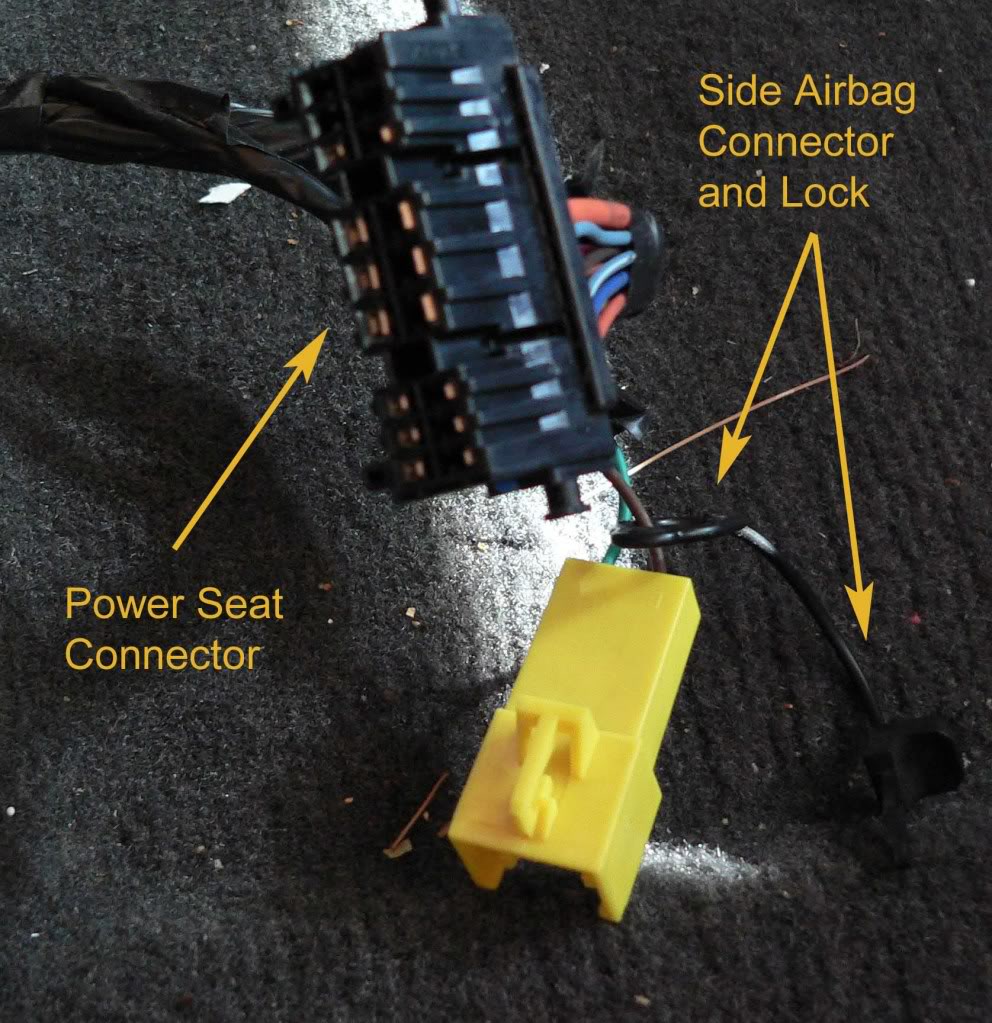
Now, you can tip the seat backwards and get to the two plugs at the carpet.
One of these plugs is for the side airbag. There is probably a good procedure to follow before unplugging the airbag. And I'll let someone else share that information. (I just unplugged them.)
The seat can be removed. I tilted the steering wheel up and pulled it thru the front door.
Here'* the bottom of the seat...
Now we will talk about the heater.
As near as I can tell, there are at least 5 elements in the seat�
Yes, You can access the module and the seat elements without removing the seat.
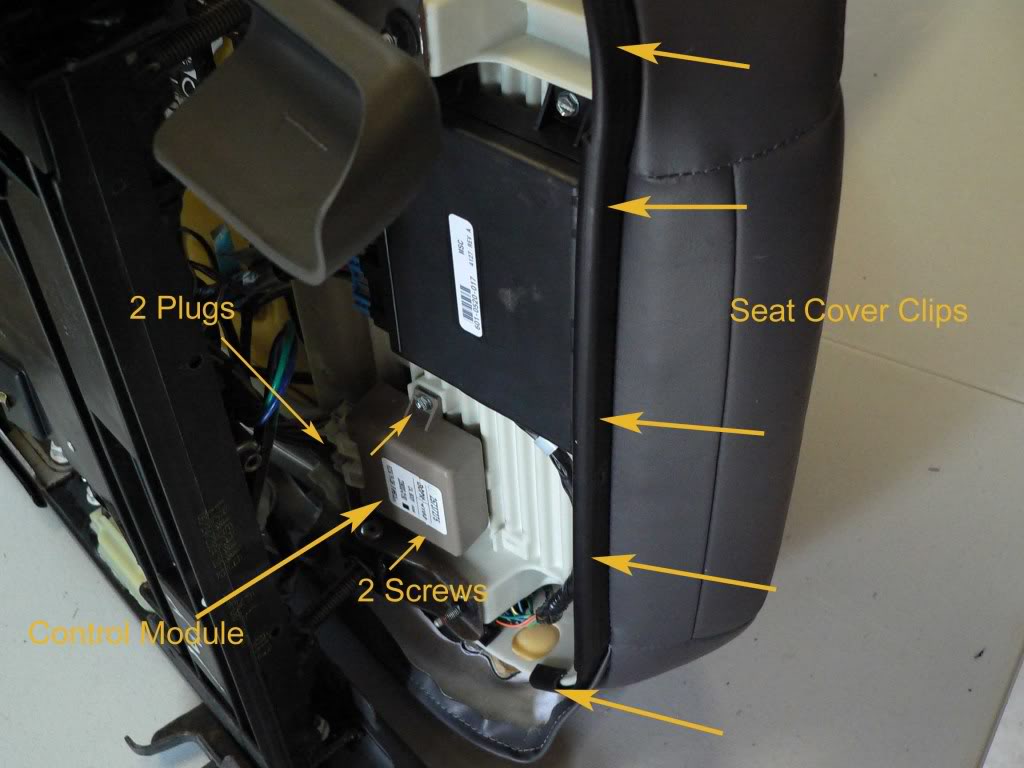
The module is held on with two 8mm screws (or a flat screwdriver). The gap on the rail side may be too narrow to get a socket in there. I had to use a screwdriver.
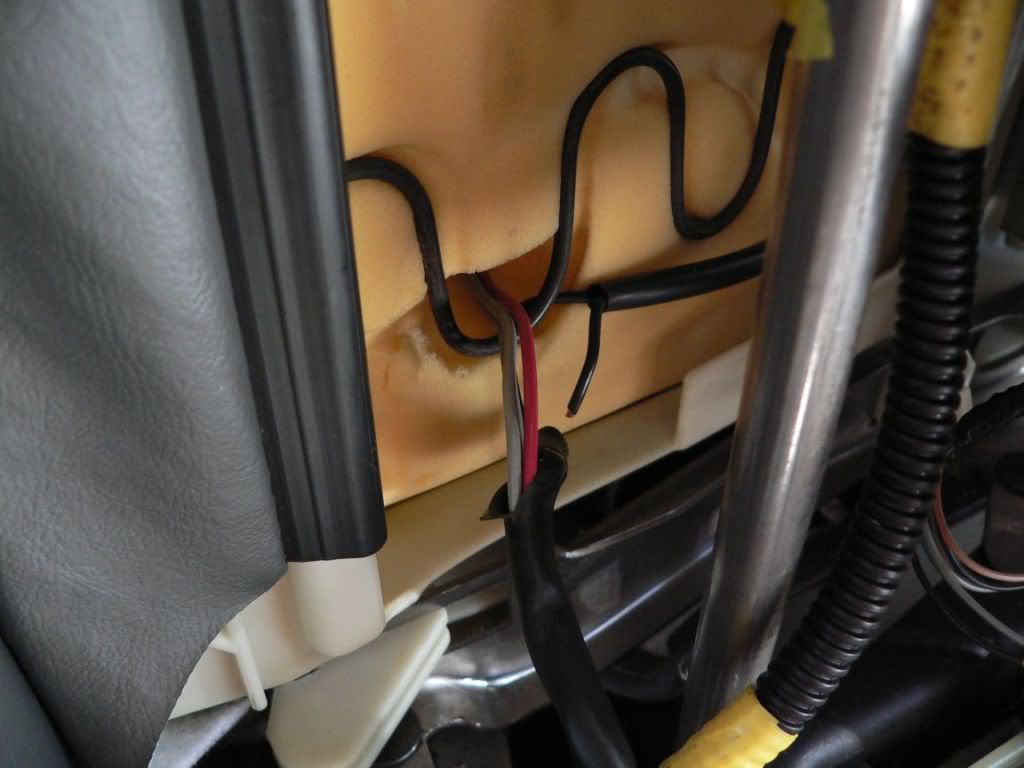
Here�* a picture of the module. It has two plugs. The smaller plug has four wires that lead to the heater elements.
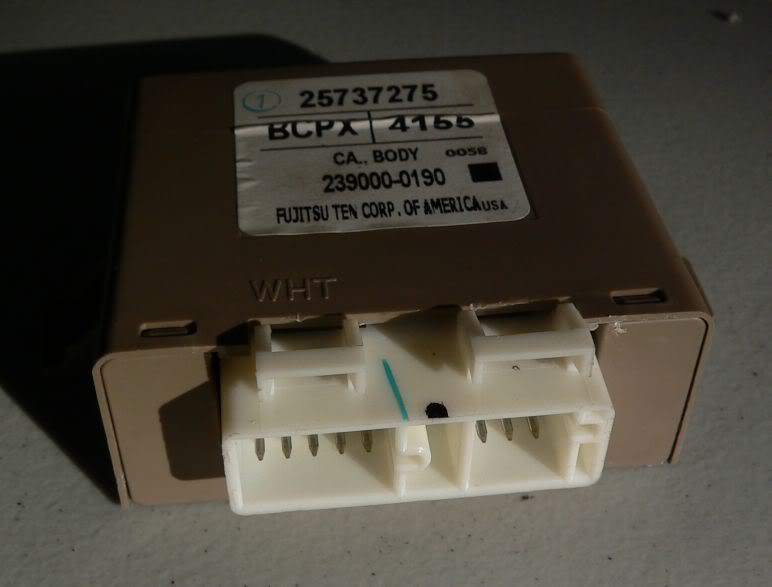
Yes, the elements are wired in series. One break, and they�re all gone.
From the small plug, the two gray wires probably go to a thermo-couple to monitor the heat temperature. The Red and Black wires go to the elements. If you put an ohmmeter across these wires, there should be resistance. I had nothing. My main problem was this broken wire.
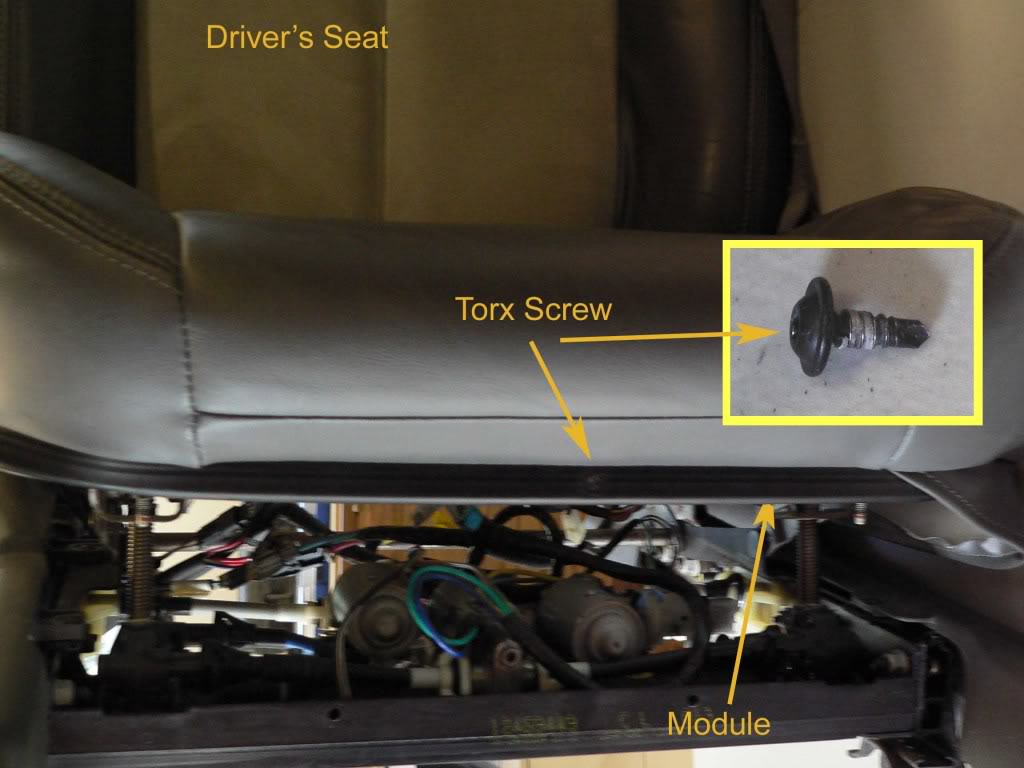
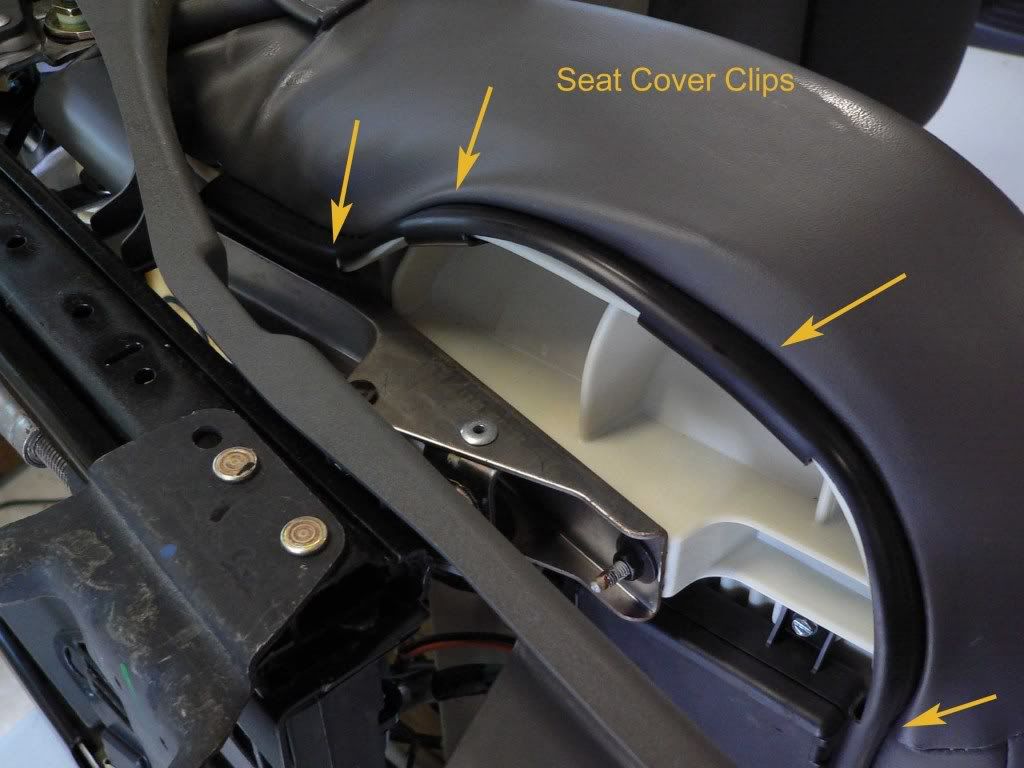
There is one long clip holding the lower seat cover on. Remove the one Torx screw first, and then pull down on the clip(*).
Here are pictures�
That is as far as I had to go to solder in a short wire. I now had resistance at the red & black wires. Unfortunately, that didn�t fix the heater. I also had a bad module. That�* why there is a module under each seat. Swapped them, and the problem moved to the passenger seat. I looked inside the module� a lot of circuitry, but no obvious faults.
GMPartsDirect has the 25737275 module for $64.40 (plus shipping).
I�m thinking that my passengers are going to freeze. Sorry.
I decided to share my experience with you all.
The passenger heater worked fine.
The driver side heater would flash on and turn off. (Typical)
(Story spoiler - I ended up finding a broken element wire and a bad module.)
It sounded like the odds were pretty good that it was one of the elements, so I decided to just pull the seat so I could get some working room. The seat comes out pretty easy. All you really need is a T45 Torx socket for the 4 bolts.
This is a GXP and it could be similar to most Bonnevilles.
To remove the seat... move the seat all the way up and forward.
Here'* a picture with the seat removed and the location of the T45 bolts.
There are two T45 bolts in the back. The first bolt is screwed sideways into the rocker panel.
The other bolt is under this half-round cover:
Move the seat backwards until you can see the front covers. They have these little tabs that need to be squeezed so the covers can be slid straight forward.
Remove the two covers and remove the two T45 bolts.
Now, you can tip the seat backwards and get to the two plugs at the carpet.
One of these plugs is for the side airbag. There is probably a good procedure to follow before unplugging the airbag. And I'll let someone else share that information. (I just unplugged them.)
The seat can be removed. I tilted the steering wheel up and pulled it thru the front door.
Here'* the bottom of the seat...
Now we will talk about the heater.
As near as I can tell, there are at least 5 elements in the seat�
Yes, You can access the module and the seat elements without removing the seat.
The module is held on with two 8mm screws (or a flat screwdriver). The gap on the rail side may be too narrow to get a socket in there. I had to use a screwdriver.
Here�* a picture of the module. It has two plugs. The smaller plug has four wires that lead to the heater elements.
Yes, the elements are wired in series. One break, and they�re all gone.
From the small plug, the two gray wires probably go to a thermo-couple to monitor the heat temperature. The Red and Black wires go to the elements. If you put an ohmmeter across these wires, there should be resistance. I had nothing. My main problem was this broken wire.
There is one long clip holding the lower seat cover on. Remove the one Torx screw first, and then pull down on the clip(*).
Here are pictures�
That is as far as I had to go to solder in a short wire. I now had resistance at the red & black wires. Unfortunately, that didn�t fix the heater. I also had a bad module. That�* why there is a module under each seat. Swapped them, and the problem moved to the passenger seat. I looked inside the module� a lot of circuitry, but no obvious faults.
GMPartsDirect has the 25737275 module for $64.40 (plus shipping).
I�m thinking that my passengers are going to freeze. Sorry.
 03-14-2012, 08:16 PM
#2
Junior Member

Join Date: Mar 2012
Posts: 1
Likes: 0
Received 0 Likes
on
0 Posts
I know that this is an old post, but WELL DONE!!!!
This might be just what I need to get into my GMC (there must be some similarities!) and address the gremlins that have plagued my seat.
Again, great post... pictures worth a million words.
This might be just what I need to get into my GMC (there must be some similarities!) and address the gremlins that have plagued my seat.
Again, great post... pictures worth a million words.
03-15-2012, 12:15 PM
#3
Senior Member

True Car Nut

This is a great post, but you do not have to pull the front seat to repair the seat heater (most of the time). Move the seat to the full back position, and there are 2 10MM nuts under the front edge that secure the seat cushion to the seat. Remove those 2 nuts and the seat cushion will lift up. Undo some electrical connectors (mark them for re-connection) and the seat cushion can be removed from the seat.
Most of the time the break in the wiring is in the seat cushion, not the seat back.
Most of the time the break in the wiring is in the seat cushion, not the seat back.

Thread
Thread Starter
Forum
Replies
Last Post
2000BLKBONNEVILLE
Everything Electrical & Electronic
0
09-10-2009 12:43 PM
bill buttermore
Everything Electrical & Electronic
12
04-28-2004 11:36 AM