Replacing the rear deck speakers in a 2000 Park Ave.
 12-11-2014, 11:54 PM
#1


Recently inherited my parents Park Ave and it needs a little work. The passenger 6x9 in the rear deck was rattling so I replaced it with a new one. The rattle is gone but I want to replace the driver'* side but ran into the metal cage around that speaker. It appears the rear deck can be removed but not knowing the process I thought I'd ask if anyone out there has tackled this before.
Thanks in advance.
ntech
Thanks in advance.
ntech
 12-12-2014, 01:41 AM
#2
Senior Member


True Car Nut

Welcome to the forum Larry. We have a few members that own 97 and above PA'*.
Unfortunately I have not replaced my rear speakers. I will try to get another members input to better help you as well, so hang in there.
The factory manual is letting me down on rear speaker'* info on removal.
There must be an omission or the recommend 8C section is MIA...go figure.
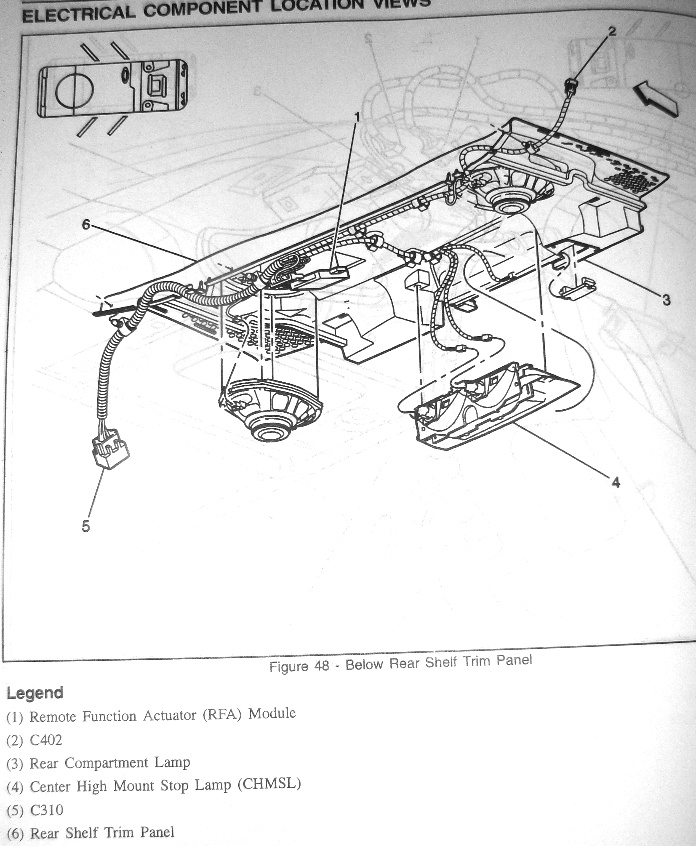
Here is a diagram that locates the drivers side speaker, but I don't see a cage there.
Does this help at all?
Any way to take a photo of what cage is in the way?
Unfortunately I have not replaced my rear speakers. I will try to get another members input to better help you as well, so hang in there.
The factory manual is letting me down on rear speaker'* info on removal.
There must be an omission or the recommend 8C section is MIA...go figure.
Here is a diagram that locates the drivers side speaker, but I don't see a cage there.
Does this help at all?


Any way to take a photo of what cage is in the way?
__________________
1997 Buick Pk Ave (Soft Ride) Suspension!
1997 Buick Pk Ave (Soft Ride) Suspension!
12-12-2014, 02:03 AM
#3
Senior Member
True Car Nut
On further research if you google "removing rear speakers on 2000 buick park avenue"
You will find some information about a bracket that may be in the way of dropping down the 6x9. Possibly you have to unbolt that amp to gain access to the speaker.
You will find some information about a bracket that may be in the way of dropping down the 6x9. Possibly you have to unbolt that amp to gain access to the speaker.
__________________
1997 Buick Pk Ave (Soft Ride) Suspension!
1997 Buick Pk Ave (Soft Ride) Suspension!
12-12-2014, 07:08 AM
#4
Senior Member
Certified GM nut
Certified GM nut
Yep. Amp has to come down. I believe its a bunch of 7mm bolts. Its also worth noting, if it has the 9 speaker system with the rear door speakers, the deck speakers are bass only.
The following users liked this post:
Soft Ride (12-12-2014)
12-12-2014, 07:13 AM
#5
Senior Member
Posts like a Turbo
I assume u have the 9 speaker setup which is the good sound system some of them have. Mine doesnt hav an amp or bracket under a speaker i ran down and snapped a couple pics! Just 4 white push clips per speaker. If its an amp in place, it does need to be removed to replace the speaker.
Last edited by shawn_s; 12-12-2014 at 07:14 AM.
The following users liked this post:
Soft Ride (12-12-2014)
12-12-2014, 05:06 PM
#6
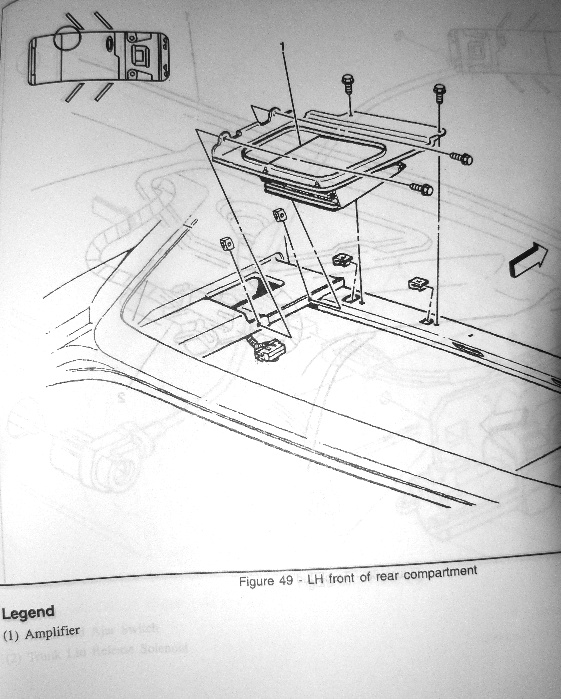
Yes, I do have the 9 speaker system. And after a closer inspection in the daylight I realized the problem is the mounting bracket for the amp. And I see some bolts that appear to be holding it on. So I'm going to take a crack at it and see if it will come off. I think fig. 49 up there has a bad image of it.
I'll see if can do a picture of it here.
I'll see if can do a picture of it here.
The following users liked this post:
Soft Ride (12-12-2014)


The following users liked this post:
Soft Ride (12-13-2014)
12-12-2014, 10:58 PM
#8
Senior Member
Posts like a Turbo
Should be pretty easy once you remove the fastners holding the bracket. Especially if they are all see able! Go for it! Hope all goes well.. If you dont mind can u post how to remove it? So in the future if someone comes across this same project its somewhere to direct them.
The following users liked this post:
Soft Ride (12-13-2014)
12-13-2014, 09:40 PM
#9
Well, got it mostly finished here. Just some small details left but after thinking about it I should type up what I did. That bracket is a real pain to remove the first time. So here'* what I did.
First I removed the 4 bolts on the amplifier. And let it hang.
Then the amplifier bracket is held in by 4 bolts. Two on the front and two on the left side. The two on the left side were easy. Merely required a foot long socket extension bar to get around the speaker.
The front two? Not so easy. The support bar they mount to is flush with the deck above. And they are on the top of the support bar. It does require taking out the rear seats to get at them. And loosening the front edge of the deck to get enough clearance to slip in a wrench and getting those bolts out.
So to do that you pull out the lower seat cushion. Then remove the 2 #19 metric bolts that hold the seat belts and the seat back in. Then lift up and remove the seat back. Then across the top of that support bar there are 3 luggage hooks I guess you would call them. The 3 bolts that hold the 3 hooks to the support bar also hold down the deck to the support bar. Remove those bolts and there is enough play now to slip in a wrench and remove the 2 bolts holding the amplifier bracket. It then comes out. And you now have a clear shot at the speaker.
Now then since I had a while to think about it I decided to do a little bit of Red Green engineering here and fix this so if I ever need to get back in there again I won't need to take out the seat back again.
So to start with I really hated those white push pin bolts they used to hold in the original speakers. So I went to the hardware store and got 8 2 inch machine screws with wingnuts and decorative washers. Then I took my drill and drilled out holes to the top of rear deck and mounted the speakers to the screws.
Then on the amplifier bracket I only reused one of the original bolts because of the issue with the front 2 bolts and one of the side bolt holes is now blocked by the new speaker. So I used tie wraps on the other 3. And if I ever need to get at the speakers again I won't need to go through the rear seats to do it.
The only thing I might do differently is if I could find blue anodized hardware I might replace the steel bolts I used with that. Otherwise I think it looks OK as is.
The following users liked this post:
shawn_s (12-13-2014)
12-13-2014, 10:19 PM
#10
Senior Member
True Car Nut
Even though that was probably more fun than you wanted, Thanks for posting the fix!
Gosh... I bet the 6X9 at the factory was an easy install right?
Gosh... I bet the 6X9 at the factory was an easy install right?
__________________
1997 Buick Pk Ave (Soft Ride) Suspension!
1997 Buick Pk Ave (Soft Ride) Suspension!

Thread
Thread Starter
Forum
Replies
Last Post
wonderwoman305
Audio (and aftermarket electronics)
2
07-27-2015 04:16 PM
bonnevillemac
Audio (and aftermarket electronics)
2
07-21-2007 11:27 AM
GXP_Vince
Audio (and aftermarket electronics)
5
07-19-2007 07:34 PM
black_friday
Audio (and aftermarket electronics)
3
12-19-2006 12:53 PM