Funny time of the year to find this problem....Updated!!!!
 08-15-2006, 07:20 AM
#11
DINOSAURUS BOOSTUS


Expert Gearhead

My experience is that you should have the same size/shape replacements.
Maybe needing to unstitch them from the seat.. but I'd only replace on a one for one basis..
Maybe needing to unstitch them from the seat.. but I'd only replace on a one for one basis..
 08-15-2006, 10:28 AM
#12
RIP
True Car Nut

Do you know which part number they gave you? I show 25730797.
This is the releavant section on installation from a TSB. Maybe it will help.
1. Remove the seat back and seat cushion trim covers. Refer to the appropriate seat trim cover removal procedures in the Seats sub-section of the appropriate Service Manual.
Important: DO NOT attempt to remove the factory heat elements from the seat trim covers.
Important: ALL of the elements in the Front Seat Heater Package MUST be installed in order for the system to function properly.
2. Remove the factory heat element wiring harnesses from the seat trim covers. Use a pair of diagonal side cutters to cut the wiring as close to the factory heat element as possible.
3. Install each of the service heat elements as follows:
3.1. Remove the backing paper.
3.2. Carefully position the service heat elements, harness side down, onto the seat cushion and back foam pads. For each seat cushion element, insert the harness through a hole in the cushion foam pad.
3.3. Press the heat element onto the seat cushion and back foam pads. Ensure the heat elements are laying flat.
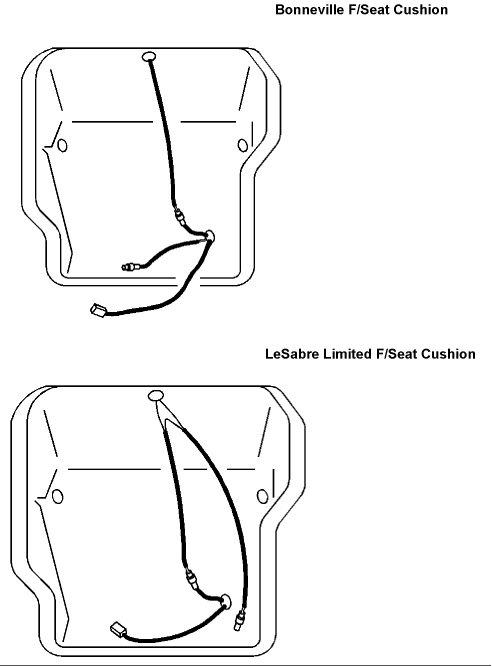
3.4. Connect the service heat element electrical connectors. Refer to the applicable front seat cushion illustration for cushion heat element connection information.
4. Install the seat back and seat cushion trim covers. Refer to the appropriate seat trim cover installation procedures in the Seats sub-section of the appropriate Service Manual.
5. Place the seat assembly inside the vehicle. DO NOT install the seat assembly at this time.
6. Connect the seat assembly electrical connectors.
7. Verify that the seat heat function is operational.
8. Complete seat assembly installation. Refer to Seat Replacement-Front Bucket/Split Bench in the Seats sub-section of the appropriate Service Manual for installation procedures.
This is the releavant section on installation from a TSB. Maybe it will help.
1. Remove the seat back and seat cushion trim covers. Refer to the appropriate seat trim cover removal procedures in the Seats sub-section of the appropriate Service Manual.
Important: DO NOT attempt to remove the factory heat elements from the seat trim covers.
Important: ALL of the elements in the Front Seat Heater Package MUST be installed in order for the system to function properly.
2. Remove the factory heat element wiring harnesses from the seat trim covers. Use a pair of diagonal side cutters to cut the wiring as close to the factory heat element as possible.
3. Install each of the service heat elements as follows:
3.1. Remove the backing paper.
3.2. Carefully position the service heat elements, harness side down, onto the seat cushion and back foam pads. For each seat cushion element, insert the harness through a hole in the cushion foam pad.
3.3. Press the heat element onto the seat cushion and back foam pads. Ensure the heat elements are laying flat.
3.4. Connect the service heat element electrical connectors. Refer to the applicable front seat cushion illustration for cushion heat element connection information.
4. Install the seat back and seat cushion trim covers. Refer to the appropriate seat trim cover installation procedures in the Seats sub-section of the appropriate Service Manual.
5. Place the seat assembly inside the vehicle. DO NOT install the seat assembly at this time.
6. Connect the seat assembly electrical connectors.
7. Verify that the seat heat function is operational.
8. Complete seat assembly installation. Refer to Seat Replacement-Front Bucket/Split Bench in the Seats sub-section of the appropriate Service Manual for installation procedures.
08-15-2006, 11:24 PM
#13
Junior Member
Thread Starter

Join Date: Jun 2002
Posts: 0
Likes: 0
Received 0 Likes
on
0 Posts

Do you know which part number they gave you? I show 25730797.
:( So it says I have to replace all three elements......damn
O'Neil - did you replace all 3 elements? It looks like there are two on the bottom cushion and one for the seat back.
08-16-2006, 01:02 AM
#14
Junior Member
Posts like a Ricer Type-R

Join Date: Aug 2006
Location: Barrie, Ontario, Canada
Posts: 16
Likes: 0
Received 0 Likes
on
0 Posts
Here are pics of the bottom cusion kit in my car. I did not take the back cover off, just wanted to check resistance of the elements individually. When I pressed the heater button the relay in the mod clicked and instantly shut off. I noticed that when I unplugged the elements (simulating an open element) the relay stayed on for about a second and then shut off. After conferming the elements were ok with an ohm meter, I swapped control mod from the pass side and the heater worked.
Hope this helps.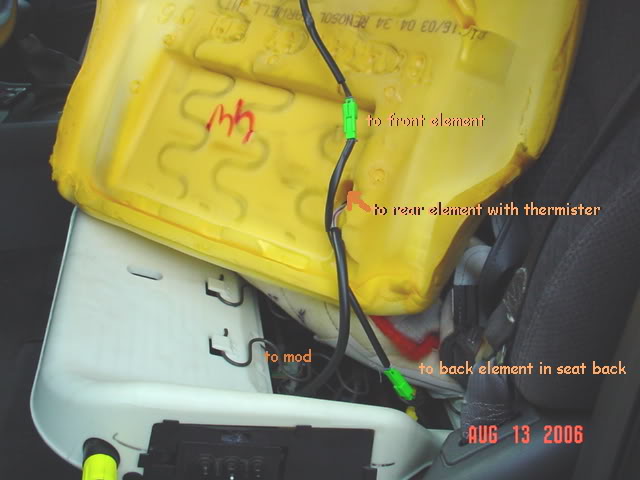
Hope this helps.
08-18-2006, 03:47 AM
#15
Senior Member
True Car Nut

Join Date: Jun 2003
Location: Purgatory
Posts: 6,313
Likes: 0
Received 0 Likes
on
0 Posts
Originally Posted by 2000SilverBullet
O'Neil - did you replace all 3 elements? It looks like there are two on the bottom cushion and one for the seat back.
11-12-2006, 04:06 PM
#17
Senior Member
Posts like a 4 Banger

Join Date: Oct 2006
Posts: 141
Likes: 0
Received 0 Likes
on
0 Posts
SilverBullet, your seat still has the factory elements in it. You need to leave those attached to the leather and cut the wires as close to the seat cover as you can. Do NOT attempt to remove the old elements from the seat cover. The new elements will transfer heat right through the old elements.
The service kit you have is designed to replace the entire old element network. So you do have to install all 3 pieces. Can't do just the bad one and leave the others.
The service kit you have is designed to replace the entire old element network. So you do have to install all 3 pieces. Can't do just the bad one and leave the others.
11-12-2006, 04:21 PM
#18
Junior Member
Thread Starter
Join Date: Jun 2002
Posts: 0
Likes: 0
Received 0 Likes
on
0 Posts
Yes, thanks Motorhead, I found that out a couple of months ago, that'* why it'* been sitting for so long.
Do you have a procedure for doing the seat back element. Is there a trick with the air bag assembly?
Do you have a procedure for doing the seat back element. Is there a trick with the air bag assembly?
11-12-2006, 04:49 PM
#19
Senior Member
Posts like a 4 Banger
Join Date: Oct 2006
Posts: 141
Likes: 0
Received 0 Likes
on
0 Posts
Well step one is to remove the seat from the car. It is a lot easier to work on it with the seat out. The air bag will be disabled once the electrical connections under the seat are unplugged from the car.
1. Disable the SIR system.
2. Position the seat cushion out of the way.
3. Remove the head restraint.
4. Open the seat back cover zipper from the bottom to the top.
5. Disconnect the double J channel retainer at the bottom of the seat back cover.
6. Remove the Inflatable restraint.
7. Remove the head restraint retainers.
8. Remove the shoulder belt retractor.
9. Remove the seat back cover from the seat back pad and the seat back frame.
10. Remove the seat back pad from the seat back frame.
11-12-2006, 04:52 PM
#20
Senior Member
Posts like a 4 Banger
Join Date: Oct 2006
Posts: 141
Likes: 0
Received 0 Likes
on
0 Posts
That is the procedure for cover or cushion replacement, but since you are not replacing either, there are some steps that you can skip. All you realy need to do is get the covers off, put the new elements in and put the covers back on.