Heated Seat Repair
 01-05-2008, 12:33 PM
#1
Member
Posts like a V-Tak
Thread Starter

Join Date: Jan 2005
Location: Acton Ontario, Canada.
Posts: 88
Likes: 0
Received 0 Likes
on
0 Posts

Hi guys,
I just bought a 2003 SLE over the holidays, and the driver’* heated seat was not working. Like most others have described, the light would come on for about 2 seconds and then go out...
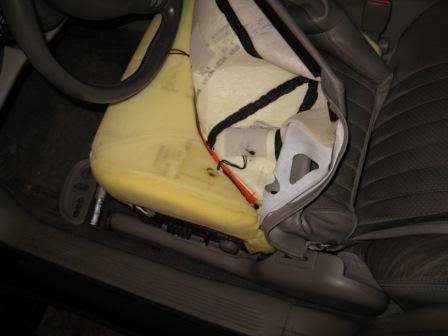
I decided to remove the seat from the car and then take the leather seat cover off. A visual inspection showed nothing wrong, but when I put an ohm meter on the connector, it showed an open circuit. Looking at the wiring more closely, I saw that the 3 heated elements in the cover are all wired in series, so if there is a break in the circuit, nothing works...
The wiring connections themselves, are soldered to the heating wires, and then held in place in the seat with what appears to be glue from a hot gun. Using the ohm meter and doing a bit more probing around in the foam pad under the leather, I was able to find the broken wire and repair it with my soldering iron and some heat shrink tubing. The heating element wire had broken right where it exists the hot glue, so it was a pretty easy fix once I found the broken wire. I put everything back together using some silicone to hold everything in place, and it works just fine now.
My wife’* butt was nice and warm not long after she started the car the other morning when the temperature was down to -22C! She was real happy! Nothing worse than sitting on cold leather at those temperatures!
It seems to me that if GM had of used anything else other than a stiff glue to hold the wiring in place, they never would have broken in the first place. Any adhesive that would remain flexible when you sit on the seat, would have been the way to go.
Hope that helps some of you who have the same problem I did.
I just bought a 2003 SLE over the holidays, and the driver’* heated seat was not working. Like most others have described, the light would come on for about 2 seconds and then go out...
I decided to remove the seat from the car and then take the leather seat cover off. A visual inspection showed nothing wrong, but when I put an ohm meter on the connector, it showed an open circuit. Looking at the wiring more closely, I saw that the 3 heated elements in the cover are all wired in series, so if there is a break in the circuit, nothing works...
The wiring connections themselves, are soldered to the heating wires, and then held in place in the seat with what appears to be glue from a hot gun. Using the ohm meter and doing a bit more probing around in the foam pad under the leather, I was able to find the broken wire and repair it with my soldering iron and some heat shrink tubing. The heating element wire had broken right where it exists the hot glue, so it was a pretty easy fix once I found the broken wire. I put everything back together using some silicone to hold everything in place, and it works just fine now.
My wife’* butt was nice and warm not long after she started the car the other morning when the temperature was down to -22C! She was real happy! Nothing worse than sitting on cold leather at those temperatures!
It seems to me that if GM had of used anything else other than a stiff glue to hold the wiring in place, they never would have broken in the first place. Any adhesive that would remain flexible when you sit on the seat, would have been the way to go.
Hope that helps some of you who have the same problem I did.
 01-05-2008, 12:59 PM
#2
Senior Member
Posts like a Corvette

Join Date: Nov 2006
Location: Alberta, Canada
Posts: 1,446
Likes: 0
Received 0 Likes
on
0 Posts
This is a great post. Thanks for sharing this information. The heated seats in these cars have been a problem for many. There is a service kit available from GM which consists of new heating elements. It'* great you were able to save yourself the cost of having to purchase them. They can be a little costly.
01-06-2008, 01:21 AM
#4
Senior Member
Posts like a Turbo

Join Date: Apr 2007
Location: Santa Rosa, CA
Posts: 360
Likes: 0
Received 0 Likes
on
0 Posts
My heated seat is inoperative also. Thanks for posting this!! Your tenacity in repairing your seat has caused me to reconsider my plans on fixing my own. Thanks for showing me a new approach!
Is it difficult to remove the seat and leather cover? Was the failure on the seat bottom or the seat back?
Again, THANKS!!!
Is it difficult to remove the seat and leather cover? Was the failure on the seat bottom or the seat back?
Again, THANKS!!!
 01-06-2008, 09:02 AM
#6
Member
Posts like a V-Tak
Thread Starter
Join Date: Jan 2005
Location: Acton Ontario, Canada.
Posts: 88
Likes: 0
Received 0 Likes
on
0 Posts
Sorry guys, I did not take any pictures, but the repair itself was fairly easy to do once I found the broken wire in the "bottom" seat cover. An ohm meter is essential. I say "bottom" because the back of the seat was fine. I’d be willing to bet the seat bottoms are the problem 99% of the time as that is where most of the weight is when someone is in the seat.
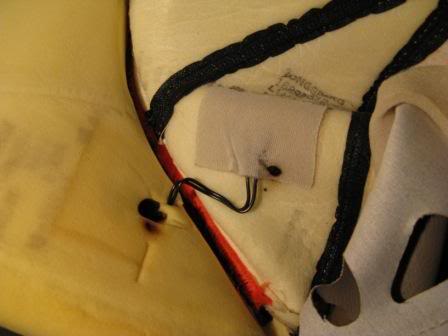
Mine was broken on the first of 3 elements, right where the 4 wire connector goes into the foam under the leather. There was a tiny black spot in the foam along the edge of the glue [I assume from where it overheated a bit and then caused the mark the last time the seat worked] and was able to confirm this was the problem with the ohm meter.
Taking the seat apart itself to remove the leather cover, was easy as well. There are a # of electrical connections to disconnect, 2 bolts to remove, and you also have to remove the seat adjusting control *****, and the switches, before it will all come apart. They just snap in and out of place. The whole repair took about 2 hours to do.
Give it a shot guys! I was quite proud of myself when I was done, and I didnt have to give GM another dime to get working again!
Of course it goes without saying, I will not accept any liability for anyone else’* issues or problems they may encounter, if they decide to try this repair themselves.
Mine was broken on the first of 3 elements, right where the 4 wire connector goes into the foam under the leather. There was a tiny black spot in the foam along the edge of the glue [I assume from where it overheated a bit and then caused the mark the last time the seat worked] and was able to confirm this was the problem with the ohm meter.
Taking the seat apart itself to remove the leather cover, was easy as well. There are a # of electrical connections to disconnect, 2 bolts to remove, and you also have to remove the seat adjusting control *****, and the switches, before it will all come apart. They just snap in and out of place. The whole repair took about 2 hours to do.
Give it a shot guys!
I was quite proud of myself when I was done, and I didnt have to give GM another dime to get working again!Of course it goes without saying, I will not accept any liability for anyone else’* issues or problems they may encounter, if they decide to try this repair themselves.
01-06-2008, 11:04 AM
#7
RIP
True Car Nut

Mike, for those who may feel comfortable trying to remove the seat cover, but not the seat - do you believe it possible to do the repair without removing the seat from the car?
01-06-2008, 11:10 AM
#8
Member
Posts like a V-Tak
Thread Starter
Join Date: Jan 2005
Location: Acton Ontario, Canada.
Posts: 88
Likes: 0
Received 0 Likes
on
0 Posts
I would say its probably possible, but extremely difficult as everything that needs to be disconnected / removed, is under the seat. Not much room under there to work...
01-07-2008, 02:12 AM
#9
Senior Member
Posts like a Supercharger

Join Date: Jun 2006
Location: Moon of meepsorp
Posts: 183
Likes: 0
Received 0 Likes
on
0 Posts
I just got around to doing my heater today too. After seeing this post yesterday, I was starting to regret buying the service kit in the hopes of an easy repair. When I got it apart, I found a burned spot similar to what Mike described. The foam and seat cover backing looked like they had cigarette burns.
Since the black wires leading to this location had been overheated and were stiff for about 3” back from this spot, I decided to install the service kit (since I already had it too). I guess this is one of those cases where you have to get lucky.
Also, as I suspected, the service kit does not heat up quite as fast as the original one that was sewn into the seat - so there is an advantage to doing Mike’* repair if you can.
---------------------
I did the deed without removing the seat and didn’t have any problems. With the seat motors wired up you can move or tilt the seat as needed for convenience. For safety, before you stick your hand under there you should disconnect battery or fuse after you have the seat in the desired position.
