Low-Cost Reduced Diameter EGR Stovepipe for 95-98 L36
 03-22-2005, 09:34 PM
#1
Senior Member
True Car Nut
Thread Starter

Looks like it might just work, boys! 
The background information for this work can be found in these two threads:
http://www.bonnevilleclub.com/forum/...ic.php?t=31653
http://www.bonnevilleclub.com/forum/...ic.php?t=31766
Initial results look promising on my efforts to produce a low-cost reduced diameter EGR stovepipe. Assuming the alignment of the shoulder and the pipe prove acceptable, it appears that the part can be fabricated at home for a little more than $6 plus mailing costs of maybe another $2, with someone willing to act as the "wholesaler." For those new to the discussion, the pipe can be used to help prolong the life of failure-prone plastic upper intake manifolds in L36 Series II 3800 engines built from '95 to '98. The smaller diameter pipe provides an insulating air gap of about .063" between the hot metal and the plastic upper manifold. This is the same gap provided in the newer design GM manifolds built since '99. The 3/4" shoulder that fits into the lower intake manifold is the same diameter as the original GM stovepipe. The pipe is assembled by shrinking a ring onto the base of a pipe. The material is 304 stainless steel. The pipe is a 1.420" length of 5/8" OD, .035" wall tubing. The ring that forms the shoulder is a piece of 3/4" OD, .065 wall tubing about .275" in length. I paid $1/cut to have the tubing parted (cut) on a lathe at my local machine shop. This gives a square end, but results in a good bit of excess material that must be removed prior to assembling the ring and the pipe. To make the prototype cost me $40 which left enough materials to make six additional pipes. The low cost is achieved by using material available off the shelf from metals suppliers like Bob Dillon did for the 7/8" sleeve for his UIM.
I used a grinding wheel, a penknife and a dremel rotary tool to prepare the tubing for assembly and a propane torch to heat and expand the ring.
Here are the pieces as they come off the lathe. Notice there is quite a bit of flash or burr to be removed.
Here they are after a bunch of hand work to clean up and remove all the excess metal. You must be careful not to alter the ID of the ring as you clean off the excess metal.
And here is the finished assembly after heating the ring to red hot and inserting the pipe. The OD of the pipe was a little big at .627 and the ID of the ring was .620. So the heat expands the ring more than .007" I just held the ring on a piece of wire to minimize heat loss by conduction, and when it was red, laid it on my vise anvil. I quickly inserted the tube - it slipped right in - and tapped it with a hammer to make sure it was all the way through. You want to get this right the first time, because once the piece is shrunk on, it won't likely come off and remain re-usable.
I'll take the piece back to the shop tomorrow, chuck it in a lathe and check the runout. If it is not too bad, I will pay to have the rest of my stock cut up and will be happy to mail a ring and pipe (as shown in the first image) to anyone who wants to clean up the parts and shrink their own at home. To recover my costs, I will need about $6 for the two pieces and another $2 for shipping.
I don't reckon it is cost-effective for me to assemble these as it takes quite a while to clean the parts up for assembly.
Since I have gone this far, if enough folks show interest, I can also get some sleeve material (same 304 stainless) .875 OD, .049 wall for about $2.00/inch shipped to me. This leaves you with an ID of .777, just about identical to the hole in the FelPro gasket. The airgap produced with the above pipe and this sleeve would be .076 if you can ream the hole perfectly concentric. To install the sleeve, you need to ream the upper and JB weld it as discussed in the above threads.
I'll let you know how it goes tomorrow, but so far, it looks pretty good.
Thanks to Ranger, Bob Dillon, Harry, Vital, and others for their input.
 03-23-2005, 01:22 AM
#2
Senior Member
Posts like a Turbo

Join Date: Apr 2004
Location: Sheridan Wyoming
Posts: 210
Likes: 0
Received 0 Likes
on
0 Posts

When you get your total price figured out, be sure to let us know, and I'll order a couple of your "kits."
Harry
 03-23-2005, 08:45 AM
#3
Senior Member
True Car Nut
Thread Starter
Here is a comparison of the original pipe and the reduced diameter pipe. The bases are touching so you can (sort of) see the gap that you would get with an unsleeved upper.
03-23-2005, 10:01 AM
#4
Senior Member
Posts like a Camaro

I like it!
Bill, just a thought. Since the length dimensions are not critical on either part, I wouldn't worry about turning them on a lathe for a buck a shot. I had my tubing cut at a buddy'* muffler shop with his cutoff saw-and they came out a lot cleaner than your lathe-cut pieces.
All I had to do was grind the ends flat against the side of my grindstone and debur the inside with a burr knife.
I'll take one when you're up and running, though. Also, since I've order the reamers (haven't arrived yet) we need to hook up somehow so I can ream the failed uppers for the sleeve.
What do you suggest?
03-23-2005, 01:53 PM
#5
Senior Member
True Car Nut
Thread Starter
Well two steps forward, one step back. Went down to my buddy Joe Pearce at the shop this morning and we chucked up the new pipe in a collet lathe on the 3/4" ring. When he spun it, the runout looked obviously unacceptable  Joe flipped the piece and chucked it on the 5/8" tube and spun it and it looked pretty danged good. Could have just been that the shoulder is so short (.275") that it is hard to get a good true grip, or it could be (more likely) that the ring distorted from the heat. While it was chucked on the pipe, Joe ran a cutting bit into the shoulder and skimmed it to see where it might be out of round. It probably isn't more than one or two thousandths out. (Should have set up a runout gauge, but Joe was busy.) Joe said I should just lay the ring on a piece of steel on the anvil and heat it to a straw color. That might solve the problem. I need to wait 'til he can whack a few more rings and pipes for me to try again.
Re the chop saw deal - tried that first - you can do it OK on a longer piece but for the little ring, it was not possible to get a true square cut. Remember, this stuff is gummy cutting stainless and the wall is .065" - pretty thick. Anyway, in the grand scheme of things, if everything is lathe cut, it only adds $3 to the total cost if you are doing the shrink pipe and a sleeve- not significant given what you get. And, given that I apparently have an alignment problem with the ring and the pipe, and considering the method of assembly, I need those ends to be as true as I can get them.
I really wish I had a lower and an upper that were not in service so I could check out my prototype on the real thing. I have a suspicion that once you set this in the hole in the LIM, and set a gasket and the plenum on, you only need a mechanic'* mirror to show you if the tube is a little crooked in the hole. I'll bet if it was a little off, a fellow might be able to adjust the centering by slipping a socket into the tube or over the tube with the shoulder in place and carefully delivering a little tap to make it right. I would very much like to try this, but I don't know if I am willing to tear my SLE back down.
One thing is for sure. This shrinking method is not gonna be as accurate as turning a piece on a lathe. It doesn't have to be perfect, but it does need to be close to be workable.
My other concern is about the sleeve. I would really be happier to find a cheap source for stainless tubing with an ID between .750 and 775 and a wall thickness of .020 to .025. Then we could be reaming at around .800 and be nowhere near the coolant. I know that the JB and the stainless will work to seal it if it breaks through, but if we were down around .800 we could just ream to a press fit like Ranger did and not even worry about the JB weld. I did find a source for a tubing that would work but Ye gods! it was $240 for two feet. If we had enough people willing, $10 still isn't bad for a sleeve, but it'* out of the question for me to buy it just for testing.
If someone out there has a lower and upper they would like to donate for research, let me know. I'd be happy to pay the shipping, and return them when I'm done if they want 'em back. Otherwise maybe Harry would be willing to see how my prototype fits and if it is possible to adjust the centering if need be in his relative'* car when he has it torn apart in a couple of weeks?
Bottom line is I still have a ways to go before I am willing to recommend this method to anyone. But, I'm having fun learning. And I'm not in a hurry to get it done. Just need to get it right!
Well I don't own any reamers, and I don't think I want to go into business making these reduced pipes. :?: My desire is to develop the method to give guys a cheaper option. I also anticipate doing several of these cars myself as the years go on, so If I have materials to make a few on hand, that'* good for me. I'll PM you , Bob.
Re the chop saw deal - tried that first - you can do it OK on a longer piece but for the little ring, it was not possible to get a true square cut. Remember, this stuff is gummy cutting stainless and the wall is .065" - pretty thick. Anyway, in the grand scheme of things, if everything is lathe cut, it only adds $3 to the total cost if you are doing the shrink pipe and a sleeve- not significant given what you get. And, given that I apparently have an alignment problem with the ring and the pipe, and considering the method of assembly, I need those ends to be as true as I can get them.
I really wish I had a lower and an upper that were not in service so I could check out my prototype on the real thing. I have a suspicion that once you set this in the hole in the LIM, and set a gasket and the plenum on, you only need a mechanic'* mirror to show you if the tube is a little crooked in the hole. I'll bet if it was a little off, a fellow might be able to adjust the centering by slipping a socket into the tube or over the tube with the shoulder in place and carefully delivering a little tap to make it right. I would very much like to try this, but I don't know if I am willing to tear my SLE back down.
One thing is for sure. This shrinking method is not gonna be as accurate as turning a piece on a lathe. It doesn't have to be perfect, but it does need to be close to be workable.
My other concern is about the sleeve. I would really be happier to find a cheap source for stainless tubing with an ID between .750 and 775 and a wall thickness of .020 to .025. Then we could be reaming at around .800 and be nowhere near the coolant. I know that the JB and the stainless will work to seal it if it breaks through, but if we were down around .800 we could just ream to a press fit like Ranger did and not even worry about the JB weld. I did find a source for a tubing that would work but Ye gods! it was $240 for two feet.
If someone out there has a lower and upper they would like to donate for research, let me know. I'd be happy to pay the shipping, and return them when I'm done if they want 'em back. Otherwise maybe Harry would be willing to see how my prototype fits and if it is possible to adjust the centering if need be in his relative'* car when he has it torn apart in a couple of weeks?
Bottom line is I still have a ways to go before I am willing to recommend this method to anyone. But, I'm having fun learning. And I'm not in a hurry to get it done. Just need to get it right!
Originally Posted by Bob Dillon
we need to hook up somehow so I can ream the failed uppers for the sleeve. What do you suggest?
03-23-2005, 06:28 PM
#6
Senior Member
Posts like a Turbo
Join Date: Apr 2004
Location: Sheridan Wyoming
Posts: 210
Likes: 0
Received 0 Likes
on
0 Posts
Bill, I'd be glad to try out your parts on my Brother'* '98 Series II.In fact I'm pretty curious about the depth of the hole in the LIM. I just got to wondering if the hole is deep enough, you could make your ring 2 or 3 times as tall, (and of course increase the tube length by the same amount that you add to the ring) which would certainly reduce any problem with accuracy/run-out, etc.
I suspect to drive the finished product into the hole, a person would want to use something with just the right inside diameter, so at to put the driving force on the ring, and not on the tube, taking a chance on knocking it loose from the ring. -just some thoughts.
But yes, I'd be glad to "test fit" one for you if you wish. It will probably be nearly two weeks yet before I get ready to do the '98 Buick.
Harry
03-23-2005, 09:19 PM
#7
Senior Member
Posts like a Turbo

Join Date: Feb 2005
Location: Western New York State
Posts: 228
Likes: 0
Received 0 Likes
on
0 Posts
I'd be VERY interested in purchasing one of these if you get it to work, $80 for the other one seems steep. I want to change the plenum and such but I will wait to see how this goes so I can do it in one shot.
03-23-2005, 11:07 PM
#8
Senior Member
True Car Nut
Thread Starter
Originally Posted by 57chevythunder
Bill, I'd be glad to try out your parts on my Brother'* '98 Series II.
Originally Posted by 57chevythunder
In fact I'm pretty curious about the depth of the hole in the LIM. I just got to wondering if the hole is deep enough, you could make your ring 2 or 3 times as tall, (and of course increase the tube length by the same amount that you add to the ring) which would certainly reduce any problem with accuracy/run-out, etc.
I suspect to drive the finished product into the hole, a person would want to use something with just the right inside diameter, so at to put the driving force on the ring, and not on the tube, taking a chance on knocking it loose from the ring. -just some thoughts.
I suspect to drive the finished product into the hole, a person would want to use something with just the right inside diameter, so at to put the driving force on the ring, and not on the tube, taking a chance on knocking it loose from the ring. -just some thoughts.
The best thing to drive it in the hole would probably be the original EGR pipe. If it isn't ruined coming out, it will slip right over the new pipe and lay on the top of the ring. But, I don't think that ring is moving anywhere. Once it is shrunk on, it should be on there for good.
Anyway, thanks again, Harry
03-23-2005, 11:55 PM
#9
Senior Member
Posts like a Camaro
All: I haven't received the reamers yet, but when I do, I'll ream out the first couple of manifolds sent to me and install the sleeve for free. You just pay postage both ways.
Remember, though, if if flucks up, you're a test mule.
Remember, though, if if flucks up, you're a test mule.
03-29-2005, 09:23 PM
#10
Senior Member
True Car Nut
Thread Starter
UPDATE:
Joe whacked off 5 more rings and tubes to finish off my stock of stainless steel tubing yesterday and I have been playing around in the shop putting them together. I went to a .400 high ring - .250 will go down in the LIM and .150 up through part of the .177 height of the gasket'* plastic. So the top of the ring should still be about .027 below the UIM when it is installed.
A good thing happened. I was having considerable trouble getting the tube to go all the way through the bigger ring and after 4 red-hot tries, put the assembly in the center of my little 4" vise and cranked away - slipped right in. That got me thinkin' , so I prepared another ring and tube and just chamfered the mating surfaces, put 'em together in the vise and voila! it pressed right home cold. PLUS, the OD of the ring was much less distorted 'cuz no heat.
So, it is getting easier to assemble these for your average Joe.
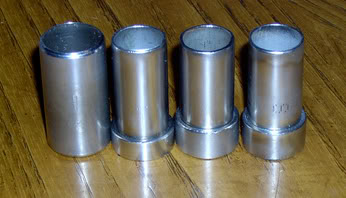
Here is the original .750 pipe, .250 hot, .400 hot, and .400 cold press
Now my goal is to find a better way to cut the tubing square so they can be made up without a lot of work cleaning up the ends. But things are definitely lookin' up. A couple of these prototypes go out to Harry (57Chevythunder) tomorrow for a "real world" test fit.
Joe whacked off 5 more rings and tubes to finish off my stock of stainless steel tubing yesterday and I have been playing around in the shop putting them together. I went to a .400 high ring - .250 will go down in the LIM and .150 up through part of the .177 height of the gasket'* plastic. So the top of the ring should still be about .027 below the UIM when it is installed.
A good thing happened. I was having considerable trouble getting the tube to go all the way through the bigger ring and after 4 red-hot tries, put the assembly in the center of my little 4" vise and cranked away - slipped right in. That got me thinkin' , so I prepared another ring and tube and just chamfered the mating surfaces, put 'em together in the vise and voila! it pressed right home cold. PLUS, the OD of the ring was much less distorted 'cuz no heat.
So, it is getting easier to assemble these for your average Joe.
Here is the original .750 pipe, .250 hot, .400 hot, and .400 cold press
Now my goal is to find a better way to cut the tubing square so they can be made up without a lot of work cleaning up the ends. But things are definitely lookin' up. A couple of these prototypes go out to Harry (57Chevythunder) tomorrow for a "real world" test fit.