Helping my friend.

 01-30-2007, 12:20 AM
#13
Junior Member

Join Date: Apr 2006
Location: Purgatory
Posts: 0
Likes: 0
Received 0 Likes
on
0 Posts

Oh, ok. Just making sure. But yes, peel the old LIM gaskets off the LIM, block off the coolant ports with old towels and spray the **** out of it with carb cleaner and scrub off any excess crap with a brush (NOT a wire brush). After that, lay a towel in the lifter valley and scrape the gasket surfaces with a razor blade to get any crap off. Vacuum excess dust and crud away, including inside the intake ports and coolant ports. Then continue reassembly.
01-30-2007, 08:48 AM
#14
Senior Member
True Car Nut

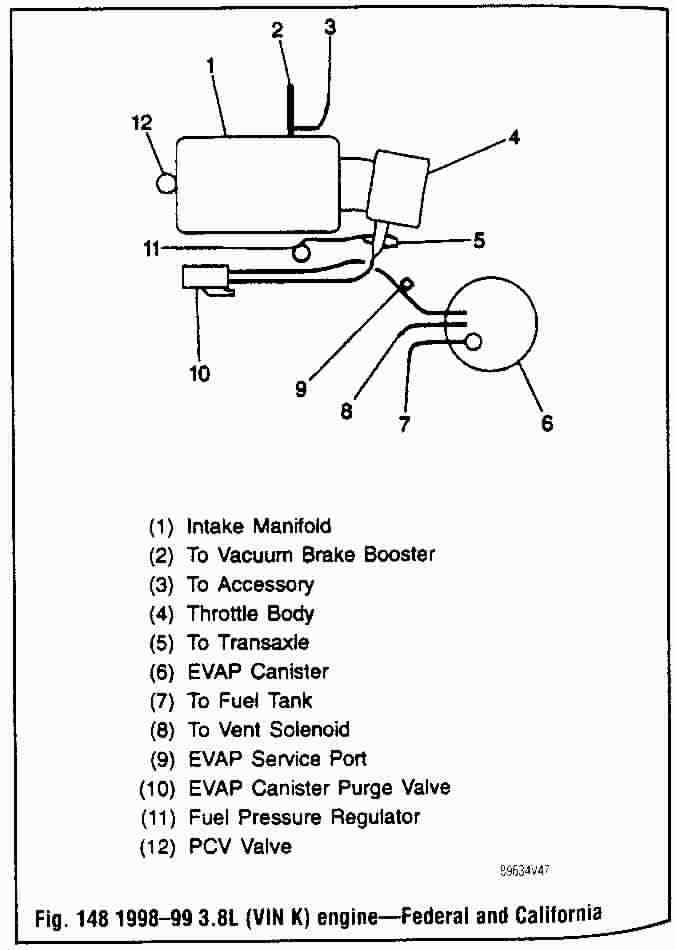
According to my Chilton'* 28200 vacuum diagram for 98-99VIN K, the fuel pressure regulator vacuum comes from a tap at the throttle body. The charcoal canister purge valve (where you ask about the connection to the fuel pressure regulator) is only shown with two vacuum lines and an electrical connection in the diagram. One supplies vacuum from the throttle body, the other goes to the canister. In your picture, the hole you indicate on the purge valve appears to have dust in it. Could be just bad lighting, but if a hose had been in that hole, there should not be dust in the bore. Sometimes these generalized (Chilton'*) diagrams are not correct, so check on the inside of the hood and radiator support for a vacuum diagram specific to that vehicle. I use a silver sharpie to mark the lines when I disconnect them; you might want to throw one in your tool box for next time.
The fuel rail leaks are probably caused by bad o-rings in the female part of the connector that you removed from the rail. Make sure you get fuel-rated o-rings the right size to replace them. The dealer should be a good bet for those. They are difficult to get in and out, but it can be done.
Speedy wash will clean the lower intake manifold, but probably get you filthy in the process. Another option is to buy a gallon of kerosene and pour it into an oil drain pan. Get a stiff parts cleaning brush and go to it. Don't use abrasives on the gasket sealing surfaces. Use a razor blade holder with a single-edge blade and/or a good carbide edge gasket scraper. Be careful to keep the carbide and razor flat, and change the blade when it gets nicked to prevent scratching the aluminum.
NGK TR55 plugs will make the car very happy.
We just learned that the newest Dorman UIM kits are supplied with a reduced diameter stovepipe that will fit the 95-98 LIMs. If you are going that way instead of the APN (a better choice) try to find one of these newest stock items. You don't want to put this together with the stock 3/4" stovepipe. The Dorman kit will come with new o-rings for the injectors. A little silicone on those o-rings will help that rail to pop right back into the LIM.
When you upload your images, if you can, resize them to 600 pixels wide so everyone does not have to scroll left and right to read the thread.
01-30-2007, 04:51 PM
#15
Senior Member
True Car Nut
Join Date: Feb 2003
Location: Philly
Posts: 4,508
Likes: 0
Received 0 Likes
on
0 Posts
Just to be sure, when you install the new coolant elbow, you have to take the tensioner assembly off. You slide the elbow into the tens. assembly then push it into the LIM while putting the tens. assembly back on.
01-30-2007, 04:58 PM
#16
Junior Member
Posts like a Ricer Type-R
Thread Starter

Join Date: Jan 2007
Location: NJ
Posts: 21
Likes: 0
Received 0 Likes
on
0 Posts
thanks for reply and sorry for large pictures 
Anything specific about takin tensioner assembly off?
Also, what kind of rachet/socket you guys use to get spark plugs off (firewall side).
Anything specific about takin tensioner assembly off?
Also, what kind of rachet/socket you guys use to get spark plugs off (firewall side).
01-31-2007, 01:20 AM
#17
Senior Member
True Car Nut
Originally Posted by Alex Odessit
Also, what kind of rachet/socket you guys use to get spark plugs off (firewall side).
01-31-2007, 04:15 AM
#18
Senior Member
True Car Nut
Join Date: Feb 2003
Location: Philly
Posts: 4,508
Likes: 0
Received 0 Likes
on
0 Posts
Originally Posted by Alex Odessit
Anything specific about takin tensioner assembly off?
You may use both plastic elbows that come together in the help section since your a 98.
01-31-2007, 11:24 AM
#19
Junior Member
Posts like a Ricer Type-R
Thread Starter
Join Date: Jan 2007
Location: NJ
Posts: 21
Likes: 0
Received 0 Likes
on
0 Posts
Originally Posted by 95naSTA
Originally Posted by Alex Odessit
Anything specific about takin tensioner assembly off?
You may use both plastic elbows that come together in the help section since your a 98.
01-31-2007, 05:59 PM
#20
RIP
True Car Nut

Most auto parts stores will have a section that has various auto parts hung on cards with "Help" printed on the package. One of them is a package that contains 2 coolant elbows. They're made by Dorman. I don't believe that they started using the second elbow until '99. Yours will likely still have the metal fitting on the lower left part of the tensioner. Check the condition of the O-ring on it.